Trying it out.
I continue to watch the excellent tutorials to be found here and have now downloaded the 30 day free trial of Lightroom 2.1 from the Adobe web site. I delayed doing this as the predicatble raft of bugs in 2.0 has now been largely resolved and discussion boards suggest the application is stable. Never buy Version 1 of anything ….
My first focus is on the graduated density filter and adjustment brush, which are new features of the localized adjustments added in Version 2 of Lightroom.
While I have for ever toyed with the idea of using those slip-on graduated density filters for landscape work, the whole thing has always seemed too clunky. Further, interposing yet another easily scratched surface between object and image has never much appealed to me and the thought of carrying dozens of those filters and all the related gadgetry to attach them to my lens has left me cold.
Well, with Lightroom 2 there is no more need for external filters. Not only can you add a graduated density filter of your choice to selected areas of an image, you can also tilt the horizon for these where necessary, elect the level of graduation and change color, brightness, clarity, contrast, saturation and sharpness in your area(s) of choice. Try that with mechanical attachments!
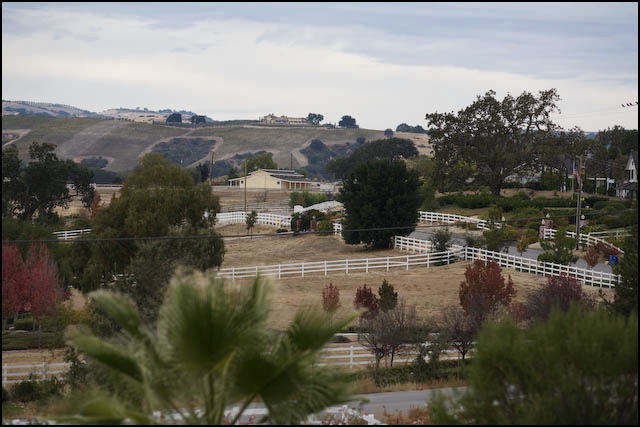
Here’s a case in point of a landscape with a sloping horizon taken from my front door yesterday. As the original discloses, the lighting was flat, the scene less than interesting and the sky horribly bland.
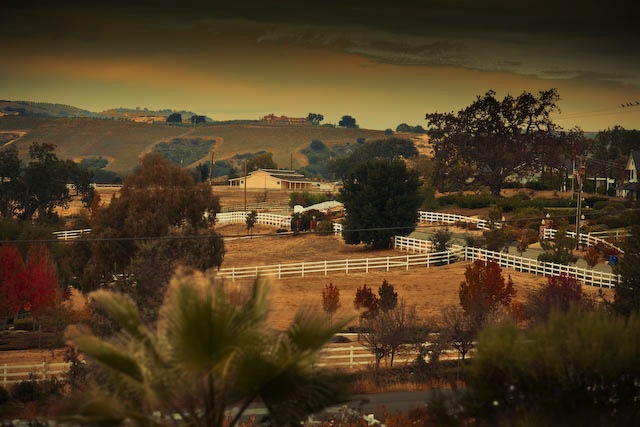
A few moments work, applying graduated sloping colored filtration to the sky area and selectively darkening the foreground using the new adjustment brush feature (look at the road at the bottom), plus an overall tweak for saturation and clarity, and upping the reds and oranges, and you get a nice Old Master look, like this:
From my front door – the beauty of central California. 5D, 200mm ‘L’, 1/1000, f/4, ISO 400
The ability to make localized graduated adjustments is powerful and Adobe’s implementation superb. It bears watching those videos as there are so few adjustment buttons that you have to learn how they work, but the engineering and user interface are remarkably elegant. Indeed, it was Lightroom’s far more intuitive user interface and logical work flow that made me abandon Aperture. Not to mention the general slugishness of the Apple application regardless, it seems, of how current or fast your computer is. Lightroom flies, the slowest step being localized adjustment brush operations which take a second or so to register on my MacBook (4gB RAM, 2.1gHz C2D CPU).
By the way, when you first fire up Lightroom 2 it will convert your Lightroom 1 catalog for use with the new version, but it also leaves the original Version 1 catalog untouched in the event you decide not to upgrade. (The on screen narrative does not make this clear, implying that your original files are lost). Nice – no need for yet another back-up, though I made one just in case. You should too.
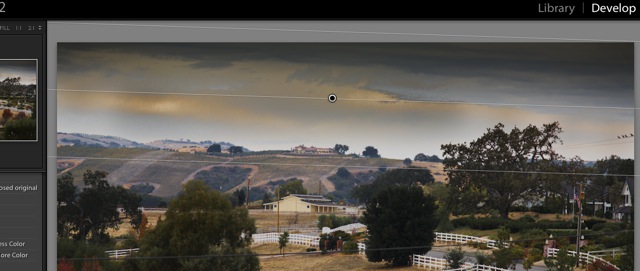
Finally, this screen snap shows the area to which I have applied the graduated effect – the dot is the center point above which things darken. You can also see that I have sloped the graduated density area to replicate the natural slope of the horizon – just drag up or down on one side to slope the area affected.
Lightroom 2 is beginning to look like a keeper.
As for these guys, well, I would be looking for a new day job in their place:
Yesterday’s hardware. Yesterday’s concept.
And if you have a big investment in these, well, sell them in a yard sale and the proceeds may just pay for the upgrade to Lightroom 2!