Assembly and benchmarks.
In the spirit of taking the high road, my anonymous colleague and ace computer builder FU Steve has changed his moniker to TU Steve, and writes what follows. TU – Thank You.
While Gigabyte’s motherboards have proved reliable once up and running, I have had a high rejection rate of new ones. Chat boards confirm it’s not just my bad luck.
So this time I bought not one but two motherboards from Amazon – One Z68 and one P67. The latter deletes support for Intel’s integrated GPU (as used by Apple in almost all its laptops and desktops) but adds two more USB sockets for a total of 14! The cost of this insurance is return shipping of one of the boards – money well spent.
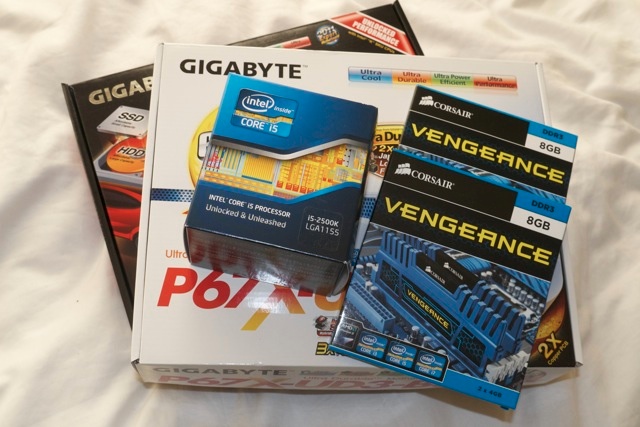
Parts for the HP100 upgrade, including two mobos.
By contrast, I have never had a bad Intel CPU or memory in the many machines I have assembled.
It’s amusing to note the wild neo-Mayan design of the cooling fins on the Corsair memory, named ‘Vengeance’ of all things:
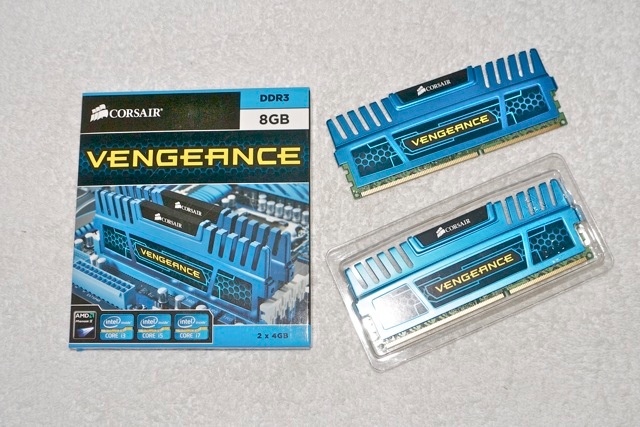
16gB of 1600mHz DDR3 RAM on four sticks.

The Mayan variant. Slower, but longer lived.
As is my habit, I pored over the Gigabyte manual and stared at the board for a good half hour, thinking of obstacles to a smooth installation. Gigabyte has moved sockets around a bit so that will affect wiring. Least helpful is the move to edge connectors for SATA HDDs, meaning the cables connect parallel to the mobo’s surface rather than perpendicular to it, making access, once installed, tricky. While other makers’ mobos do it better, Gigabyte is the best supported board from a hacker’s perspective, so I’m sticking with the brand.
Mercifully, the layout of the socket for all those fiddly, small front panel connectors (power LED, power, reset, HDD LED, etc.) is unchanged. These are a real challenge to aging eyes and, as they are not keyed, incorrect insertion will defeat function. All other connectors are keyed so when I say this is like building a Lego toy I really should say it’s easier. Absent those front panel connectors you cannot insert things incorrectly, unlike Lego. Both mobos add a couple of 6gb/s SATA HDD sockets (twice the theoretical speed of the older 3gb/s ones if you use SATA III HDDs, though my tests have disclosed that the speed gains are nearer 50% than 100%) plus internal and front panel USB3 sockets. As I have no USB3 devices I’ll pass on these, preferring to wait for the even faster LightPeak/Thunderbolt technology to become available on PCIe cards.
Because HP1 will be disabled once dismantled and reassembled, its software hacks now obsolete and of use for the old mobo and CPU only, I set up my backup SSD with the parameters for the new hardware, hoping that it would boot straight from that SSD. As insurance, I also created an installation flash drive stick with Lion 10.7.2 using the tool illustrated here as a backup boot device in case the SSD refused to cooperate. When it comes to these things I’m a strong believer in the old saying that has it that “If it can go wrong, it will”. Irishmen know it as Murphy’s Law, but they are mostly drunk much of the time.
The Build:
Things went well. Studying the mobo in advance paid back mightily, as I had made a note to plug in the two SSDs, two HDDs, DVD burner and SDHC card reader into the mobo’s socket before installing the mobo in the chassis. They are virtually inaccessible once the mobo is installed. I also took the opportunity to vacuum out the amazing amount of dust which had gathered in the chassis these past 30 months of 7/24 use.
First the Intel i5-2500K (the ‘K’ designates it can be overclocked) is inserted in the mobo socket, and thin layers of Arctic Silver thermal paste are applied to both the surface and the mating plate on the Coolermaster CPU radiator. If you get squeeze out you have used too much and your thermal efficiency will be compromised The stock Intel cooler is recycled – it’s junk.
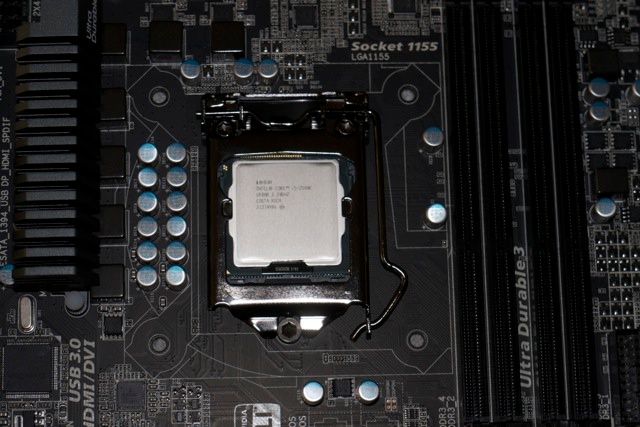
The Intel Core i5-2500K installed.
The final thing to remember before screwing the mobo down is to replace the socket plate, and as you can see the new Z68 board comes with high power USB sockets (for properly charging an iPad), USB 3.0 sockets, a DisplayPort and an HDMI socket, in addition to all the usual Firewire and sound connections. The Display port socket will allow the use of a third monitor – something I do with my rig with a separate USB->DVI powered adapter. Note also the DVI socket for the on board Intel GPU, integrated into the CPU, and the VGA connector. Some joker has left the PS2 mouse and keyboard socket. Who uses those?
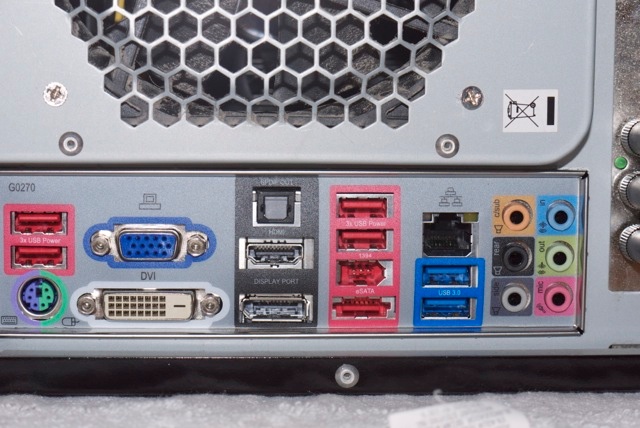
Connections on the Gigabyte Z68 motherboard.
The holder for the large Coolermaster 212Plus cooler was installed before screwing the mobo into the chassis and, yes, the usual garage language was involved in installing the radiator and its fan with those finicky clips (improved on current production). Of course, the stock installation blocked one of the memory slots, proving that Murphy is alive and well:

Coolermaster 212+ radiator blocks #1 memory slot.
So a few more colorful words later, I had the radiator turned through ninety degrees and all was well with the world:
Coolermaster CPU radiator repositioned.
Stock performance:
After making sure all the various connectors were properly attached, I switched on and went into the mobo’s BIOS making the usual adjustments you can see from my HP1 pictorial here, then booted from the backup SSD which had previously been prepared for the Z68 motherboard. Everything ran perfectly first time. More time was spent futzing with that cooler fan than the whole rest of the process in total!
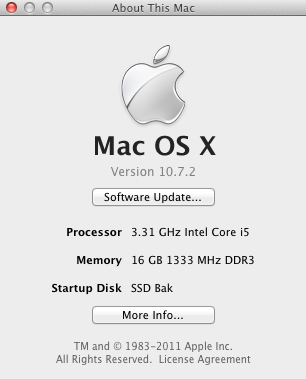
As you can see the memory is running at 1333mHz, compared to the 1600mHz rating, something addressed below when I overclock the CPU.
A quick Geekbench-64 test returns a reading 42% faster than the stock HP1 (Core2Quad) and 8% faster than HP1 overclocked at 3.6gHz.
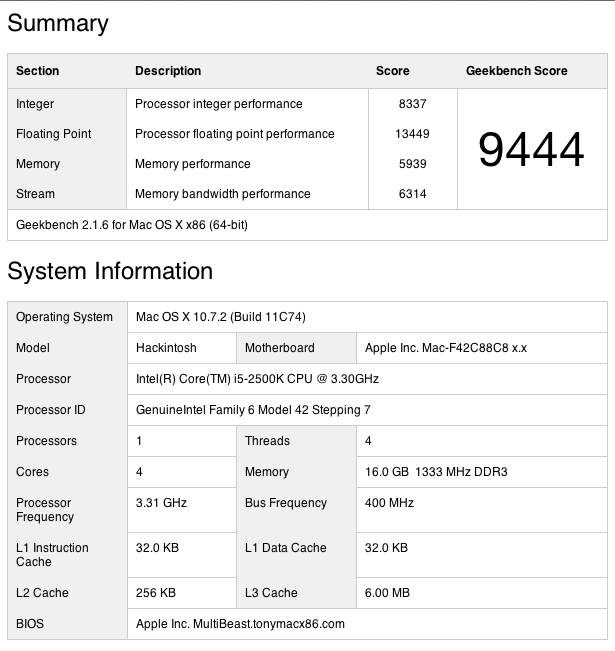
Stock HP100 with slow memory setting.
I reused the fairly dated EVGA Nvidia 9800GTX+ GPU and with just cause. The framing rate in rendering video is stunning, 47% and 13% faster than HP1 stock and overclocked, respectively.
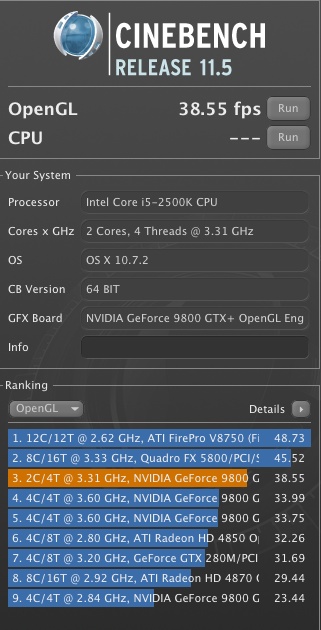
HP100 graphics test.
Overclocking:
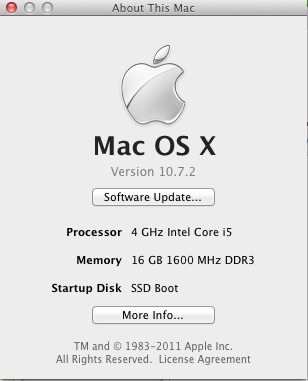
OK, time to get serious. The Core i5 is made to be overclocked, so back into the BIOS and an increase of CPU speed from 3.3gHz to 4gHz took seconds. I merely changed the multiplier from 33x to 40x, leaving the voltage unchanged, so as not to void Intel’s warranty. Gaming fora suggest that 4.5gHz, or another 13% faster, is stable with a small voltage increase, but why take risks and get greedy? This is meant to be a reliable workhorse, not a highly strung thoroughbred. At the same time I set the memory to its rated 1600mHz speed.
Here’s Geekbench-64 – 20% faster than the stock Core-i5 and a stunning 69% faster than HP1 stock (Core2Quad @ 2.83gHz):
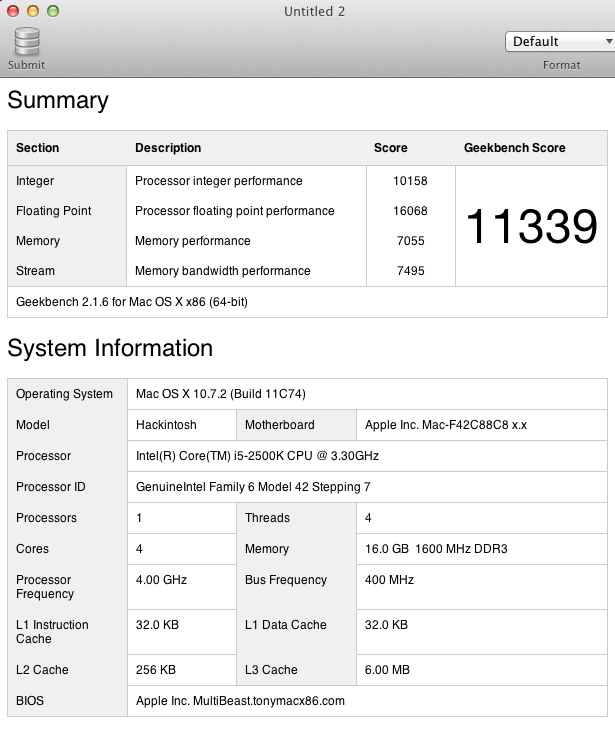
And here’s Cinebench – 15% faster than stock and no less than 69% faster than HP1 stock for an outstanding framing rate of over 44 fps. That’s getting into serious gaming and better spec’d MacPro Xeon territory at a bargain basement price!
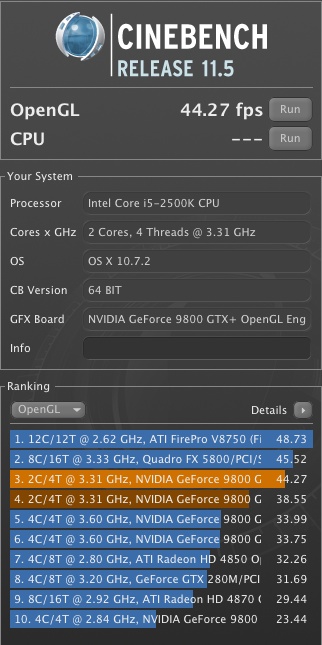
HP100 overclocked, showing a very high framing rate.
Video test:
This is a tough test – rip a full length DVD (4.7gB) and compress the result to ATV2 file format (1.2gB) using Handbrake.
HP1 – 36 minutes – 100%
HP100 – 16 minutes – 44% of the above
Though the EVGA Nvidia 9800GTX+ graphics card used is a 4 year old design, not much has happened to improve mass market GPUs since, except gussied up looks and prices. The Nvidia 9800GTX+ rocks, more so when married to a state-of-the-art Intel CPU. The card has a scant 512mB of DDR2 video RAM.
You can see the dramatic increase in framing rate from the Cinebench tests above – and that’s what you are seeing in the above real world data.
Temperature management:
The BIOS which Gigabyte ships with the Z68 (mine came with the current F9 variant) is greatly enhanced over that in its earlier EP45 Core2Duo/Quad mobo, adding a host of temperature and energy management options. A few minutes adjusting things saw idle CPU temperatures drop 10F from 112F to 102F in overclocked mode. That compares with 122F for the overclocked Core2Quad with identical cooling – a significant 20F drop.
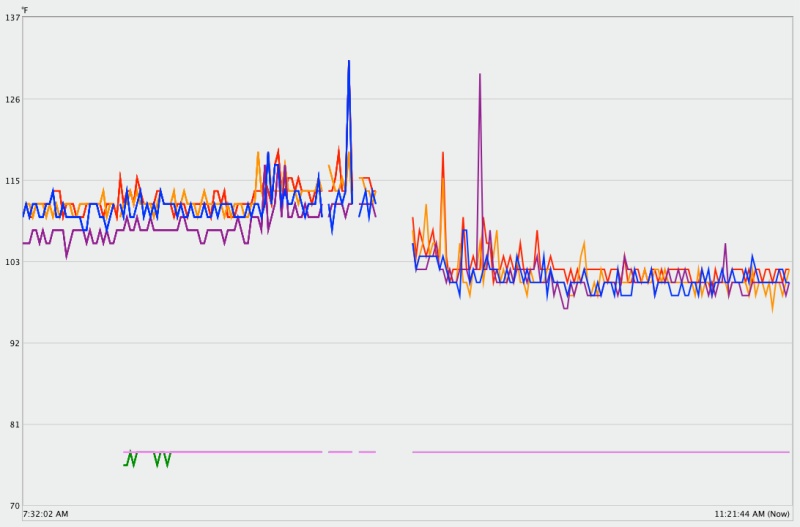
Effect of enhanced energy management settings on CPU temperature – all four cores shown.
The spikes are from the restart cycle.
Z68 or P67 mobo?
I bought both, in case one was faulty, and went with the Z68 ($160) because I liked the black finish! The Z68 adds support for the on board Intel 3000 graphics processor, which is integrated into the CPU. Nice idea, but not compatible with good thermal management, and a major cause of overheating in over-stressed and poorly cooled MacBooks and iMacs. The P67 ($135 and blue!) deletes this functionality, with both boards supporting overclocking of either the i5-2500K or i7-2600K Intel CPUs, the ‘K’ suffix denoting the CPUs’ unlocked state. The unlocked CPUs command a modest $10 premium over the stock units.
Overclocking compounds thermal stress and anyone looking for serious graphics performance will opt for a discrete graphics card with its own dedicated fan, in addition to an aftermarket CPU cooler to replace the ineffectual stock Intel model. Further, choose the right graphics card and it will come with dual DVI sockets for dual monitor setups, unlike what is available with on board graphics. So using the costlier Z68 makes no sense. But I do like the color ….
Real world experience:
Tests disclose data, not experience. How does the HP100 perform in real life? I recall when I built HP1 how my jaw dropped at the speed and fluidity of the machine. This is another jaw dropper. Simply stated, there’s no going back, especially for an upgrade whose net cost, after used parts sales, was under $200.
With 16gB of fast memory you can leave PS CS5 and LR3 loaded at all times, and everything in those much used apps just flies.
If you built HP1, build HP100. If you did not build HP1, build HP100.
Thank you, TU!
Part IV is here, complete with a video showing the machine’s operating speed.
Nice! Inspired by one your older posts, I built a Core i7-2600k machine to replace my aging first generation MacPro. I went with the P67 mobo with 16GB Corsair RAM. Here is the geekbench for that machine:
http://browse.geekbench.ca/geekbench2/view/513165
I put in it an insane amount of disk space, something you cannot do on a MacPro even if you want: I have 8 x 3TB drives, setup in a hardware RAID 6 using an Areca board. MacOS X works beautifully with it.