It works!
Background:
Read this first to understand the benefits of adding a CPU to older manual focus Nikkors or to other makers’ aftermarket lenses (Zeiss, Voigtländer, etc.)
Ai conversions:
To learn how to do your own conversions of pre-Ai lenses to Ai, allowing use on current bodies, click here.
CPU fit:
This is not where you glue the CPU; it’s merely a test to see that the contacts are not proud of the bayonet flange. If they are you risk damaging the contacts in the camera. This shows all is well:
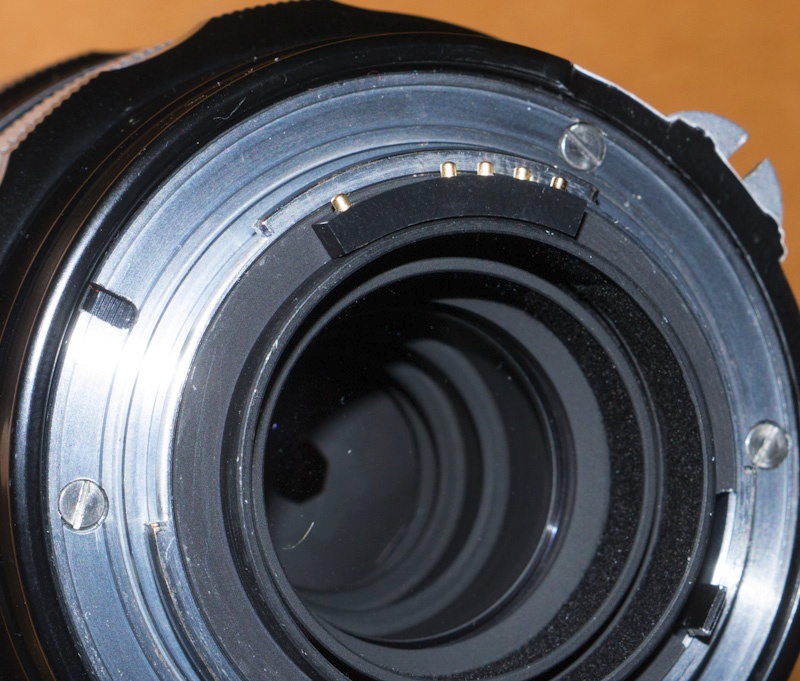
The gold contacts do not protrude above the bayonet flange. If they do the mounting point must be machined down.
General dimensional rule:
Based on my experience in adding CPUs to several lenses, any lens whose rear baffle external diameter is in the range 1.355″ through 1.426″ (34.62mm through 36.22mm) permits a simple glue-on CPU installation, with no need for machining. The “rear baffle” referred to is the black ring protruding from the rear of the lens, inside the chrome bayonet mounting flange. Lenses with baffle diameters larger than this will need metal removed from the baffle to avoid damaging the CPU and/or camera’s contacts. Two examples in my collection which needed such surgery – a few minutes with a Dremel cut off wheel and a file after removing the baffle – are the 100/4 Micro Nikkor Ai-S (1.621″ diameter/41.17mm) and the 300/4.5 ED IF Ai-S (1.613″/40.97mm). A third, the 50mm f/1.4 Nikkor-S is a bit trickier.
CPU alignment:
A piece of tape helps – the fourth contact from the right is aligned with the focus mark (and, in the case of the 200mm, with one of the rear flange retaining screws):
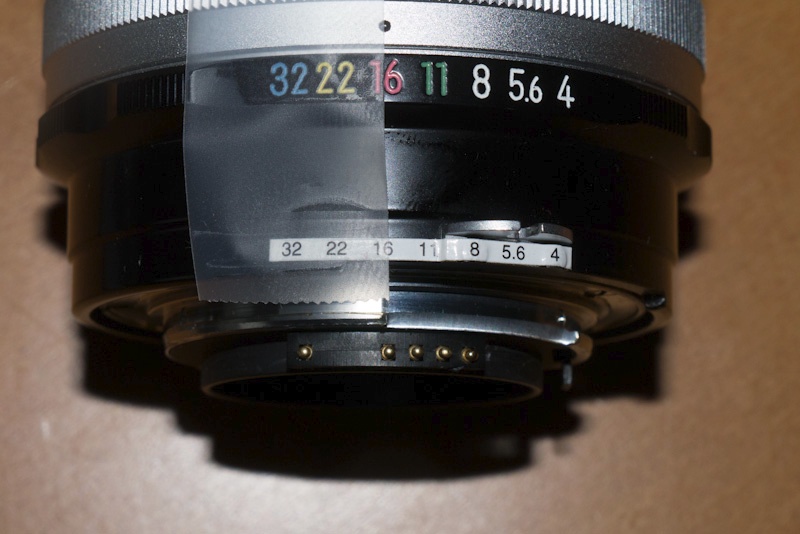
Tape assists with CPU alignment. The tape runs through the focus indicator on the lens – not shown.
I installed the CPU (just 2 sided sticky tape for now) on the 200mm f/4. The CPU comes with an alignment aid, but my instructions are all you need. There’s also a shim for lenses with very small internal barrels which require the CPU to be raised from the barrel’s surface for contact to be made. In what follows I used the Nikkor-Q Auto 200mm f/4 because it needs neither machining or shimming for a proper CPU fit. I checked and confirm my CPU measurements set out in Part I – the CPU I bought is identical in size to the OEM Nikon one.
If you prefer to use the supplied alignment aid, place it thus – the aid has a bump or protrusion, rather too broad for my liking, which has to align with the lens’s focus and aperture indicators and the fourth pin from the right on the CPU, viewed from the rear of the lens, thus:
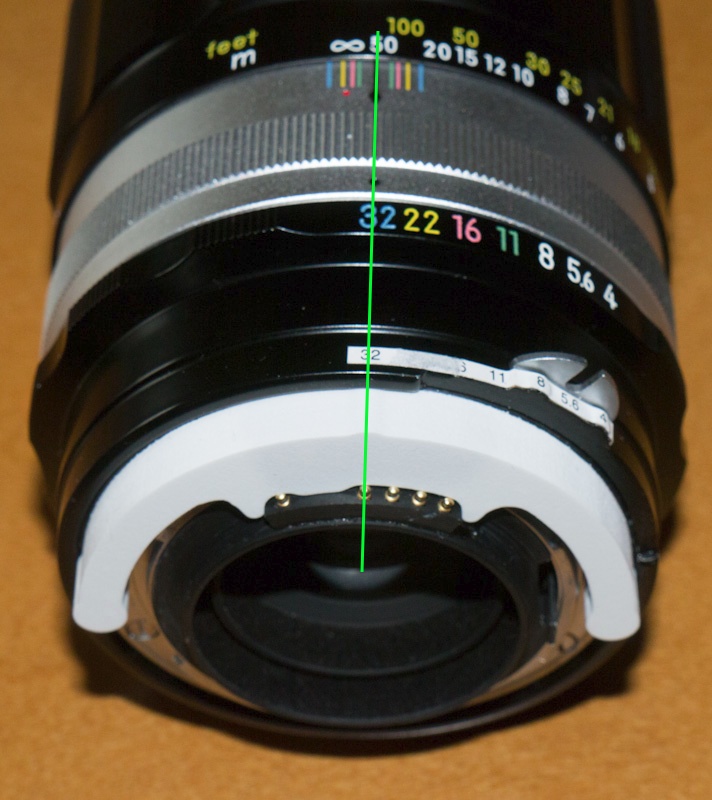
Using the alignment jig provided with the CPU.
The green line indicates correct alignment, though the protrusion on the jig is hard to make out in the picture.
Programming:
The instructions the vendor provides for programming the CPU are a tad garbled, so I have rewritten them here.
This is one of those cases where the first one takes a while to do and subsequent ones are as easy as it gets.
There are three steps after installing the CPU in the lens – program maximum aperture, program focal length and program minimum aperture. You can also toggle ‘Focus Block’ and adjust lens collimation for optimum focus. Once the CPU is installed, the aperture ring on the lens is disabled by default and apertures are changed solely with the control wheel on the body of the camera, meaning in between settings are available if that’s how you set up the camera. You only want to leave this default setting for Ai-S lenses. (Ai and pre-Ai lenses will not deliver correct auto exposure if this is not changed – these lenses have to be controlled from the aperture ring on the lens.) You do not have to set a chipped Ai-S lens to its minimum aperture in ‘A” or ‘M’ modes, only in ‘P’ or ‘S’ modes. This is unlike the way you have to with an AF ‘D’ lens. The setting of the aperture ring is irrelevant in ‘A’ and ‘M’ modes once the CPU is installed and programmed, as long as the CPU is set to camera control of the aperture. My instructions are for a D700 as the programming ‘tool’, but like instructions supposedly work with all modern DSLR Nikon bodies. I have no way of testing this as the D700 is the only Nikon DSLR I own. Your risk. Try to sue me if you damage or blow up your camera and I will contact my Sicilian friends, shortly after which your career as a litigant will cease and your fingers will cease to function. Take responsibility for your actions. I make no warranties, expressed or implied and what you do is done at your risk.
In programming mode the LCD will cycle through a series of eight numbers. Taking a one second exposure when any of these appears enables programming of the related feature. These features are:
- 2.8 is displayed on the top LCD – program maximum aperture
- 4.5 – program focal length
- 5.6 – toggle Focus Block
- 10 – moves optimum focus point back
- 20 – moves optimum focus point forward
- 40 – program minimum aperture
- 60 – toggles aperture control between the camera’s control dial (default) or the lens’s aperture ring. Vital for pre-Ai-S lenses. Details absent from the maker’s instructions.
- 90 – restore to defaults
I describe these in practical order below.
- (a) Programming the maximum aperture – done when the LCD reads 2.8:
- Switch on the camera with the lens mounted.
- The three position focus mode ‘C’, ‘S’, or ‘M’ switch must be set to ‘C’. If your camera will not display the 6 second setting, be sure to set EV increments to 0.5 in the Metering/Exposure menu. That will make 6 seconds accessible.
- Set the mode to M – manual.
- Set the shutter speed to 1 second (1″ on the top LCD)
- Take one exposure.
- Set the shutter speed to 6 seconds (6″) and take one exposure. (As reader Sven point out in his comment, below, Nikon D90 users should set the shutter to 5 seconds, not 6).
- The top display will flash ‘job nr’ for 7 seconds.
- When it’s done flashing, change the shutter speed back to one second (1″) and take an exposure.
- The top display will now show the aperture changing 2.8-4.5-5.6-10-20-40-60-90. It will continue this routine for three cycles or until you take an exposure.
- If you do not get cycling, switch off and start again.
- Make an exposure when the top LCD on the camera shows 2.8.
- With the shutter speed at 1 second, where you left it, make an exposure when the aperture indicated is identical to the maximum aperture of your lens. For the 200mm f/4 I chose ‘4’.
- Power off the camera.
- (b) Programming the focal length – done when the LCD reads 4.5:
- Switch on the camera with the lens mounted.
- The three position focus mode ‘C’, ‘S’, or ‘M’ switch must be set to ‘C’.
- Set the mode to M – manual.
- Set the shutter speed to 1 second (1″ on the top LCD)
- Take one exposure.
- Set the shutter speed to 6 seconds (6″) and take one exposure.
- The top display will flash ‘job nr’ for 7 seconds.
- When it’s done flashing, change the shutter speed back to one second (1″) and take an exposure.
- The top display will now show the aperture changing 2.8-4.5-5.6-10-20-40-60-90. It will continue this routine for three cycles or until you take an exposure.
- If you do not get cycling, switch off and start again.
- Make an exposure when the top LCD on the camera shows 4.5.
- Refer to the table below. The aperture shown on the camera’s top LCD will change from F1 through F90, in steps.
- When you see the aperture for your desired focal length (refer to the table below, or download the original instructions) make an exposure at the 1 second setting. For the 200mm lens I chose a setting of 20 from the table.
- Power off the camera.
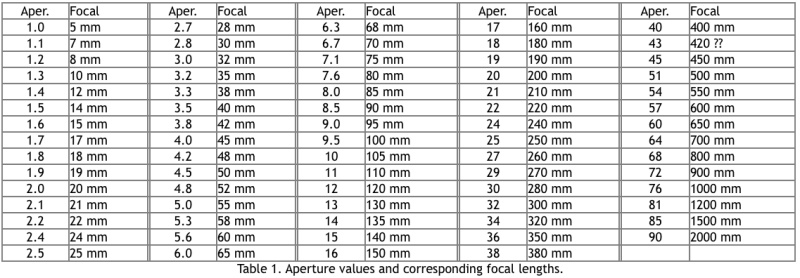
The CPU focal length programming table.
- (c) Programming the minimum aperture – done when the LCD reads 40:
- Switch on the camera with the lens mounted.
- The three position focus mode ‘C’, ‘S’, or ‘M’ switch must be set to ‘C’.
- Set the mode to M – manual.
- Set the shutter speed to 1 second (1″ on the top LCD)
- Take one exposure.
- Set the shutter speed to 6 seconds (6″) and take one exposure.
- The top display will flash ‘job nr’ for 7 seconds.
- When it’s done flashing, change the shutter speed back to one second (1″) and take an exposure.
- The top display will now show the aperture changing 2.8-4.5-5.6-10-20-40-60-90. It will continue this routine for three cycles or until you take an exposure.
- If you do not get cycling, switch off and start again.
- Make an exposure when the top LCD on the camera shows 40.
- With the shutter speed at 1 second, where you left it, make an exposure when the aperture indicated is identical to the minimum aperture of your lens. For the 200mm f/4 I chose ’32’.
- Power off the camera.
- (d) Programming aperture control – done when the LCD reads 60:
- Switch on the camera with the lens mounted.
- The three position focus mode ‘C’, ‘S’, or ‘M’ switch must be set to ‘C’.
- Set the mode to M – manual.
- Set the shutter speed to 1 second (1″ on the top LCD)
- Take one exposure.
- Set the shutter speed to 6 seconds (6″) and take one exposure.
- The top display will flash ‘job nr’ for 7 seconds.
- When it’s done flashing, change the shutter speed back to one second (1″) and take an exposure.
- The top display will now show the aperture changing 2.8-4.5-5.6-10-20-40-60-90. It will continue this routine for three cycles or until you take an exposure.
- If you do not get cycling, switch off and start again.
- Make an exposure when the top LCD on the camera shows 60. This will transfer control of the aperture from the control dial to the aperture ring on the lens. Generally preferred for Ai or Ai’d lenses – meaning all pre-Ai-S lenses. See Ai lens aperture non-linearity below.
- Power off the camera.
- If you mess up – reset when the LCD reads 90:
- Switch on the camera with the lens mounted.
- Set the mode to M – manual.
- Set the shutter speed to 1 second (1″ on the top LCD)
- Take one exposure.
- Set the shutter speed to 6 seconds (6″) and take one exposure.
- The top display will flash ‘job nr’ for 7 seconds.
- When it’s done flashing, change the shutter speed back to one second (1″) and take an exposure.
- The top display will now show the aperture changing 2.8-4.5-5.6-10-20-40-60-90. It will continue this routine for three cycles or until you take an exposure.
- Make an exposure when the top LCD on the camera shows 90.
- Power off the camera.
The CPU is now reset to its defaults which are for a 45mm f/2.8 lens with centered focus justification, camera control of the aperture and focus block ‘On’.
- If you want to disable focus block, you can toggle it off when the LCD reads 5.6:
- ‘Focus block’ is ordinarily On when the CPU is shipped. Focus block only works with the ‘C’, ‘S’, ‘M’ switch on ‘S’, which is why it is set to ‘C’ in the above programming steps. As Focus Block is On when the CPU is shipped, leaving the switch on ‘S’ will prevent shutter release when programming.
- By releasing the shutter at 5.6 on the top LCD, you toggle ‘focus block’ Off. Follow the procedures set forth above – the 1 second-6 seconds-1 second routine to go into programming mode. To re-enable focus block, repeat.
- With ‘focus block’ On, you can only release the shutter when in single shot mode when the focus confirmation light is illuminated in the viewfinder.
- For this to work you must have the following settings on your camera:
- 1 – Custom Function ‘a2’ has to be set to ‘AF-S priority selection’ not to ‘Release’
- 2 – The shutter must be on ‘S’ – Single release, not Continuous.
- 3 – The three position focus mode ‘C’, ‘S’, or ‘M’ switch must be set to ‘S’.
This is a very intriguing option and can be used in two ways. First, with an MF lens you simply focus the lens on your subject and once focus is achieved the shutter will be triggered automatically, as long as you keep the shutter button depressed! Second, you can preset the focus to a specific location and when a subject enters that focus point the shutter is automatically triggered if the shutter button is depressed.
This is actually potentially more useful than it may at first sound. For really hard to focus lenses like the 500/8 Reflex Nikkor, you simply turn the focus ring while holding the shutter release button depressed, until the shutter goes off. For moving subjects such as portraits in a studio, you can set the focus point to coincide with the subject’s eyes and then turn the focus ring until the shutter goes off – a variant on the focus-lock-recompose technique used in the studio with modern AF lenses.
To disable this feature, rather than mess with programming, simply turn the ‘C’, ‘S’, ‘M’ switch to ‘C’ and the shutter will fire when the button is pressed, regardless of focus accuracy.
Given this immense flexibility, I have set my ‘Focus block’ ‘On’ for the 500mm Reflex Nikkor which really benefits from it. Shorter lenses are easy to focus in the viewfinder and do not need it. It’s a fantastic feature if you know how to use it. This feature works in all exposure modes – Aperture Priority, Shutter Priority, Program and Manual,
- If you need to change the lens’s collimation/justification when the LCD reads 10 or 20:
- If your lens focuses in front of or behind the optimal position denoted by the focus confirmation mark in the viewfinder, you can change the point at which the LED illuminates.
- This option in the CPU to correct for front or back focusing lenses is identical in function to the one found in the camera’s rear LCD menus for use with modern AF lenses. The programming function provides for no fewer than 17 different positions, eight either side of the central default.
- I provide detailed instructions on how to use the ’10’ and ’20’ adjusters here.
Result:
Here are After and Before EXIF data from Lightroom 4. Aperture under ‘Exposure’ is reported as I set it with the control wheel and ‘Lens’ now reports the correct lens – I did this on the Nikkor MF 200mm f/4, Ai converted by John White.
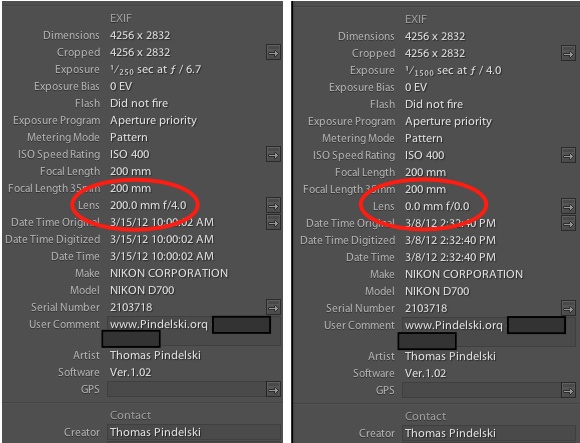
After and Before EXIF data.
A related benefit is that the focal length is now correctly reported in Library Metadata in LR4 in the ‘Lens’ field, which is used to sort; until the CPU is added, LR sees every non-CPU lens as 0.0mm even when the correct lens Focal Length is dialed in on the camera using the ‘Non CPU lens’ setting. In other words, without a CPU ‘Focal Length’ is reported at whatever you dial in under ‘Non CPU lens’ on the D700 and ‘Lens’ is wrong.
The manual focus confirmation light continues to work as before.
Preliminary tests suggest that Aperture Priority exposure is unacceptable unless the ’60’ toggle is used to revert aperture control to the lens from the camera’s body. However, the pattern of behavior varies with different Ai lenses. As an example, I have three pre-Ai lenses which have been Ai’d. The 50/2-H starts over exposing at f/5.6 then reverts to correct by f/16. The 105mm/2.5-P behaves in like manner. The 200/4 is far worse than either, see below, with a trend to increasing over exposure as the aperture is reduced to f/32. I have read that some pre-Ai-S lenses are fine, others not when aperture control is passed to the camera’s control wheel. You will just have to experiment to see whether yours is/are acceptable.
I also confirmed that if you mess up (ahem!) the CPU can be easily reset, as explained above.
Shutter Priority and Program exposure modes now work, but the lens has to be set to minimum aperture and aperture control reverts to the control dial on the camera’s body, with the related potential exposure non-linearity issues on pre-Ai-S lenses.
All three metering modes (Pattern, Spot, Center-weighted) work without any ‘Non-CPU’ lens entry dialed in.
The vendor’s stock of CPUs comes and goes (he’s out right now) so when I get more I’ll install these on my other MF lenses. For those requiring machining I’ll likely have John White do it. I chose the 200mm f/4 in this example, as it’s a perfect fit with no machining.
I have not tested this with a Nikon flash; when I use flash it’s a Novatron outfit with manual exposure. No exposure automation is used or needed.
Ai lens aperture non-linearity:
If you do not elect the toggle under ’60’ discussed above, you may have bad exposures with pre-Ai-S lenses – Ai and Ai’d optics.
One of the claims made for Ai-S lenses is that movement of the aperture stop down lever is identically spaced between apertures, a feature missing from non-linear Ai lenses. This appears true. (An Ai-S lens can be distinguished by the orange marking for the smallest aperture on the rearmost aperture scale, nearest the camera, as well as by a small scalloped ‘half-moon’ relief in the lens flange where it abuts the camera’s body. The latter test is definitive. The ‘orange smallest aperture’ is not – some pre-AiS lenses have the smallest aperture colored orange.)
I took 13 snaps on the 200mm, an Ai (not Ai-S) lens, at half-stops from f/4 to f/32 using Aperture Priority metering, before enabling the ’60’ toggle, above. Loading these into Lightroom I equalized the exposures using the histogram so that all were of the same appearance. Here is the result:

Non-linearity of aperture response – 200mm Nikkor-Q.
So at f/4, the image is under-exposed by 0.45 stops whereas at f/32 it is over-exposed by 2.05 stops, a range of 2.5 stops. In practice, accepting that 0.5 stop is practically negligible, the range from f/4 to f/8 is fine. Apertures smaller than f/8 (f/9.5 through f/32) suffer progressively increasing over exposure, and if you use these smaller apertures a lot, that is fairly significant. While this test was conducted using Aperture Priority metering, you can bet that the results will be the same in all metering modes, including Shutter Priority, Program and Manual, as the camera’s controls are being used to stop down the lens, not the lens’s aperture ring. Any time the camera does this, the non-linearity kicks in.
In practice the exposure errors are unacceptable. One solution is to use exposure compensation at smaller stops but, let’s face it, that’s not right. You will forget, likely as not, and one of the key benefits of installing a CPU is not forgetting things like having to dial in the lens’s focal length. Thus you should use the ’60’ toggle to transfer aperture control back to the aperture ring on the Ai lens, which is inherently linear. Leaving control with the control dial on the camera will result in bad exposure. Plus, face it, apertures should be set on the lens, not on a dial on the camera. That’s how gear was made was made when I was a boy, and that’s how I like it.
One further note on non-linear Ai and pre-Ai lenses. Proper exposure automation (control of aperture from the aperture ring) will only be obtained in the ‘A’ (aperture priority) and ‘M’ (Manual) metering modes. The ‘S’ (shutter priority) and ‘P’ (program) modes cede control to the camera’s stop down lever and the lens has to be set to the lowest aperture and exposure will be wrong even with the ’60’ toggle set to lens aperture ring control. This means that proper exposure cannot be guaranteed as the aperture ring on the lens is no longer in control. The extent of non-linearity varies – my 200/4 gradually over exposes as the lens is stopped down, the 105/2.5 is right at about f/5.6 and so on, so it’s going to vary from lens to lens.
For me, the requirement to use ‘A’ exposure mode with pre-Ai-S lenses is not a problem as, like most serious snappers, that and ‘M’ are much my preferred exposure modes. But it’s something to be aware of. Further, as I mentioned above, I much prefer using the aperture ring to a wheel on the body of the camera, because that’s how I grew up.
For more data on a broad range of pre-Ai-S lenses, click here.
Proof of the pudding:
In the following snaps of the garden fence, the first seven exposures were made using the 200/4 Nikkor pre-Ai with aperture control passed to the camera’s control wheel, using apertures from f/4 through f/32 and ‘A’ exposure mode. You can see how the result trends from under- to over-exposure. The second series of seven exposures was made with aperture control passed to the aperture ring on the lens. Exposure is constant at all apertures.
The difference between control dial (top) and aperture ring (bottom) control
on exposure accuracy on a pre-Ai-S lens with CPU installed.
I stress that my 200/4 Ai’d lens is far the worst in this respect. Test yours and see if you can live with it if you must have the control wheel setting the aperture.
How best to set up your camera body:
If you have nothing but Ai-S lenses and only want to use the camera’s control dial to change apertures, simply leave the ’60’ setting on the CPU as shipped.
If you have Ai/Ai’d lenses or a mixture of Ai/Ai’d and Ai-S lenses, then be sure to toggle the ’60’ setting to move aperture control to the lens. Then go to the D700’s ‘Custom Setting Menu->f Controls->f9 Customize command dials (f7 on some bodies like the Df)->Aperture setting->Aperture ring->OK’. This passes control of the aperture to the lens. Save this setting to your ‘My Menu’ and then you can easily toggle aperture control between the camera and the lens. Note that if you pass aperture control to the lens you will not be able to use ‘Live View’.
I address non-linearity exposure issues for pre-AiS lenses in more detail here.
Remember this rule:
- All lenses, Ai-S, Ai and Ai’d can meter in ‘A’ and ‘M’ exposure modes correctly with aperture control passed to the lens.
- If you want to use ‘P’ or ‘S’ exposure modes, proper exposure is only certain with Ai-S lenses, which will have to be set to their minimum aperture, thus removing the ‘EE’ warning on the top LCD and producing accurate exposure. Ai and Ai’d lenses will behave in like manner, requiring the lens’s aperture ring to be set to minimum aperture, but accurate exposure cannot be guaranteed. Some work well, many do not.
- Even with Ai-S lenses, I have found that the best auto exposure linearity results from letting the lens control the aperture, not the control dial on the camera’s body.
Epoxy – the final step:
Once programmed and all functions confirmed, I removed the lens from the camera, marked the CPU’s position, removed the two-sided tape and epoxied the CPU in place. A dry run using good quality two-sided tape is highly recommended. Once you epoxy the CPU in place it’s hard to go back to correct alignment errors!
I used this brand. This gives a few minutes working time and is stated to work on hard plastics and metals. I cleaned both surfaces with isopropyl alcohol first:

This is not a woodworking project. The last thing you want is glue squeeze out. After mixing the epoxy I used a fine pin to apply a very thin layer between the pencil marks I had made on the lens when the CPU was temporarily installed with two-sided 3M tape. I made sure to not extend the glue line all the way to the marks or all the way to the edge of the lens’s barrel. You want to put the glue on the lens’s barrel not on the CPU. The CPU is very small and slips easily when held. Getting epoxy on the sprung contacts or on your fingers is the last thing you want. If you get it on the contacts the chances are that you will freeze them in place, they will refuse to retract when the lens is mounted on the camera and you risk damaging the camera’s contacts.
Reliability:
I have now installed CPUs in over a dozen MF Nikkors, all used with my D700, D2x and D3x. Four of these needed machining of the baffle, the others were straight glue-on jobs. All CPUs were perfect as shipped from Singapore. Programming worked as indicated above.
In use I have had only one issue – see ‘Problems encountered’, below, and that was easily cured. The biggest risk is that a severe knock to the back of the lens in the area of the CPU will dislodge it. However, the epoxy I am using is very strong and it would take a really ham handed operator or an unlucky accident to dislodge these. I always do a ‘dry run’ using 3M two-sided tape and then let the epoxy cure for 24 hours before use. I also take care to roughen the glue surface on the CPU using coarse emery cloth (80 grit) before applying epoxy, for the best possible bond.
I use matrix metering with single servo autofocus (‘C’, ‘S’, ‘M’ front switch on escutcheon set to ‘S’) and have had no exposure issues with apertures controlled by the lens in ‘A’ mode. I use dynamic area 21-point autofocus – the switch on the rear of the camera below the four-way dial is centered. Every single lens I have converted requires +1.5EV exposure correction to be dialed in for correct exposure, which is even throughout the full range of apertures. Because of the need to do this, I generally do not mix MF and AF lenses when taking pictures, as you can be sure I will forget to make the change when swapping between them. The extent of EV correction seems to vary between bodies, though all my three Nikon bodies – D700, D2x, D3x – require +1.5EV. Readers have reported as little as +0.5EV on other digital bodies and one F6 film body user has reported no adjustment is needed at all. Be sure to establish your EV adjustment befor venturing out.
Ai versus Ai-S:
With the current version of this CPU, with the ’60’ option, there is no longer any reason to avoid buying pre-Ai-S lenses. Simply elect the ’60’ toggle to transfer control back to the aperture ring on the lens and your ancient MF Ai lens will deliver perfect exposure every time. And if your lens is a gorgeous pre-Ai all metal piece of art, as are many of mine, simply have it machined for a few dollars to confer Ai compatibility with the current DSLRs from the House of Nikon. D4, D3, D800, D700, you name it. Classics made current again.
Some MF lens experience:
Here are my experiences so far with MF Nikkor/Nikon lenses I own:
Known to work:
- 20mm f/3.5 pre-Ai UD**. Glue on with no machining. An aperture follower needs to be added, as shown here; this can be readily fabricated using the original aperture ‘claw’, reversed.
- 20mm f/3.5 Ai-S. Glue on with no machining.
- 24mm f/2.8 Nikkor-N.C**. Glue on with no machining.
- 28mm f/2 Nikkor-N.C.**. Glue on with no machining.
- 35mm f/2 Nikkor-O**. Glue on with no machining.
- 50mm f/2 Nikkor-H.** Glue on with no machining.
- 55mm f/3.5 Micro-Nikkor.** Glue on with no machining.
- 75-150mm f/3.5 Nikon E. Glue on with no machining. Lens programmed as a 75mm focal length (programming a zoom range is not possible). This is an Ai-S lens with a linear aperture mechanism, though not marketed as Ai-S. Mine is the earlier all black version but I have learned that not all of these are identical; later black ring and all chrome ring versions have a larger rear baffle which will need machining.
- 85mm f/1.8 Nikkor-H**. Glue on with no machining.
- 105mm f/2.5 Nikkor-P** (early Sonnar type, metal focus collar). Glue on with no machining.
- 135mm f/3.5 Nikkor-P**. Glue on with no machining.
- 200mm f/4 Nikkor-Q** (early four element design, metal focus collar). Glue on with no machining.
- 500/8 Reflex. Glue on with no machining. CPU is glued to the periphery of the rear mounted L37C UV filter which screws into the rear of the lens. Marketed as an Ai lens, the result is identical to an Ai-S, as the aperture is fixed. Programmed with Focus Block ‘On’ (camera’s front switch set to ‘S’) to ensure the shutter can only be released when critical focus is acquired. Switching the camera’s ‘M’, ‘F’, ‘C’ front panel control switch to ‘C’ disables focus block if required.
Leave the job to professionals if you are mechanically inept – these all work fine once machined:
- 28mm f/3.5 Nikkor-H**. Requires machining. Not a job for amateurs. Nikon made the rear of the baffle sloped, requiring a section to be cut out to provide a perpendicular mounting surface for the CPU. As there is little support for the CPU once this is done, the machining has to be very accurate to provide the best possible surface for the CPU to properly adhere. You can download images illustrating the machining process here.
- 35mm f/3.5 pre-Ai Nikkor**. Baffle needs machining to remove slope. Tricky but can be done.
- 43-86mm f/3.5 Ai Zoom Nikkor, version II. Requires machining. Not a job for amateurs. Needs special Dremel diamond-tipped tool to remove alloy on lens mount. See here for details.
- 50mm f/1.4 Nikkor-S**. Requires machining. Not a job for amateurs. The rear baffle must be relieved to gain the required clearance for the CPU. Clearances are very tight and glue squeeze-out can ruin your lens. The bayonet lens flange has to be removed to access the baffle for the machining step. It is not an option to machine the baffle in situ as metal shavings will enter the lens’s mechanism. Leave this one to professionals unless you are very confident in your skills. If you are confident, I provide detailed modification instructions here.
- 80-200 f/4.5 Ai zoom – late 12 element version. Requires machining. This is one of the easiest machining jobs. Three screws retain the baffle and the metal which has to be removed is thin, with lots of glue area. Machining details appear here. Used samples invariably have loose zoom/focus collars making the lens very inexpensive, and the problem is easily fixed in a few seconds with a strip of vinyl electrician’s tape, leaving you with one of the finest zooms of the MF era for maybe $100. A great lens with which to experiment as regards machining, allowing you to build up your courage for the tougher ones.
- 100mm f/4 Micro Nikkor Ai-S. Needs machining. Machining details are here. Not too hard but a Dremel cut-off tool or a mill is essential owing to the thickness of the metal which has to be removed.
- 300/4.5 ED IF Ai-S Nikkor. Needs machining. Machining details are here.
** Pre-Ai all metal model, with conversion to Ai spec done by John White or by me where required. Sometimes pre-Ai lenses can be found already Ai converted; if not, John White is highly recommended based on my experience, or you can do it yourself.
That’s all the manual focus lenses I presently own.
Custom lens profiles:
I urge you to use mine if you can find ones for your lens(es)or make your own if you use PS or Lightroom. You can make your own profiles using Adobe’s free Lens Profile Creator. The CPU makes it possible to record the specifics of a lens in the correct EXIF field when the picture is taken, something not possible using the ‘non-CPU lens’ setting in the body. With the latter approach and non-CPU lens mounted, LR will report your lens as ‘f/0.0, 0.0mm’ and you will never be able to sort by focal length when searching for images. This means that, with a CPU installed and programmed and a proper import preset, your profile will be automatically applied when picture files are imported to LR or PS and maximum aperture and focal length will be accurately reported.
Most lenses, even the latest AF-S designs, especially the wider ones, benefit substantially when a properly tailored lens correction profile is applied. A proper lens profile is the icing on the Nikkor cake. Adobe ships many profiles for current AF-S and recent AF-D lenses, but none for older manual focus optics, so you have to make your own, or download mine. There is seemingly no curation of the aftermarket profiles they make available, and I have found many to be so poor that it simply makes more sense to make your own.
Does my lens need machining to add a CPU?
I have compiled a table of lenses I have examined to determine whether machining is needed. I’ll update it as new information becomes available. Please email me (link at base of page) with details of yours if it’s not in the table or conflicts with my data. I show the serial number of the lens on which the conclusion is based. The red ones are ones I own and have converted to CPU operation, and a lens correction profile for each of these can be downloaded here. The bottom line is that if you are seeking to buy MF lenses, you can generally find something in every focal length which allows a straight glue-on of a CPU (which just about anyone can do) rather than having to dismantle and machine (which many may be reluctant to do).
Any pre-Ai lens also has to have the rear of the aperture ring machined to clear the aperture sensing tab on current Nikon DSLRs. If this is not done, the camera may be damaged.
When buying, take nothing for granted if you want to avoid machining. If you are unsure, ask the seller to measure the diameter of the rear baffle. If the diameter is over 1.426″ (36.2mm) machining will be required.
For example, note that the Series E all black early version 75-150mm zoom (no chrome ring, used on later versions) was changed during the production run. My version needed no machining. A slightly later version owned by a reader did.
Comprehensive Nikkor and Zeiss lens database – is machining needed or not?:
Click the link for the Nikkor lens machining database
The simplest choice for CPU conversion is to buy lenses which need no machining and are Ai-S. Ai-S allows aperture control from either the camera’s body or from the lens with no auto-exposure concerns. Ai and pre-Ai lenses can have exposure issues if the aperture control is passed to the lens.
NOCTs have been converted using special CPUs with remote circuit boards. The rear lens element has to be ground (!) and space has to be found for the attached circuit board. I question whether you want to risk so costly a lens (over $3,000 used at the time of writing) for the convenience of a CPU.
Zoom lenses can only have one focal length programmed. Choose something unique to permit subsequent identification in EXIF data on import to LR pr PS. For eample, for the 75-150mm Series E, I programmed it as 75mm.
A useful source for serial number data is here.
Body compatibility:
The extent of CPU-body compatibility varies with the body for chipped Nikkor MF lenses.
(a) – Aperture operation passed to the body:
A chipped lens behaves like an AF or AF-D lens (but has no autofocus, of course) when aperture control is passed to the body, and requires that the lens be set to the smallest aperture for exposure automation.
This means that the following Nikon models provide full exposure function in P, S, A or M modes:
- D4, D3, D2 and D1 series
- D800E, D800, D700, D300s, D300, D200, D700
- D90, D80, D70, D70s, D50, D100
- D5200, D5100, D5000, D3200, D3100, D3000, D60, D40, D40x
A note on programming the CPU using the 5xxx series bodies:
Reader Scott W. reports as follows:
“I did in fact program two chips on my D5100, so it can be added to your list of camera bodies that “work fine.” I found it easiest to do the programming while looking at the bottom info line inside the viewfinder. While waiting for the f number to increment up to what I needed, I found it useful to give a half press of the shutter every few seconds to keep the info line from turning off. If I waited too long and the display turned off then the chip would sometimes, but not always, exit programming mode and I’d have to start over.
Correct EXIF data is recorded, though in ViewNX2 my AI-S lens is reported as a 50mm f/1.4G. Probably because it’s Nikon software and they do make a G version of a 50/1.4. When I temporarily taped on and programmed a second chip for my pre-AI 50mm f/2 the software didn’t append the G in the lens info.”
(b) – Aperture operation passed to the lens:
A chipped lens will provide full exposure function in P, S, A or M modes for Ai-S lenses on the bodies below. The lens must be set to the smallest aperture in P and S modes.
A chipped lens will provide full exposure function in A and M modes for Ai or Ai’d lenses on the bodies below. Exposure anomalies may arise in P or S modes with these optics, the extent of these varying from lens to lens. The lens must be set to the smallest aperture on P and S modes if these work well.
Anomalies with the D800:
Reader RW has alerted me of certain anomalies regarding the use of chipped lenses on the D800 body. That body differs from the D700 in that the selection switch on the front escutcheon of the D700 (‘S’, ‘C’ or ‘M’) has been replaced by a button which, when depressed, permits adjustment of the S/C/M setting using the control wheel and top LCD. It’s no longer a purely mechanical control. This is not a good thing is you want to pass aperture control to the lens. Further, there is interference if you try to do that with the focus block feature (programming step ’50’, above). The following conditions prevail:
1 – Passing aperture control to the lens:
- Set Custom Function f9 – Aperture setting to ‘Off’
- If Custom Function is set to f9, focus block does not work even if the CPU is set for focus block ‘on’, regardless how the camera is set
Do the above and you will disable focus block.
2 – Focus block:
So passing aperture control to the lens with a chipped lens does not work and if you try to do so the CPU programming gets scrambled and you have to use the reset (’90’ step above) function and reprogram. A shame.
Thus it appears that D800 users may be restricted to body control of the aperture with all the attendant exposure error issues that implies for pre-AiS lenses.
The following have been reported to transfer control to the aperture ring correctly:
- The new Nikon Df – reader GB writes: “Just wanted to send you a quick note and let you know that I followed your instructions to the letter and was able to program the chips including passing the aperture to the lens aperture ring on the Nikon Df.”
- D4, D3, D2 and D1 series
- D700, D300s, D300, D200, D7000, D40x (see Greg Facer’s Comment, below)
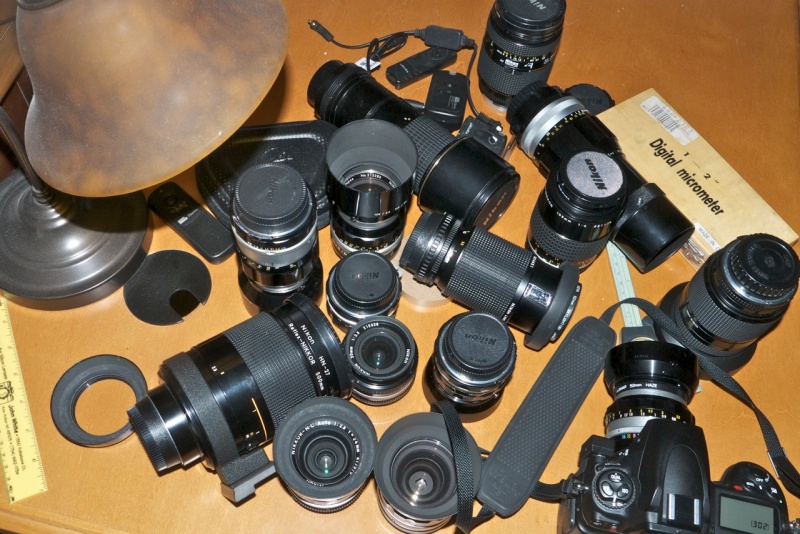
The author’s Nikkors.
LiveView: LiveView will not work when aperture control is passed to the lens.
A warning about PIXCO CPUs: Friend of the blog Ron reports that newly available Chinese CPUs, marked ‘PIXCO’ are poorly made, protrude further and that at least one of the pins is poorly installed with stiff spring action. Though cheaper at $19.95 these would seem to be a false economy. Avoid.
Which bodies can be used to program the CPU?
Reader SJ asks this question and the answer is I do not know. SJ states a D7000 works but the D3200 does not. However, read Simon’s comment which explains how to program using the D3200.
So far I can confirm the following (‘mine’ denotes on my body; ‘reader’ means on a reader’s body):
Work fine:
- Nikon D2x (probably means the D2, D2h and D2xs will also be OK as the designs are similar) – mine
- Nikon D3x (probably means the D3 and D3s will be OK as the designs are very similar) – mine
- Nikon D3100 – reader
- Nikon D5100 – reader
- Nikon D40x – reader (see Greg Facer’s comment, below)
- Nikon D90 – reader
- Nikon D700 – mine
- Nikon D7000 – reader
- Nikon D800/D800e – (with the usage anomalies addressed above) – reader; see the much more detailed analysis from reader Jon Smith in the Comments, below.
- Nikon F100 – (reader – see Tobik’s comment, below)
- N90S/F90 – LED shows f/1 at all apertures and metering does not work
Do not work:
- D90 – one reader – issues with accessing the programming menu – see the Comments below
- Nikon D3200 – reader. Be sure to read Simon’s comment, below, on how to program using this body.
- Nikon F801s – (reader – see Tobik’s comment, below)
- Nikon F601 – (reader – see Tobik’s comment, below)
If you have experience with other bodies please email me (link below) and I will update the above.
On May 2, 2015, Peter Davies wrote:

On June 13, 2015, Winston Neutel wrote:

and:

On October 6, 2015, Jeff Miller wrote:
“I just chipped a Nikon 105mm f2.5 non-AI (the Gauss design #554579) and used a lot of info from your site to finish that project. The lens baffle had to be machined out, just as a data point. I also chipped an older Nikkor Q 20cm f4.0 and it went easily.
Secondly, I wanted to share a setup that seems like it might work for the underexposure issue. I have a D750 so not sure but this might work in other models with the U1/U2 settings such as a D7000 series. Please let me know if anything seems like it could be enhanced as the whole non-AI exposure issue is a pain to remember so far.
If you dial in exposure compensation when saving the U1/U2, it recalls that compensation when re-selecting U1/U2. So I have U1 setup as basically M mode with +1.7 EC and aperture set to the lens ring along with other preference settings in the “custom” controls. Then if I switch to S/A/M/P with a normal AF lens, zero out the EC and have the menus set for my similar preference controls though now aperture is done by control wheel, this is my basic default use either A/S or M. If I want to use a chipped lens then U1 and the EC and aperture control comes back automatically and disappears when I turn back to A/S/M.
I have U2 setup as a rather full auto in order to hand the camera to anyone and hope for a good picture with shutter button AF, full auto exposure, etc but you could define U1/U2 as with or without the chip as well…I guess one more U3 would be handy :)”
CPU availability – an update – 9/16/2018:
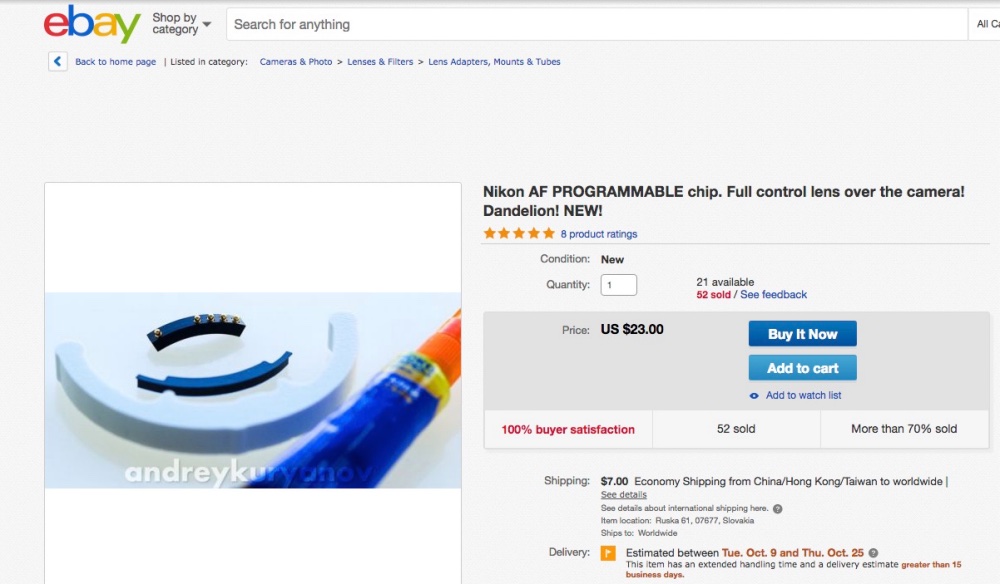
It seems the only vendor of CPUs on eBay is a Russian fellow. Great. Here is the listing:
Readers of the above will know that Ai and pre-Ai Nikkors require the ’60’ function to be toggled to transfer aperture control to the aperture ring on the lens, not to the control dial on the body of the Nikon camera. This sidesteps the non-linear cam issues on earlier Nikkors which will result in incorrect exposure with control dial operation of apertures, as I illustrate above.
I asked this fellow to answer a surpassingly simple question: “Does your CPU permit operation of the ’60’ function”. All I got was evasion, misdirection and nonsense telling me I did not know what I was doing. Tens of thousands of readers of this page might claim otherwise. Dial in “Add CPU to Nikkor” on Google and guess which is the first listing?
Well, after multiple attempts at corresponding with this seller I received this quite special piece of gibberish. If you can understand it, congratulations:

English as she is wrote.
Put aside the extreme distaste I have for doing business with a nation sworn to destroy the United States, one which tried to destroy my parents in Poland and is a criminal oligarchy which thinks nothing of invading its neighbors and murdering its enemies at home and abroad, I had gritted my teeth as this seems to be the only current source of CPUs. I should have known better.
Draw your own conclusions.
works great on my d3100. i started with a t mount adapter on ebay to check out the chip. i loved it. i have modified 2 glue ons so far. i take note of the back of the lens if it dosent have the ledge im not messin with it, for now. thanks for the info. be blessed
I tried it on my D90 + Nikkor-S Auto 50mm f/1.4 S/N 877156. I got to programming menu (method 1-6-1), then set up the f/1.4. Now it reports apperture f/1.4 to the camera but no chance getting to programming menu. Ok, I bought 2 pcs of chip so second try: (1) programming min apperture f/16 – ok. (2) Programming focus length – ok. Taking photos – seemed to report correct values. (3) Then setting max apperture to f/1.4. IT seemed to be successful, but again in the same status as in first try. The only change is it reports 50mm fucus length. No chance to get back to programming menu and also doesn’t respond to changing apperture in M mode on camera!
Is there any bug? Can I reset chip somehow now?
I just tried on a 28mm series E lens, using a custom made laser-cut placement jig (I have a laser cutter so why not!) and just d/s taped for now. I was programming on a D40x, which worked fine but set the focus mode to MF (no lever, and AF-C didn’t work) and no “job nr” flashing anywhere I saw. My only other mistake was to accidentally set the lens aperture control, the “60” option, but I then reset and started again, no problem.
Other than that, I started by mistakenly trying a 1″,1/6″,1″ pattern, and not the proper 1″,6″,1″ pattern. I also find that I have to be careful putting the lens in too, although I haven’t quite figured out why, it might be the laser cut placement jig or maybe the contacts are just out a touch too far.
Oh, and I have to dial +0.7 EV to get good exposure, but otherwise it seems consistent and everything works great. On the D40, setting the MF focus type allows the shutter to fire when you press, regardless of focus lock, and AFS focus mode allows it to fire only when in focus (with the same press/turn for focus/fire behaviour as described here).
Awesome!
I tried F100, F801s and F601. Everything goes smoothly on F100 if I follow your guide. I just have two notes.
Body goes to stand-by mode shortly after exposure so I have to half-press shutter shortly after 1-6-1 (1-5-1 works too) initial exposure otherwise the body asleeps before chip enters programming mode (or body ignores it). After this half-press the meter switch of time preset by CSM 15 works. The same is valid for parameter selection 1s shot. I kept half-pressing the shutter as a mad because I didn’t want to loose programming mode specialy when setting minimum aperture as it takes long time.
After I preset minimum aperture, its value on display changes to value selected by aperture selection dial on the body. I was confused and I reset and re-programed the chip three times before I revealed it. I never set aperture by dial, only with aperture ring on a lens so it didn’t come into my mind. In addition I have CSM 22 set to lens so I really had a pinch of panic.
Chip seems to be incompatible with F601 and F801s (N6006, N8008). F601 looks like switched off when lens is mounted. F801s looks like going off when I press the shutter if the lens is monted when camera is switched off. If the lens is mounted when camera is switched on, then I am able to make a shot but the camera ignores signal from the lens and in addition doesn’t meter. It is bad for me – I cannot have a lens which cannot be used on some bodies. So far I stay with temporarily mounted chip with double sided tape – no epoxy here.
One advantage which is not mentioned in Part I – chipped MF lens shows actual aperture in viewfinder even if it is controlled via ring on the lens – exciting! Thank you – I have updated Part I to state this. – Ed.
Dear Thomas, first of all, thanks for the fantastic article! Just bought the chip from ebay to equip my Nikkor 50 f1.8 or my Sankor pre-AI 135 f2.8. This last one works already w/o mods on my D70 (distance from the bayonet and lens body is greater than nikon’s), but I will have to glue a small piece of plastic to let it engage the lever of minimum aperture on the body…
The question is about focusing: chip docs says: “On the screen you will also find highlighted spots that got into focus area” – does that mean that I will have focus confirmation from the pharentesis [ ] on the screen center, like it happens in AF, or just from the green dot at the left bottom of the internal lcd?
The behavior of the focus brackets/rectangle differs between the three bodies I have tried – the D700, D3x and D2x. None flash the focus brackets/rectangle when sharp focus is attained with an MF lens, whereas the D700 and D3x (but not the D2x) flash the focus rectangle with AF Nikkors. The focus brackets of the D2x remain unlit with chipped MF lenses. As I am not familiar with the D70 I cannot answer your question, but suggest that you take the painless step of installing the CPU with double sided tape, program it as explained above and test. I can confirm that all three bodies I have tried activate the lower left green focus diode and arrows correctly.
The piece you need to glue on the rear of the aperture ring of the Sankor telegraphs maximum aperture, not minimum. Nothing is needed for minimum aperture – the rotation of the aperture ring will communicate that at its limit. To see where to glue that piece, read this.- Ed.
Thanks Thomas for your fast reply. I did read your article on AI modification: yes, I meant maximum aperture… As for the brackets, I suspect they will remain unlit with MF lens; they flash with AF lens. The green dot is already active using MF: no arrows on D70 – it is just distracting from the scene becouse is in the left corner.
As soon as I have the chip I will try and report. Great work!
So, the chip arrived. I installed on my Auto-Sankor 135mm f 2.8 from the 70s pre-AI. I used the provided alignement tool, which worked very well, I have to say. Did not need the additional plastic support provided, just glued the chip on the border. No machining needed for this one. But I transformed the lens in AI using the metal piece with the fork for the index. I just unscrew it, and then cut the fork out; then I glued it upside down along the circumference of the lens in a way that it pulls the lever on the Nikon body to tell the camera to operate the aperture. I then programmed the chip with your instructions and now I have a fantastic old-modern lens!
The pre-AI fork was screwed on the lens in the opposite position from the now glued one. It was difficult to cut the fork (very good steel), then I filed it a bit and used Bostik transparent. For the chip I used loctite (superglue) because that’s what was around.
Images of David’s conversion appear below. – Ed.
Up to now, I have not noticed any anomalies on the D600 and D3100 bodies.
I’ve had the following AIS lenses chipped by my dealer: 28/2.8, 35/2.8, 85/1.4, 105/1.8, 105/4 (Micro), 180/2.8 ED
Dear Thomas, so I got another chip and I wanted to give it a try on my last buy from ebay: a Soligor 75-260, Tokina-made from the late 60’s…3 pounds of metal! It is preAI, so I had to modify it, but not for the AI coupling lever, as there’s no such thing on my D70, but for the EE servo lever. In fact, the aperture ring was slightly colliding to the EE lever of the D70. So I took it out and file it by 1,5 mm, and now the aperture ring engage the EE lever when at f22. So I can command the aperture from the D70. The chip is in place with just bi-adesive tape as you suggested.
Two questions: 1) even if it is preAI, aperture commanded from the camera seems to get the correct exposure… the preAI non linearity does not seems to be so wrong here… or am I wrong? 2) I set the chip to focal 260 of the zoom range… but I get a lot of misfocused images… is it because of this setting (should I try 75) or it is just the lens?
David – 1) Aperture non-linearity is a function of the design of the aperture cam in the lens. Just because your Soligor/Tokina is pre-Ai does not mean it does not have a non-linear cam. All AiS Nikkors have linear cams (Ai and pre-Ai do not) but it’s likely Tokina used a linear cam which explains why you have no issues. 2) The focal length dialed into the CPU has nothing to do with focusing. All it does is record EXIF file data so that you can subsequently search on that focal length. Thus the rational conclusion is that your lens is at fault. – Ed.
Thanks for clarification. Maybe it is not at fault, it is just me holding a 3 pounds monster and not being steady enough, because some half of the shots taken are in focus. Now I got from my uncle two great lens with Pentacon six mounts (Carl Zeiss Jen Biometar 80 f2.8 and Mir 3b 65 f3.5) and a Nikon converter. If I chip the converter can I use both lenses?
Yes. – Ed.
Thanks for the great tutorial and clear programming instruction manual. I have just successfully chipped my first lens! A nikkor 20mm f/2.8 AiS. Actually my favorite lens of all.
I have one note for Nikon D90 owners: In stead of a 1″ and then 6″ exposure to initiate the various programming cycles, you should do a 1″, then a 5″ and finally another 1″ exposure. Set the EV increment to 1/3 to enable a 5″ exposure. The rest is similar to Thomas’ description. Thank again Thomas!
Btw: for reference chipping a 20mm f/2.8 ais is a simple glue job. No sawing or grinding required.
Trap focus works fine on a D800 with f9 (this refers to the ‘f9’ menu selection on the rear LCD screen – Ed.) in either mode. Well, it does for me. However, programming the chip took two efforts. The first time it didn’t take properly.
I swapped to a fully charged battery, reset the chip (command 90) and started again. Then it worked fine. Also, command 60 can only be undone with a body that has the AI reader (these are the higher specification bodies). Once command 60 has been set into a chip, it isn’t possible to enter chip programming mode without that capability on the camera body. (The AI reader is that sprung loaded prong that sticks out above the lens release button and reads where the aperture ring has been turned to. There is a separate switch opposite it that is used by some camera bodies to record when the lens isn’t set at its smallest aperture, however that switch can’t record actual aperture.)
Just for info, there is no real change in the way AF M/S/C works on the newer bodies (D800 et al) and the previous ones, it is only the user interface that has changed. The mechanical bit is from M to S, and that is the same on the latest cameras as the older ones. S/C (& the new function in the D600 that auto switches between S and C) is an electronic command, nothing more.
I suggest that the first command should always be a chip reset (command 90). Make sure the power is switched off after each step too. Also, I don’t get the 7 second delay before the aperture readout starts scrolling, I do 1s, 6s, 1s and straight away the aperture readout is scrolling from 2.8.
Command 60 stops later camera bodies (maybe 2008 on?) from working in a sensible manner, the AF won’t respond to commands, the trap focus stops, the chip won’t take new programming instructions (and is in a different mode). So the comment re the D800 and AF is correct if command 60 has been set. It would seem that command 60 is a “don’t do it” situation and therefore AI lenses might not be reliable regarding exposure. The D700 is about the 2008 era, so after that? Maybe there is a reason that command 60 isn’t documented?
The D800’s f9 command can be in either setting on the body but it is ignored, the sub command dial is active in both settings (command 60 not set) and the aperture ring setting is ignored. (However, if the aperture ring isn’t at minimum, the camera body cannot set an aperture smaller than the one the ring is set to, this is a mechanical limitation of Nikon’s aperture control on lenses with an aperture ring.)
Once command 60 has been set and an attempt is made to enter chip programming mode (with a suitable body in aperture ring ON set in the body), instead of the aperture reading scrolling as expected, it scrolls with ‘normal’ values to f90 (passing f45, and f64 on the way). I tried selecting f64 (the one before f90) to see if it would come out of command 60 mode and the chip didn’t. Command 90 reset the chip as expected.
The later bodies stayed ‘hung up’ as regards AF until a Nikkor was fitted. Then it all reverted to nominal.
When I did get command 60 set, when not on minimum aperture, I got the EE error displayed (all bodies) (as expected). When at minimum aperture and in sub-command dial mode, the display was of a varying aperture. When switched to aperture ring mode in the body (f9 in a D800), now the aperture readout changed with the ring, but the camera was basically unusable re AF. I’m not sure that other aspects of the body weren’t hanging up, exposure was unreliable.
In case it matters, I did all chip programming with the lens physically at minimum aperture.
It would seem that the chip isn’t properly/fully compatible.
I can make no promises about any damage you might be doing to your Nikon camera. This is entirely at your own risk.
The Nikon D3x which I use was first sold in December 2008, and all chip commands, including ’60’ work properly. Accordingly, the anomalies noted above with regard to ‘Command 60’ may be specific to the D800 – Ed.
Hi,
just a quick reply to everybody who has stuck at 60th command and cant get into program mode,check your Nikon camera (mine is Nikon D5100),it has a small black clip on the left hand side(if looking from the front). Press it and repeat steps for a cpu reset. It worked for me. I was getting message that aperture ring wasn’t locked and couldn’t enter programing mode.
This switch is on select Nikon DSLR bodies; neither my D2x or D3x has it. The location on the D5100 is shown below – Ed.
Thomas, many, many thanks. Here in Brazil we live in a kind of a fantasy island with little real stuff, regarding photography. Your post is awesome, I’ve four AI Nikkors and I’ll try your prescriptions, very accurate indeed, althought my D7K has 9 non-cpu lenses to be registrered, as you noticed. Having a CPU lens is reallly a boost, I never imagined it possible! Great post!
Regards!
Hi, thank you for this wonderful tutorial! Today I tried to install a chip on a 50 mm f/1.8-22 Nikon Series E lens. I’ve got the old edition (black ring), wich has a signaling pin notch (like common AI-s lenses).
http://www.nikonusa.com/kdb/images/ailens/img5.jpg
I’ve a Nikon D5200, so I can’t use lens’ aperture ring.
So, I’ve completely programmed the chip with actual lens parameters, but I see a very bad linearity of exposures at different apertures (almost 1 stop at apertures between f/4.5 and f/8!).
Is this lens really AI-s? Do you know why I’ve this non-linearity?
Thank you!
Niki
If the lens has the scalloped cut out in the bayonet mounting flange it is AiS. It looks like your body may be the cause of the anomaly owing to its inability to pass aperture control to the lens’s aperture ring. -Ed.
AiS scallop on a Series E 75-150mm zoom.
I can confirm that the D3200 can in fact program the lens but it seems to exit programming mode if the camera is allowed to go into power saving mode, so you will want to put in a longer timeout in the settings menu.
Hi Thomas, I have started using focus block on my chipped 200mm f4 Nikkor-Q and I think it is fantastic, really much faster than using the dot and much more spot on than I could ever judge. I also turned this on for my 50mm F1.4 ai’d but the focus seems really bad when holding down the shutter and turning the focus. I read your article about adjusting the focus point in the CPU but I don’t believe that would help here. If you start focussed too near and go forward you will get the focus too near in the image and vice-versa if focussed too far. I noticed that if I just use the dot that it lights over too a broad range of foci. This is with my D3200 body in AF-C mode. If I put it in MF mode (so shutter can be triggered anytime and viewfinder bargraph shows focus instead of exposure) then using the bargraph gives accurate focus in good light. I have the same problem at F5.6 as I do at F1.4, although less obvious due to increased DOF. Weird!
Hi..thanks for the great tutorial..I just bought this CPU.. my Ai-s lens is Nikkor 800mm f5.6..can it work with this lens?? I use a d700 body..thanks
Yes it can be used but you need to do some work. As your image of the lens’s flange, below, shows, there is no protruding lip to which the CPU can be glued. The CPU – green box – is installed with the fourth pin aligned with the red-circled screw. Thus you must first glue in an arc of plastic or metal inside the barrel at the green box location which will protrude to the depth of the CPU. Then you glue the CPU to that protrusion. You can fashion the glued-in piece form scrap metal or plastic, it’s not hard if you are handy.
Green rectangle denotes location of CPU, red circle is the alignment mark for the fourth pin – three pins to the right clockwise is the correct orientation.
Alternatively, while it’s hard to make out from your picture, above, if the rear black portion of the barrel is plane with the chromed bayonet, you can simply glue the CPU, flat side down, to the black portion of the rear flange, such that the CPU’s pins do not protrude beyond the outer edge of the bayonet.
For best results I would do both – install a protruding arc of material and glue the CPU both to that (on its inner concave surface) and also put some epoxy on the curved, flat lower surface of the CPU where it contacts the existing black part of the rear of the lens. – Ed.
January, 2014 – Here are the reader’s images of the CPU installation on his 800mm Nikkor – nice job!: