A modest improvement.
Readers will recall that my desktop Hackintosh was upgraded from a Core2Quad CPU to a Sandy Bridge i5 2500K, with CPU performance gains of the order of 25% and doubled RAM speed, late last year. This required a new motherboard and memory in addition to the CPU, but was a painless experience, substantially ‘future-proofing’ the machine as rates of change in CPUs and RAM have pretty much stalled.
Intel released a modest upgrade to the Sandy Bridge CPU, named Ivy Bridge, last month, and reading the performance data at Anandtech here is my advice to readers contemplating the construction of a new Hackintosh or an ugrade to an older machine.
Just a reminder that the goals of this bulky, desktop machine are simple. 90% of the highest performance available (the MacPro) at 30% of the price, with easy upgrades possible using inexpensive parts from the local computer store. In the 8 months since my Hackintosh was upgraded by FU Steve to Sandy Bridge it has been on 7/24 and has not locked up once. It has been restarted a couple of times when OS X Lion upgrades required that. Otherwise it runs all the time and is used hard all day. Thermal properties are outstanding. Except when compressing a large movie file when the CPU temperature rises to 135F, the prevailing temperature, regardless of load, is 108-115F compared with a safe operating limit of 170F. My i5 CPU is overclocked 25% to 4.0 gHz.
Should you build an Ivy Bridge machine?
The answer depends on what you are using now and what your needs are. If you use Photoshop with many files open and simultaneously run Lightroom and maybe a few other applications, a fast machine with a lot of RAM makes sense. Whether it makes sense for you is largely a function of the value of your time. If you like to smell the daisies and plonk along, it probably makes little sense. If, on the other hand, you regard all processing time as time wasted, then it’s worth considering an upgrade.
Cost: The i5 ‘K’ version is the best bet unless you do a lot of video processing, in which case the extra $100 for the i7 is money well spent. ‘K’ designates that the CPU can be overclocked with a few key strokes. Free speed. The i5 is easily and safely overclocked to equal the stills processing capability of the i7. Ivy Bridge 3570K – $240. Sandy Bridge 2500K – $215. No brainer. Use Ivy Bridge. The overall cost of a similarly spec’d Ivy Bridge Hackintosh will be similar to that of one using Sandy Bridge. FU Steve strongly recommends Gigabyte mobos as these are the easiest to hack with no issues. The many variations largely address the number of expansion sockets and rear panel connectors available.
Fit: These use identical LGA1155 sockets, but Sandy Bridge motherboards will need a BIOS update, so make sure you can do that if you are using a Sandy Bridge motherboard. If you are migrating from an LGA775 motherboard (Core2Duo and Core2Quad) simply buy a current Ivy Bridge motherboard.
GPU and RAM: For the first time it’s safe to say that even demanding users can go with the integrated GPU included with the Ivy Bridge CPU. The HD4000 GPU is now a very capable graphics processor, and Anand Tech’s specs confirm it will easily handle the needs of PS and LR. You save $60-200 on a separate GPU card, and can use a smaller motherboard and box. The HD4000 integrated GPU will need some RAM to do video processing, so make sure to max out RAM, which is very inexpensive in 1600MHz spec. Also, use a proper aftermarket cooler – FU Steve recommends the Coolermaster 212 at $26 – as heat kills, and Intel’s stock fan sucks. The 212 needs a big box to accommodate it.
However, if you are using more than one monitor and prefer those with very high pixel counts, then a separate GPU is recommended. For example, users of 27″ monitors with 2560 x 1440 pixel counts would be better off with a separate GPU. Spending more than $120 on a discrete GPU only makes sense if you are a gamer. FU Steve is a big fan of EVGA Nvidia GPU cards as no additional hacking is required for most of these.
Power needs: Irrelevant for a desktop. The most significant advantage of Ivy Bridge over Sandy Bridge is lower power consumption, of primary interest to laptop users. Ivy Bridge uses less power. Even if your box includes 2 SSDs, 2HDDs, 16gB or RAM and a separate GPU card, as does mine, a decent quality 500 watt power supply will easily cope. FU Steve likes Thermaltake power supplies because they are conservatively specified and reliable.
WiFi: The 802-11n protocol will be replaced by 802-11ac over the next few quarters, offering higher speed and better resistance to interference. It is not available on any aftermarket PCIe card or, for that matter, on any Mac, so it’s a question of ‘wait and see’ for now. The right way to enable 802-11n wi-fi in a Hackintosh with full AirDrop capability is described here. This provides full support for the 5gHz and 2.4gHz spectra. FU Steve built all of my three Hacks with these and they work perfectly, being recognized as native Airport cards by OS Lion.
Everything else: Check the Hackintosh article linked at the beginning of this piece. Everything else works unchanged. 16gB of RAM costs little more than 8gB, 1600Mhz RAM is barely costlier than 1333Mhz for a 20% speed boost, and just about every Ivy Bridge motherboard now supports USB3 and SATA3. SATA3, used with the latest HDDs and SSDs, doubles the rate at which data is read from or saved to disk, and will be especially noticeable for those photographers who splashed out on a Nikon D800/E only to find that they now have to process 75mB files!
Hacking tools: I’m no hacker, but my builder FU Steve (Going rate? One six-pack of imported beer per Hackintosh) says that Tonymac’s tools are fully up to date for both Ivy Bridge and HD4000 use with OS Lion.
iMac?: On paper the specs of the iMac look price competitive. If you want a machine with minimal ability to upgrade, sporting a display which cannot be properly calibrated for photographic use, a long turnaround time for repairs, impossible to dismantle for all but experts with special tools and one guaranteed to overheat in heavy, professional use, the iMac is the machine for you. And it looks nice too, as you contemplate your reflection in its high gloss screen. The Hackintosh is a Mack Truck, the iMac is a daily commuter with Cadillac glitz. For like specs, the iMac will cost you twice as much as the Hackintosh and there’s no alternative to the truly ghastly glossy display.
The proper comparison for the Hackintosh is the MacPro which gives you 10% more performance for three times the price and dictates the use of costly OEM upgrade and repair parts. But even the latest (6/2012) MacPro will not run 1600mHz Ram has no USB3 and will not support SATA3 6gb/s disk drives. Very disappointing for the money asked.
Build sheet: You have to add the wifi card/adapter ($40) and your display(s) of choice to this list which makes a 2 SSD, 2 HDD, 16gB Ivy Bridge machine for $1,300, with state of the art performance for any photographer, using the integrated GPU in the i5 CPU – all disk drives are fast 6gb/s SATA 3:
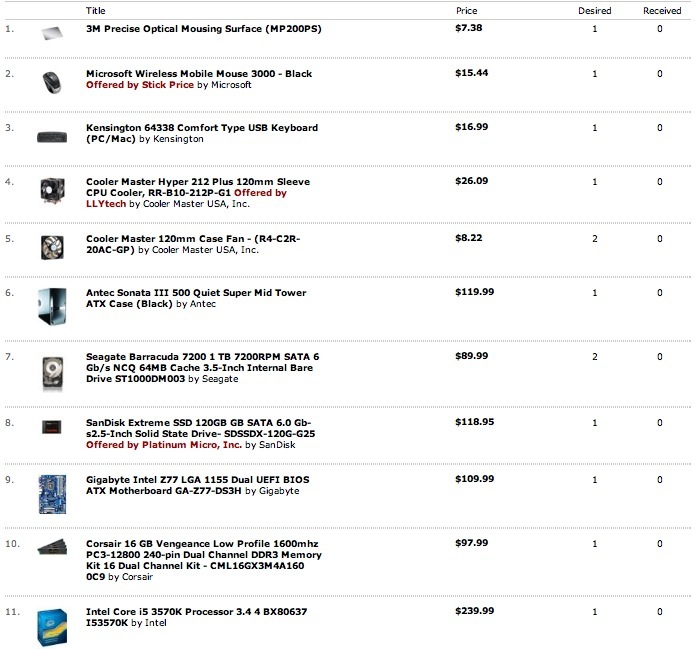
Ivy Bridge Hackintosh components.
Add a couple of Logitech speakers for $25 if you need sound.
A 1tB HDD will store 13,000 75mB Nikon D800/E files or 80,000 D700 files (you really need a D800?). A 2tB HDD costs $30 more, doubling capacity. SSDs are used for Mac OS and application files; picture files go on the HDDs. Disks are paired for full redundancy. The costliest part, the CPU, is also the most reliable.
FU Steve recommends Dell Ultrasharp monitors. Their 21.5″ 1920×1200 runs some $260 and comes with a matte surface and a three year warranty. It is easily profiled using a colorimeter like the EyeOne and has excellent build quality.
Updating a Sandy Bridge motherboard:
If you use a Sandy Bridge motherboard from Gigabyte, the maker provides a free BIOS update which will enable that board to use the later Ivy Bridge CPU. That’s for the Z68 (F12). H67 (F7) and P67 (F7) boards can also be updated, but no update has been released for the Q67; search for the appropriate page on the Gigabyte site. You may need a PC un-shrink the downloaded BIOS update, extracting the installable file. Read on.
- Download the BIOS update; it downloads as a DOS .exe file so you will need to use Windows to run the file which uncompresses it. Alternatively, if you refuse to use Windows as I do, download FileJuicer and it will extract what you need from the .exe file.
- Place the BIOS file on a flash drive (MS-DOS formatted in Apple’s Disk Utility).
- Enter BIOS at startup.
- First save your old BIOS to the flash drive, just in case, using the BIOS F8 (‘Q-flash’) function.
- Make a picture of all the old BIOS screens as you will have to reinput the changes after the BIOS update.
- Set your motherboard to ‘Optimized Defaults’.
- Using F8 again, load the new BIOS from the flash drive (it’s some 4mB in size) while still running your Sandy Bridge CPU.
- Now reload your preferred settings (Turbo, etc.) once done, using the pictures you took earlier.
- Turn the Hack off, restart, test with Sandy Bridge.
- Swap the Sandy Bridge for an Ivy Bridge – they use identical LGA1155 sockets – and restart.
The difference between an upgraded Z68 or similar Gigabyte Sandy Bridge Board and the later Z77 Ivy Bridge version is that the Z77 will support PCIe3, whereas the updated Z68 will go to PCIe2 only. New cards coming to market, probably Thunderbolt and others, may well be PCIe3 only. But the BIOS update on a Z68 board will allow use of an Ivy Bridge in every other respect.
I updated the BIOS in my Z68 UD3H from F9 (as shipped) to F12, and I continue to run a Sandy Bridge i5 CPU on it with no performance changes.