Photographs, Photographers and Photography

August 16, 2010

Virtual reality revisited

Filed under: Panoramas — Thomas Pindelski @ 4:00 am

Better tools and some thoughts on Flash.

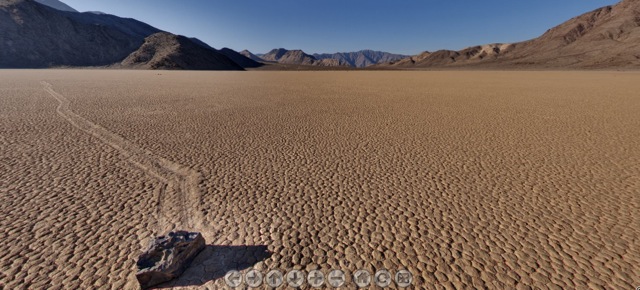
I have decided to do some new work in Virtual Reality panoramas, having written extensively in these pages about the technique some four years ago. Snow Leopard refuses to let either PTMac – the software used to stitch the constituent images – or CubicConverter – which converts the stitched panorama into Virtual Reality format – work, so my first port of call was to ace panoramic pro UK photographer Rod Edwards. Rod has got this technique down and one of the most stunning examples of VR I have seen is his panorama of the famous Racetrack in California’s Death Valley which can be seen by clicking here.

Following Rod’s advice I settled on PTGui for stitching and Pano2VR for VR generation. Processing VR panoramas is a two step process – first stitch the constituent images into a seamless flat whole, then convert that image into a circular panorama which the viewer can pan at will in all directions, not to mention the ability to zoom in and out.

In the process I learned a couple of things. First, the software is now friendlier than before, though the Panotools engine used by PTGui seems identical to that used by the obsolete PTMac. Second, Pano2VR is an excellent tool making it easy to add sound, navigation controls and copyright data. But, most importantly, I learned how superior Adobe’s Flash is to Apple’s Quicktime. Yes, Pano2VR can generate VR files in either format. The Flash versions are half the size and offer far more control. Panning in Flash panoramas is also much smoother than the jerky alternative in Quicktime. Yes, the very same Flash which greedy piggy Steve Jobs has banned from the iPad. It’s ironical that Quicktime VR is no longer supported by Apple’s own latest version of their media player, QuickTime X, as they appear to be abadoning the VR format. But you don’t expect Apple to tell you that now, do you?

So to play a jerky Quicktime VR pano you have to download the older Quicktime 7 if it’s not on your system. Let’s hope the anti-trust powers stomp on Jobs’s arrogance and force him to open the iPad to Flash. If not, the competition will see to it in any case, and I’ll be first in line for a tablet which plays Flash and has a built in SDXC card reader. What a jerk! Here’s a guy who has a monster ego and a huge vendetta against Adobe for some reason. A little power is a dangerous thing ….

As a quick proof of concept, I snapped six pictures of a loft interior using the Canon 5D and Canon fisheye lens mounted vertically on the King Pano panoramic head. The excellent King Pano remains available and I recommend it. You do not need a fisheye to use it but a fisheye lens is the way to go if you want to do 360 degree Virtual Reality panoramas. Even with regular lenses, the King Pano is immensely useful as it provides the correct nodal point offset for the camera, meaning your efforts to stitch images properly will be speedily rewarded. Determination of the right setting for rotation of your rig about your lens’s nodal point is not that hard, and well explained in many places on the web, including on this site.

As proof of concept, click on the picture below. I have added some Vivaldi to jolly things along and the whole thing takes a minute or so to download. I did not bother using HDR, though that technique is highly recommended in VR work owing to the huge dynamic range frequently encountered – look at the burned out windows as an example. HDR fixes that. Nor did I fill the zenith and nadir holes, concentrating on the core stitching functionality instead. So next week it’s off to Point Lobos to do the real thing. In the image below I used TIFF files for maximum definition and you are looking at the Flash version.

Click to load and play the panorama. Use the mouse to navigate in all directions.
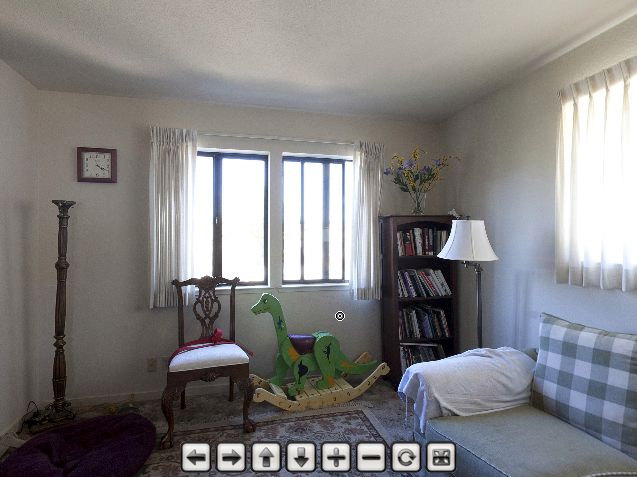
Will NOT play on an iPad.

To view a selection of my earlier panoramas, please click here. These use Quicktime7.

Disclosure: No connection to, or investment in, any of the companies mentioned in this article.

June 8, 2009

The Race Track improved

Filed under: Panoramas, Photographers — Thomas Pindelski @ 7:35 pm

Dykinga was good. Edwards is better

There’s a magical place in Death Valley, Arizona and it’s called the Race Track.

Jack Dykinga illustrated it in his magnificent book which I reviewed a couple of years ago. Simply stated, stones of substantial mass move, magically, yet no one has ever seen this occur. I choose not to dwell on the reasons. Some things are simply magic. The Race Track is one of those.

Why not leave it there?

Well, because a fine photographer whose work I have been privileged to mention here on occasion, has done it better.

Rod Edwards, a UK professional, is that photographer and he has taken Dykinga’s work to a higher level in his rendition of that phenomenal place in Death Valley.

I have been unsuccessful in monetizing my QTVRs, much as I have tried. I would take my iBook around various wineries in central California and show them to proprietors, only to be met with blank stares. Indeed, when I had my one man show I considered including a couple of big screen TVs to better show them off, sound effects and all, but gave up on the idea based on those self same stares.

However, to Edwards’s credit, he has persevered and has been justly rewarded with a commission from Britain’s National Trust – an institution which you can best learn about from the wonderful writings of James Lees-Milne, a magnificent conservator and writer about the early years of the NT. Simply stated, the National Trust is charged with the preservation of the UK’s architectural and cultural heritage – a rare good use of taxpayer monies.

No need to dwell further on the subject – just click on the picture below.


Rod Edwards’s Race Track

September 18, 2008

Immersive media

Filed under: Panoramas — Thomas Pindelski @ 6:47 am

A step up from QTVR.

I have written a lot in this journal about my discovery and adoption of QTVR 360 degree virtual reality photography using Quicktime and a special camera mount. If you would like to see some of the results of my efforts, please click here.

Now all of that is old hat!


Immersive Media’s Dodeca 360 camera

How about a 360 degree movie version? Click here for a demonstration. The camera, by Immersive Media has no fewer than eleven lenses and can be worn on the head, for those seeking to emulate the man from Mars. It seems pretty light.

Now where’s my check book?

August 22, 2006

Surrounded

Filed under: Panoramas, QTVR — Thomas Pindelski @ 7:58 am

Having close detail all around you makes for strong QTVR panoramas.

Click here

Three image HDR pictures, combined in Photomatix, were used here.

August 18, 2006

Adding sound to QTVR panoramas – Part II

Filed under: Panoramas, QTVR — Thomas Pindelski @ 6:32 am

Batteries not included! Heck, lotsa things not included.

I looked at incorporating public domain sound into QTVR panoramas in Part I. How about recording your own sound track?

Meet the latest addition to the digital household:

Made by the fellas who gave us all those rock-’n-roll consoles, Roland, it is mightily costly at $400 (whadya expect? It’s made in Japan, not China), comes with no batteries, an insanely chintzy 64 mB SD card for storing recordings (a leaf out of the digital camera makers’ book – at least Canon has the good sense to include no card with the 5D) and no headphones.

Appropriately enough, Marty Paris, ace acoustical guitarist and local UPS driver, just delivered it so we got to chatting about sound recording. “Wait a minute”, he intoned, “I thought you were a photographer?”. “My dear Marty”, quoth I, with that bemused look of pity and understanding we sound panographers reserve for the unenlightened, “Photography is sound!”. “What?”. “Hey, you know, QTVR and all that. Imagine your band with 360 panoamas and sound, man”. Note the ‘man’ bit. A little bit of hip. Big thing in the musical world, I’m told.

So I open the box and find that this little MP3/WAV sound recorder, which will serve to add sound to my QTVR panoramas – no more public domain stuff for this operator – comes without batteries. Gee, is that cheap or what? No problem. Two AA sized NiMh batteries, which have yet to explode or catch fire, are resurrected from one of the chargers in the ancestral manse, and hey presto!, she fires up.

OK, so the R09 records on an SD card. The 64 mB card included with the R09 can record just about all the true statements from all of the USA’s senators and congressmen made over the past decade, which means 5 minutes’ worth, at best quality. Well, the spare 1 gB card for the Leica DP comes out and truth, justice and the American Way (or, at best, the prospect thereof) are restored.

How large is the Edirol R09? Judge for yourself – that’s the 1 gB SD card on top of the iPod and the picture is about life size on my iMac:

Feel? Positively chintzy compared to the iPod, and the flimsy combined door for the two AA batteries and the SD card is a problem waiting to happen unless it loosens up with use. Indeed, one of the first things you see on opening the box is a warning to the effect that the battery/card door is easily damaged. Not good. How about redsigning it, Roland, rather than hiding behind lawyers and disclaimers? Add the fact that the supplied (useless) charger cannot recharge NiMh batteries in the R09 means the door will get a lot of action as batteries are removed for recharging and replacement. I suppose you could argue the charger can be used for running the R09 off mains power, but given that it’s twice the size and six times the weight of the R09 you know what you can do with it.

Another useless accessory is the provided USB II cable to connect the R09 to your Mac. In practice, you simply remove the SD card and pop it in your card reader which displays all the MP3 or WAV files on the card. Nor do you even need to format the card in the R09, despite dire warnings in Roland’s instruction book. The 1 gB Sandisk Extreme III card formatted in my Lumix worked fine in the R09. Nice. At a pinch you could mix MP3 and JPG/TIFF/RAW files on the one card.

In fairness, one reason for the light weight of the R09 is that there is no hard disk inside, unlike in my 60 gB iPod. Recorded sounds are stored on the miniscule SD card, meaning the device should be fairly shock resistant as there is a near total absence of moving parts.

Roland claims a battery life of 4 hours continuous recording (at least small stereo microphones are built in – you can see them in the snap above) so figuring in the ‘Washington factor’ (when you hear your taxes will go up by 5%, multiply by four) that works out at one hour, which is still a lot, given that the average loop for a QTVR panorama is some 60 seconds long. Even my boy reciting his ABCs takes less time than that!

Monitor your recording or listen to the playback using the R09? No such luck. No earphones are included. Fortunately, I saved mine from the iPod (a device I use connected to the home AV system, not to my long suffering ear drums) and the R09 can be monitored just fine:

Note the sad and unsuccessful attempt to emulate the superb iPod ‘click-wheel’. Aren’t patents wonderful?

So we have here a very expensive, crappy looking device, with a miniscule SD card, no batteries, no earphones, a useless charger, unnecessary cables, no case and the usual 102 page booklet (hell, you press ‘Rec’ and have at it – you need a 100+ pages of legalese to tell me how to work this thing?) So how does it work? Stay tuned for Part III.

August 16, 2006

QTVR panoramas on my web site

Filed under: Panoramas, QTVR — Thomas Pindelski @ 7:23 am

Time to make these a page on the site.

I have assembled some of my recent panoramas on my web site and, to make them easily accessible, have added a Menu option on the Main Page. Click the Menu then click on ‘The Panoramas’.

Alternatively, you can go directly to the panorama index page by clicking here. Recommended especially for Safari users, as this web bowser is especially bad at refreshing its cached history of web pages.

Can panoramas be photographic fine art? I have absolutely no doubt – if art is something that evokes emotions and feelings, then the answer has to be a resounding Yes. Who could not thrill to the strains of Wagner’s Tristan and Isolde in Redwood Valhalla?

August 15, 2006

Another sound panorama

Filed under: Panoramas — Thomas Pindelski @ 10:29 am

Not quite Renoir, but it will do for now.

Renoir’s Bal au Moulin de la Galette is as good as it gets. Suffused with warmth, gaiety, movement, sheer joy, modern crowd scenes simply cannot improve on this masterpiece.

But Renoir did not have QTVR + sound, though he came awfully close. I swear I can hear the revellers in his magnificent canvas. And look how tightly he crops his composition!

Here is my own pathetic imitation.

Click here

August 14, 2006

Strong foregrounds make for strong panoramas

Filed under: Panoramas — Thomas Pindelski @ 7:06 am

Close foreground details makes for heightened drama.

I’m learning that QTVR panoramas are similar to using a very wide angle lens in conventional photography. Meaning that if the foreground is devoid of close, sharp details, likely as not the result will be disappointing.

The broken limb in this example – visible when the panorama first opens, was so close to the fish eye lens that it actually touched the front element at one point as I tried to gain a reasonably solid position for the tripod in what has to be years of dead leaves on the ground. Once again HDR techniques were used in this very challenging lighting.

Click here

August 13, 2006

Thrill to the sights and sounds of racing Porsches

Filed under: Panoramas — Thomas Pindelski @ 10:59 am

Your intrepid panographer checks in from the Laguna Seca racetrack paddock.

Next weekend sees the Monterey Historics with Monterey and Pebble Beach overrun with tourists ogling the million dollar machinery on display and for sale.

The Laguna Seca track is as bad – hour long queues to get in.

The smart money goes to the racetrack the weekend before where all is calm, all the cars are there and twenty visitors turn up. Entrance to everything is free. I’m fortunte that the track is just 100 miles north of home. The mechanics and drivers – many of them retired famous racers – are relaxed, friendly and very accommodating. Until you have seen GP motorbikes or old Formula One cars take the Corkscrew at full chat you have not lived. As great race track corners go, perhaps only the Casino Hairpin in Monaco is more famous.

The paddock contains everything from true amateurs with no budget and one car trailered in to multi-million dollar marketing operations which think nothing of thrashing their pristine $2mm Ferrari Testa Rossas around the track at race speeds.

I took the attached yesterday in the Griot’s tent – more racing Porsches and the like than you could shake a stick at.

And in case you want to know, the sound track is of four great Porsches (aren’t all Porsches great?) – the 904, the 911 turbo, the 935 and the fabulous 956.

Click here

The sounds come from four tracks here and were joined end to end using a fine free application named Audacity.

The mechanics were nice enough to allow me, clunky tripod and pano head and all, into their tent.

One ‘pro’ with a Nikon and a two foot long lens – more boring pix of cars on the track – eyed my strange panorama rig with interest but male pride prevented him from asking what the hell I was doing. Shame – he might have learned something.

What on earth possessed me to sell my pristine 1967 911?

The author’s much missed 1967 911 with wife. I kept the wife.

Change or die

Filed under: Panoramas — Thomas Pindelski @ 7:32 am

It has long been my motto, or mantra now that I’m a Californian, that you either ‘Change or Die’. It is instructive to consider this in the light of the equipment change my landscape photography has undergone during the past year:

Before:

Rollei 6003 + 45 degree prism
40mm, 80mm and 150mm Rollei lenses
Rolls of 120 Kodak Portra VC160 film
A Crown Graphic 4″ x 5″ camera with 90mm, 135mm and 210mm lenses
Several film holders for the above
A dark cloth and loupe to focus the bloody thing
A cable release
My old Linhof tripod
My even older Weston Master V exposure meter
A bad back from carrying all that stuff

After:

Canon EOS 5D
Canon 15mm fisheye lens
King Pano panoramic head
A two axis bubble level
A spare 1 gB CF card
An overpriced Canon ‘cable’ release
My old Linhof tripod
A headache from trying to remember to do everything right (strictly a hardware problem, I assure you)
And, shortly, an iPod-sized digital sound recorder

The software change has been no less dramatic.

Before:

Silverfast Ai for scanning the negatives
Photoshop CS2

After:

Aperture
Photoshop CS2
Photmatix Pro (for HDR rendition)
Photomatix Photoshop plug-in
Panagea Photoshop plug-in
PT Mac (to stitch panoramas)
ImageAlign Photoshop plug-in (to defish zenith and nadir images)
Cubic Converter (to adjust QT defaults)
Cubic Connector (to add sound)
QuickTime (free from Apple for Macs or PCs)
And probably some other things I cannot recall

I don’t think my mantra would be disappointed.

Back-end hardware remains unchanged – the superb Apple iMac G5

And, yes, you can do QTVR panoramas with film gear, but that’s about as sane as driving a Hummer with $4 gas on the horizon.

August 12, 2006

Adding sound to QTVR panoramas – Part I

Filed under: Panoramas, Sound — Thomas Pindelski @ 3:03 am

The penultimate enhancement.

Well, over the past few days my feet and the tripod’s have been buried in sand and in running water. Five wet feet….

The QTVR + HDR accompanying this column, from Limekiln State Park in central California, despite using three pictures for each of the eight components of the panorama, renders the running water quite nicely. Note also the great shadow detail in the trunks of the massive redwoods thanks to the HDR process – no way that I can see conventional single shot exposures capable of this.

But the picture alone is not enough.

After asking around a bit and being met with stone cold silence, I spent the morning searching the web for some way of adding sound to my QTVR panoramas. QuickTime, even in its upgraded ‘Pro’ version, does not let you do this with VR movies, only with regular movies. Shame.

Well, after much searching the answer lay no further than the boys at ClickHere Design, the good folks in Australia who make CubicConverter to allow adjustment of default settings on QTVR movies. In addition to being great cricketers, the Aussies make great software and Foster’s beer – a fine race. The application is named Cubic Connector.

CubicConnector does far more than add sound. It permits creation of an interactive web design with clickable hot spots. When clicked, these hot spots, which can be superimposed on a map, take the user to a VR movie of the location selected. That’s the ultimate and it will take a few more trips to Limekiln for me to complete a comprehensive, QTVR, map and panorama web page which will give the viewer an experience close to being there. Sorry, no way I know of adding the fabulous aroma of a redwood forest. Maybe Apple will do that in the next version of QuickTime?!

CubicConnector also allows presetting of panning actions and speeds, which I have used here; you can override it and pan in any direction, including up and down, by using the mouse. The file is 7mB so it will take a few moments to load – 25 secconds on my broadband connection. Enjoy!

Limekiln State Park, CA in sight and sound – click here

If you want to add sound to your QTVRs, buy Cubic Converter and CubicConnector together at $99, not like I did at $79 each.

I will look at recording your own sound track in Part II.

July 31, 2006

Senility is a nasty thing

Filed under: Panoramas — Thomas Pindelski @ 6:51 am

It’s tough to remember everything when doing those panoramas!

So I made a small check list which I embossed and which now happilly resides in my camera bag:

You may like to do something similar. In my early attempts I kept messing up exposure for some reason …. not good for a guy who grew up without an exposure meter.

By the way, as taking 360 degree panoramas dictates a new way of seeing – you think of the whole scene around you rather than just one straight ahead view – my limited mental powers suggest that a photography expedition in search of QTVR panoramas should be limited to just that. Meaning only a tripod, the KingPano and the 5D/fisheye come along.

So a trip to the local Target store found me splashing out on a small shoulder bag that accomodates the 5D mounted on the KingPano, all set up and ready to go. A somewhat unwieldy mass. This avoids the need to collapse or dismantle the KingPano which greatly reduces setup time. My genuine-Eddie-Bauer-original-Made-in-China shoulder bag ran all of $22. You can always buy a camera bag for four times that if you are so inclined.

July 27, 2006

QuickTime + High Dynamic Range photography

Filed under: Panoramas, QTVR — Thomas Pindelski @ 7:11 am

Some serious heaviosity, as Woody Allen once remarked.

Putting it all together calls for one more test; namely, combining High Dynamic Range photography (HDR) with QuickTime panoramic images. Not just a dry academic exercise as I propose to put this to work on my first field trip to the redwood forests where the dynamic range can be simply astonishing. From shadows to highlights can be as much as ten stops. It gets very dark on the forest floor.

What better environment than the home theater with the drapes open to disclose a 100F day and brilliant sunshine outside? Thank God for the sunspot cycle.

I reprogrammed the Custom setting on the 5D’s mode dial to include three exposure bracketing for each picture, meaning normal, +2 stops and -2 stops and set the drive mode on Continuous. That way one press on the shutter fires of three shots in one second.

The eighteen constituent pictures (6 x 3 – I did not take zenith or nadir shots in this test) were then placed in their own folder in the Mac’s Finder and color coded to avoid mistakes (File->Color Label:>).

These are all at the lowest JPG quality setting on the 5D.

Here’s how the result of the HDR + tone mapping step in Photomatix looks:

I increased the default tone mapping saturation from 50% to 60% and checked the ‘360 degree image’ box – no idea what that does, but it seemed like a good idea. Photomatix lets you save settings to ensure repeatability between picture groups.

I ran the six HDR pictures through PTMac using the techniques set forth in my previous articles and, sure enough, the first pass was perfect as regards stitching. Except for one thing:

A thumping great big tone discontinuity as clearly visible above. Poking around it was obvious that this was at the junction of the first and last images.

Back in PTMac, I checked the box marked ‘Blend around the -180/+180 boundary’. No stopping me now!

This process generates a lot of files, so orderly housekeeping is in….order. Here’s the result:

The first 18 JPGs are the source images, followed by 6 tone mapped HDRs.The ‘.xmp’ file records the settings made in Photomatix for processing each. The ‘.mov’ file is the QuickTime video, the ‘.ptm’ file is the result of saving all data in PTMac, the ‘.tif’ file is the Enblend TIFF file from PTMac and, finally, the ‘.txt’ file is something PTMac generates and I have no idea what it does!

If you check the times, it’s 108 minutes from taking the first snap to having the movie file completed. (I saved the ‘.ptm’ file later – must be better about that in future).

Before putting the TIFF file through CubicConverter, I adjusted tones a tad in Photoshop then let her rip.

And you can click here for the result. Does Enblend rock or what? Don’t waste your time on non-Enblend stitching.

The home theater doubles as Le Gallerie Pindelski (French gives it that touch of class, don’t you think?). The pictures on the wall are by yours truly, all taken over the past twelve months, and in case you are wondering where my assistant, Bert the Border Terrier is, would you be walking between buildings with a fur coat on when it’s 100F outside? We are talking one pretty smart animal here.

Do I think I am God or what? Or, to once more quote Mr. Allen, “Look, I have to model myself on someone”.

Enough of this testing. It’s time to put all of this into practice. A real live, in the field, photography trip follows. That will involve 360 x 180 HDR pictures in the local redwood forest.

July 25, 2006

King Pano head and PTMac – Part III

Filed under: Panoramas — Thomas Pindelski @ 7:57 am

The acid test – a 360 x 180 QuickTime panorama.

In Part II I explained how to calibrate your lens/camera combination for use with PTMac, using just three heavily overlapped images.

While that article addressed use of the Canon EOS 5D and 15mm Fisheye, the approach is similar for any camera/lens combination. One caveat. If you are using a less wide lens, be sure to take the pictures so that you have sufficient overlap that a detail in the middle of the center picture appears in the left and right hand snaps also, and not too close to the edges of the outlying two images. This will make it possible to establish control points not just between adjacent images but between non-adjacent ones as well, heightening the accuracy of the calibration. Once calibrated this ‘large overlap’ approach is not needed with real life panoramas.

1 – Taking the pictures:

The deliverable is a 360 x 180 panorama, meaning a complete circle around the scene, with no breaks, and the ability to pan up to the sky and down to the ground with no ‘holes’ in the image.

For the 5D + Canon Fisheye, which has a horizontal angle of view of 91.7 degrees when mounted vertically, this dictates that six horizontal pictures be taken – theoretically you could get away with just four (4 x 91.7 > 360, if you get my drift) but that would result in such small overlap between images that the chances of a properly stitched panorama are zero. Likewise, five images might do, but control points would be too close to the edges of adjacent images, which PTMac does not like, so we go with six images. That gives a 53% overlap, if you must know, which falls under the description of ‘generous but not wasteful’ – everything your Government is not.

That means 8 clicks on the KingPano head between pictures, each click being 7.5 degrees. As the clicks are not very firm I double check my work by looking at the degree scale – starting at 0, the next five pictures are at 60, 120, 180, 240 and 300 degrees. All of this, of course, after very carefully aligning the first (or ‘anchor’) image with the accessory shoe mounted double bubble level. Now the bubbles do not stay perfectly centered as you rotate, as King Pano recognizes in its instruction sheet, but you can easily readjust the camera to dead level in each shot with the three thumb wheel adjusters in the KingPano’s base. It takes seconds to do.

Those will complete the circle but will leave holes at the top and bottom. So after returning the KingPano head to its original position, the 0 setting, loosen the big knob on top of the vertical plate and rotate the camera 90 degrees so that the lens points up to the sky. Take a picture. Loosen the knob again and point the camera down to the ground – take another picture. This one will, of course, include the tripod and KingPano in the field of view. These are known as the ‘zenith’ and ‘nadir’ images and require special processing.

Here are the six ‘circle’ images:

And here are the nadir and zenith images:

2 – Process the images:

First load the images into PTMac – load only the six images constituting the horizontal circle. We will not be using PTMac for stitching of the zenith and nadir images as the program is simply too clunky to allow that to be easily done. We will plug them in later using Photoshop, ImageAlign and CubicConverter.

Then on the Lens Settings tab, load the file you created in the calibration process:

Go to the Image Parameters tab and click on Arrange, select (Shift-Click in the left hand column) Images 0-5 and make the entries shown below:

This table reflect the fact that the horizontal images have to be turned 90 degrees CCW and the angle between each is 60 degrees.

Unlike during the calibration process where Control Points were manually entered, we will tell PTMac to automate the process. Go to the Preferences->SIFT (what the hell does that mean?) ans set ‘Number of Control Points: to 5, as here:

Go to the Control Points tab and click on ‘Auto match’ at the bottom:

PTMac will generate 5 control points for each image pair and will report back with a message something like this when it’s done (the count will be zero through 5 in this case):

Go to the Optimizer tab and select images as shown:

We are leaving the Yaw, Pitch and Roll of Image 0 unchanged – the camera was carefully levelled – allowing the keying of Images 1-5 off this anchor image.

Go back to the Control Points tab and click on Table at the lower left. You will see a table of all Control Points which you can sort in descending distance order by clicking on the ‘Distance’ column heading.

Delete the worst (biggest number) from each image pair, leaving four control points per image pair. Re run the Optimizer.

Now we need to confer the calibrated field of view and ‘b’ parameter on the optimization process. Click on FOV and run the optimization. Then click on ‘b’ and run the optimization again.

Go to the Create Panorama tab, select Enblend TIFF [.tif] for File format and click on ‘Create Panorama:’

3 – Photoshop check-up:

Load the image into Photoshop and it looks like this:

Now from the Filter menu load the Panagea plug-in and you can do a proper QuickTime preview of the image, like this:

As you can see, I have once more involved Bertie the Border Terrier in the action, but I’m afraid you cannot buy him anywhere, even at B&H, and he’s not for sale.

This preview shows the image is almost perfect, but any troublesome areas can be fixed by alternating between the preview and PTMac (Command-Tab) and adding or fixing control points in troublesome areas. The panorama previewer in PTMac (Command-E) is simply not up to the task, I’m afraid, showing overlap errors where there are none.

4 – Adding the nadir and zenith images:

While PTMac can add zenith and nadir images, once you add them and regenerate control points your nice low control point distances for the circle images get shot, and there’s no way to just generate control points for the zenith and nadir images alone – PTMac insists on redoing all Control Points. I constantly got messed up circle image stitches using this approach. As the holes left at top and bottom with the fisheye lens are very small, it’s far easier to simply defish the zenith and nadir images using the ImageAlign plug-in (see my earlier pieces on this) and insert them via Cubic Converter and Photoshop. More about how to do this appears here.

6 – Adjusting the tonal range:

Reload the final panorama into Photoshop, check for alignment and, if all is well make adjustments to Levels, Curves, tonal range as you like. If stitching is still suspect, repeat the fine tuning process above. Save the TIFF file. Then save your work file in PTMac (File->Save As) – this creates a file with the .ptm extensionj which saves all references to your images and the optimization settings. Useful if you ever want to go back and fine tune things.

7 – The QuickTime conversion:

It now remains to convert the TIFF file into a QuickTime movie. I use Cubic Converter to do this – it’s far more flexible than the straightforward function in PTMac, allowing you to dictate the starting point of the panorama when it is first loaded (mine, of course, starts with Bertie in the middle of the picture) as well as permitting constraints to be placed on the (default) huge zoom range which otherwise allows zooming in well past the resolution limits of the original.

Here is the file loaded into Cubic Converter:

Before saving it in the default Cubic QuickTime VR Movie format, I adjusted the starting point to center on Bert by moving the slider below the image. Click on Convert and Cubic Converter commences asembling the six cube faces, graphically displaying each as it does so on the cube shown.

When it’s done the display gives you Save options as so:

I elected Min/Max zoom settings of 35/70, Fast Start Grey preview (this displays grey in unloaded sections as the image loads) and the default size of 1200 x 600 pixels which is a nice fit for most screens.

If there are no zenith or naditr images present, I restrict the ‘Tilt’ setting to -65 to +65 degrees. that way the viewer will not be allowed to tilt so much that the ‘holes’ become visible.

The TIFF file is 46 mB in size, whereas the QuickTime movie is just 1.3 mB, and you can view it by clicking here. The aggregate size of the eight constituent images, each shot at the 5D’s lowest JPG setting to yield individual images sized 2496 x 1664 pixels, was some ten megabytes. Thus you can see that the QuickTime format is exceptionally economical, and the definition of the movie lacks nothing if you don’t go berserk zooming in – and I have prevented you from doing that with the Cubic Converter settings I chose.

And yes, feel free to zoom in on that all round dynamo and breed standard, Bertram the Border Terrier. He kept my morale high during the black dog days working my way through the labyrinthine software that is PTMac. As for the KingPano head, I have nothing but praise. It’s a third of the cost of the Manfrotto and it does the job, even with the heavy Canon 5D on board, thanks to the built in levellers. Well done Mr. King.

A note on processing time:

Now that everything is in order, I did a dry run to determine the processing time for a newly taken six picture 360 degree circular panorama, without zenith and nadir images. After taking the pictures, here’s how it went:

Load images into PTMac, auto-generate control points, run optimizer and generate panorama – first pass: 8 minutes.
Examine result in Photoshop using the Panagea plug-in and add control points as needed (6 added): 5 minutes
Regenrate control points and new panorama – second pass: 6 minutes.

The result is perfect.

Total processing time for six 1 mB files on a PPC 2 gHz, 2gB iMac: 19 minutes.

Now that’s what I call a good return on investment of time!

You think that’s long? Well, consider this. In 19 minutes Ansel Adams was still trying to remember where he left that bottle of pyro developer which he mistook for wine the other evening and when he did find it, what has he got three hours of dodging and burning later? Lung cancer and a lousy black and white print of some damned old rock in Yosemite. Gimme a break.

July 23, 2006

King Pano head and PTMac – Part II

Filed under: Panoramas — Thomas Pindelski @ 8:41 am

Three days of hard labor = one perfectly calibrated camera + lens.

There’s little use in setting up the King Pano head correctly if your camera/lens combination is incorrectly calibrated for the PTMac application.

PTMac comes with tons of lens/camera database settings which you can just load, but my experience suggests that you really should calibrate your particular body + lens, as calibration will adjust for your combination’s anomalies as well as for the offset of the sensor in the camera body. I cannot stress enough how important it is to do this, and as I have learned from my mistakes, you should be able to do this in a couple of hours by following the instructions below. This took me three days….

What follows is specific to the Canon EOS 5D + Canon 15mm EF Fisheye lens, but adapting these instructions to your camera/lens combination is a simple matter. It doesn’t help that the one set of lens parameters I found on the web for this combination (it does not exists in the PTMac database) did not work for my particular setup.

The problem with PTMac is that this great application is hampered by confusing instructions. The vendor is clearly very conscientious in responding to queries, but the result is that the magic sauce is in several places – the application’s Help file, the vendor’s forum and various FAQs also on the vendor’s web site, not to mention all sorts of chatter on Google. What follows is self contained – everything you need.

1 – Taking the calibration pictures

With the camera mounted in the King Pano as shown here, go to an indoor setting with as many horizontal and vertical lines as possible. Indoors is preferred to outdoors as you have total control of your environment – no wind movement, constant light, etc. – and you will be much closer to your subject, which makes for more critical calibration and, chances are, the setting will be replete with strong horizontal and vertical lines. Except for geodesic dome types, most homes tend to be rectangular.

I have my 5D’s custom setting (’C’ on the mode dial) set for ISO 200, 1/125, f/8, color balance set to sunlight (not AWB), JPG quality set to the lowest possible (you want small files to speed up PTMac processing), auto rotate Off and the lens set to manual focus. Set the focus between the 3′ and infinity marks, adjust the shutter speed for exposure, leaving the aperture at f/8 and take a trial picture to check everything is nice and bright and easy to see. One half stop overexposed does not hurt. Now set the KingPano to the zero degree click stop and orient the camera + tripod so that the camera points to the leftmost side of the scene.

You will be taking just three pictures – each three click-stops apart on the KingPano – meaning 22.5 degrees as each click stop is equivalent to 7.5 degrees. Now while the full frame Canon 15mm fisheye will cover a 360 degree circle in just 6 shots (60 degrees between shots), we are opting for a huge overlap in the interest of best calibration.

Now level the camera carefully using the accessory shoe-mounted double bubble level I illustrated here . You want the camera to be level, so disregard the bubble level on the King Pano which will give false readings owing to the slight sag of the assembly from the weight of the 5D. That’s not the manufacturer’s fault. To make the King Pano much sturdier would greatly increase bulk and weight.

Take three pictures spaced three clicks apart.

2 – Load the pictures into PTMac:

The screen looks as follows:

3 – Guesstimate the lens settings:

Go to the Lens Settings tab and set the Lens type to Full-frame Fisheye[Rectangular] and the Hor. Field of View to 91.733 degrees. This will change as we calibrate but that’s Canon’s data sheet spec for the fisheye.

Note the Focal length multiplier is set at 1.000000 as the 5D is a full frame camera. Other Canons may be 1.3x or 1.6x, Nikon DSLRs are 1.5x and so on. You know your number. Leave everything else unchanged.

4 – Fix orientation:

Now go to the Image Parameters tab and this is what you will see:

The left hand column of images shows the full frame shot, the next column how these images are aligned by PTMac. Two things are wrong. The images are turned through 90 degrees and all overlap exactly.

Click on Arrange at the bottom of the screen and adjust the variables as shown below:

What you are doing is telling the application to turn every image 90 degrees CCW and to make the spacing between each 22.5 degrees, which is what the spacing was when you took the pictures.

Your screen now looks like this:

The pictures in the ‘Warped’ column are now turned upright and offset from one another.

5 – Set preliminary Control Points:

Now go to the Control Points tab. A Control Point is nothing more than two indicators – one in each picture – telling PTMac that those points either constitute identical points on those images or are points between horizontal or vertical lines. We will establish vertical line control points first – these tell PTMac about the Fisheye’s distortion.

In the following picture one Vertical control point has been placed at the top left of the vertical door jamb in Picture 1 and the second, in Picture 2 where the door jamb is most bowed from fisheye distortion.

You must also click the entry in the ‘Align’ column in the data box at lower left and choose Vertical Line to tell PTMac this is a vertical line control point pair.

Now you have to add five more control points which are spot Control points – remember to elect the Spot choice (a circle with a dot) in the ‘Align’ entry for the first of these – PTMac remains at whatever Control Point type was previously selected. Once chosen, a spot Control Point will be somewhat confusingly shown as ‘H+V’ in the Align column. No one ever accused engineers or software writers of being good at ergonomics, the guys at Aperture excepted. This is how it looks after adding five spot Control Points between Images 0 and 1 – strongly defined image details have been chosen not too close to the edges. PTMac does a nice job of magnifying the Control Point cursor in the small panels below the pictures as you move the mouse, clicking first in one image then in the other:

Now click on the right arrow key to the right of the Image 0 drop down menu at the top left and Image 0 becomes Image 1 on the left. Image 1, on the right, becomes Image 2. All Control Points have disappeared as none have yet been established between this image pair. Repeat the process – one set of vertical Control Points and five spot Control Points:

Now in each pair of images establish a pair of Horizontal Control Points – the example below illustrates point 7 between Images 1 and 2, at the top of the picture. Remember to elect the Horizontal Line choice in the Align table entry, as has been done here:

Finally, chose Image 0 for the left hand pane and Image 2 for the right. Create at least one control point which is identically placed between these non-adjacent images. You can do this by virtue of the huge overlap the 22.5 degree spacing affords – common information will apear in each of the three pictures.

6 – First Optimizer run:

The first Control Point pass is done. Go to the Optimizer tab and check the ‘Yaw:’, ‘Pitch:’, ‘Roll’: and ‘Use Control Points of:’ boxes as shown below. You have to click well to the right of the word ‘Image0′ and so on to get the check mark (or ‘tick’ to Her Majesty’s subjects) to show :

Here’s what the terms mean. Imagine you are on the Titanic, doing your Kate Winslet thing, facing the prow (front) of the ship, your arms outstretched horizontally to your sides, pointing to the horizon on either side. When the ship Rolls, your arms go up and down relative to the horizons. When it Pitches, the prow goes up and down in your dead ahead line of vision. When it Yaws, the prow moves from side to side as you look forward dead ahead. Just don’t ask me about port and starboard.

Click on the Run Optimizer box at the lower right. When the program is done, click the Field of View entry in the Lens parameters: box and run the Optimizer again. Then click the ‘b’ entry and run the Optimizer. Then click ‘a’ and ‘c’ and run the Optimizer. Finally, click both ‘Hshift’ and ‘Vshift’ and run the Optimizer one last time. By running the optimization process in multiple steps you heighten the accuracy of the result, as the program learns about your lens’s distortions and the camera’s sensor offset – the latter a normal result of manufacturing tolerances (Canon is emphatically not Leica in this regard!). Baby (optimization) steps beat one giant leap anyday.

Now take a look at the Lens Settings tab – you will see something like this (your numbers will differ):

Reflecting your optimization, PTMac has entered the various parameters in the boxes for your camera/lens combination.

We are not done. The critical point is now reached where you must fine tune your control points to get them as accurate as possible.

7 – Save your work:

But first, so as not to lose anything, click on the Lens Database box and you will be presented with this screen:

Click on Lens Database again and click on your saved settings’ name and you will see the following:

8 – Fine tune your control points:

Now we need to examine Control Points, so go to the Control Points tab an click on Table at lower left. This is what you will see:

We want to get the amounts shown in the Distance column as low as possible – below 2.0 ideally.

Click Goto and PTMac will go to the the images with your control point pair. Click the box above each picture to choose 100% display – that’s the largest you can get and allows you to critically reposition control points with the benefit of greater screen detail. Here’s how it looks. You can pan around with the slider bars at the sides of the pictures or Option-Drag the mouse cursor to move the image. Click the padlock in between the image tops to decouple their movement.

You can reposition any control point by grabbing it with the mouse pointer and click-dragging it. I cannot stress enough how critical this step is to a proper calibration. Go back to the table, chose the next over 2.0 entry in the list (none change until you re-run the Optimizer) and repeat. Keep doing this until you have addressed all point control points with a distance reading over 2.0. By all means check your horizontal and vertical control points also, but beware that PTMac gives wild readings for these which are not meaningful to the fine tuning process. If they are correctly set – meaning exactly on their respective vertical or horizontal lines – leave them alone.

9 – Now fine tune your Control Points again:

Now repeat the Optimizer routine above, doing it in many steps as before. Check the Lens Settings tab and you will see the data have changed, so resave them as before:

Now go back to Control Points and again re-tune any spot control points over 2.0. Keep doing this until all are under 2.0. It takes time. Believe me, the pay back in time saved from a correctly calibrated camera/lens combination is worth it. Now resave the lens settings.

10 – Preview the panorama on the screen:

You can now preview the panorama on the screen with Command-E, but be warned that the previewer is very crude and does not properly show alignment. On no account should you even think of manually dragging the images in the previewer screen to secure better alignment. You will waste a lot of time and you will fail.

11 – Generate the panorama:

You must have Enblend (on the Kekus.com web site) installed in a directory on your hard drive and you must input the path to Enblend in the Preferences settings for PTMac, otherwise the panorama generation will fail.

Click on the Create Panorama tab and select Enblend TIFF in the drop down box. This is the only setting that results in the best possible blending of stitches between adjacent pictures. Leave everything else alone and click Create Panorama at the lower right.

The panorama creation process takes a while – with these three small files (each ~800k) on my 2 mHz, 2gB PPC iMac it took some three minutes – this is what you will see towards the end of the process:

12 – Get the dog out – sorry, I mean Photoshop:

Load the TIFF file generated by PTMac and Enblend into Photoshop and this is what you will see:

Note that sophisticated man about town, Bertram the Border Terrier, earning his modelling fee. A dog far superior to anything from Adobe/Macromedia. You can use other breeds, of course, but I find the Border Terrier works best.

13 – Install the PanoPreviewer plug-in:

To allow previewing of this in QuickTime format, go to Panagea’s web site and download and install the PanoPreviewer Photoshop Plug-in. Restart Photoshop, reload the image and you can preview the image in its full QuickTime glory by selecting the plug-in from Photoshop’s Filter menu. This is how it looks:

14 – Check for skew and stitching errors:

Pan around and check the whole thing. If your picture is skewed to the horizontal you need to recheck your camera levelling and do this all again. There are no short cuts. If you see any stitching errors, go back and rework the control points. If that still fails, recheck your KingPano setup, especially checking nodal point and alignment settings. The subject above is very, very challenging with a multitude of strong overlapping details very close to the lens. The door is but eight feet from the camera, despite appearances. If it works with this sort of subject, it will work anywhere!

Here are the final Control Point distance statistics (identical to the finally saved data in the lens database on the Lens Settings tab) after all this calibration:

Why PTMac has determined the Field of View (FoV) to be 134.9 degrees when the vertical FoV of the Canon Fisheye is 91.733 degrees beats me but, hey, it works!

You can see that the 5D’s sensor is offset some 15 and 12 pixels from dead center (the Hshift and Vshift numbers). Yours will be different which is why you should calibrate your camera/lens and not depend on someone else’s settings from a table. It may be that full frame sensor cameras with fisheyes are just more sensitive, I don’t know, but it is the only approach which worked for me. The result is simply perfect – the joins are impossible to see.

In Part III I will look at creating a full 360 degree panorama using six images at 60 degree angles to one another plus a nadir and zenith image. Right now, if you scroll up or down you will see holes where image data are missing, like so:

By the way, here are my final camera/lens calibrations – these are unique to this particular camera and lens; substituting another 5D body (I should be so lucky!) will not do, as the sensor offset will be different owing to manufacturing tolerances:

15 – View the result:

Click here to view the QuickTime movie created from the three images stitched above. The file is 600kB. As you will see, it’s only a partial panorama as images were only taken over a narrow range of Yaw.

There. I finally used a technical word! You can take the lad out of engineering, but you cannot take the engineer out of the lad.

You can pan with the mouse cursor in all directions and zoom in and out with the Shift and Control keys. You will need QuickTime on your computer – all Macs come with it installed.

16 – Buy an Apple computer is you don’t have one:

I believe there is even a version of QuickTime available for download from Apple for those poor unfortunates who have yet to see the light – they are called Windows users – but you need a Mac to use PTMac, so now’s the time to switch to one of these great machines. Each lock-up on your Windows machine costs you 30 minutes. Say your time is worth $50/hour. A new 17″ iMac with the maximum 2 gB of memory installed costs $1,600. So that’s 64 lock-ups or two months’ of use of Windows. Get a grip!

July 21, 2006

King Pano head – Part I

Filed under: Panoramas — Thomas Pindelski @ 6:49 am

Calibration for Quicktime 180×360 panoramas.

Having got the panorama bug a while back, I finally took delivery of the King Pano head yesterday. Orders are currently backlogged three weeks, testifying to the popularity of the product.

The King Pano camera base is screwed to the camera with the provided 1/4″ slotted screw and a screwdriver. Not good, as I want to keep the Manfrotto QR plate on the camera at all times, and the thought of messing about with a screwdriver in the woods is not something I wish to contemplate. So I left the QR plate on the Canon 5D and fitted a QR tripod base to the King Pano camera baseplate, which now looks like this:

The Manfrottoo QR tripod base fitted to the King Pano camera baseplate

A camera QR plate is then fitted to the base of the King Pano. This combination allows the camera to be fitted and removed to the King Pano in a second or two and the King Pano to likewise be attached or detached speedily to or from the tripod. In this way the King Pano can remain undisturbed between panorama projects.

When it came to centering the camera vertically over the bubble level, I had to rack the vertical plate all the way to the back to properly center the camera over the built-in bubble level; had I not used the QR plate the setting would have fallen nearer the center of the range of movement. As it is I just squeaked in!


The plate is racked as far to the left as it will go

The next step is to set the nodal point – I only need to do this once and as my camera/lens combination will be the 5D/Canon 15mm fisheye. Different lenses have different nodal points. The idea is that, as the camera is rotated, the relative spacing of near and distant objects remains constant. This means the camera/lens combination is now rotating about the nodal point of the lens (the point where light rays invert en route to the film/sensor), thus eliminating parallax which plays havoc with subsequent image stitching attempts.

Here’s the correct setting for the 5D/15mm Fisheye:

The left scale shows 102mm at the upright, the right 52 with the King Pano attached through the right hand threaded hole.

I set the camera on a tripod with the edge of the office door some three feet away. The ceiling lamp is 12 feet distant with the window some 75 feet away. Here are the results with the camera rotated to place the window edge to edge:


Four sections of pictures with the lamp at right and moving progressively left across the frame

Note the constant spacing between lamp and door edge and between the window and door edge. The nodal point is correctly set.

Here’s how it looks on the tripod – the nodal point with the fisheye is very close to the front of the lens; for more normal lenses you would expect the nodal point to be well within the body of the lens dictating that the lens be further forward.

Finally, when it comes to levelling I consider the built in bubble level to be the wrong way to go. You want the camera aligned to the ground, not the King Pano. The relatively heavy (compared with cropped sensor cameras) 5d causes the King Pano to flex a tad, meaning that the bubble level no longer reflects the alignment of the camera, and as I tend to believe that Canon’s hot shoe is exacty parallel to the base of the camera body, I bought a neat little double bubble level which can be shoe mounted. It comes from B&H for a few dollars:

Bubble level ensures the camera is dead level. That’s what you want.

Here’s the part number:

Lighter cameras probably do not need this as they will distort the King Pano far less than the heavy 5D.

By the way, the King Pano will not work with the big Canon DSLRs with the battery grip – the body is simply too tall to permit centering of the lens over the bubble level. To accomplish that the vertical plate would have to be quite a bit taller which would probably compromise stability too much in any case.

So now that things are set just so, Part II will address lens calibration for use with the PTMac software used to create QuickTime panoramas.

Powered by WordPress