Easy Hackintosh wi-fi

Never easier.

The ease with which full function wi-fi can be installed in a Hackintosh has never been greater or the cost lower.

What follows assumes you use an Airport Extreme (AEX) or Time Capsule (TC) wi-fi router. My AEX is a Gen 1 (2008), single band only, but Gen 4 AEX/TCs and later are dual band, meaning that they can support both 2.4GHz and 5GHz (802-11n) devices simultaneously. With the advent of iPhone 5 most of my ‘go to’ devices now support 5GHz, including Hacks, iPads and iPhones, so dual-band is not a requirement. We do have two devices in the home which are 2.4GHz capable only, the xBox 360 and the old iMac G4, and these are set to receive their broadband signal directly from the A&T Uverse router which is 2.4GHz, 802-11b. As usual, the Telephone Company is a decade behind. Everything else looks to the Airport Extreme and now uses the 5GHz band.

The Hackintosh wi-fi issue has become much simpler over time. First one used an external USB wi-fi dongle with the associated (awful) Realtek software. Then TP-Link came along with internal PCIe cards which delivered Airport capability and, later, when OS X Lion came along, AirDrop functionality after you messed with Pref files some. You would buy the TP-Link PCIe card then an aftermarket wi-fi card which was an SOB to install in the card owing to the fiddly connectors. After application of cable ties and solder for the joints you destroyed, the card worked fine.

The other day I learned from the excellent Tonymacx86 Hack forum that TP-Link now makes a dual band wi-fi card which integrates the PCIe card and the wi-fi card. The model number is TL-WDN4800 and Amazon has it for $35 – which is less than the previous card + wi-fi card combination cost and is a plug-and-play installation in any Hack. B&H Photo also carries the card for a similar price. (Prices seem to fluctuate daily by a few dollars). The card comes with regular and low-profile brackets, the latter for use in Hacks built in Micro ATX cases.

Here are the old and new cards, antennas removed:

And here are the before and after results on one of my Hacks – the one with the botched old card installed, one antenna missing, replaced with the new card. A two minute job:

Clearly, having three working antennas does no harm. Comparing the speed of the new card with a properly installed old one at a like location, the new card consistently reports download speed 10% higher than the old, possibly attributable to superior antenna design.

There is but one quirk. The Airport Extreme defaults to channel 149 with 5GHz wi-fi, whereas the new TP-Link card only goes up to 48. So, go into Applications->Utilities->Airport Utility->Airport Extreme->Edit->Wireless->Wireless Options and set Radio Channel to 48, then Save. Your new TP-Link card will now be visible to the Hack in which you installed it.

Setting the Channel to 48 in Airport Utility.

Hackintosh goes Kepler – Part II

Benchmarks and observations.

Ace computer builder FU Steve reports on benchmarking results for the HP100, now renamed the HP100Plus.

Power consumption:

The first thing I did with the Hackintosh HP100Plus was to finally measure real power use. Theoretical tables where you list your components seem to assume that everything is running full bore simultaneously, which is clearly unrealistic. So I used a Kill-a-Watt power consumption meter (Amazon – $20) and inserted it between the HP100Plus (computer only, not the displays) to determine real, live power use in a variety of situations. HP100Plus uses a stock 500 watt power supply which has done fine with the old nVidia 9800GTX+ card and the new nVidia GTX 660 is benchmarked at a lower wattage than the old card. That means power use should not be an issue, but nothing beats this test method.

The Kill-a-Watt monitoring real time power use.

Here’s a table of findings:

HP100Plus power use.

So none of these activities remotely tax the 500 watt power supply, with the most demanding being the Unigine rendering test which uses the most sophisticated graphics around. To put these data in perspective, the CPU’s operating limit is 191F, and HP100 is running the Core i7 CPU at 4.3GHz, or 23% faster than the stock frequency of 3.5GHz – a modest overclock made possible by the use of the excellent Coolermaster 212Plus after market CPU cooler. The rest of the innards include a Gigabyte Z68 motherboard, a Core i7 Sandybridge 2600K CPU, 16GB of 1600MHz RAM, two SSDs both 120GB (one SATA 3, one SATA 2), two 1TB 7200 rpm SATA 3 HDDs, a USB socket card, and a wireless Airport card. Bottom line? Even for gamers, 500 watts should be sufficient.

Benchmarks:

Traditional GPU performance benchmarking apps like Cinebench do not cut it. The app fails to test all the great new technologies in the Kepler cards being put out by nVidia. The GTX660 has some 2.54 billion transistors, compared to a mere 800 million for the Core i7 CPU, and four times the memory of the old 9800GTX which HP100 used to use. The new standard in GPU performance measurement is Unigine which has immensely sophisticated video graphics – right down to fields of swaying grass blades – so that is what I used. Unigine refused to run on the 9800GTX+ as that card simply cannot hack it, so there are no comparative data.

In addition to installing nVidia’s drivers for the GTX 660, as explained yesterday, I also installed their CUDA drivers which make the best use of the latest rendering technology in the new card. CUDA speeds complex math calculations and will halve the time in ripping and encoding a movie, typically from 14 to 7 minutes. For reference, my system rips (no compression) a 4GB movie in 6.4 minutes.

Luxmark is another rendering benchmark tool which I ran to simultaneously test CPU and GPU functions.

And finally, while Cinebench is outdated, I ran the GPU test this one last time and the HP100Plus came in top of the heap.

Here are the screenshots:

Note that in the Cinebench run I have also tested the integrated HD3000 GPU which comes with every i5 and i7 Sandybridge CPU. The current Ivybridge comes with the better HD4000 GPU and can be expected to maybe deliver twice the framing rate of the HD3000. Call it 25fps, still leagues below what the GTX 660 delivers.

The CPU speed for all tests was 4.3GHz – not all the apps report it correctly. Like tests without CUDA installed came in a few percent lower. Not dramatic, but why not install this enhancement?

Finally, Novabench is yet another benchmarking app and in this case I was able to run it on the old and new cards.

Novabench – 9800GTX+ GPU

Novabench – GTX 660 GPU

The significant change here is the doubling of the Graphics Tests score, much as predicted on theoretical grounds in yesterday’s piece.

Lightroom 4 and Photoshop CS5:

In practical use there is little change from the 9800GTX+. The old card was already blindingly fast in these relatively undemanding tasks. The main advantage of the new card is that it will be able to far better drive larger monitors. Thomas’s three Dells are 1680 x 1050, and good 27″ displays are now sporting 2560 x 1440 pixel densities. That’s twice the number of pixels per square inch, and a lot more square inches to cover.

Other sockets:

The GTX 660 comes with two DVI sockets, one DisplayPort and one HDMI. Thomas currently has two Dells connected to the two DVI sockets with the third driven via USB using a DisplayLink adapter. I have read that the HDMI and DisplayPort outlets can be used at the same time as the two DVI ones to power two additional monitors, but until he gets the cables to test that I cannot comment. The advantage of this approach is that if it works, higher resolutions can be supported, as the DisplayLink is limited to 2048 pixels on the long side. That said, it has been super reliable, requiring only the occasional driver update as Apple introduces new major OS X releases.

Use with MacPro:

The GTX 660 only works with OS X Mountain Lion. It is not supported in Lion or earlier versions and it seems nVidia has no plans to release drivers for those. The latest builds are rumored to include nVidia drivers and at least one much maligned and disregarded MacPro user has reported success in installing the GTX 660 in a MacPro chassis with the latest version of 10.8.2 (with supplemental updates). I have not tested it but any MacPro user still poking along with older video cards should try the upgrade or, better yet, build a HackPro.

PCIe x16:

To make sure you are using the fastest 16-bit bandwidth to communicate with the GTX 660, make sure to turn off TurboSATA/USB3 in BIOS – Integrated Periipherals. Your USB3 devices will still work fine if the USB3 driver is installed. By doing so you will ensure that the x16 data path is used, rather than the x8, which will be the case if only one card is installed and the BIOS is wrongly set. Also make sure that the card is in the x16 slot, not the x8. On the Z68 Gigabyte motherboards, the x16 slot is the one nearest to the CPU.

PCIe = x16 correctly set.

Does it make a difference? Yes. In the Unigine bench test an occasional minor stutter at x8 disappears at x16.

Use of two SSDs:

HP100Plus uses two 120GB SSDs which store the OS and all apps, cloned nightly using CarbonCopyCloner. I highly recommend this setup as it makes major upgrades, like this one, very easy. The backup drive is used as a test bed and if anything blows – as it usually does – can be restored in a matter of two minutes using an incremental restore using CCC. I mean two minutes! Ask me how I know …. Life is simply too short to do major upgrades using spinning disk drives.

Cold start:

The time from the Apple logo splash screen to the Login screen is 14 seconds. For comparison the 2012 MacBook Air takes 10 seconds.

Warranty:

The Zotac USA warranty is for two years. No need to waste money on AppleCare ….

* * * * *

Thank you, FU Steve. Here’s until the next time you decide I need something upgraded.

Update March, 2013:

Apple has just released OS X 10.8.3 which now includes native GTX660 support for nVidia cards, whether EVGA, Zotac, PNY or any other brand. They did this as one of the 2012 iMac variants use the 660M GPU, the mobile (and less speedy) version of the real thing. Once you upgrade to 10.8.3 you can delete these two lines from your Boot Drive/Extra/org.chameleon.Boot.plist file on your Hackintosh as the presence of native drivers no longer requires the Hack to be informed that a 660 Kepler card is installed:


The above lines can be deleted.

nVidia also released an update to its CUDA driver, which you can download through the related System Preferences pane, after which you will see this:


Latest CUDA driver.

The above System Information display is also updated to reflect the use of native nVidia 660 drivers:

I can confirm that all works well with 10.8.3.

Hackintosh goes Kepler – Part I

More graphics performance.

The bronze Zotac GTX 660 with the geriatric 9800GTX+ in the foreground.

The roar of the tuned V8 in the driveway followed by four loud raps on the door could only mean one thing. Ace computer builder FU Steve was dropping around to regale me with the latest and greatest in the Hackintosh world. When we last saw my Hack, the HP100, it was sporting an overclocked Sandy Bridge i7 CPU running at 4.3GHz, an ancient Nvidia 9800GTX+ graphics card with 512MB of memory, 16GB of 1600MHz RAM and three Dell Ultrasharp displays. Used mostly for my day job of managing money, it is a blast to use with Lightroom 4 and Photoshop CS5, never so much as missing a beat.

But FU was not about to leave well enough alone.

“Come on pal, we’re off to Fry’s in Palo Alto to pick you up a Kepler graphics card.”

“Eh! what?”

“Well, if you got your nose out of your spreadsheets now and then you would know that your graphics performance is indistinguishable from a bilge pump. Both suck.”

Well, it seems fine to me, but who am I to argue with a man who eats silicon for breakfast?

“Before we leave, be sure to download a fresh version of 10.8.2 to your MacBook Air. It takes a while and we will be needing it for the fresh system install we will be doing for the new card.”

A brand new roadster graced the driveway of the modest abode, and a question to FU about cost returned an insouciant “Oh!, a few dozen AAPL shares”. Given that the man has been accumulating these since El Jobso was knee-high to a grasshopper, that translates to ‘Free’, or as close as it gets.

“I had the manifolds ported and polished” quoth FU, as he blipped the throttle to the disgust of all within a couple of blocks.

As we hit the tunnel joining the 92 to the 280, FU hit his usual 120, shifting down as we hit daylight on the most beautiful freeway in the US. After the backfires on the overrun I leaned over and asked:

“So Kepler, Schmepler, why do I care?”

“Because, my dear boy, one day you are going to junk those 1680 x 1050 Dells of yours and get a coupla 27″ 2560 displays. Trust me, you don’t want to be poncing about with that 9800 GPU of yours when you do. Kepler cards are Nvidia’s state-of-the-art and they just came out with the economy priced GTX 660, perfect for all who do not do 3D rendering. Your graphics speed will double.”

I buttoned it, visions of vast outlays dancing in my head as we passed seemingly endless miles of real estate on the east side of the freeway, all belonging to that academic powerhouse – and dormitory for half of Beijing – known as Stanford University. Rumor has it that railroad baron and financier Leland Stanford had offered snotty Harvard a chunk of coin to endow a few buildings and scholarships. They had turned their Brahmin noses up at him and his scruffy appearance, so he built Stanford instead. Old man Stanford would doubtless be appalled to learn that his creation was now the leading repository of Chinese intellectual property theft. Rocketing past the radio telescope and the linear accelerator, we exited on Page Mill Road at a brisk 90 as FU slammed on the binders for the left turn onto Page Mill and Fry’s on the other side of El Camino Real.

“Tell me, FU”, I asked, “what do you do when the cops pull you over?”

“Ain’t gonna happen pal. Ever check my license plate? 11-99 Foundation, dude, 11-99 Foundation. You help the cops’ pension fund along and they look after you.”

Hmmm.

Parking in a handicapped spot at the entrance – “They always get the best spots” – FU took a sharp left on entering Fry’s and made for the GPU section.
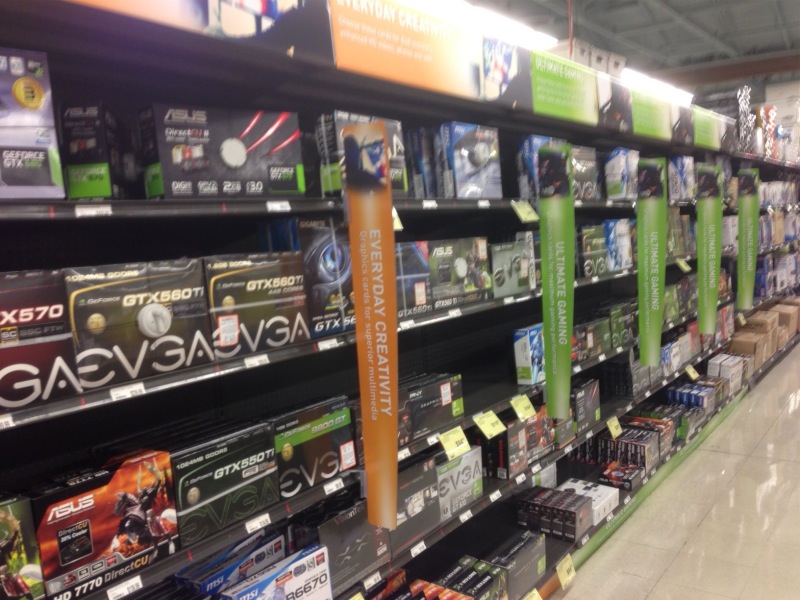
GPUs at Fry’s.

“I say, FU, shouldn’t I be buying at Amazon? You know how frugal I am.”

“Screw Amazon, mate. Since they started charging us hard-working Californians sales tax, Fry’s has become competitive on price plus we get to rack the V8 out on the freeway.” In truth, it was a perfect California day and there was a light spring in my step. FU was onto something.

“Now here’s the scoop. Nvidia came out with the GTX 660Ti a while back and it’s the bee’s knees for video. But as video is not your thing their latest, the GTX 660, will save you $80 and still double your speed. As for who comes up with their naming conventions I can only think it’s some schmuck in Redmond.”

We had our choice of EVGA, PNY and Zotac and I started reaching for the EVGA – the EVGA 9800 having served so well – when FU stepped in.

“Get a life, matey, get the cheapest one. All use the same Nvidia chips, just packaged in different wild colors for the zit set. Here, grab this Zotac at $229. After the $15 rebate, which I doubt you will ever see, your price with CA sales tax will be $235. Up yours, Amazon. Get yer plastic out.”

It was such a perfect day that even FU noticed, never exceeding 85 on the way back, though he did chuck it about a bit on Canyon Road coming back down through Hillsborough, almost taking out a couple of dowagers out for their afternoon constitutional.

“No prob, dude. Inherited wealth. Parasites. Never worked a day in their lives.” was all I could get out of him.

“Now here’s the thing with these Keplers. They are pretty new and a bit of a pain to install, so rather than go through with that we are going to do a clean OS X Mountain Lion 10.8.2 install on your boot SSD, after checking it’s cloned and bootable to the backup SSD, rather than futz with incremental changes. The long way is always the shortest with these things.”

So while FU proceeded to open the HP100 and pull the 9800GTX+ which has served me so well, he instructed me how to make a bootable OS X installer flash drive using the MBA and TonyMac’s tools, specifically Unibeast.

The new card is considerably shorter, making access to the poorly designed horizontal SATA sockets on the Z68X-UD3H-B3 (rev 12) motherboard easier. Further, though it sports two fans to the 9800′s one, it’s incredibly quiet. Technology marches on. FU took all of three minutes to remove the old card, plugged in the 6-pin power supply to the Zotac, but left the Zotac loose.

“We will boot without a graphics card, using the native HD3000 GPU in your Sandy Bridge i7. Then we will add the tweaks for the new GTX 660 and you’ll be off to the races”.

We repaired to the garden to blow the froth off a couple while the MBA did its thing preparing the flash drive installer.

“The other thing you have to do with the GTX 660 is to be sure to download and install Nvidia’s 10.8.2 drivers. These will come native in 10.8.3 as Apple uses the same GTX 660 in its latest iMac’s (needless to say, these remain unobtainable thanks to another Cook cock-up) and then run TonyMac’s Mountain Lion Multibeast, setting GraphicsEnabler=No in the system options. Forget that and the Hack will not boot. That changes the chameleon.boot.plist file so that it works. After we have HP100 running on the HD3000, we will make those changes, insert the Zotac GTX 660 and off we go.”

I let him ramble on happily, making for another couple of beers. ‘A man has to know his limitations’, as that jerk once put it.

Once the installer was ready, some 20 minutes plus the time to re-download a fresh version of Mountain Lion, it was plugged into an available USB socket on the HP100, booted from and the installation process in the above Unibeast link followed. FU then installed the new Nividia drivers, or ‘kexts’ as Apple calls them, did the GraphicsEnabler=No step using TonyMac’s Multibeast app, restarted and, hey presto! We have the Kepler GPU running.

Here are the theoretical comparison from Hardware Compare:

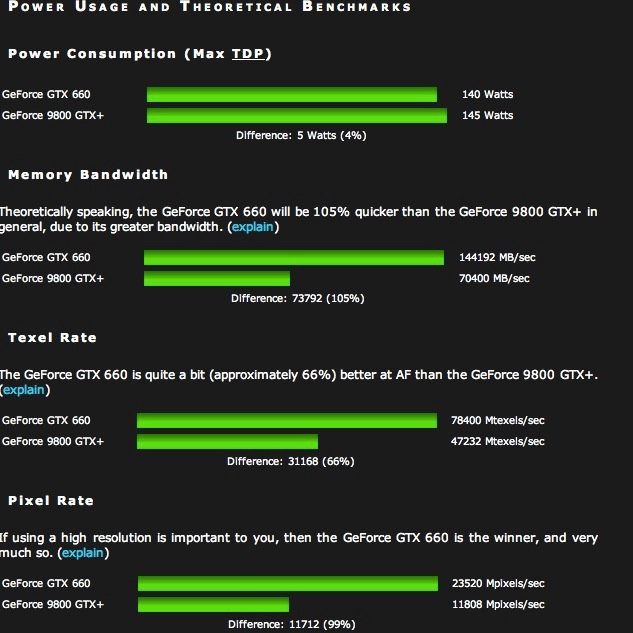
Thanks to reader PB for the source.

Non-trivial performance increases. Note especially the last metric addressing performance in high resolution applications – meaning with bigger, more pixel-laden displays. This is a key reason Apple has used the GTX 660 in it’s high definition Retina Display MacBook Pro laptops, albeit using the lighter-duty GTX 660M mobile variant. (Can you say ‘overheating’?) In addition to sporting two DVI connectors, the GTX 6600 also has HDMI and DisplayPort outlets so that the USB connector HP100 has used for the third display can be removed and a DisplayPort cable substituted, allowing the enhanced performance to be delivered to all three displays. This remains to be tested.

As the GTX660 uses slightly less power than its predecessor, no changes were made to the stock 500 Watt Antec power supply used by HP100. I’ll publish total real (rather than theoretical) system power use in Part II.

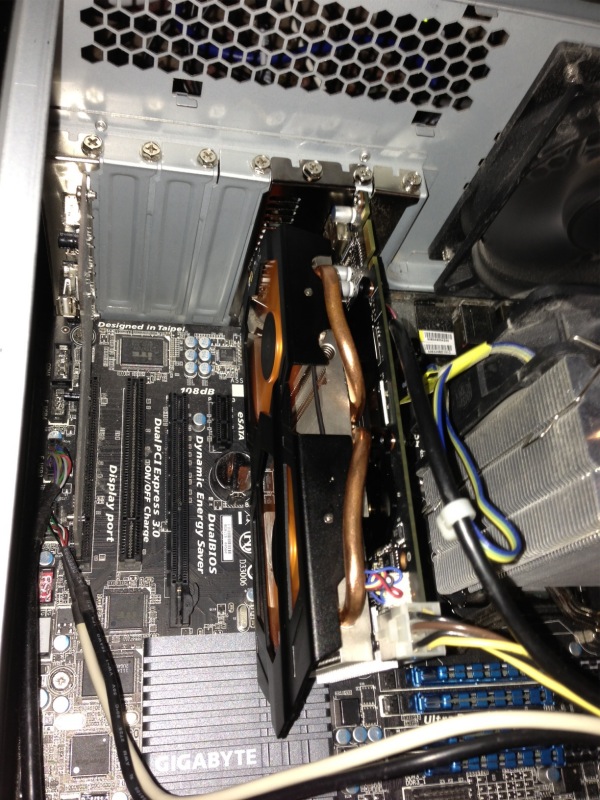
The Zotac GTX 660 in the HP100. Lots of room.

I’ll publish test data in Part II, along with subjective operating impressions using Lightroom 4 and Photoshop CS5.

Mountain Lion on the Hackintosh

Shades of Microsoft.

While I very much doubt Steve Jobs knew an operating system from an operating table, his tyrannical, bullying rule of Apple Corp. ensured a high level of attention to detail on the part of his workers. As the guys on the disastrous MobileMe product team, who are now holding up cardboard plaques at the corner of Atherton Avenue and El Camino Real proclaiming “Will Work for Food”, will attest.

Such were my thoughts when installing Mountain Lion on the HP100 nuclear powered Hackintosh chez Pindelski. The download price was right, as in free, as my 2012 MacBook Air had grandfathered the freebie. Getting the freebie was a mess of passwords and poor instructions for which I had to wait 48 hours, the sort of thing Bill Gates revelled in, but I got there. Installation on the MBA was uneventful and after thoroughly wringing OS Mountain Lion out with all my favorite apps (especially LR 4.1 and PS CS 5.1) I concluded it was time to give the big guy a spin.

The Hackintosh thing requires that a major release be downloaded from the AppStore and the installation files transferred to a separate bootable medium. (Minor releases are a simple AppStore download). Tonymac’s Unibeast transfers the downloaded files together with a bootloader to the partition of choice. Restarting from the new partition saw Mountain Lion installed to my boot partition in some 10 minutes (SSDs are fast!) and a restart resulted in …. another Microsoft moment. Most things worked well, but Mail was a spinning beach ball much of the time and Contacts (the Address Book of yore) refused to show. So I did a second install, identical to the first and found myself in the land of sweetness and light. Shades of Windows.

The CPU is at 4.4GHz, but 4.3GHz is as high as OS X can show.

The first Geekbench CPU performance score was a ghastly 5500 – I expected 15,000 or so on the overclocked Core i7 SandyBridge. A moment later I had installed NullCPUPowerManagement.kext using Tonymac’s Multibeast as well as the HDARollback and Realtek sound kexts to restore sound functions. Another restart and the Geekbench report was back over 15,000 and Cinebench came in at almost 30fps. Slower than the 38 I was getting in Lion, but it may be that the Nvidia 9800GTX+ GPU, ancient as it is, is beginning to show incompatibility issues. Still, for my purposes (LR and PS) CPU speed is far more important than GPU throughput, given the CPU-intensive nature of those apps.

Geekbench and Mountain Lion.

Cinebench with Mountain Lion. CPU speed is shown correctly.

So, overall performance is largely unchanged compared to Lion 10.7.3 and some handy features are added. One note – Photoshop required a large Java update when first launched, which took a few minutes. Now it loads faster than ever, under 2 seconds, and Lightroom remains as fast as ever.

Dictation works well (HP100 has a Logitech USB microphone connected), the Notification capability mimics iOS and obsoletes Growl to a large extent, and the showstopper (on the MBA) is the addition of AirPlay, a feature common to iPads and iPhones for a while. This allows you to redirect video and audio from Mountain Lion to any TV with an AppleTV connected BUT the sending machine must have an integrated GPU for this to work. Thus regular Core2Duo or Core2Quad machines cannot do this, whereas those with an HD3000 (Sandy Bridge) or HD4000 (Ivy Bridge) integrated GPU can accomplish the task. I have no need to do this with HP100, despite the presence of its HP3000 integrated GPU, but having this on the MBA, the ‘sofa’ Mac, is heaven-sent, and will create another crack in the bundled pricing hegemony of the cable TV providers. You can get it on your laptop? You can send it to your TV!

The enhancements in Mountain Lion are mostly cosmetic. It’s 64 bit only so you will be SOL if you use 32 bit apps, and now is as good a time as any to start researching the topic. Given the otherwise modest changes, the ML upgrade is a low risk proposition if you can cross the ’64 bit only’ hurdle.

This is no bleeding edge upgrade, as Apple’s $20 upgrade price indicates, and I suggest it’s a low risk update for Lion users. Stated differently, it’s last year’s Ferrari with some chrome trim strips added. With Windows 8 set to emulate Windows Vista (last year’s Trabant), there has never been a better time to abandon the Evil Empire. Let’s just hope that Tim Cook shows some tyrannical traits real soon and kicks some rear on those installation glitches.

Preserving TRIM with SSDs:

To understand TRIM – garbage management for SSDs – just search the term using the box atop this page. A photographer friend who has just built a fabulous Hackintosh using a Z77 Gigabyte motherboard and an Ivy Bridge i5 CPU advises that preserving TRIM with a user DSDT file requires the following settings in Multibeast:

TRIM and Mountain Lion.

I can confirm these work.

HP100 adds USB3

Not without a struggle.

Intel’s LightPeak is currently the fastest way of moving data to or from external storage, claiming 10 gigabits/sec, or 1.25Gbytes/s in regular English. This compares with a theoretical limit of 0.06Gbytes/s for USB2, so twenty times as fast on paper. LightPeak was rolled out in several Macs where it continues to enjoy near-zero market share, owing to a dearth of peripherals using the connector and insanely expensive connecting cables.

Meanwhile we have USB3 which claims 0.63Gbytes/s, is backward compatible with USB2 and USB1.1, and is available on most current Macs. The 2012 MacBook Air supports both USB3 and LightPeak (‘Thunderbolt’ in Apple Hypespeak).

For Hackintosh owners there are two ways of adding USB3. For those with older motherboards (LGA775, LGA 1156 typically) a PCIe internal card has to be added at a cost of $20-40. For more recent builds (LGA1155 and LGA1366 sockets) most come with USB3 connectors built into the motherboard. For Sandy Bridge and Ivy Bridge machines (LGA1155) current Gigabyte boards include USB3, so when ace computer builder FU Steve upgraded HP1 (LGA775 Core2Quad) to LGA1155 (Sandy Bridge i7-2600K) by fitting a Z68 Gigabyte motherboard, it came with two blue USB3 sockets on the back and a 19 pin USB3 connector inside.

And my HP100 has done nothing to use those USB3 sockets since the upgrade, as I have no USB3 peripherals. Until now. As we are getting into hardware, definitely not my forte, I’ll hand it over to ace Hackintosh builder FU Steve for what follows.

* * * * *

Thanks, Thomas.

When I upgraded Thomas’s HP1 to HP100 I intentionally chose the Z68X-UD3H-B3 motherboard from Gigabyte because it’s easily hacked, comes with two USB3 sockets (and many USB2), and has the 19 pin USB3 connector on the board itself. I envisaged upgrading the USB2 internal, front panel USB2 card reader to USB3 and had Thomas plonk down $33 for a Silverstone FP37B 3.5″ internal card reader. This was easily swapped with the older Sony 3.5″ reader, plugging into the 19 pin mobo socket.

And here the story gets complicated. After installing the appropriate USB3 driver (kext file) using TonyMac’s MultiBeast app, the two rear panel blue USB3 sockets were recognized:

Installing the USB3 driver – check the box and restart after running this.
The Gigayte Z68X mobo uses an Etron EJ168 controller. No instability issues noted.

However, no matter how many different drivers I tried the card reader was MIA. Nada. Zilch. Back she goes to Amazon.

Failure. Not recognized by the Hackintosh.

Plan 2. I had Thomas buy an external USB3 card reader, confident it would be recognized once plugged into one of the rear sockets. $35 and nowhere near as elegant a solution, but having the advantage that it could also be used with Thomas’s 2012 MacBook Air, which has no built-in card reader.

US Robotics USB3 card reader.

This comes with a ridiculous 6″ (yes, inch) USB3->micro-USB3 cable, so another $7 saw a 6′ extension cable arrive which is actually usable on the HP100. Having Thomas cuss me out because he cannot get at the card reader is more than life is worth. The stock, short cable is fine for use with the MBA. The reader is USB-powered, so no power brick is required.

Micro-USB3 extension cable.

Don’t bother with that old male-female USB2 extension cable in the brown cardboard box under the stairs. It will fit but you will only get USB2 speed. A USB3 cable has more wires and contacts. There is no free lunch here.

The card reader was immediately recognized, and though System Profiler reports the maximum speed is the 480Mbits/s of USB2, rather than the 5000Mbits/s of USB3, the full USB speed is available. Here’s how it’s seen in System Profiler:

USB3 card reader with a Class 10 SDHC card inserted.

USB3 is reported as ‘USB Super-Speed Bus’, and you can see both sockets are recognized.

Confirmation of the transfer speed was easily done by running the Xbench disk test. Here’s USB2, which takes 10 minutes (!) to run:

Xbench – USB2 (extension cable) with SDHC Class 10 card.

And here’s USB3 which takes a 75 seconds:

Xbench – USB3 cable with UDMA CF 400x card.

Like, whoa!

So USB3 is working properly on the HP100. I ran the same tests with the card reader connected to the 2012 MacBook Air, with identical results, except that the MBA reports the card reader’s speed correctly:

USB3 card reader as reported by the 2012 MacBook Air.

How about some real world tests?

Import and processing of 20 Panny G3 RAW files from the SDHC Class 10 card (not especially speedy as cards go) using USB3 compares with USB2 as follows, using Lightroom 4.1:

  • Import 20 files: 20/20 seconds. No difference.
  • Generate 20 1:1 previews and apply lens correction profiles: 43/48

Hmmm. Not very impressive. Why is USB3 no faster?

The limiting factor here is the slow SDHC Class 10 card. Here are the speed specs for the various SDHC card classes:

As you can see both USB2 and USB3 are working at maximum efficiency in HP100 – meaning one second per file, with files being around 10Mbytes in size. SDHC simply cannot go any faster, and is not helped by USB3 at all. More recent high-speed CF and SDXC cards however should benefit, as they support data transfer rates of 32Mbytes/s or more and here USB3 should realize the benefits. Thomas’s Panny G3 does support SDXC cards, his earlier G1 does not. He needs a faster card to realize the benefits of USB3 with the Panny G3.

Now repeating the same test using the Lexar 400x CF UDMA card from the Nikon D700:

  • Import 20 files: 3/20 seconds. Seven times as fast
  • Generate 20 1:1 previews and apply lens correction profiles: 46/48. No material difference.

* * * * *

Thanks, FU. So USB3 in the HP100 will work great with external USB3 drives, and with SD and CF cards. If the card is fast, USB3 is 7x as fast importing files with a 400x UDMA CF cards (and probably similar with recent SDXC cards), and all at a fraction of the cost of LightPeak/Thunderbolt. Processing time remains unchanged as that’s a function of the CPU and GPU, having nothing to do with the card. For users of the latest DSLRs like the Nikon D800 which generate 75Mb files USB3 is a cheap – and highly recommended – fix for fast import – the time will fall from 6 seconds a file to under 1 second.

And, of course, any USB3 external disk drives will be much faster, especially if SATA3 drives are used in preference to the older SATA2 designs.

As for the processing speed when importing to LR, that’s hardly a limitation. Once the files are imported, you can let LR grind through processing while you simultaneously start developing your picture. Processing occurs in background mode and only a faster CPU and GPU can speed that up.

So if you want the best transfer speed per dollar, USB3 is the way to go at very modest increased cost – $35 for the card reader plus $7 for an extension cable.

Update January 27, 2013:

I managed to bend two of the pins in the US Robotics USB3 card reader when inserting a CF card from my Nikon D3x. The pictures on the card were corrupted, but were easily recovered with the wonderful DiskDrill application. Mercifully, I have retained the original internal USB2 Sony card reader in my Hackintosh, so download could proceed. I dismantled the US Robotics device (you have to pull off the four rubber feet hiding the screws) and managed to straighten the bent pins and all is well again.

Moral: Be very careful to insert the card straight into this device. The guide channel is short – misalign your card and the suspect engineering design of the CF card which requires perfect alignment will trip you up, much as it did me. SD/SDHC/SDXC cards are a far more robust design, using broad contacts on the card, addressed by wipers – not pins – in the reader. Yes, you hear of CF cameras with bent pins too, but Nikons are fairly well made in this regard as they use a very long channel to ensure proper alignment of the card in the slot.