Category Archives: Nikon lenses

Some of the best optics ever

D700 dream trio

What the well dressed FX snapper is wearing.

Flash back to my youth and the snapper’s dream outfit was a Leica M2 with 35mm and 50mm f/2 Summicrons and the 90mm f/2.8 Tele Elmarit. The 90mm Summicron at that time was simply too big to carry around, with the compact and outstanding ApoSummicron only coming along much later. I owned and used all of those and they were simply the best the film world had to offer. SLRs changed all of that and DSLRs changed it further, with modern makers boasting zoom lenses of extraordinary quality, range and …. price, bulk and weight.

In planning my little D700 outfit it was not lost on me that the Dream Team for most Nikon pros consisted of:

  • 14-24 f/2.8 AF ED zoom, $1,997, 2.1 lbs.
  • 24-70 f/2.8 AF ED VR zoom, $1,887, 2.0 lbs.
  • 70-200 f/2.8 AF ED VR zoom, $2,397, 3.4 lbs.

I have used none of these but the large number of test reports suggests that each is superior to prime lenses at its respective focal lengths. But there are drawbacks. While quite possibly the most extraordinary design triumph in modern optics, the pregnant, distended front element of the 14-24mm zoom precludes the use of filters and invites damage. And the bulk and weight of all three is non-trivial, with the trio weighing in at no less than 7.5 lbs and costing $6,300 in total. Add in one body and a carrying case and you are close to 12 lbs of dead weight.

I took a more modest approach. I very much tend to a wide angle view of the world so was prepared to splash out on the best wide zoom I could afford, as a broad range here obviates the need to carry many lenses. AF would be nice to have, but not essential as most everything is sharp most of the time, VR no big deal for a wide lens but no option to delete it. Shame, as it adds a lot of bulk and adds little for wide angle photography. Fixed maximum apertures are nice to have and generally denote a lens made to a standard, not to a price. So I ended up with this combination:


My economy Dream team.

  • 16-35 f/4 AF ED VR zoom – new $1,140. 1.5 lbs.
  • 35-70 f/2.8 AF D AI-S zoom – used, mint $400. 1.5 lbs.
  • 75-150mm f/3.5 Nikon Series E zoom – used, mint $85. 1.1 lbs.

The 16-35 is a current model, is one stop slower than the 14-24 but has a flat front element which allows the use of filters. You lose 2mm at the wide end but gain 11mm at the long end and VR is thrown in, if not really necessary. I spent big on this as it replaces the 16mm, 18mm, 21mm, 24mm, 28mm and 35mm lenses, which also makes sense of the bulk and weight. The 35-70 was the pro zoom of the 1990s – push-pull zoom, outstanding optics and a very useful true macro range, with definition to match down to 25% of life size, at 35mm. AF is nice on a lens which sees a lot of use, build quality puts the current 16-35 lens to shame. The lens was strongly recommended to me by a photographer whose work I love – what better way to choose? More on this optic later. And the 75-150, while MF and ‘only’ Series E (Nikon’s attempt at a budget line a couple of decades back) is light, has a fixed maximum aperture and is so compact that it’s not something you hesitate to take along. I’ll add a CPU chip to it for proper EXIF recording for another $30, a simple DIY job. Total weight is 4.1 lbs, almost half the weight of the first outfit and cost was $1,624 in aggregate for one stop less, 2mm lost at the wide end and 50mm sacrificed at the long end, for a saving of over $4,600. To make the comparison fair, used lenses should be substituted in the first example but these premium Nikkors sell for very modest discounts used, so maybe the true amount saved is more like $4,000. Non-trivial however you look at it.

Best of all, despite the frugal approach, there are no compromises when it comes to optical quality. All three are outstanding with maybe the best being that little sleeper the 75-150, an optic with a deserved reputation amongst Nikon fans in the know. And at $85 a replacement will be cheaper than repair in the event of damage.

Adding a CPU to MF Nikkor lenses – Part I

Feature enhancement.

Background:

Manual Nikkor lenses lack a CPU, distinguished by 5 (AF D lenses with aperture ring) or 8 (AF-S G lenses with no aperture ring) electrical contacts on the back of later lenses. The CPU (really just a simple EPROM, hardly a CPU) confers a lot of modern functionality on the hardware when the CPU’s contacts meet like connectors in the body of the camera.

Advantages of a CPU:

  • Correct automatic recording of lens focal length in EXIF file data, except for zoom lenses.
  • EXIF data for focal length is posted in a searchable field in Lightroom, unlike the case where a non-CPU lens is keyed in manually.
  • The limitation on nine non-CPU lenses keyed manually into the camera’s body disappears.
  • The user cannot forget to dial in the right lens, as is the case when using non-CPU lenses. Correct EXIF data are assured.
  • Lenses which focus incorrectly, as indicated by the focus confirmation light in the viewfinder, can be fine tuned for optimal focus.
  • Ai and Ai’d lenses can be set so that aperture control reverts to the aperture ring on the lens, not the control dial on the camera, permitting correct exposure in ‘A’ and ‘M’ modes. ‘P’ and ‘S’ modes require the lens be set to its minimum aperture and control reverts to the body, but correct exposure in these modes is not guaranteed, owing to the non-linear design of the aperture cam.
  • Ai-S lenses can be set so that aperture control is either with the aperture ring on the lens or the control dial on the camera, permitting correct exposure in ‘A’, ‘P’, ‘S’ and ‘M’ modes. ‘P’ and ‘S’ modes require the lens be set to its minimum aperture and control reverts to the body; correct exposure in these modes is retained, owing to the linear design of the aperture cam.
  • Exposure automation is no longer limited to Aperture priority.
  • Full matrix metering becomes available and I confess I am becoming a devotee given how good it is. Non-CPU lenses use matrix metering only if the ‘non-CPU’ lens data is entered using the LCD on the rear of the camera.
  • Program and Shutter Priority exposure automation are added; non-CPU lenses support Manual and Aperture Priority only. Shutter Priority would seem especially useful for sports photographers.
  • Focus lock is an option – the picture cannot be taken unless the lens is correctly focused when focus lock is programmed ‘On’.
  • Enhanced fill-in flash capabilities are added.
  • On ‘pro’ bodies like the D700 the Command Dial wheels can be used to set aperture (in aperture priority mode) in preference to the aperture ring on the lens, the latter being left at minimum aperture at all times, like with an AF D lens. I confess I prefer to use the aperture ring as I support the lens with my left hand from below, but it’s an option.
  • A lens with CPU fitted permits the appropriate lens profile to be automatically applied on import in Lightroom 3/4/5 when using custom lens profiles.
  • Certain earlier Nikon DSLRs, which do not provide auto exposure when no CPU is fitted, will now do so, allowing the use of MF lenses on these bodies with full exposure automation.
  • One reader has reported that chipped lenses (programmed on a D700, for example) can be used with bodies – such as the D40 – that don’t allow input of non-CPU lens data.
  • Bodies with electronic aperture readouts in the viewfinder which do not otherwise report the aperture to which the lens is set will now report it if aperture control is passed from the body to the aperture ring on the lens.

I am a huge fan of early Nikkors – Ai and pre-Ai with Ai conversion as, in my opinion, the construction and operating ‘feel’ of these lenses have never been surpassed, and the optics are outstanding on my D700. They are generally incredibly inexpensive, too, with near-mint copies easily found. As I never use ‘S’ or ‘P’ exposure modes, the limitations on auto exposure for these pre-Ai-S lenses, above, do not trouble me.

What I am aiming to accomplish with these articles:

Having had a couple of really old Nikkors converted for AI operation on my D700, I began to realize some of the shortcomings of not having a CPU in those lenses, so I did some investigating. My due diligence disclosed that there is a substantial body of knowledge relating to updating old manual focus Nikkor lenses by adding a CPU, that this knowledge is not to be found in one place, and that a programmable CPU could be purchased for $30 from a Singapore eBay vendor. What I have done in this piece, and in the article which follows, is put simple instructions in one easily accessible place and added a substantial amount of detail based on my practical experience of installing CPUs in both Ai, Ai’d and Ai-S manual focus Nikkor lenses. I address aperture non-linearity issues in Ai and Ai’d lenses and how to avoid these. I illustrate the differences between aperture control approaches. All of this was done using my D700, but much of it likely applies to other Nikon DSLR bodies.

Finally, I integrate the CPU installation and programming process with the use of custom tailored lens correction profiles for use in Lightroom and Photoshop, as the icing on the cake when a lens with a CPU installed is used.

Who can do this?

Anyone with two hands, one eye, an MF Nikkor, $30, maybe a screwdriver and jeweler’s file/Dremel/milling machine, some patience and some glue can install a CPU in most MF Nikkors. An engineering degree is not required. Some exotic lenses like the 55mm/1.2 and Noct cannot be easily adapted as there is simply insufficient room to install the CPU. But most Nikkors can be easily converted.

Red oval denotes the 5 CPU contacts on this AF D Nikkor.
Green line denotes alignment of the fourth contact on the CPU with the focus mark.
Non CPU Nikkor on the right; this is my 50/2 converted to AI operation.

Corresponding contacts in the camera body. AF-S lenses use all eight; AF D use only five.

Source for the CPU:

Here is the information on the eBay seller – the price includes shipping. The reference to Leica in the listing is irrelevant:

The vendor says that the CPU comes with an alignment template but if you follow this article all should be well even if you do not use it.

One reader advised this vendor is out of stock so try this one – look for ‘Dandelion Chip’. I do not know whether this Leitax CPU includes the ’60’ option to switch aperture control to the lens. If that’s important to you – meaning you are using pre-Ai-S lenses or prefer to use the aperture ring on the lens to the control dial on the camera – you should check before spending your money. See Part II of this article to understand what the ’60’ option does.

CPU alignment:

This CPU is simply glued into place on the rear of the lens’s internal barrel with the fourth pin aligned as shown by the green line in the picture above. However, the five contacts must not protrude beyond the periphery of the adjacent chrome bayonet mounting ring if proper fit in the camera’s body is to be assured. Likewise, they must not be too far recessed or no contact will be made.

Green circle denotes correct protrusion of the five contacts.
This is on an 85mm f/1.8 AF Nikkor D.

So there are four scenarios:

  • The contacts protrude just so when the CPU is positioned on the barrel. Just glue the CPU in place, aligned as shown.
  • The contacts do not protrude enough. Glue a shim in place first to confer the appropriate stand-off, then the CPU, thus ensuring electrical contact.
  • The contacts protrude too far, risking damage to the camera and/or CPU. Remove metal from the barrel to ‘countersink’ the CPU appropriately.
  • There is insufficient room for installation of the CPU. (e.g. 55mm f/1.2, 58mm f/1.2 Noct). Delegate the job to an expert.

In the first two cases, no lens dismantling is needed. Glue only. In the third case, the internal baffle must be removed (generally requiring removal of three radial, countersunk Philips screws in the chromed bayonet flange), removing excess metal from the baffle with a Dremel cut-off tool, until the CPU is sufficiently recessed. It seems a modicum of material can also be removed from the base of the CPU but care is needed not to trash the CPU when doing this, so I do not recommend that approach. In the fourth case DIY is not recommended – seek out an expert. The idea of butchering a $3,000 Noct-Nikkor and getting it wrong is not one I want to contemplate!

Here are the key dimensions – the protrusion of the contacts and their distance from the outside edge of the bayonet flange:

Dimensions, as measured on a factory AF D lens.

Here is the key longitudinal measurement – the contacts are centered between the green lines but, once again, it’s not that critical – look how broad the contacts in the camera body are, above:

Longitudinal protrusion. Just look how shoddily made the CPU on this 85mm f/1.8D prosumer lens is!

Precision vs. accuracy:

I do not want to overemphasize the need for precision here. Reasonable accuracy is all that is called for. The contacts on the CPU are sprung for 0.05″ of travel, allowing for radial error, and as you can see from the above picture of the mating contacts in the camera body, you would have to be way off on axial placement to get it wrong. Looking at the above, if your Nikkor has 0.18″, give or take 0.01″ say, of clearance between the barrel and the outside edge of the bayonet flange, you should be able to simply glue it in place. Any less and you need a shim; any more and you will have to use a file on the barrel. As an example, my 50mm Nikkor-H of 1971 vintage measures a total of 0.16″, so 0.02″ of barrel would have to be removed before gluing the CPU in place.

General dimensional rule:

Based on my experience in adding CPUs to several lenses, any lens whose rear baffle external diameter is in the range 1.355″ through 1.426″ (34.62mm through 36.22mm) permits a simple glue-on CPU installation, with no need for machining. The ‘rear baffle’ referred to is the black ring protruding from the rear of the lens, inside the chrome bayonet mounting flange. Lenses with baffle diameters larger than this will need metal removed from the baffle to avoid damaging the CPU and/or camera’s contacts. Tow examples in my collection which needed such surgery – a few minutes with a Dremel cut off wheel and a file after removing the baffle – are the 100/4 Micro Nikkor Ai-S (1.621″ diameter – 41.17mm) and the 300/4.5 ED IF Ai-S (1.613″/40.97mm). Two others, the 28mm f/3.5 Ai’d and the 50mm f/1.4 Nikkor-S Ai’d are much trickier.

Choice of adhesive:

Which adhesive? I am no fan of Super Glue (cyanoacrylate). It is extremely dangerous should you get it on your fingers (two fingers become one), runs far too readily (though ‘gel’ consistencies are available) and has far too short an ‘open time’. I propose to use a two-part epoxy which has none of these drawbacks and also is far more reliable than the fussy Super Glue variants, working with a broad range of surfaces. The glue used must work with plastics and metal. The very last thing you want is for the CPU to become detached and get whacked by the camera’s mirror or trapped in the focal plane shutter, either scenario guaranteed to spoil your day. And what with the occasional whack from a rear lens cap when the lens is removed for storage, you really want this to last for the long-term, without having to baby it. Waiting 24 hours for the glue to cure seems like little to ask for peace of mind.

Programming:

The beauty of this CPU is that it is programmable using the camera! Once the CPU is in place, the lens is mounted on the body and the programming instructions are followed. The programming step serves to tell the generic CPU the maximum and minimum apertures of the lens and the focal length. Additionally, you can switch on focus lock (though I don’t see doing this with an MF lens) which will operate in ‘S’ shutter mode only, just as with any modern AF Nikkor. ‘C’ mode disables it.

This ‘CPU’ is a simple EPROM (Erasable, Programmable, Read Only Memory) meaning that if you make a mistake you can simply redo your work and your latest settings will be saved. The CPU has no variable or moving connections to the lens. It simply sits there, like a lump on a log, waiting to tell the camera body which lens it’s attached to, and the camera’s battery provides the power to do this.

Further, if your MF lens front focuses or back focuses (meaning the focus confirmation light does not come on at the optimal focus sharpness), you can correct for this when programming the CPU. For regular AF Nikkors you do this using the LCD panel and the Menu system. For CPU-modified lenses it’s done as part of the CPU programming step.

Non-OEM lenses and zooms:

The programming instructions are relatively well written and easy to follow. However, I hope to improve on them in Part II of this article, based on my practical experience. It is clear that Zeiss (and other non-OEM) lenses in Nikon mounts can be programmed to work correctly so long as there’s room to glue the CPU in place, but it’s unclear how one programs zoom lenses’ focal lengths. As the CPU is a passive device, it cannot report the correct focal length with zoom lenses, and there appears to be no way to state a focal length range in the programming instructions, so I expect I would enter the 75-150mm lens as ’75mm’ for identification purposes in EXIF data. Note also that my zoom is a fixed maximum aperture lens. I would expect that variable maximum aperture zooms would run into exposure problems as the CPU can only program one maximum aperture.

Coming in Part II:

To cut a long story short, I have ordered several of these CPUs and when they arrive I’ll write about my experience in installing and programming. As a first pass I’ll try it on the newly AI-converted 50/2 H, 105/2.5 P and 200mm f/4 Q as the barrels are easily accessible even without removal of the rear chrome ring on the lens, and I should be able to do a dry run to confirm positioning and programmability using just two-sided 3M Scotch adhesive tape (very carefully!) for a temporary fit. If all is well, epoxy will be the next step.

The CPU will not, of course, add AF or VR, but it does add a lot of value to some great classic Nikkors for little time, effort and cost.

More in Part II.

Nikkor 500mm f/8N AI Reflex lens

Not easy to use, but with massive promise.

Warning: This article could end up costing you money. It debunks all the myths about a much derided class, the mirror reflex lens.

Background:

Name the two photographic themes which were overdone in the 1960s and most lists would prominently feature fish eye images and those taken with mirror reflex lenses. Opposite ends of the focal length spectrum – 8mm and 500mm. The distortion of the former is well known, though I suspect the peculiarities of the latter may be largely forgotten.

Indeed, read about mirror lenses and their objectionable out of focus ‘doughnuts’ in an age obsessed with ‘bokeh’ (The out of focus bits really matter that much? You paid how much for that?) and you have no reason to question Nikon’s decision to discontinue the last of theirs, the 500mm f8, in 2005.

And that is a massive shame, as the post processing wonders of digital have finally conferred the fix for what ails reflex lenses. And what ails them is poor contrast, a small fixed aperture, the need for high ISOs to avoid camera shake and modest resolution. Plus those doughnuts. Digital fixes all of those. f/8 is no longer especially slow, ISO 3200 is no biggie and sharpening in post processing is a given in the world of anti-aliasing sensors and Lightroom.

Doughnuts:

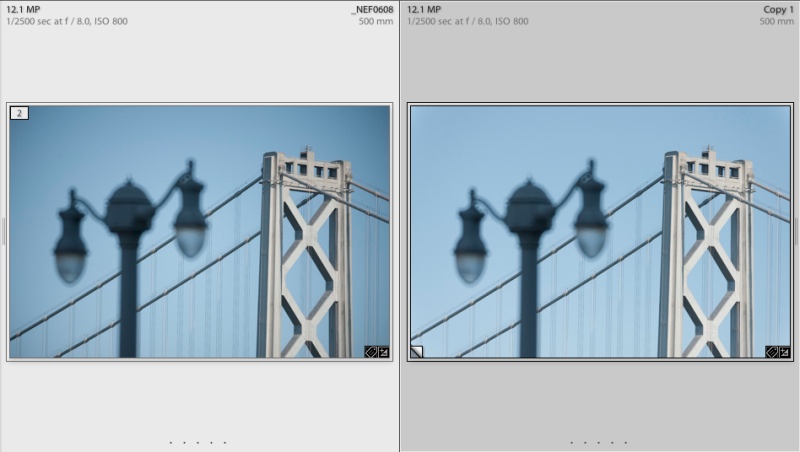
If you want to get those objectionable out of focus doughnuts prominent in your snaps, then be sure to photograph low key subjects against bright backgrounds. But it does not have to be that way. Select your subjects and compositions with a modicum of care and you can largely avoid the doughnuts with this compact tool, a 4″ long 500mm lens, weighing in at some two pounds in your gadget bag, challenging your skills to the utmost. What’s left of the doughnuts, if unwanted, is easily removed in Photoshop, as I show below.

Nikon’s offering:

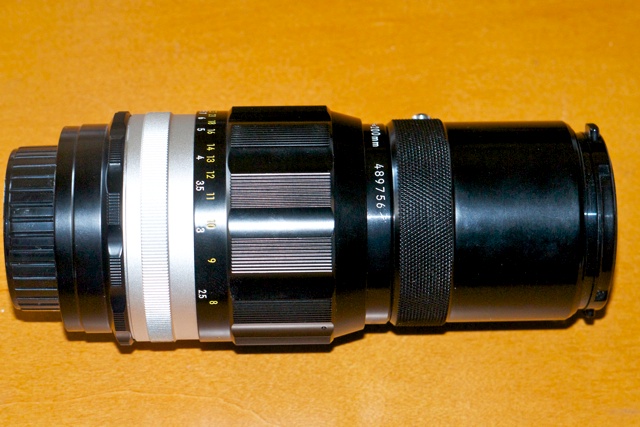
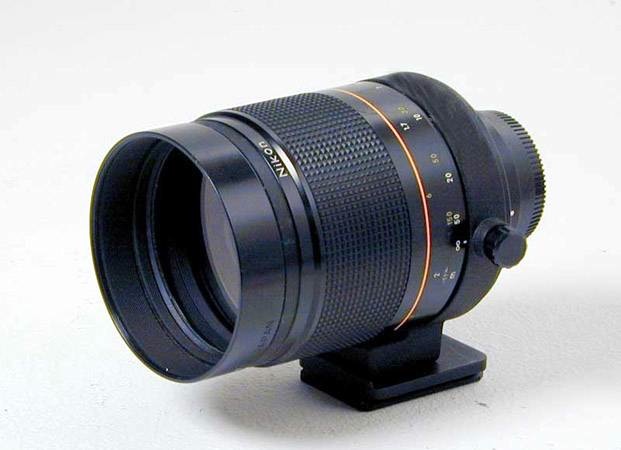
The best known mirror lens is probably the 500mm f/8 Nikon Reflex-Nikkor. It’s small and light, with exceptionally good mechanical construction. The focus collar is feather light, the fit and finish as good as it gets and all the markings are paint filled engravings. The tripod collar has detents at 90 degrees – why aren’t all collars like this? – and I have fitted a Manfrotto QR plate to mine for use on a tripod or monopod. The latter is a recommended adjunct for street snapping as it takes out the major source of movement blur, vertical motion.

500mm Nikkor f/8 AI N Reflex lens.

Nikon made a few versions of these and the one to get is the last one made, the ‘N’, as it has ultra-close focusing and the lowest weight and bulk. It’s distinguished by an engraved orange arc (for the close focus range) on the focus collar. They usually sell for $650 or so, though prices seem to fluctuate over a wide range; mine came for about half that from the estimable Fred Miranda forum, the sole defect being a smudge of grease on the front glass, easily removed with a Q Tip, lightly moistened in isopropyl alcohol. It seems like most owners take a snap or two, conclude it’s not so good, and sell, making these abundantly available, most having seen little use. The earlier version, slightly bulkier, typically sells for half as much. I have not used it so cannot comment on definition, but I’ll bet that the build quality is comparable, meaning superb in every way. That version weighs a few ounces more, focusing down to 12 feet rather than 5 feet in the last model.

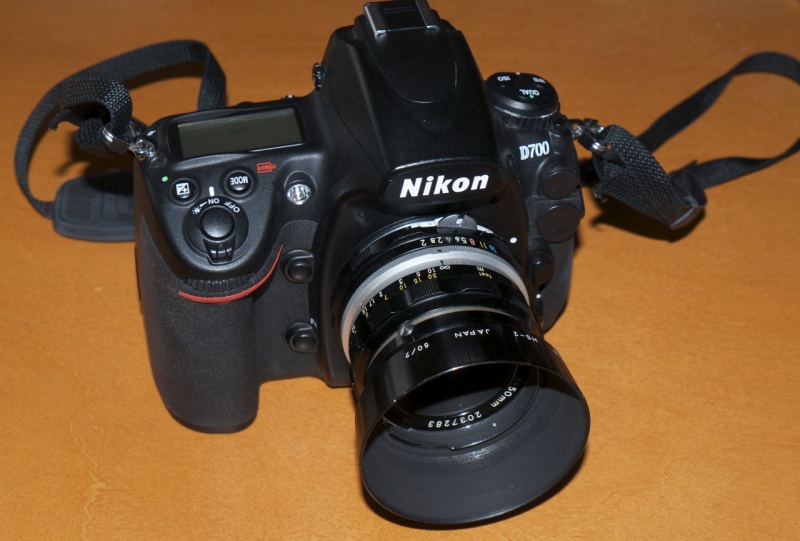
This lens is certainly not easy to use. If you do not use a support your snaps will likely be blurred. Further, even with focus confirmation in the D700, getting the point of focus right is not easy. Nikon says focus confirmation in the D700 needs f/5.6 or faster, yet it works perfectly with this f/8 optic, a lens with immense promise. A truly creative lens, well worth the effort of scaling the steep learning curve.

Processing:

I have found that my default Sharpness import setting of 86 in LR3 has to be increased to 125 with this lens, at which point the images start to perk up. Add some contrast and they start to sing. At ISO 800 and up a bit of luminance noise starts to creep in and is easily corrected in LR3. None of these options was available in the days of film when these lenses were sold new, nor was LR’s Clarity slider, which also helps greatly when more micro-contrast is called for.

As is common with mirror lenses, this optic suffers from ‘hot spotting’ wherein a central circular zone is brighter than the remainder of the image and also from light pincushion distortion. Download my tailored Lightroom lens correction profile here to correct for this, making a great lens even better.

The images in this article were processed without applying this profile and you can clearly make out the ‘hot spotting’ in one or two. In those situations where this detracts from the image, use my profile.

Some snaps:

I have never owned or used a mirror lens so what follows is literally from my first ‘roll’. These were all snapped handheld with ISO varying from 800 to 3200 on the D700. I left the monopod at home just to see what the lens could do handheld, and mostly used 1/500th or faster shutter speeds. Maybe 30% of my pictures were incorrectly focused or showed unacceptable camera shake. A monopod will greatly help to improve the success rate. Used in like conditions with my 300mm Nikkor I had no camera shake down to 1/60th. Without some form of support, it makes sense to use continuous shooting to take several frames of each subject, in the hope that one comes out best.


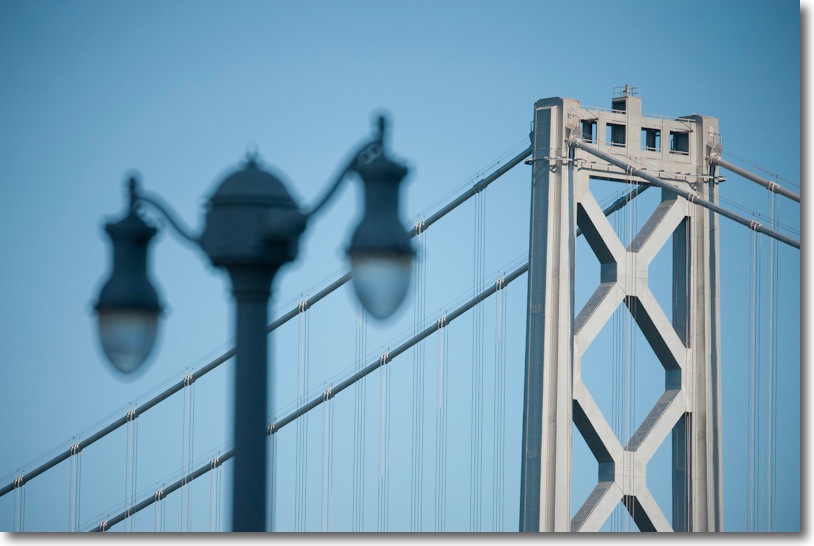
The magnificent Oakland Bay Bridge.


Viva California!


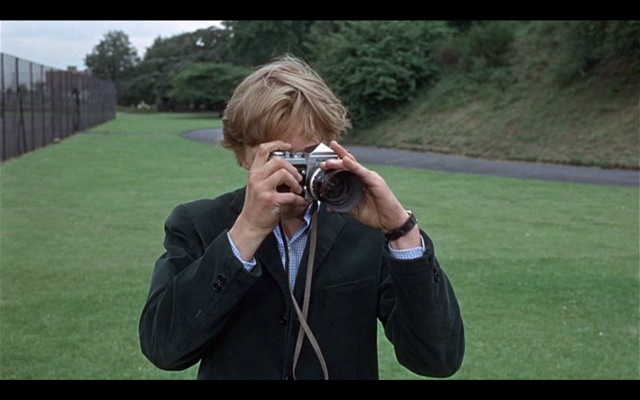
An artist sketches his subject.


Blurred, yes, 1/60th second handheld does that. But the passion is there.


Umbrellas. Face.


Hair!


Young love.


Tan.


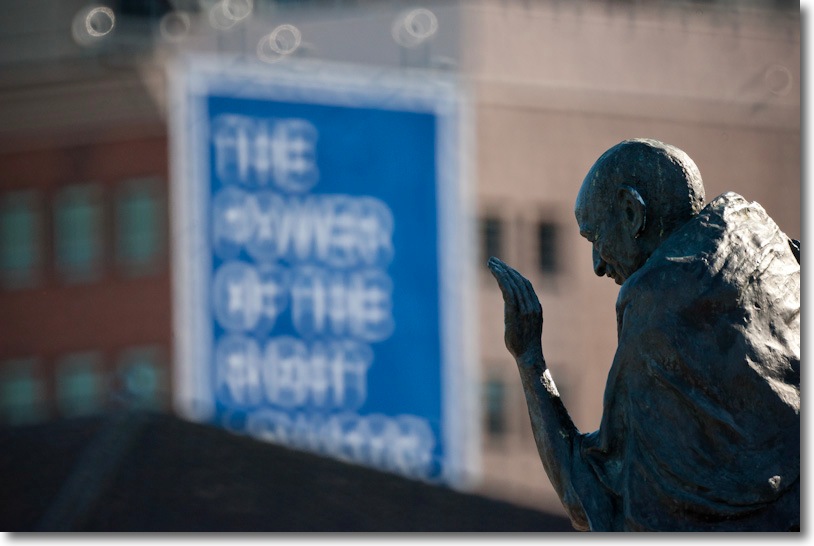
Gandhi. I actually like the out-of-focus effect here.
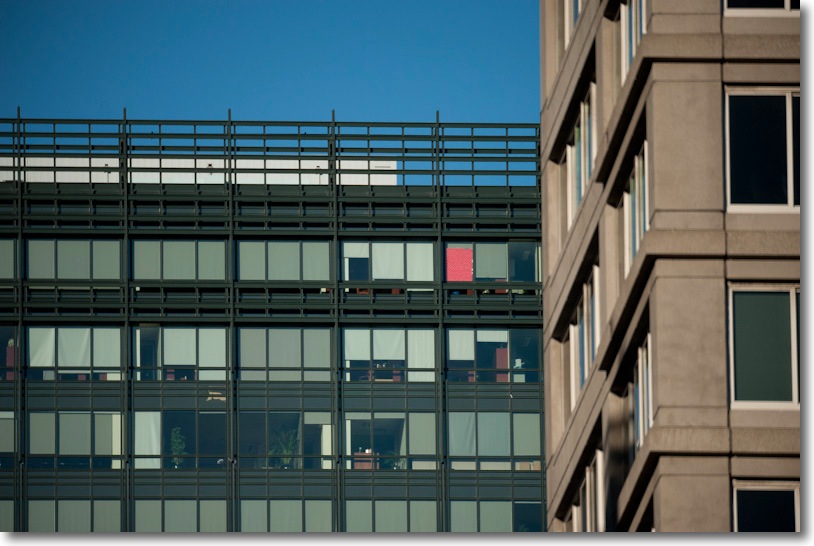

Red.


San Francisco – America’s finest city.

Photoshopping the out-of-focus bits:

If the appearance of the out-of-focus area is not to your liking, a quick round trip from LR3 to Photoshop and the magic lasso and lens blur filter make things look more orthodox – and more boring:


Orthodox looking blur, conferred using Photoshop CS5.

Doughnuts be gone!

Debunking myths:

‘Experts’ have it that catadioptric lenses of this kind are inherently aberration free. This, of course, is pure rot. Ask the fellows at Hughes/Perkin-Elmer who cost the US taxpayer millions of dollars when their faulty Hubble telescope was blasted into orbit. The subsequent fix requiring replacement of the mirror and software enhancements did not do anyone’s reputation any good and likely hurt NASA’s dwindling prospects of surviving. That said, I have found no evidence of chromatic aberration when pixel peeping my snaps from this Nikon lens. This is not some warmed over, cheap aftermarket imitation. (Note to NASA: Have Nikon make your mirrors next time.)


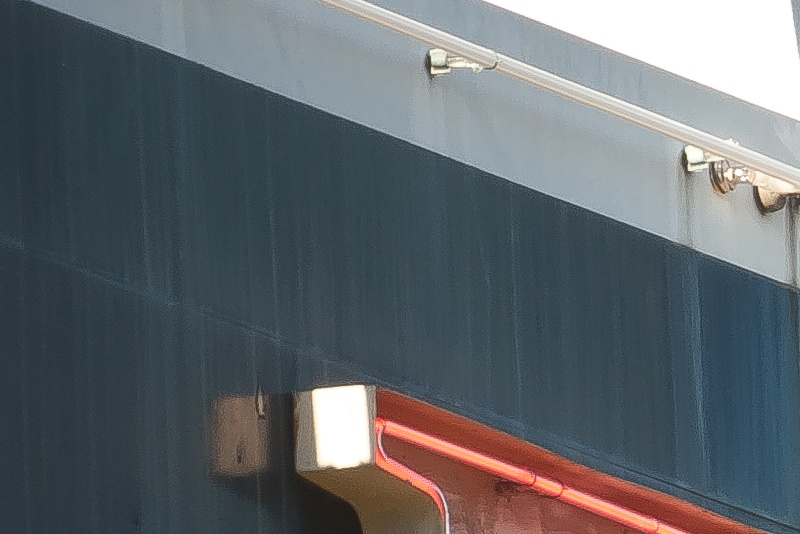
1/500th, hand held, ISO 800. LR3 sharpening = 125, Clarity = +29, Luminance Noise reduction = +30.

Here’s a magnified version of the top left corner, consonant with a print sized 30″ x 45″:
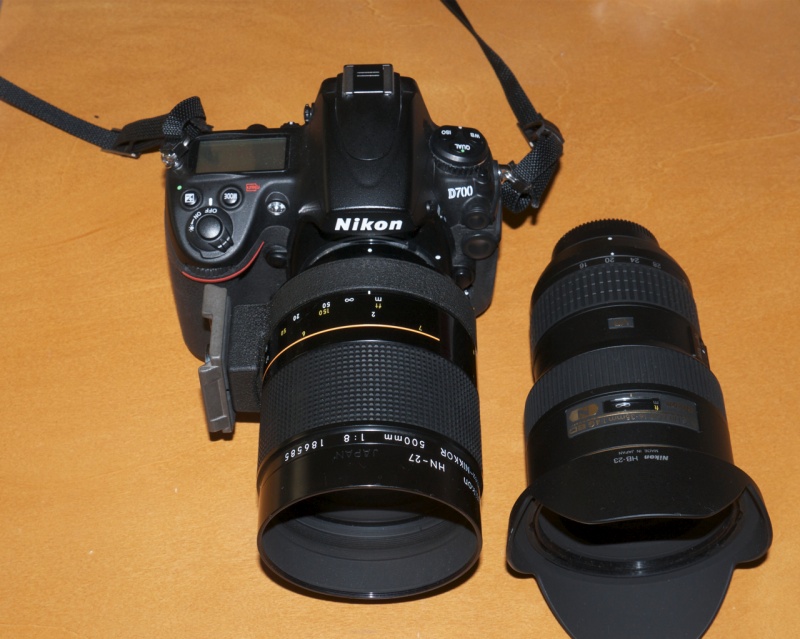
In use:

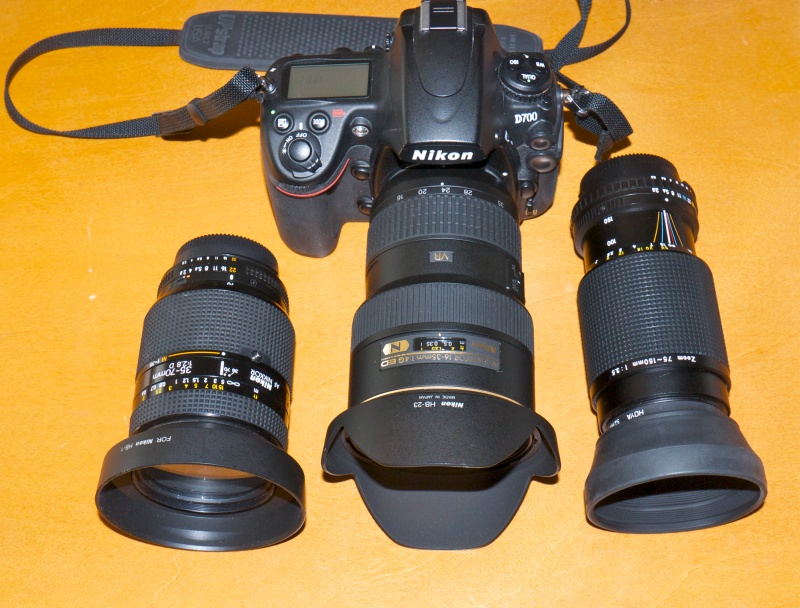
The diminutive size of the lens makes it very ‘stealthy’ – here it is compared with the gargantuan 16-35mm current auto-everything zoom (I call the latter my cuckoo lens because it looks as silly on the D700 as a cuckoo does in a warbler’s nest):

The 500mm focuses past infinity – as here – to allow compensation with changing temperature.
The tripod collar, with my QR plate, is rotated 90 degrees in this photograph.

Closest focus is an astonishing 5 feet, or 40% of life size, at which point the length of the lens is a mere one third of an inch or so longer than at infinity. That focus distance is comparable to a standard 50mm lens at 6″. The focus collar rotates well over 360 degrees, but there’s sense in that. The long focus throw greatly aids in critical focusing, and that is a key dictate with this lens. Incredible engineering, thoroughly thought out.

Indeed, when I was snapping the other day on San Francisco’s beautiful Embarcadero, a fellow photographer, toting a Hasselblad no less, stopped to ask me about the strange looking lens on my D700. I gave him the camera and as he pointed it I suspect he was expecting a portrait lens kind of focal length. The look on his face was priceless, and I explained that two of the great motorcycling roads in America are those winding their way up to the mirror telescopes at Mount Wilson in Los Angeles and Mount Palomar in San Diego. The Reflex-Nikkor uses the same technology, though Palomar’s 200 inch mirror will not fit in your bag.

Use on a tripod and why MLU helps:

Another myth says that it’s not possible to properly steady this lens. In tripod use the critical shutter speed range is generally 1/8th to 1/60th, regardless of the lens fitted. That’s where the period of vibrations caused by the DSLR’s flapping mirror and shutter is the highest as a percentage of total exposure time. With shorter exposures the vibes don’t have much of a chance to have a say in the matter and with longer ones they will have long died when the bulk of the exposure time commences. It’s when and how long things shake that matters.

This is easily proved. Using my solid, cantilevered Linhof tripod with a good ball head, I pointed the lens at the Dow Jones chart in my office (Hey! A guy has to eat!) and after focusing using the focus confirmation feature, fired the shutter four times, varying the ISO to get two snaps at 1/25th and two at 1/5th second. In each pair of pictures I let the mirror operate normally in the first but used the Mirror LockUp (MLU) feature in the second. In all cases a wireless remote was used.

The results confirm two things:

  • That shutter speeds around 1/25th are the most likely to suffer definition loss
  • That vibration induced by mirror slap is very significant at these speeds

Without and with MLU at 1/25th second,

Without and with MLU at 1/5th second.

The lesson is to avoid speeds in the 1/8-1/60th range if possible, by changing ISO. Better sharp grain than blurred continuous tone. And if you must use these shutter speeds, use the MLU feature for best definition.

The above enlargements are from 30″ x 20″ print sizes. Pixel peeping the two sharp ones where MLU was used shows that, indeed, the one at 1/5th is the sharper of the two, vibes from the release of the shutter being a smaller percentage of the overall exposure time. The slower shutter speed delivers the sharper result. As the ISO used was 800 and 200, the essentially grainless nature of the D700’s sensor is not a material variable in the comparison.

But if anyone tells you that you cannot get sharp results from this lens on a tripod, you need to read someone else and make sure you use a solid tripod and a wireless shutter release. Proper technique wins every time when it comes to definition. In the two sharp originals taken using MLU, the very finest 6 point text on the chart is sharp and easily read in a photograph taken from fifteen feet distance, confirming the quality of the lens and the accuracy of the focus confirmation feature in the D700’s body.

Use with other makers’ cameras:

For all you envious Canon digital owners out there, adapters are available at very low cost for the current EF mount (EOS – 5D, 5D/II etc.) cameras, and as the lens is MF and fixed aperture, you will have the same operational issues as Nikon fans. I don’t know whether Canon’s focus confirmation beeper works with this lens on the body.

For those suffering from brand loyalty, Canon made a 500mm f/8 Reflex for the discontinued FD mount but even if you can find one, it will not focus to infinity on the current EF mount Canons with a regular adapter. Adapters which permit this interpose a poor quality negative lens element, which is guaranteed to destroy the definition of this fine Canon optic. The same goes for Minolta adapters for Sony Alpha bodies and Pentax K body adapters. Avoid.

Minolta/Sony used to list a 500/8 mirror with autofocus, but I can’t find it at B&H any more. Sony is expert at making a superior product and then discontinuing it before anyone notices. The next Kodak.

Adapters for use of Nikon lenses on Sony NEX and on Panasonic/Olympus MFT bodies are readily available and no negative lens is required, owing to the thinness of these bodies. On APS-C the effective focal length is 800mm, and 1000mm on MFT. One significant advantage of bodies using electronic viewfinders is that the small f/8 aperture will be automatically compensated, rendering the usual, bright image in the finder.

Zeiss once listed both 500mm and 1000mm reflex Mirotar lenses for their long discontinued Contarex bodies, but the cost of those exceeded Greece’s national debt and used copies remain exorbitantly priced and very rare.

Lens correction profile:

As is the case with most mirror reflex lenses, the Nikkor suffers from ‘hotspotting’ – the central area of the image is brighter than the periphery. Accordingly, I have made a tailored lens correction profile, for use with LR or PS, and you can see the fairly dramatic difference when this is applied in the pair of snaps below.

Before and after applying my lens correction profile.

Usage instructions and profile download can be found here. All the pictures above were reproduced before applying the profile, as is clear from those with continuous tone backgrounds.

Conclusion:

It’s ironic that now, when camera and processing technology exist to make the best use of the capabilities of reflex lenses, that all except a few crappy aftermarket brands have been discontinued. A used Nikon Reflex lens is a superb bargain for those willing to work at making it sing and easily the most exciting lens I have used in ages.

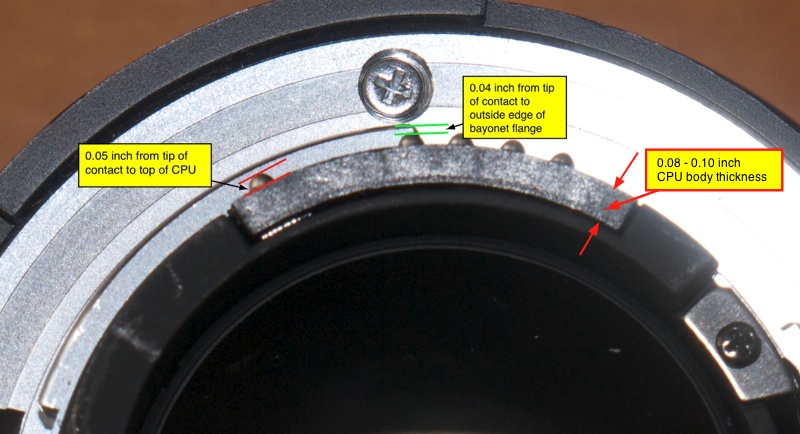
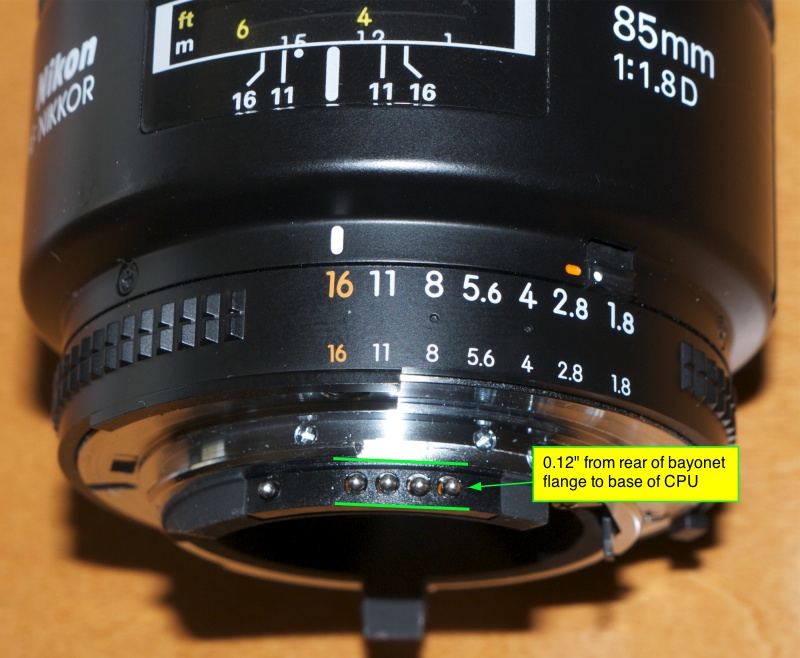
Installation and use of a CPU is addressed in a follow-up piece here.

Nikkor-H Auto 50mm f/2 lens

Move over, Mr. Hemmings.

When I wrote recently about early manual focus Nikon lenses, I suggested that the 50mm f/2 Nikkor standard lens was a competitor for Leica’s vaunted Summicron. That opinion was not exactly guesswork. I had used the Nikkor extensively as a kid and a succession of Summicrons over 35 years with Leica M bodies. Both optics were beautifully engineered in metal with performance to match. Plastic was not a concept. Nor was multi-coating, AF or VR/IS. That does not take away from the performance of either. My favorite 50mm Summicron was the first black version, and the last with the removable head, made by Leitz Canada. It took on more of the gutsy rendering offered by Nikon and Pentax at the time and deleted one element from the earlier design, making do with just six glasses, not coincidentally the same as the Nikkor addressed here.

With the intention of testing my ‘new’ 50mm MF 1971 vintage Nikkor, I took to the streets of San Francisco the other day with the D700, and had at it. I used the classic metal hood of the period, given to me for no charge by a nice person at Kaufmann’s Cameras in San Mateo, the same location where I had bought the 75-150mm Series E lens for a song. No filter was used. This 50mm lens is not the later “HC” version which was multicoated, and distinguished by a black front ring. This is the earlier single coated version, a classic symmetrical six element Gauss design. Apertures used in the snaps below were f/2 through f/5.6, and f/4 looks like the sweet spot, just like with those Summicrons of yore. Post processing in LR3 was minimal, and my standard Sharpness setting on import of 86 seems just right. Even at f/2 definition is more than adequate to permit large prints to be made, though micro contrast improves a couple of stops down.

Manual focusing proved easy, with the D700’s screen more than up to the task. While there’s always the focus confirmation light as an option, I found I rarely needed to use it, except in very poor light.

Here are some results:


Umbria


Speakeasy.


Biker bar. I had to beat this guy up for a better view of the bike.


Self portrait. Unlike Mr. Hemmings, below, I’m holding the camera right!


Things go worse with Coke.


San Franciscan.


101.


Spotted!


Bubble Lounge.


Blue. At f/2 – definition is even across the frame.

Looks like a keeper to me. All in cost with AI conversion by John White for my mint specimen was $75. Conversion is required for ‘pre-AI’ lenses to permit mounting and metering on modern bodies. Thank you, John, for a job well done!

And if you absolutely must make out like David Hemmings, this lens may even get you a hot date – I suspect he is using the f/1.4 variant:


Click here to read A Fantasy.

Converting old MF Nikkors

Bringing classics back to life.

Nikon’s Nikkor lenses, made through the early 1970s, were strangers to plastic. Brass and alloys were the order of the day, right down to that gorgeous scalloped metal focusing collar. These come with the meter coupling prong used on the old Photomic metering heads on the Nikon F and Nikkormat bodies of the era, redundant on modern digital bodies. But, while Nikon made their later lenses ‘AI’ (Auto aperture Indexing), these old masters will not fit a modern DSLR. A sector has to be milled from the rear of the aperture ring to permit fitting and to index the lenses’ maximum aperture if the metering system is to work correctly.

You can get a sense of what I’m talking about by simply feasting your eyes on my latest acquisition, a 200mm f/4 Nikkor-Q lens, made in 1971. Simply gorgeous to handle and behold, with optical quality to match. Markings are engraved and paint-filled, and of very high quality. The whole thing is a beautiful, thoroughly engineered tool.

They simply do not make them like that any more. The lens hood is built-in.

Here’s the rear of a Nikkor of that era before AI conversion:


Arrow denotes lip.

As you can see, the small lip protruding from the rear of the aperture ring does so all the way around. It prevents the lens from mounting on a modern DSLR body.

And here’s a Nikkor which has had the AI conversion done:


The arrows show the limits of the milled arc.

I own two such classic Nikkors, a 50mm f/2 and the 200mm f/4 above, and had both converted to AI specifications by John White of Ann Arbor, Michigan, a highly regarded source for such work.


Click the picture to go to John White’s site.

The turnaround time is about a week, and the cost $33 including shipping. Mr. White is polite, answers emails promptly and is a pleasure to deal with. After conversion, lenses work perfectly on my Nikon D700 body, though you have to remember to dial in the right ‘non-CPU lens’ setting if you want correct EXIF data stored with the image file.

And the cost of that mint 200mm gem? Would you believe $29? Yes, twenty nine dollars. With conversion and shipping the total cost came to $75.

1972 50mm lens on a 2012 body.

It’s not easy to describe the sensual pleasure of using these old lenses. The best I can do by way of analogy is to say that, after using their modern equivalents, it’s comparable to the difference in telling time on a mechanical watch compared to a digital timepiece. Both serve identical purposes but there’s only one you return to with eager anticipation and that silent thrill that has you thinking “Wow! Do I really own this?” Form and function are one.

These classics are abundantly available and, if you can live without VR and autofocus, worthy of serious consideration. You can be sure of two things. They will outlive you and they go for the price of a sushi dinner.

Obligatory snap of the long suffering Bert, at f/5.6.

Some people use a brick wall to test lenses. Chez Pindelski the test chart is none other than Bertram, the Border Terrier.

For more snaps taken with the 50mm Nikkor lens, click here.

For DIY instructions on AI conversion of old Nikkors, click here.