Category Archives: Lightroom

Adobe’s masterpiece for processing and cataloging

Collections and Slideshows

Useful Lightroom tools.

Two powerful tools in Lightroom which perhaps don’t get the recognition they deserve are Collections and Slideshows.

Collections allow you to group selected images in one place, suitably named. No catalog bloat results, as a Collection is simply a set of pointers to existing pictures in your Lightroom catalog.

Collections in Lightroom.

The other day a relative asked for a selection of recent snaps so that she might choose one or two for display in large print format. I simply placed four dozen into a Collection, based on her taste for the simple and uncluttered, then went into the Slideshow module of Lightroom, choosing that Collection for the slideshow.

The Lightroom Slideshow module.

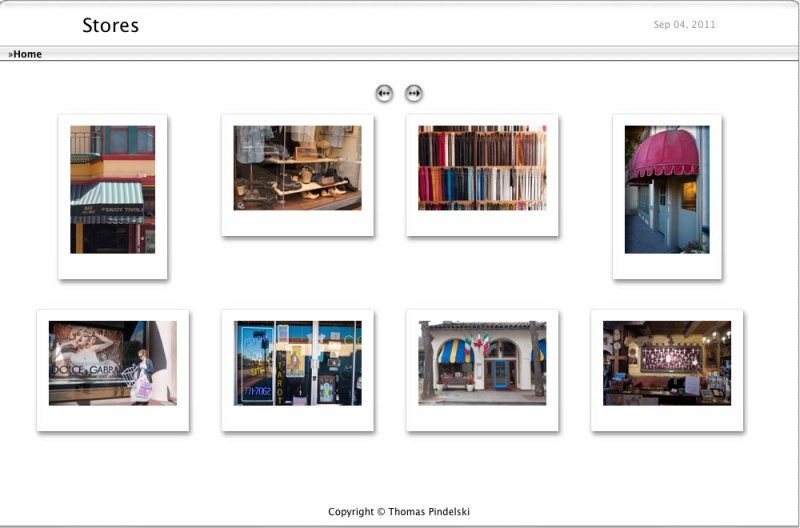
I saved the whole thing in low quality, to keep the files size down, exported it to DropBox and, minutes after receiving the request my relative had a file of proofs for review. The only things I did in the Slideshow module were to add a face page, which you can see below, and numbering, so that she need only report back the identifying numbers of the images she wants printed. The slideshow was saved as a PDF file in 1024 x 768 page size, formatted for her iPad. (The images break up if viewed larger than that).

If you like you can even embed a sound file to accompany the slideshow and can also save the slideshow as a video in a wide variety of sizes and formats. Adobe is totally on the ball here. Be warned that video creation really stresses your CPU and owners of iMacs should think twice before doing this, owing to the atrocious cooling design of those machines. Even the extraordinarily well cooled HackPro I use showed its quad core CPU temperature rising from the usual 115F to 165F when processing the related RAW files into a video, with the process taking 10 minutes. To put that upper temperature in perspective, I have the overheating warning buzzer in the HackPro’s BIOS set at 175F, near the CPU’s service limit, so that’s getting up there. The video, whose delay between slides can be set in the Slideshow module, came in at a whopping 88mB in 720P format.

Don’t try this on an iMac. Dramatic CPU temperature rise when
creating a video in the LR Slideshow module – all four cores shown.

The PDF file is a modest 4mB in size, by comparison, and you can download it by clicking the picture below.

Click to download. Best viewed in GoodReader on the iPad or in Preview on a Mac.

More on Adobe lens corrections in Lightroom 3

Very clever indeed.

A friend wrote recently how much he was enjoying using the newly added built-in lens corrections in Lightroom 3 with his ultra-wide Nikon zoom on a pair of Nikon pro bodies, a lens whose profile is included with Lightroom 3.

This got me thinking. How can one-click corrections work when distortion varies so widely over the focal length range of many wide zooms? If the lens is pre-programmed into Lightroom’s database by Adobe you do not get a choice of focal length when applying the profile. It’s strictly a one choice affair, which contrasts with my approach when crafting profiles for the 9-18mm MFT Olympus zoom for my Panasonic G1, where I had to create disparate profiles for each of the four marked focal lengths. The barrel distortion of that lens decreases with increasing focal length, so it’s not possible to make one profile to fit all focal lengths.

Now one of the finer lenses for my full frame Canon 5D is the 24-105mm L zoom. Lightroom 3 includes a built-in profile for this lens unlike with the Olympus 9-18mm where I had to make my own. The Canon has fine resolving power and micro contrast at all focal lengths of its useful zoom range but suffers from the most atrocious barrel distortion at the wide end (the center of peripheral straight lines bows out), changing to mild pincushion distortion (the center bows in) at the long end. How could Adobe’s ‘one click’ approach possibly work with this lens whose distortion characteristics vary widely with focal length?

Note that if you use Canon’s DPP software (I do not) to process your pictures I’m fairly certain that it corrects distortion at all focal lengths. However, the 5D, unlike the G1, has no in-body distortion correction for the manufacturer’s lenses, so processing in LR3 brings in the images in their fully distorted glory just as with the G1/Olympus lens combination. And distortion correction is important to me as I frequently take architectural pictures where I want my straight lines straight.

Well, it was but a few moments work to take five snaps, one at each of the marked focal lengths, with a straight edge close to the top of the frame in each. I processed these through Lightroom 3 and, after making virtual copies of each, applied the one-click lens distortion correction to each of the virtual copies, selecting the single profile for Canon’s 24-105mm L lens in each case. The pictures were snapped at 24, 28, 50, 67 and 105mm.

Here are the results – in each case the corrected version is shown first:

At 24mm. Noticeable barrel distortion in the uncorrected image at right.

At 28mm. Mild barrel distortion in the uncorrected image.

At 50mm. Very minor barrel distortion in the uncorrected image.

67mm. Very mild pincushion distortion in the uncorrected image.

105mm. Very mild pincushion distortion in the uncorrected image.

So as the above pictures suggest, the Adobe built-in profile for the Canon 24-105mm lens takes into account the focal length at which the image was made and applies distortion correction appropriately. It may be ‘one-click’ for the user, but it seems there’s much more going on below the surface. In all cases the correction is almost perfect, with only the 67mm and 105mm images slightly overcorrected and showing mild barrel distortion. The correction at the wider focal lengths is especially praiseworthy, as the above pictures show. Very clever and much more sophisticated than the case where you have to make your own lens profiles in those instances where Lightroom 3 does not include these.

Topaz DeNoise

Snake oil?

I confess that I have always regarded noise reduction applications for digital images as so much snake oil – a solution which makes the problem worse. Sure, they reduce noise but they also destroy definition in the process. Better noisy and sharp than blurred and smooth, in my book. Further, with most of my digital snaps being on the essentially noise-free sensor in the Canon 5D my incentive for ‘denoising’ images has been non-existent. Until, that is, the Panasonic G1 with a sensor one quarter the area of the one in the Canon became my daily user. Go over 13″ x 19″ when printing (and that is really the only time you will see noise in practical use) and noise makes itself heard, if you get my drift.

So the other day when I was giving my new Olympus 9-18mm MFT lens a good workout on the G1, I indulged in a spot of pixel peeping to see how good the definition was and, in the process, ran into noise when examining the equivalent of a 30″ x 45″ print on the Dell 2209WA monitor. Now one of the claims for Lightroom 3 is that it comes with significantly improved noise reduction capabilities, so I promptly gave these a shot .

Here’s the original RAW image:

At 18mm, f/8. Sunflowers.

And here’s a 30x selection before applying any noise reduction; this is an excellent test image as it has fine detail and shadows:

No noise reduction at 30x. ISO320, RAW.

Here’s that same section after applying the best looking noise reduction in LR3:

After applying LR3 noise reduction.

The LR3 noise reduction setting were as follows – the sharpness settings are my import defaults for the G1 RAW files, and were determined after much experimentation (5D images need less sharpening, by comparison):

LR3 noise reduction settings

Topaz DeNoise costs $80, seems to be popular on the chat boards, and requires Photoshop CS3 or later, where it installs as a plugin. As I’m still on CS2, and unlikely to upgrade, I wanted to run Topaz DeNoise from within LR3. This dictates the download of two applications – the plugin itself (41.2mB download, 113.7mB installed) and a separate app named Fusion Express (free) which is a 509.1 mB monster of a download but installs at 57.9mB if you restrict the installation to Topaz DeNoise; the Fusion Express application supports many Topaz apps, hence the size of the download. Now the installed size of Topaz Denoise must represent some of the sloppiest programming on record. At 113.7mB for a single purpose tool it exceeds the 89.5mB of Lightroom3 by some 27% – and last I checked LR3 does a heck of a lot more than just remove noise. Draw your own conclusions.

For RAW originals Topaz provides no fewer than seven presets for noise reduction and after some experimentation I determined that the lightest of these gave the best result. That said, the result was significantly inferior to what LR3 delivered with its built in tool. No matter how I tried, I could not reduce the artifacts in the circled area to as low a level as LR3 provided and shadow detail in the hairs on the stem of the sunflower was marginally worse at all settings, even after adjusting the ‘Adjust Shadow’ slider.

Topaz DeNoise version at RAW – lightest setting.

The Topaz noise reduction setting were:

Topaz DeNoise settings

What this little experiment goes to prove is that Adobe has done a truly stellar job in coding the noise reduction features built into LR3 and kept it nice and simply with just five sliders (you mostly use the first three shown above) compared to the overkill of seven offered by Topaz. No matter how much I messed with these I could not approach the LR3 result with regard to the elimination of contour artifacts in out-of-focus areas, and these artifacts are both more noticeable and annoying in the Topaz processed image.

Speed? LR3 is instantaneous. Topaz? First you need to invoke the plugin from within Lightroom which causes the RAW image to be converted to a TIFF copy then exported to Topaz DeNoise, some 7 seconds. Topaz Denoise take a further 7 seconds to process the preview image, and seven seconds every time you move a slider which makes experimentation a royal pain, then a whopping 58 seconds to process and save the file in TIFF format (I’m doing this on my four core Mac with 8gB RAM running a 2.83gHz CPU speed with an Nvidia 512 mB 9800GTX+ video card – it doesn’t get better than that!). So that’s a minimum of 72 seconds per image on a very fast computer. Good luck if you have many images to process …. that’s no more than 50 images an hour.

For the geeks amongst you, here is the Geekbench 64-bit score for my hardware:

So while Topaz DeNoise does a half decent job for the $80 asked, and if you shop around you can find discount coupons bringing the price down to $50, if you are a Lightroom2 user you can upgrade to Lightroom3 for $100. For the additional $20/$50 you get superior noise reduction, the processing is instantaneous compared with bog slow for Topaz, LR3’s improved Adobe Camera RAW processing software compared to that in LR2 is included, and LR3 offers an integrated solution which does not require that you exit the Lightroom application to enter a separate de-noising one. I did not do any tests with JPGs as I only use RAW, and you should too.

You can draw your own conclusions where the value lies. Here’s a side-by-side comparison to make things easier:

LR3 on the left. Topaz on the right.

Keywords in Lightroom

A useful discipline.

No matter how well you catalog your images in Lightroom, adding keywords always helps. That snap at the beach may belong under ‘Beach and Sea’ in your catalog or, equally well, under ‘Abstracts’. But if you add the name of the beach as a keyword, or the words ‘beach’ if it’s cataloged in abstracts, the chances of finding it at some later date when you have many thousands of images added will increase through the use of keyword search.

To find which of your images are missing keywords, set up a Smart Collection (Library->New Smart Collection) as follows:

Then when you click on the Smart Collection named ‘Without Keywords’ you can see all the images that need keywords added. I frequently forget to add keywords before cataloging my images after import and processing, so this is a useful discipline. And if you are way behind on your keywording, simly do a few images each time before quitting Lightroom. The payback down the road in image retrieval and time saved is immense – it takes less time to enter a keyword than to search for an image without one.

And while you are setting up this Smart Collection, take a look at some of the other filters that Smart Collections support. It’s a powerful tool.

Lens profile correction in practice

A dream to use.

Having explained how to create your own lens profiles for use with Lightroom3 yesterday, here’s that experience being put to use.

In this snap I wanted to emphasize the foreground sign to heighten the impact of the lone child on the beach. As you can see the original is rather blah as I was trying to moderate exposure between the poorly lit sign (the sun was shining into the lens – note how flare free the image is, especially as I do not use a lens hood) and the brightly lit beach. A separate attempt using fill-in flash looked too artificial for my taste, like one of those over-lit 1950s outdoor Hollywood musicals.

Original on the top. G1, Olympus 9-19mm MFT lens at 9mm.

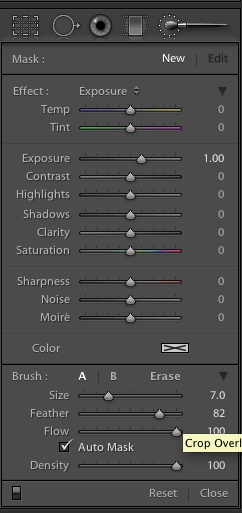
A quick tap on the lens correction profile for the lens in LR3, two minutes work with the adjustment brush on the signs using AutoMask and zero feather to faithfully define the edges, a local exposure adjustment of plus one stop on the masked signs, a minus one stop exposure adjustment to the whole image, a touch on the vibrance slider, a little post-crop vignetting (the Olympus lens is totally free from optical vignetting even at 9mm, as you can see from the original, above), some selective darkening of the foreground and a blah original becomes a picture, and exactly what I visualized when pressing the button. The sheer idiocy of the sign testifies to the fact that the least able in any society work for government.

Stop! Turn right! G1, 9-18mm Olympus at 9mm, 1/800, f/8, ISO 320

With images where you expect to use lens distortion correction or perspective correction at the processing stage, it makes sense to compose with a little space around objects close to the edge of the frame, as that space will be lost when corrections are added – as in this example. Things are made a lot easier by the fact that the Panasonic G1 has one of the very few viewfinders which shows 100% of the image – most crop 3-5% making it impossible to exactly preview the saved file.

Lightroom3 is a powerful, efficient photography tool. The enhancements in Lightroom3 have now almost totally obsoleted my use of Photoshop for which feature, alone, I am immensely grateful.

Thank you, Adobe. Now maybe you can convince that jerk Steve Jobs to allow Flash to work on the iPad before I resort to jailbreaking mine.