A couple of cables, a smart friend and the iBook do the trick.
My eventual goal for the QTVRs + sound that I am making is to show them on the big screen, meaning the 100″ screen in the home theater on which I project movies.
Well, my iBook, a nice portable source for all of this, is a rather dated G4 model so the first port of call was my trusty nerdy friend, a man of great erudition and wisdom when it comes to things computer. As usual, he did not disappoint.
As advised, I bought an adapter from Apple for some $25 for the video signal – its output end looks like this:

Apple calls it the ‘iBook Video Adapter’ and it connects to the mini-VGA socket on the side of the keyboard. If you want to do this make sure you get the right adapter for your iBook – they vary from model to model.
Those outputs are, respectively, S video and Composite video. As I have a few composite video cables lying around terminated with standard RCA phono plugs, I connected the adapter to the iBook and thence to one of the yellow video inputs on the front of my TV and, hey presto!, the image appeared on the screen, easily controllable with the track pad on the iBook.
For sound, my nerdy friend advised that the only way to do things with this older iBook (meaning it’s completely obsolete, being 3 years old….) was to rout a stereo minijack cable from the low level headphone output using an RCA phono plug-terminated cable to attach the sound feed to the ‘Tape’ input on my receiver. The latter is an ancient Onkyo bought used for very little and produces great sound. Sure enough, the oracle did not let me down, as sounds of birds twittering proceeded to emanate from the speakers. Once inserted the poor quality internal speakers in the iBook were silenced.
It may not look pretty but it works:
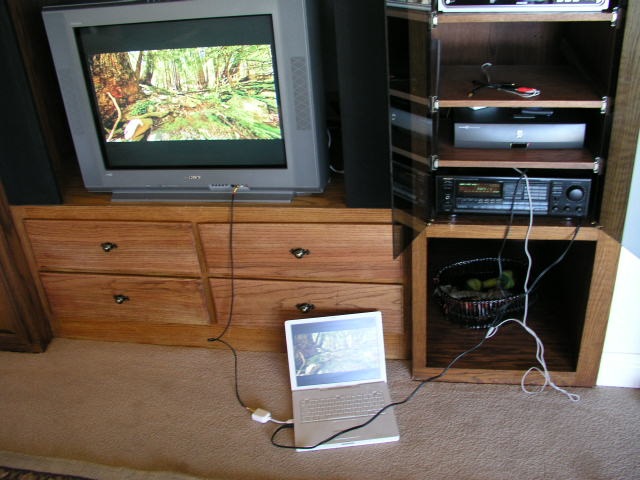
I also tried connecting the red and white phono plugs from the iBook to the sound terminals on the TV and there was more than enough signal to drive the TV’s speakers at adequate volume, even if the fidelity was lower than through the speakers attached to the stereo system.
The next step, then, is to try this same setup with the home theater system. This panorama used HDR photography to prevent the bright outdoors from burning out.