A bit tricky.
The idea of tethered photography with a digital camera is that what you snap appears shortly thereafter in Lightroom on a screen size of your choice.
Practically, this translates into controlled conditions where the camera and a computer can remain close together, so think studio photography. No matter whether your subject is a flower or a person.
The opportunity of immediately seeing your pictures in Lightroom, with default import processing (camera profile, sharpness, etc.) applied, all viewed on a large, properly profiled screen will take you as close to visualizing the finished thing as you can get. Indeed, if computer display is your goal you will see what you are getting; those who print and have a properly profiled screen/printer will be just as happy.
In a perfect world you should be able to attach your camera to your computer, open Lightroom and bang away. In real life the process is two stage. First, you have to tell Canon’s software (ugh!) to deposit pictures in a named location. Second, you then tell LR2 the name of this folder which it will monitor, transferring any new content to a different folder seen by LR2. Thus the first folder is emptied by LR2 and the second is transferred by you, the user, within LR, with contents either moved to your LR catalog or bad snaps moved to Trash. So you start and finish with these two empty ‘transit’ folders but they must not be removed for everything to work. That’s for the neatniks amongst us!
What follows applies to Canon DSLRs but doubtless similar steps apply with others.
With most modern Canon DSLRs (5D, 40D, whatever) you will need current versions of Canon’s Digital Photo Professional (I am using DPP 3.5.1) and Canon’s EOS Utility (2.40). You tether your camera to a USB connection on your computer (laptops are ideal for this) and the camera end is connected with a miniature USB plug. As the one supplied with the camera is short, you can either buy a USB-A to USB-A extension cable, or simply get a longer USB-A to USB-Mini cable. Radio Shack or whatever. There’s no brand value here.
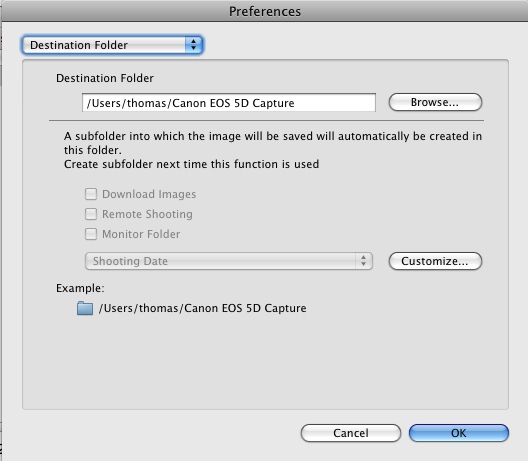
Plug in your camera, switch it on and fire up DPP, then click on Tools->Start EOS Utility. Go to EOS Utility->Preferences and check the box shown below:

This makes sure that what is transmitted to your laptop is also saved on the card in the camera. A useful safety precaution.
Now using Finder, create a unique folder you want monitored. I call mine ‘Canon EOS 5D Capture’ in my user directory.
Back in EOS Utility, go to the Destination drop-down box and enter that destination:
Before even getting into Lightroom 2, check this setup. Take a test picture and it should appear in a few seconds in DPP. With my 5D on a MacBook it pops up in DPP in 4 seconds – that’s for a RAW original.
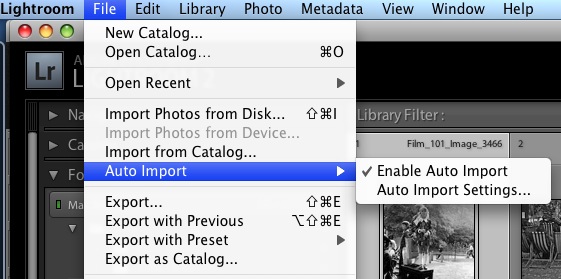
Now Lightroom 2 has to be told where to look for the picture you have just taken.
Go to File->Auto Import and check ‘Enable Auto Import’ thus:
The click on ‘Auto Import Settings’ and enter the exact folder name under ‘Watched Folder:’ you just created in EOS Capture as shown:
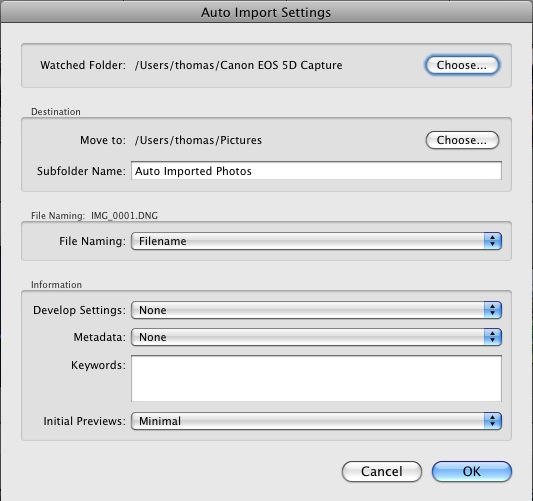
Any typos here and nothing will work.
Back in Finder, create a new folder for the destination of your pictures as seen by LR. I have used the default name of ‘Auto Imported Photos’ which LR2 suggests, above.
Now take a test snap and the left panel of LR2 will show the following:
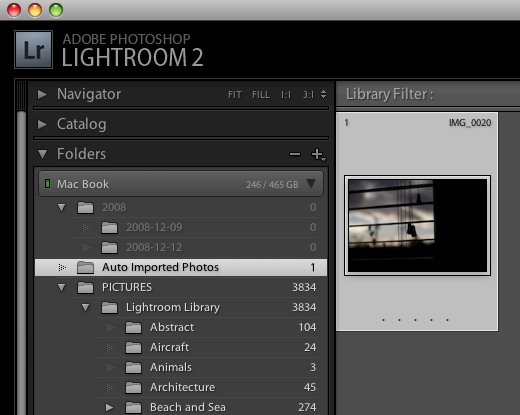
The new folder you designated appears in LR2. Click on it, hit F5, F6, F7, F8 and L and you will see this and all future pictures presented in their full glory, filling the screen. It takes 7 seconds from click to view with my 5D and modest MacBook (2.1 gHz C2D CPU, 4 gB RAM) with RAW originals. Doubtless JPG would be faster as less processing is involved, but JPG so compromises quality I do not bother with it.
If you like what you see, remember to drag-and-drop (move) the keepers to your permanent Lightroom catalog. Then, still in LR, delete the losers.
If you power down your camera or the battery fails or you disconnect the cord, you will need to go back into DPP and reload EOS Utility from the Tools menu. Other than that, it’s plain sailing. I’m using OS 10.5.5 Leopard and LR 2.1; earlier versions of Leopard seem to have had issues with the Canon software but now all is well. You can check Canon’s site for free upgrades to the latest DPP and EOS Utility software. (The older Capture application refuses to work with Leopard on my MacBook, so don’t bother with it if you are using like tools).
If you read that tethered photography was only fixed by Canon in the 5D Mark II, save yourself the upgrade money. My 5D Mark I works fine with this technique.
There’s no better way to preview studio snaps even if they involve moving subjects. You can check light and color balance from just a few test snaps. Very handy when you are using studio flash where its virtually impossible to ‘see’ how your lighting has turned out on the camera’s miniscule LCD screen.
Once you have made the settings above, tethered photography involves the following simple steps:
- Switch on camera
- Connect to computer
- Load Canon DPP and EOS Utility
- Load Lightroom
- Take a test snap
- Navigate to the folder in LR and expand the test snap to full screen
- Bang away
Your camera will use up its battery faster this way as it’s saving both a card image and transmitting a copy to your computer, so come prepared with spares!
Come to think of it, a battery powered netbook computer and a tethered camera would be more than useable in the field. An ideal combination, perhaps, for those who like to take their studio with portable strobes with them. Of course, you would have to convert the netbook to running OS X to use your time effectively ….