A little bit of magic.
Santa came through again this year, this time in the guise of a Panasonic 45-200mm zoom for my G1. I had noodled on the idea of getting the 20mm f/1.7 but that lens’s lack of OIS meant that its f/1.7 was no faster than the f/3.5 of the 14-45mm kit zoom from a steadiness perspective. Further the saving in bulk was not that great – the camera is not pocketable with either. So while f/1.7 is appealing from the perspective of limited depth of field, the overlap with the range of the kit lens left me uninterested.
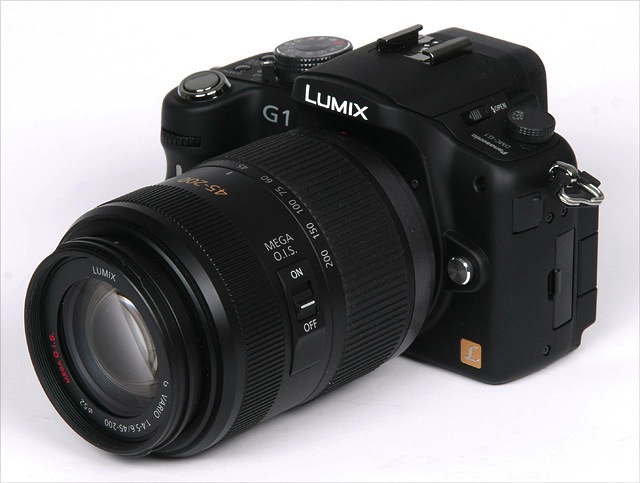
The miniscule 45-200mm mounted on a G1
When I was buying the G1 I wrote of the myriad adapters available for the body, but I have since realized that these offer far less than you might think. Unless you have some special bit of legacy glass that you absolutely must use, adapted lenses fail on many fronts. You have no aperture or focus automation, manual focus with the enlarged EVF image needs buttons to be pressed, taking away the G1’s immediacy of reponse, you lose OIS and you have no possibility of taking advantage of the wonderful distortion and color correction afforded by Lightroom when processing your RAW originals. Which is another way of saying that I sold all my costly Leica M rangefinder optics ages ago and I’m simply not going to go back in time. The operating speed of the G1 is a factor of major importance to the way I work and that would be lost with these kludgy adapters which are doubtless just fine for static work. Not my thing.
So what are the first reactions? Really much the same as with the G1 itself.
- The lens is incredibly small and light when you realize it’s equivalent to a 90-400mm on a full frame body
- OIS is built in
- The zoom ring is smoother than on the kit lens but tightens up a bit at 160-200mm – no effect on use
- Mine has those three magic words on the barrel – ‘Made in Japan’. Sorry Beijing!
- The lens hood is huge – I didn’t even unpack it. No use to me.
- The balance on the body is perfect
- Focus is fast but not Canon 5D fast
- Manual focusing brings up the magnified EVF image and is very accurate – surely this is the most perfect manual focusing system yet?
- Minimum focus at 200mm is a mere 3.3 feet – like a 50mm lens on full frame at 5 inches!
- The barrel extends maybe 3″ at 200mm and has very little side-to-side play.
- Apertures are reasonable – f/4 at the short end falling to f/5.6 fully extended and perfectly usable at maximum aperture.
While there are several digital point-and-shoot cameras available with fixed ‘mega zoom’ lenses, I suspect this is the smallest and lightest interchangeable DSLR lens which reaches out to 400mm (35mm equivalent). Panny’s own FZ35 spans no less than 27-486mm with apertures of f/2.8-4.4. Canon has the SX20 (28-560mm, f/2.8-5.7). Nikon the Coolpix P90 (26-624mm, f/2.8-5.0). All breathtaking stats. And while these may be compromised with lousy EVFs and very small and relatively noisy sensors, it’s very much where design is going. Before long we will likely have APS-C sensor fixed zoom DSLRs with comparable zoom ranges and low bulk.
This Panny zoom weighs in at just 13 ounces making it, from my perspective, the first lens with 400mm capability that you take with you without another thought.
Putting matters in perspective, the G1/45-200mm combination is no substitute for a Canon 5D equipped with Canon’s non-IS 400mm f/5.6, which I wrote about here or similar ‘pro’ equivalents from Nikon, Pentax, Sony and others. While the non-IS Canon lens is the bottom of their 400mm line, which sports no fewer than four models, the other three are all faster with IS; even so, the Canon f/5.6 I own is simply in a different league optically and mechanically from any 400mm lens I have owned. Even after a couple of years’ use it still takes my breath away with its autofocus speed and accuracy and its ability to capture micro-contrast and detail at full aperture. You can see some results here. This speed and quality come at a price, of course, meaning enormous bulk and weight. You do not just casually drop the Canon in your bag when making off to take pictures. It’s a considered decision because you are not going to be switching merrily from ultra-wides to 400mm unless you want to carry a lot of gear. Further, chances are you will be taking a monopod or tripod when using it.
A significant point is that the Canon will run you over $1,200 whereas the Panny comes in at just $300. Maybe not a fair comparison as the Canon covers a full 24 x 36mm frame and is in a different class build-wise, but money is money and few need the big print capability of the superior Canon optic.
The working style with the Panny optic could hardly differ more. First the lens has no tripod bush, so you tend to think about hand holding it. Second, IS adds two to three shutter speeds making handholding even more tempting. And third, it’s so light and small that …. heck, you end up hand holding it! A nice added feature is that the filter size, at 52mm, is identical to that of the 14-45mm kit lens – nice for me as I forgot to order a UV filter when I bought the lens!
The first thing I did on receiving the lens was to go to Panasonic’s site and download upgrades for the lens’s firmware. Yes, modern lenses are packed with code and Panny’s 14-45mm and 45-200mm lenses are now on version 1.2. Both mine were on 1.0, so I updated each – the downloaded installable files differ between the two. I neither much know or care what these downloads change but I prefer to be current. The G1 itself is now on body firmware version 1.4.
The next step was to bang away and try a few snaps at 1/125th or so at full extension. The claimed 3 shutter speed benefit of OIS seems largely realized as I was finding that two out of every three snaps were shake free and good enough for 13″ x 19″ prints. Further, these were taken at full aperture, which is f/4 at 45mm, dropping to f/5.6 at 200mm. I simply set the lens to f/4 at the wide end and that leaves it at maximum aperture throughout the zoom range. Having got into the habit of using the 14-45mm at full aperture and finding the results to be excellent, I went the same way with the 45-200mm and was not disappointed.
I processed the RAW images in Lightroom 2, because that’s what I ordinarily use and because Adobe has built in distortion and chromatic aberration specific to these lenses which is applied automatically. As a result, the pictures appear distortion free and I cannot see any significant color fringing anywhere in the zoom range. Quite why Adobe is not broadcasting this wonderful bit of application programming from the rooftops beats me, as independent reviews confirm that the native output of the lens exhibits significant distortion and chromatic aberration problems, whereas the Lightroom user sees none of these.
In Part II I will look more at practical use and results but can already say that this is an exciting addition to a very small camera outfit which, with two light and compact zooms, offers excellent image quality all the way from 28mm to 400mm (35mm full frame equivalents) in a camera which uses a reasonably sized, low noise sensor. Now if only Panny could be convinced to make a 10mm pancake, equivalent to an ultra-wide 20mm on full frame, this user would have everything needed in a superbly compact outfit with very light weight.
“Manual focusing brings up the magnified EVF image and is very accurate – surely this is the most perfect manual focusing system yet?”
I am not sure if you have have tried this, but in my mind the manual focus issue gets even better for both of these lenses. On screen three of the custom menu, if you toggle “AF+MF” to “Yes”, than when you half depress the shutter button you get the autofocus. Keeping it half depressed, when you touch the manual focus ring, the enlarged field of view comes up on the EVF and you can tweak the focus (if need be). Its a great feature once you get used to it. It helps in finding the good initial focus, especially as the lenses dont have distance markings on the MF ring. My two cents, from a rank amateur who is liking his Blumix…
Great tip, thanks. An incredibly useful technique when focusing through a window if the AF sensor insists on focusing on the glass instead of the object behind it. Yet another strike against the truly awful instruction manual which Panny ships with the camera.
Thanks for the review, seriously thinking about getting this lens for my GF1. Just curious, why do you say the hood is of no use to you?
Rory – it adds a lot of bulk which makes it impossible to pocket and increases how noticeable you become. Plus, unless you are pointing it directly into the sun – in which case no hood works – it makes no difference with modern multi-coated lenses.
Thanks, I definitely understand the bulk factor. I am new to photography so only have a vague sense of what the point of a hood is. Not sure what exactly you mean by “multi coated lenses” but glad that I (hopefully) won’t need to drag the hood around with me.