DIY lens profiles.
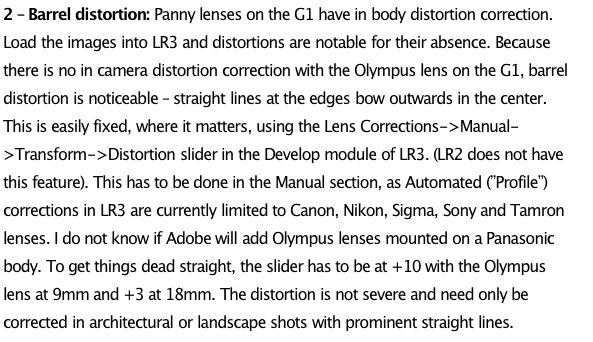
Adobe has not left Panasonic MFT camera users out in the cold when it comes to automation of corrections to remove distortion, chromatic aberration and vignetting in Lightroom 3. They provide a fine tool to create your own lens profiles, for example when using non-Panasonic lenses on a G-digital body, like my newly acquired Olympus 9-18mm MFT. In my third column reviewing that outstanding optic, I stated:
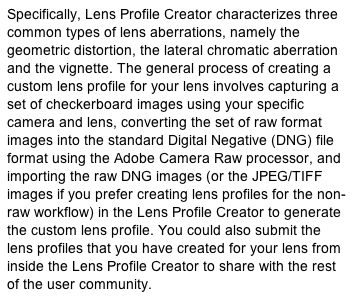
Well, it turns out that Adobe provides a free application named Lens Profile Creator which allows you to create your own lens profiles for just about any lens on any camera, film or digital, from iPhone to Leica S2 or scanning 4×5 back on a field camera. The download includes not only the charts (you must print one so that you can photograph it) but also instructions for use of both the application and details of how to set up your camera and lighting.
With the G1 it’s only necessary to do this for non-Panasonic MFT lenses like the Olympus 9-18mm ultra-wide zoom. Panasonic lens’ distortions are corrected by the software in the G1/G2/G10/GH1/GF1 range of bodies. Here is what Adobe says of their application:
The PDF instruction guide for Lens Profile Creator can be found here and the instructions for printing the calibration charts are here.
Creation of a lens profile is easy. You take nine pictures of the chart – I used RAW as that is all I use – convert them to DNG format by importing to LR3 then exporting in DNG format, and then you load the nine DNG images into Lens Profile Creator to create the lens profile for a specific focal length. As chromatic and barrel distortion in the Olympus 9-18mm lens vary with focal length, I did this at the four marked focal lengths – 9, 11, 14 and 18mm – a total of 36 pictures. It doesn’t take but a few minutes to take the pictures (alignment, per Adobe, is not critical) and, on my nuclear powered Mac, Adobe Lens Profile Creator took some 2 minutes to generate each of the four profiles from the nine constituent pictures I took for each. For the criminally insane, you could generate multiple profiles for each focal length at varying apertures, (chromatic aberration varies with aperture) but I would rather be taking pictures. Please yourself. I focused (!) on creating profiles at disparate focal lengths as it’s barrel distortion that is the most sensitive variable for my use and it varies significantly with focal length.
Once done you place the profiles in the /Library/Application Support/Adobe/CameraRaw/LensProfiles/1.0 directory on your Mac where they will be available to all users of that Mac. (There are also instructions for those poor, unfortunate Windows users who place little value on their time and have yet to get a life). Finally, the Adobe application allows you to submit the profile to Adobe’s user forum though for some bizarre reason the submitted profiles are only currently available for download to Photoshop CS5 users, not Lightroom 3 users. Hey! Adobe! Can you say ‘Duh!’?.
Here’s how your Lightroom 3 options will look if you named your profiles correctly:
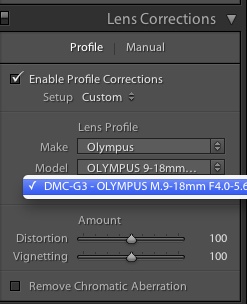
The drop down focal length selection panel in LR3.
And here’s a ‘before’ (no profile) and ‘after’ (9mm profile) comparison of a profile being applied:
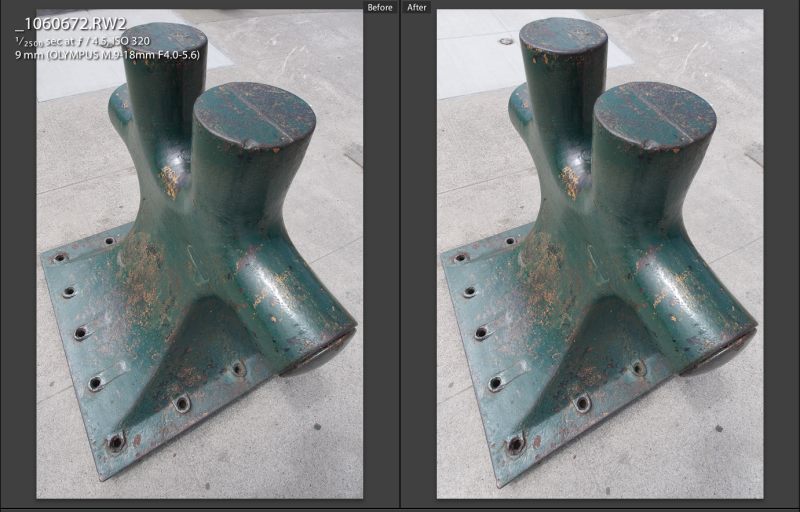
Henry Moore’s bollard. Before and after with the 9mm profile.
The profile file contains no fewer than 8 profiles, created at 9mm (f/4, f/5.6), 11mm (f/4.3, f/5.6), 14mm (f/4.9, f/7.1) and 18mm (f/5.6, f/11) at the apertures shown. Lightroom will automatically chose the profile nearest in focal length and aperture to your photograph’s EXIF data.
If you would like to download the profiles I created, for your own use, you can do so by clicking below. Please note that these are for use with RAW or DNG originals only. They will not appear if your file is in JPG or TIFF. Feel free to share them with anyone. Unzip the downloaded file then place the four individual profile files (not the enclosing folder) in the /Library/Application Support/Adobe/CameraRaw/LensProfiles/1.0 directory. Next time you start LR3 they will be available. Please note that these are solely for the Olympus 9-18mm MFT lens used on a Panasonic G-series digital body taking RAW images.
Click to download Olympus 9-18mm MFT lens profile for the Panasonic G-series body. For RAW and TIFF originals only.
So if you really must have automated corrections for that 65mm Super Angulon on your 1964 Linhof 4×5, Adobe Lens Profile Creator is the tool you need.
Indeed, I see no reason why this software tool should not be used to create profiles for your film and flat bed scanners – instead of photographing Adobe’s target, simply scan it and run the scans through the program, so now you can profile your scanner (or, heavens forbid, a darkroom enlarger) in much the same way you can profile your 21st century lens on the latest in digital bodies.
Alternative #1- DxO Optics Pro Elite:
DxO makes the fancifully named DxO Optics Pro Elite for correction of lens aberrations at the equally fancy price of $300. It’s bog slow even on my hyper-speed Mac, must be loaded separately from your regular processing application and at the price asked compares poorly with the free Adobe Lens Profile Creator. I reviewed it here. And there is no version for Snow Leopard. These people need a loud wake-up call.
Alternative #2 – PTLens:
I wrote in glowing terms of PTLens here. It’s a $15 app which can be used as either a stand-alone or as a PS or LR plugin, and has a large and constantly updated lens database. The latest version includes the Olympus 9-18mm MFT lens for both RAW and JPG on a Panny G body but I cannot recommend it. Simply stated, the RAW profile is awful, way overdoing the correction and turning barrel distortion into severe pincushion distortion instead. Further, as you have to round trip the file from LR that means that a TIFF file (lossless) is first generated, meaning that your 12mB RAW file will be 80gB by the time you save it back into LR. Not a big deal but with its current RAW profile I cannot recommend the product. My profiles, above, are way superior.
By way of illustration, here are the PTLens (left) and my custom profile (right) versions of an original which shows pronounced barrel distortion of the horizon. In the PTLens version a lot of the image is lost and the figure is way too elongated. If you could see the horizon which PTLens chops out you would see severe pincushion distortion, not to mention chopping out much of the ultra-wide effect you just paid good money for:
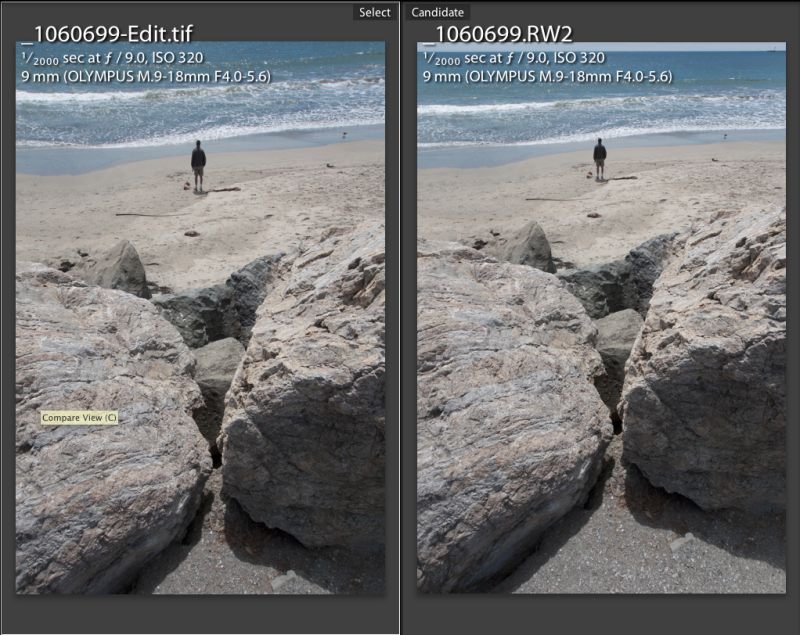
PTLens vs. my custom profile at 9mm
Here’s another example showing what a poor job PTLens does with this camera/lens combination – PTLens on the left cuts out lots of image information; my profile on the right does it correctly:
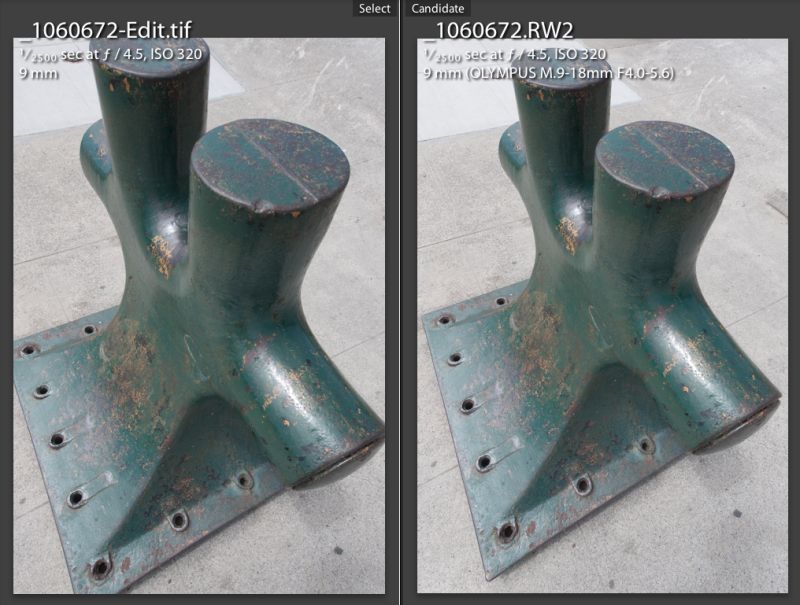
Moore’s bollard again – see above for the ‘as shot’ original. PTLens version on the left.
Alternative 3 – use LR3:
If you don’t mind having to manually correct distortions for every picture then manually adjusting for chromatic aberration, LR3’s controls are just fine when used with the Olympus 9-18mm. However, if your ultra-wide lens displays the ‘bow wave’ type of distortion where the barreling changes to pincushioning at different spots on the horizon then the built in LR3 control, which can correct plain spherical distortion only, is of no use and a tailored lens profile is the only option.
Conclusion:
“If you want a job done well, do it yourself” is one of the most asinine homespun philosophies in the Western world. If you want a job done well, delegate it to a professional and maximize your time value by applying your skill set to what you do best. This may just be an honorable exception to that dumb ‘rule’. If you want a good lens profile, do it yourself or if you use the Olympus 9-18 MFT on a G-body, use mine.
Just downloaded your lens profiles and they’re working nicely. It’s very public spirited of you to make them available, and I commend you for that. I’m also very happy to be turned on to your blog!