A bit of gadgetry does it.
Topology – before and after:
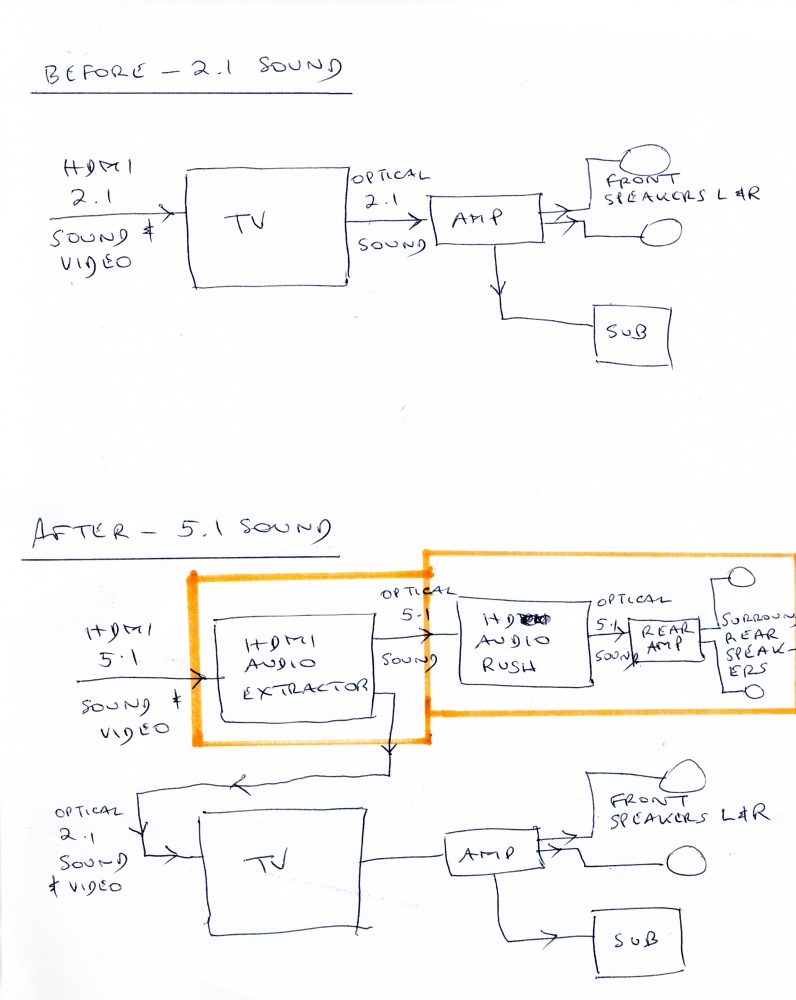
Topologies Before and After. The orange boxes contain added hardware.
The problem:
Many will find themselves in this situation. You have a high quality sound system as part of your home theater installation but it is limited to 2.1 channel sound, meaning 2 front speakers, left and right (the ‘2’) and a subwoofer for the low notes (the ‘.1’). You have spent an arm and a leg on the speakers and related amplifier because you also listen to high quality music so the amplifier and speaker set up must be really good, and that means costly. That’s illustrated in the ‘Before’ section of the above image.
Now you increasingly see that Netflix and other streaming services are advertising not just 4K video sources but that these are accompanied, as often as not, by 5.1 sound. The ‘5’ denotes the two front speakers, a center channel speaker and two rear speakers for the ambience effects of surround sound behind the listener’s head. You would like to add true surround sound to the rear speakers and maybe an added center channel speaker, but you sure as heck do not want to sell your high quality amplifier for a chintzy surround sound amplifier.
I set forth below how to do that for very modest outlay. The result is in the ‘After’ illustration, above.
Summary of the solution:
The goal is to deliver surround sound to two rear speakers. To accomplish this, in lieu of buying a surround sound amplifier, four pieces of hardware are required.
- An extractor to break out the sound components from an HDMI source
- A splitter to take the extracted sound feed and break it down to left and right rear channels
- An amplifier to amplify the left and right rear channel feeds
- Rear speakers
I address each in turn below.
The magic of HDMI:
Modern components invariable use HDMI cables for connectivity. An HDMI signal from your Apple TV/Apple TV 4K/Roku/Roku 4K streaming box (there are many other choices) uses an HDMI output which connects to your big screen TV. That HDMI cable carries 4K (or lower) video as well as 5 channel sound. We will want to split the sound and video components so that the selected additional sound channels (left rear/right rear and, optionally, center front) are separately available for amplification and routing. The ‘Before’ 2.1 topology does not use these three sound channels which are – invisibly to you – discarded.
Extracting 5 channel sound from the HDMI feed:
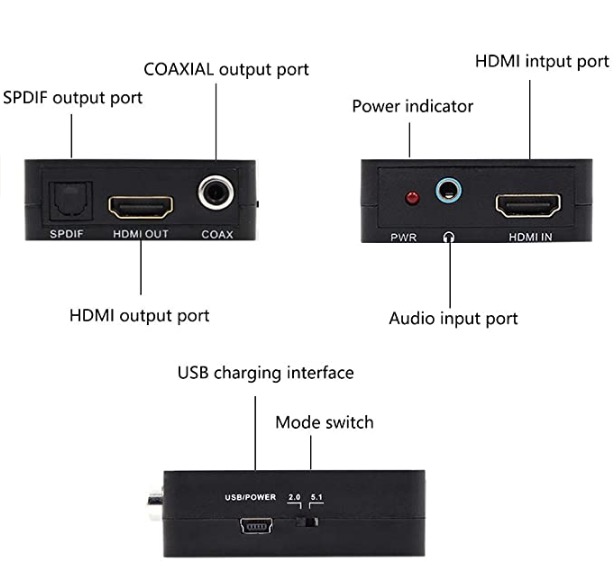
The HDMI Audio Extractor box.
First we need to extract the 5.1 sound feed from the HDMI sound + video feed coming out of your streaming box. This is done using an HDMI Audio Extractor box which comes in versions which passthrough both 4K video and the lower definition 1080p video. The 1080p version runs just $12 at Amazon while the 4K version retails for $20, so you might as well buy the 4K version in the event that an upgrade is contemplated down the road. Be sure to use HDMI 2.0 or 2.1 spec cables for HDMI as only these will preserve 4K video quality. The premium over the older HDMI 1.4 cables is trivial.
Now, instead of connecting your streaming box (Apple TV etc.) directly to your TV, you connect it to the HDMI Audio Extractor, and then connect an HDMI cable from this extractor to your TV. The extractor is smart. It delivers both video and two front channel sound to your TV but also has an optical (SPDIF) output which carries all five sound channels.
Splitting the 5 channel optical source into discrete channels:

The Analog Decoder/Converter Audio Rush box.
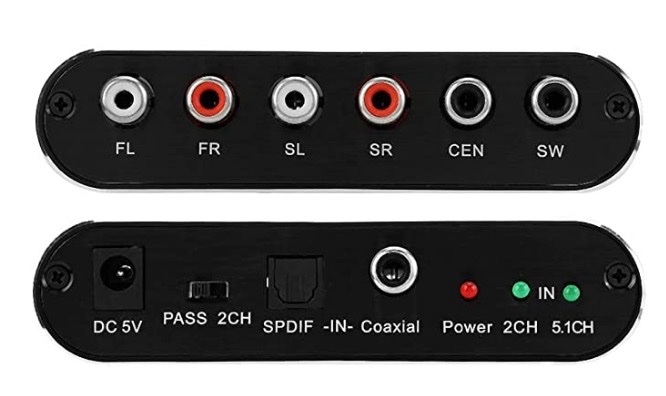
Outputs and Inputs. We will be using SL and SR outputs and the SPDIF (optical) input.
With a 5 channel high quality optical sound source now available at the outputs of the HDMI Audio Extractor box, we need to feed that, using an optical cable, to an HD Audio Rush box. This takes the optical feed and splits it into five discrete channels. The ones we want are the rear left and right and, optionally, the center front. Going by the fancy name of ‘SPDIF Coaxial DTS AC3 5.1 CH Audio DTS/AC-3 to 5.1 Analog Decoder Converter’ these can be found on eBay for all of $24. Amazon is asking $38 for the same hardware.
The optical cable from the HDMI Audio Extractor box (be sure to remove the small, protective plastic pips, or it will not fit) is connected to the optical SPDIF socket on the Audio Rush box and both boxes are switched to 5.1 sound or else 2 channel sound will be delivered to the front speakers only.
Amplifying the surround sound feed:
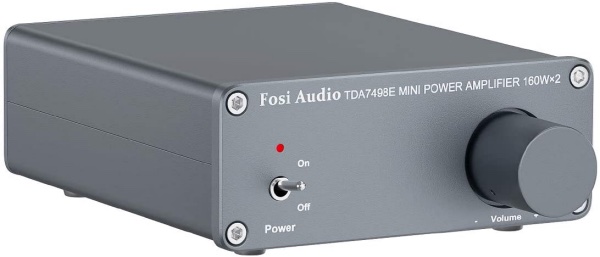
The amplifier for the rear surround speakers.
With sound feeds for the left rear and right rear channels at the outputs of the Audio Rush box, these have to be amplified, as they are low voltage ‘line level’.
My home came with ceiling speakers in three rooms and a jumble of unmarked wires emanating from the wall behind the TV. One of those rooms is the TV room where, as luck would have it, the ceiling speakers are behind the TV viewer. Perfect for surround sound. After blipping wire pairs with a 1.5 volt battery I determined which two pairs of wires were attached to the speakers in the TV room and terminated these with 2 pairs of banana plugs costing $9.
You may need to add free standing or ceiling mounted rear speakers, and you can either use regular unpowered ones, which will require an amplifier or powered ones which will require a mains connection and no amplifier. I prefer the amplified approach as it gets you rear speaker volume control at the TV set.
How powerful a rear amplifier you install depends on the efficiency of your rear speakers and the desired volume.
While my pre-installed ceiling speakers appear to be decent quality, you do not need costly, exotic amplification or high end speakers as the rear speakers’ job is to convey sound stage and ambience, not high fidelity.
After determining that mine were 8 ohm (less efficient than 4 ohm) and testing with my regular front amplifier I determined that a 2 x 160watt rear amplifier was called for.
Now, this is a very misleading specification as it refers to the maximum momentary power that the amplifier can deliver. RMS power is what should be quoted, but salesspeak sees to it that no such data are provided. I would guess the RMS (continuous maximum) power is more like 2 x 35 watts, which is fine for my installation. This ran me $75. (For the frugal, this amplifier can be found on eBay for as little as $46, but shipping from China).
The amplifier is connected to the Audio Rush box using cables terminated with RCA plugs, and the speakers are plugged into the amplifier, using banana plugs. The amplifier is a simple 2 channel device with its own volume control. It can be nestled close to the TV to make adjustment of the rear surround speakers’ volume easy. I find that setting the volume knob in the center of its range is optimal, which is pretty much how you want it with any amplifier.
Power supplies:
We have added three devices into the audio chain and each needs power. The HDMI 1080p Audio Extractor box and the Audio Rush box only need 5 volt power and each comes with a USB cable to provide this voltage. (The 4K version of the HDMI Audio Extractor comes with its own 5v power supply with a very short cable, but you can replace that with a USB power cable if preferred, at modest added cost). You can either plug those USB cables into a PC (I use a Mac Pro – with an added 4 outlet USB card – for internet access on the big screen) or use a power strip with built-in USB output sockets.
The power amplifier comes with its own 24 volt power supply brick which is plugged into a mains wall socket. The power needs of the amplifier dictate that you must use the provided power brick. USB power will not cut it.
Connecting cables:
You will need the following:
- HDMI 2.0 or 2.1 cable to Audio extractor from video streamer (AppleTV, etc. )
- Toslink optical fiber cable from Audio Extractor box to Audio Rush box – mine was included
- 12 gauge or so twin pair wire from the Audio Rush box to the power amplifier
- Amplifier to speakers – inexpensive speaker cable
Connectors:
- Twin pair wire from Audio Rush box to amplifier – RCA/twin wire connectors
- Speaker wires to amplifier – banana plugs
Total outlay:
My total outlay was around $130 to which you will have to add the cost of rear speakers and an optional center front speaker. My rear speakers came with the home, mounted in the ceiling.
Test setup:
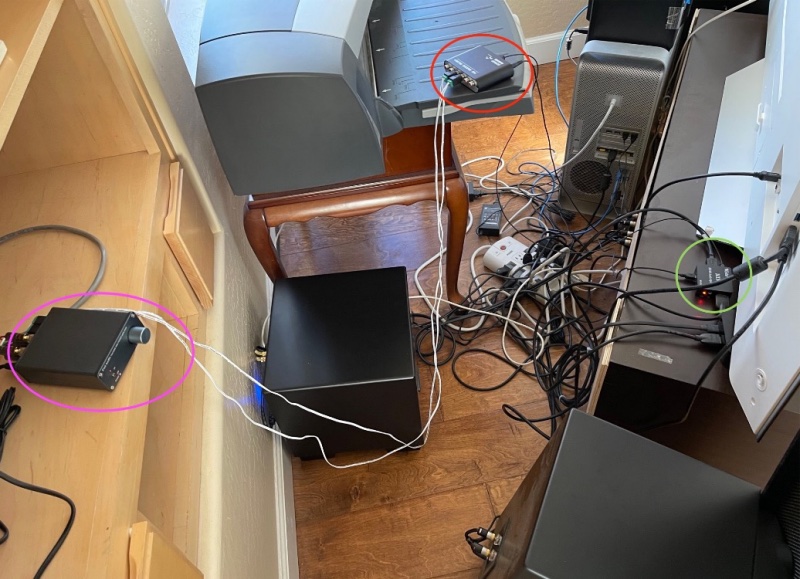
The components in place.
No it’s not pretty and, yes, I will clean things up, but you can see the three added components in the above image.
The Audio Extractor is circled in green and the Audio Rush box in red. These are ‘install and forget’ and can be placed out of sight. These two boxes are powered using (provided) USB cables plugged into the Mac Pro. The power amplifier is circled in mauve and can be placed in an easily accessible location to permit volume adjustment. It can be left on at all times as the power draw is low.
Adding additional feeds:
At this time I have one feed with surround sound added, the one from the Apple TV 4K streaming box. The TV has one other HDMI feed connected, that being from the Mac Pro which is a file server for stored movies and an internet browser. I will also be converting this to add surround sound which will necessitate the addition of a second Audio Extractor between the HDMI cable from the Mac Pro and the TV set. The optical cables from both Audio Extractors will go into a 2-into-1 optical connector/splitter ($10) and the single output optical cable will go to the Audio Rush box. Switching is done at the TV where HDMI outlets can be selected on the screen so no switches are required. You really do not want to have to mess with this once it’s all installed. The goal is to retain operational simplicity so that anyone can use the system.
More details on using more than one HDMI source appear in this follow-up article.
Overall user experience:
With a high quality 5.1 signal source you will not want to revert to 2.1 for movies. Try a good movie like Saving Private Ryan with its overwhelming images and sounds from the D Day landings. I asked my son for his preference and he chose Dunkirk which garnered not one but two Oscars for its magnificent sound track. We watched/listened last night and it was the closest you could get to the IMAX experience at home.
Hardware used:
- LG 65” OLED TV
- Martin Logan ESL front speakers
- Martin Logan powered subwoofer
- Parasound HALO integrated amplifier
- Additional hardware described above
- Ceiling speakers of unknown provenance
Universal remote>
For an easy to program universal remote to go with all of the above, click here.