Category Archives: Mac Pro

Mac Pro 2009 – Part XXVI

Thunderbolt speeds for your storage.

For an index of all my Mac Pro articles, click here.

Thunderbolt is Intel’s technology for faster data movement between the Mac and storage drives. It also permits connection of displays.

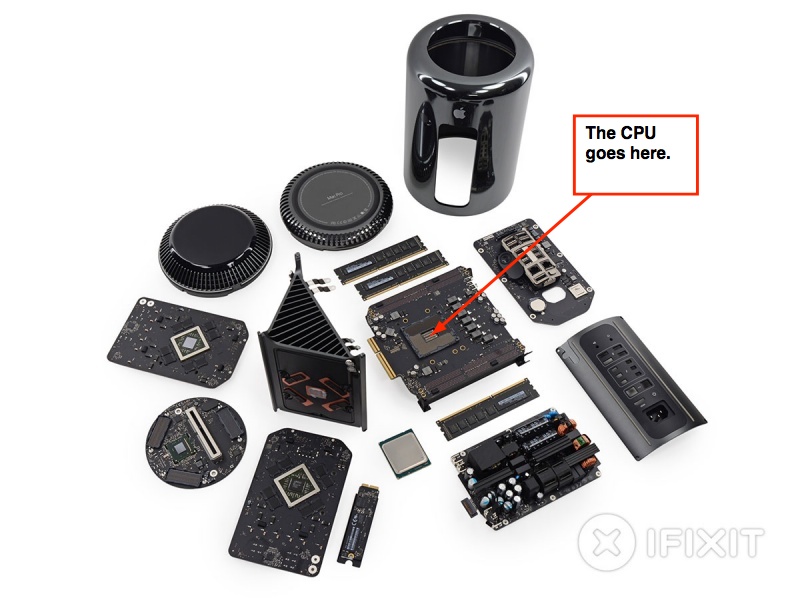
Much has been made of the speed of TB in Apple’s marketing and it’s a technology which will never become available for classic Mac Pros as the required chips reside on the backplane board (motherboard) and cannot be added on a PCIe card. Thunderbolt requires costly external disk drive enclosures to work with the new cylindrical Mac Pro, also very costly.

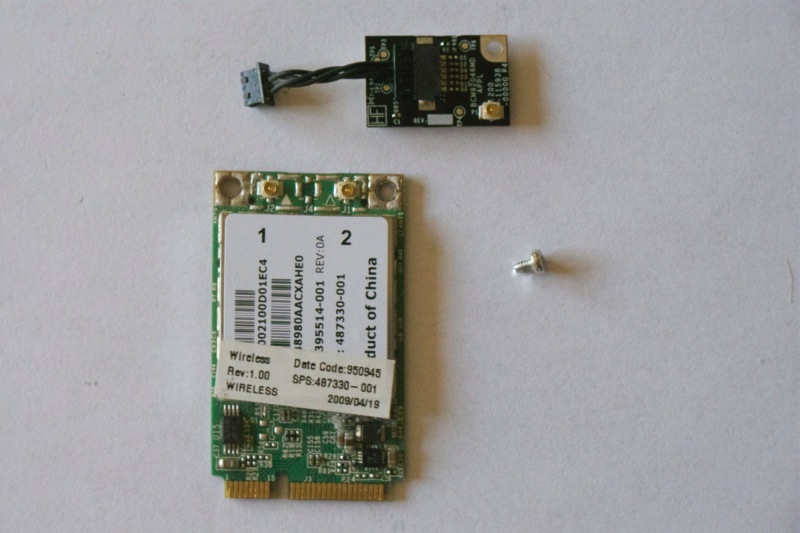
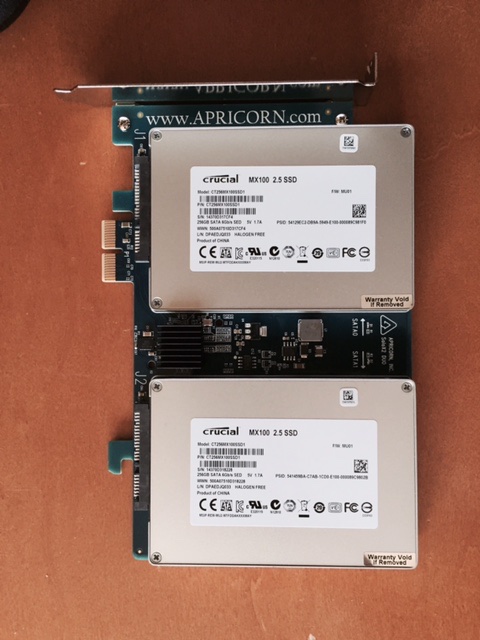
But there’s a very simple solution for classic Mac Pro users seeking near-TB speeds and it comes from Apricorn in the guise of a dual SSD PCIe card.


Click the image.

Retailing at $140-150, plus the cost of two identical SSDs of your choice, assembly takes 3 minutes and installation in any PCIe slot in the Mac Pro a minute more. There are no cables to attach. Two status LEDs on the card glow green when all is well. PCIe allows the SSDs to run at SATAIII speed, which is twice the speed of the internal, dated SATAII drive slots in the Mac Pro.

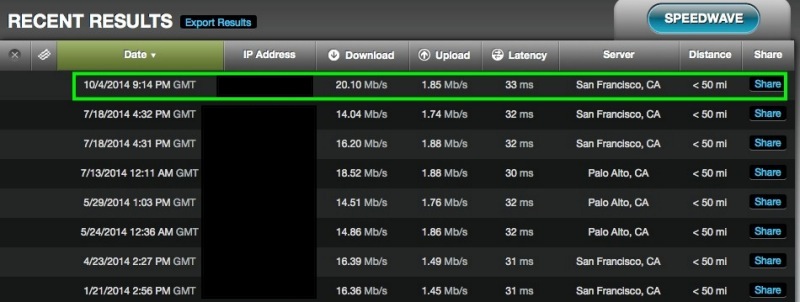
This particular card was fitted with two Crucial MX100 256GB SSDs for a total cost of under $400, and set up in Disk Utility as a striped pair, meaning that both drives are written to simultaneously with disparate data streams, thus doubling the speed compared with a single drive. The drive pair is seen as one drive in Finder and should be regularly backed up, such backup being to the cheapest spinning drive handy. The OS and applications are moved to the Apricorn and the following speed test data were obtained:

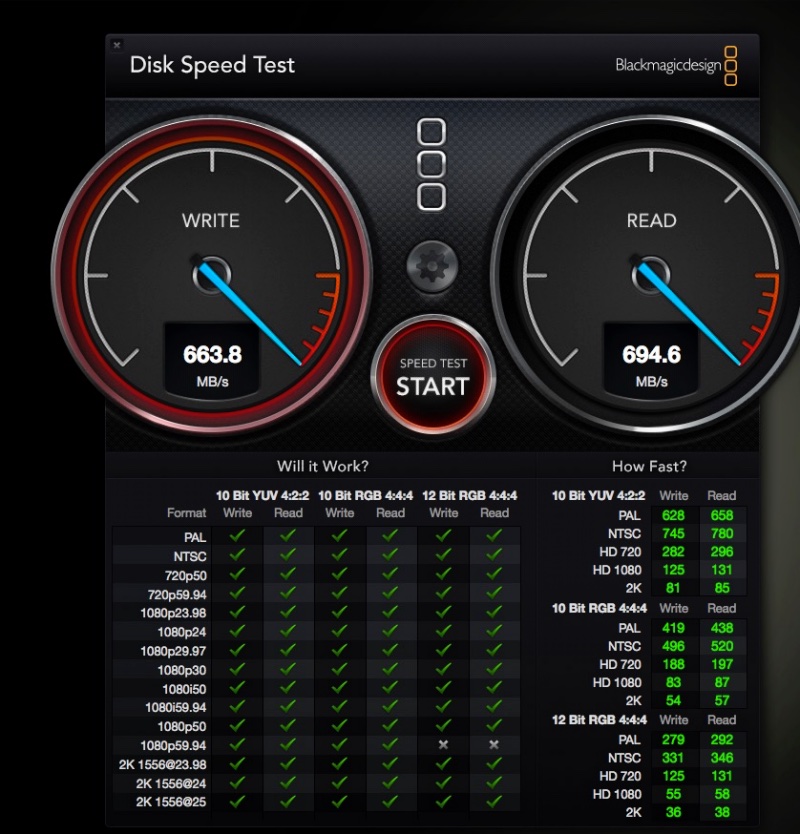
Data are for a modestly spec’d single CPU Mac Pro with an X3690 3.46GHz CPU running just 8GB of 1333MHz RAM.

This compares with 715 and 791 for the new Mac Pro 2013 with 64GB of 1600MHz RAM and the D700 dual GPUs.

Expect 50 MB/s for a spinning HDD in a regular drive slot, maybe 150 MB/s for a single SSD in an internal drive slot and 300 MB/s for two SSDs in internal drive slots in a striped array. External USB2 drives measure 30-50 MB/s, USB3 some 75 MB/s. Clearly the speed gains here are very significant.

Thus for a very modest investment, you get 93% of the Read and 88% of the Write speed of a very costly new Mac Pro.

The ideal use for such a fast drive is for the OS and applications, of course, but for photographers processing very large layered files with frequent read/write activity, it’s an excellent temporary storage drive. Once processing concludes, the files can be moved to inexpensive spinning disks for long term storage.

Mac Pro 2009 – Part XXV

Handoff and Continuity in OS X Yosemite.

For an index of all my Mac Pro articles, click here.

You can read here about these two new OS X technologies coming to Macs with OS X Yosemite, which will be released by Apple on October 16, 2014.

However, because these features use Bluetooth 4.0 they will not work with a stock 2008/2009/2010/2012 classic Mac Pro which does not run this latest version of Bluetooth.

The advantages of these OS X enhancements are described in the linked article; one of the greatest appeals is the ability to take and make phone calls on the Mac Pro as long as your iPhone is nearby within Bluetooth range, as long as you have speakers and a microphone conmected to the Mac Pro.

Thankfully, an entrepreneurial vendor has developed an elegant kit which not only updates the classic Mac Pro to Bluetooth 4.0, it also upgrades wi-fi from 802.11n (or the even older 802.11g) to the latest 802.11ac broadcast by Apple’s current Airport Extreme and Express wifi routers. You can buy the kit here. Availability is spotty, so keep trying – they are providing current iMac integrated cards in this kit. The kit is not cheap at $150+ but better than alternative clunky solutions which require you to run a cable to a USB socket. The latter approach requires a pass through opening somewhere in the Mac Pro’s case unless aftermarket PCIe cards in your chassis include an internal USB socket.

The Apple part (probably p/n 661-7514) retails at $90 so the modifications made by this vendor to permit use in the classic Mac Pro are, in fact, reasonably priced. The existing Airport card is replaced with a new dual Airport/Bluetooth card, with the old Bluetooth card removed and its electrical connector used to connect to the cable from the new Airport card. Further, an additional antenna extension is run from the new Airport card to the old Bluetooth antenna in the Mac Pro’s chassis.


The upgrade kit showing the integrated Airport/Bluetooth card, Bluetooth connector wire, and Bluetooth antenna extension (the thin one). The retaining screw is redundant – reuse one of the two used with your old Airport card.

Full instructions appear on the vendor’s web site but be warned. There are no fewer than five of the minuscule and fragile antenna connectors to insert and while I have installed many Airport cards it’s still touch and go with these. Sometimes it’s easy, sometimes they can be a real pig. The best approach is to secure the new card with one screw (the old card took two), carefully align the connector and push it down into place with a chopstick, or similar.

Note that the new card uses all three of the stock antennae in the Mac Pro; the older Airport card only uses two (the third has its connector shrouded in a clear plastic sleeve and is usually tucked under the stock Airport card) and you may have to fish for the third, which is usually disclosed once the old card is removed. Use a magentized screwdriver for the small retaining screws or be prepared to find the ones you have just lost in the chassis.


Connectors from hell attached to the new iMac Airport/BT card – red oval.
Three existing and one new BT extension antenna, the latter with one connector at each end.

The process of attaching these small connectors is tricky, and frustration or force are guarantees of failure. If you are ham handed, impatient or sausage fingered, you really have no chance of getting it done right. Even your local Apple Store or Apple technician will struggle. These are simply awfully designed connectors and standard in the industry – it’s not an Apple thing. I actually prefer to pull the processor cage in 2009/2010/2012 Mac Pros but that process requires five Allen bolts, six Philips screws and three tough to disconnect electrical connectors to be removed, as well as requiring both cage fans loosened and moved inwards within the cage and the PCIe fan removed. Not, in other words, a cakewalk, but it does make working with the very short cables on the native antenna cables easier to manipulate into position once the card is retained in place with a single Philips screw. It’s far easier to attach the antenna cables once the Airport/BT card is secured in place. Processor cage removal instructions are linked here.


The old BT card (green) and Airport card (red), disclosed when the processor tray is removed.


BT data cable (red – also very tricky to insert and keyed, so get it right) and antenna extension (green) attached to the new Airport/BT integrated card.

Most current Apple devices offer 802.11ac, including iPhone 6/6+, and all the latest computers and tablets do so except for the Mac Mini.

You can check the installation in the following screen images from ‘About This Mac’:

Bluetooth 4.0LE:

802.11ac wifi:

After installation I performed SMC and PRAM resets, consonant with best practice.

Speed? Much as with my MacBook Air, wifi speed is some 20-30% faster in my environment using 802.11ac compared with 802.11n and the Mac Pro’s wifi speed is actually slightly faster than that of my 2014 MacBook Air; forget Apple’s disingenous claims of huge theoretical speed increases (“up to 3x faster” uh, huh):

More about Handoff and Continuity when I have OS X Yosemite installed.


The old Airport and BT cards are discarded.

Anomalies noted:

On my test Mac Pro (2009, dual CPUs, GTX680 GPU) the CPU heat sink fans ran 200-250 rpm faster than usual after installation. However, overnight they settled back to normal after the usual sleep cycle. This machine is seldom turned off.

Mac Pro 2009 Part XXIV

Adding the Apple Hardware Test.

For an index of all my Mac Pro articles, click here.

In years past you could run the comprehensive Apple Hardware Test by restarting your Mac while holding the ‘D’ key on the keyboard. However, it seems Apple has ceased including this software in recent years, though that is easily remedied.

Because some of the AHT files and directories are ordinarily invisible, we need to make invisible files visible to see what we are doing.


Click the image to go to the site.

Once you have invisible files visible, download the AHT relevant to your machine by clicking the image below:


Click the image for the AHT download.

My Mac Pros are all 2009 models with firmware upgraded from 4,1 to 5,1 to permit the use of 6 and 12 core CPUs – the AHT files for the two firmware variants appear identical.

You want to create a directory named ‘.diagnostics’ (the period makes it ordinarily invisible) in the System->Library->Core Service directory, thus:


The ‘.diagnostics’ directory has been created.

Now move the downloaded files from the ‘.diagnostics’ directory in the download to the new directory on your Mac.

Go back to the first link and once more render the invisible files invisible.

Shut down then hold the ‘D’ key while starting up and you can run AHT – a useful diagnostic tool. Here it is installed in one of my Mac Pros with upgraded 12-core CPUs and lots of other aftermarket hardware installed:


Apple Hardware Test running on the 2009 Mac Pro.

Mac Pro 2009 Part XXIII

Replacing the backplane board.

For an index of all my Mac Pro articles, click here.

A 2009 dual CPU Mac Pro I was recently upgrading suffered from very long boot times sometimes refusing to boot at all. PRAM and SMC resets made no difference. This behavior prevailed with a variety of memory sticks, boot drives, processor cages/CPUs and graphics cards, so I consulted the excellent Apple Technician’s Manual and conducted a battery of diagnostic tests to determine the problem. The Mac Pro comes with a host of diodes on the backplane board (‘motherboard’ in Hackintosh/PC language) and after going through many of the diagnostics the conclusion was that the backplane board was to blame. This is a process of exclusion – the diodes can confirm the Airport and Bluetooth cards, GPU, power supply, memory and CPUs are fine, leaving only the backplane board as the culprit.

Many vendors stock the part, number 661-4996, and DV Warehouse had the best price at $344 + CA tax and shipping for a new one.

You really need the Technician’s Manual to replace this part, as pretty much everything else has to be removed from the chassis to grant access for backplane board removal and replacement. That said, it’s not difficult, no special tools are needed (unless you call a 2.5mm Allen wrench for the processor cage slider bolts exotic) and but for one error in Apple’s Manual, the task is easily completed in one hour.

The error? Apple misstates the number of Allen screws retaining the backplane board to the chassis at nine. It’s ten and if you do not find the tenth, that’s all she wrote.

Here are their instructions:

Here are the actual locations of the three types of screw openings in the backplane board:

Green are the openings for the captive processor cage screws. This is important to know as the regular backplane board retaining screws will fit these openings just fine, thank you, making replacement of the processor cage impossible …. Yellow are the two openings for the PCIe fan assembly. And red denotes the ten retaining screws for the backplane board. Apple misses this one in its instructions:


The ‘missing’ backplane retaining screw.

For the Airport and BT cards be careful to unclip the fragile antenna wires from their routing retainers (one retainer for Airport, two for BT) before removing the backplane board. Once the processor cage and PCIe fan are removed you have only to unclip four connectors (top left), the backplane board to front panel switch assembly cable (reversible and keyed) and the power supply to backplane board cable.

Result? The Mac Pro sounded the chime and booted first thing. From chime to login screen takes 21 seconds booting at SATAII speeds from an SSD in the optical drive enclosure, and 16 seconds with a SATAIII SSD located in an Apricorn card in one of the PCIe slots.

The backplane board replacement confirms, once again, that beauty is far more than skin deep in the classic Mac Pro. The 2009 single CPU and dual CPU Mac Pros use identical backplane boards.

Airport and Bluetooth antenna connectors:

These can be a major pain and cause of bad language or a piece-of-cake. The Airport card has two antenna connectors (the third remains shielded and unused) and the BT card has one – all three must be pulled when transplanting the backplane board, above.

Attach the Airport card to the backplane board with two screws if previously removed or missing. The Airport card was an extra in 2009 so many Mac Pros of that age come without one. They can be found for under $30 – buy one with the two screws required. (The BT card is captive and needs no insertion – a new backplane board comes with one installed). The wrong way to attach the antenna connectors is using fingers or pliers. Your chances of damaging the card, the connectors or yourself are high. The right way is to twist the antenna cable(s) such that the brass connectors take a natural set facing down. Then locate and hold the antenna connectors with a fingernail, pressing on the center with a flat bit in your screwdriver, like this:


Tool to push down the antenna connectors.

The flat end of a chopstick works well also, and you will hear a loud ‘click’ when the connector engages. Use bamboo, not softwood – bamboo is far tougher. If force is needed you have the connector misaligned – it’s easily crushed so be careful. The Airport card is retained by two very small screws and need not be removed when moving the backplane board. The BT card is captive. I suggest you replace all three antennae before replacing the processor cage – more working room.

Upgrading the Mac Pro 2013 – Part XXII

An expensive beast.

For an index of all my Mac Pro articles, click here.

The 2013 Mac Pro may still be hard to find but that does not mean the buyer should overpay for the better CPUs available. Paying Apple or OWC a huge premium for a better CPU suggests you have more money than sense, in which case go for it. This piece is not for you.

The nMP adds one feature not available in the oMP – Thunderbolt. This Intel data communication technology is a motherboard-only hardware installation and it is extremely unlikely that the aftermarket will ever see a TB-equipped motherboard for the oMP. So that means data speeds are limited to 600mb/s at best in the oMP (using a PCIe SATAIII card) whereas twice that rate should be theoretically possible in the nMP.

Where the nMP falls down in price:performance is in CPU speeds. The Geekbench chart below is for multi-core performance.


64-bit multi-core Geekbench data.

Given that the oMP can be upgraded with even faster CPUs than the fastest Apple ever marketed, the 4-core base nMP’s CPU performance is poor by comparison. Install a couple of X5680 3.33GHz or X5690 3.46GHz Xeons in your 2009-2012 oMP and you will get Geekbench scores of 30-32,000, which equals the extremely costly $7,000 top of the line nMP for half the total cost of the computer.

The stock 4-core Xeon E5-1620 in the nMP Geekbenches at 14,600. There are currently three ways of getting a faster CPU:

  • Pay lots to Apple for a costlier CPU at purchase of your nMP
  • Pay lots to OWC/MacSales when you send in your nMP for upgrade and they resell your old CPU for which you get zilch. You have to ship the complete nMP to OWC for the upgrade.
  • Do it yourself and save lots of money

Here’s the current data for the available CPU options which are known to work:

All of these CPUs have a Thermal Design Power of 130 watts, which compares to 80 watts (E5520 8-core), 95 watts (X5650, X5660, X5670, X5675 – all 12 core) and 130 watts (W5590 (8-core), X5680 (12), X5690 (12)) for 2009-2012 dual CPU oMPs.

To ensure meaningful comparisons, I have shown all the Apple-bought options with twin D500 GPUs, 16GB of RAM (the $3,000 base spec nMP comes with only 12GB), and a 256GB SSD. So, as you can see, Apple is charging a premium of $3,500 to upgrade from the 4-core to the 12-core CPU. OWC is barely better, charging $2,978 for the upgrade.

The math could scarcely be simpler. First, there is no earthly reason to buy a new Intel CPU. Used CPUs pulled from servers are fine – I lose count of how many of these I have installed in oMPs and have never had one fail. Never. Just avoid Engineering Samples – look for the ‘S-spec’ on the CPU lid, which confirms that it’s the final item.


Model number and ‘S-spec’ on a final production CPU.

Do the CPU upgrade yourself:

You can do the nMP CPU upgrade yourself. There’s a fair number of sub-assemblies to remove to get at the single CPU which is buried deep inside the form-over-function cylindrical case design of the nMP, but patience and care will get you there. Until Apple Service Manuals become available, the iFixit guide is excellent:


Click the image for the iFixit CPU replacement guide.

Economics of the DIY upgrade:

The current data suggest the following is the most cost effective approach:

  • Purchase the base 4-core nMP new with 16GB of RAM – $3,500
  • Purchase a used 12-core E5-2697 on eBay for $2,500 (Must be marked ‘SR19H’; avoid ones marked ‘QDUF’ which are beta test engineering samples)
  • Sell the stock E5-1620 for $150
  • Net cost of the 12-core upgraded nMP: $5,850. That’s $1,150 less than Apple charges.

The warranty issue:

This piece by OWC says the warranty remains valid when you do a CPU upgrade, unless you damage the machine in the process. Beats me if it’s right as I have not read of the principle being tested, so do your own research if a warranty is important to you:


OWC on warranties.

I remain unconcerned as CPUs very rarely fail. Fans, graphics cards, disk drives, even memory sticks – all of these are likely to fail far sooner than a CPU. That’s where you will most likely claim under warranty.

Other upgradables:

1 – RAM:

Memory upgrades are already available from OWC. Other suppliers will doubtless follow. Four 16GB 1866MHz sticks will cost you $850 or so at OWC, replacing the four 4GB sticks in the stock machine. Alternatively, go to B&H and pay $225 less for Crucial RAM of like spec. Replacement is a trivial process – unplug the old, plug in the new and you are done.

2 – Solid State Drives:

Conventional 1TB SSDs from Samsung run some $450, but these will not fit in the nMP. Apple uses a proprietary connector for the internal SSD, which is retained with but one Torx T8 screw – a trivial replacement. Here are the Apple options:

Until aftermarket options become available the best thing here is to simply wait if you really must have a huge SSD. Given that the best use of an SSD is for the OS and applications I am somewhat mystified why anyone needs 1TB, even with large scratch disks. Further, there’s nothing to stop you using an external SSD in your overpriced Thunderbolt enclosure as a super fast boot and apps drive. But paying $800 for a 1TB internal drive makes little sense.