Jewels for pennies.
When photographers of the caliber of David Douglas Duncan of LIFE first started traveling to Japan in the 1950s they quickly learned that Canon made superb Leica screw mount lenses. These were easily adapted to Leica M bayonet bodies and provided rangefinder coupling as often as not. They spread the word and Canon, in that regard, may have done more to boost the Japanese camera industry than any maker since. Later, of course, Pentax came out with their wonderful SLRs with instant return mirror and Nikon trumped all with the Nikon F SLR. Rangefinders were abandoned, though not before Canon with the 7/7S and Nikon with the S1/S3/SP created two of the great classics of the rangefinder era. These, especially the SP, command collector prices today. The Nikons introduced the titanium curtain focal plane shutter which had a lot to do with the legendary toughness of their successor, maybe the greatest SLR ever made, the Nikon F. The camera that documented Viet Nam.

Nikon SP.
Working as a kid at the Dixons sales counter in London, I had the opportunity to handle many of these as the used market was flooded with owners upgrading to the Nikon F. The feel and sound was similar to the F, meaning robust and solid. But when Nikon went to SLRs, like Canon they realized that the small lens throat of their rangefinder bodies would make design of lenses difficult, especially of the short focal lengths which had to adopt a retrofocus design if the SLR’s flapping mirror was to clear the rear element. So both makers went to larger diameter bayonet mounts, Nikon abandoning the Contax bayonet on the SP and Canon moving on from the Leica 39mm thread mount. Since then, Canon has adopted no fewer than three bayonet mounts for its SLRs. The early Canonflex style, the FD of the ’70s era and then the EF in use today. Nikon, by contrast, has stuck with the original F mount, albeit with adaptations for indexing the maximum aperture on later lenses – the AI and AIS models.
The differences in design philosophy are non-trivial. Forget early Canonflex lenses – too few choices are available and good luck adapting these to anything. Further, for the modern Canon user, FD lenses are mostly a lost cause. The trouble is twofold. First the flange to film/sensor plane distance for the EF mount is 2mm less than for the FD mount. That means that unless your FD-to-EF adapter includes a negative lens element in its design, you will be unable to obtain infinity focus using an adapted FD lens on an EF mount body. Second, as Canon went to an electronic aperture setting mechanism with the EF mount, you will lose automated aperture stop down with FD lenses on an EF body. You focus at maximum aperture then stop down what is now a manual lens to working aperture, the finder screen going dark in the process. Further, even if your adapter has a crappy negative lens to destroy the great definition of your FD lens while reclaiming infinity focus, there is no electronic focus confirmation. You go by what you see on the screen. This is a great shame as it means that, to all practical intents, the magnificent range of FD lenses is not usable on modern Canon bodies.
The contrast with Nikon’s approach could not be greater. With very few exceptions, every Nikkor lens can be used on a current Nikon body, with pre-AI models requiring a $25 machining adaptation to fit and work. The sole exception is mostly early fisheyes which required a mirror lock-up and external finder. No mirror lock-up exists on the modern DSLR Nikons (save for sensor cleaning) so these lenses are not usable. Nikon retains a mechanical control for aperture stop down to this day, so even early Nikon F lenses will retain aperture automation. Auto exposure measurement at full aperture is retained and bodies like the D700/D3 and others provide an electronic rangefinder confirmation of optimum focus, denoted by a green diode in the finder. Out of focus results in one of two arrows pointing in the direction the lens mount has to be rotated.
Why would anyone care? Well, because unless you must have autofocus, these manual focus Nikon lenses are some of the best ever made. In the early days there was only one range – no bargain basement models where design corners had been cut. The mounts were massive, the construction fabulous and the optics outstanding. One of the nicest things about working as a sales clerk at Dixons in the late ’60s was that I was allowed to borrow gear for the weekend (anything except the Leicas!) and I often found myself with a Nikkormat FTN, with the 24mm, 50mm, 105mm and 200mm Nikkors. All these optics were superb in every way. A 16″ x 20″ print was expected, not exceptional. The Nikkormat replaced the bulletproof shutter in the Nikon F with a somewhat fragile shutter (later improved) but came with compact TTL metering on most models and was a sweetheart to use.
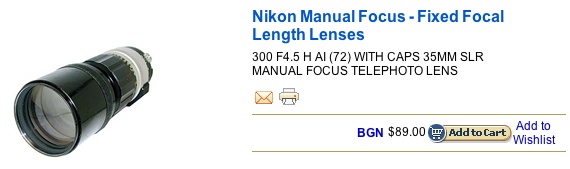
Here’s what some of those great lenses sell for today – I have illustrated the scalloped metal focus ring versions which are my absolute favorites for look and feel:

Nikkor 24mm f/2.8 – $150 used.
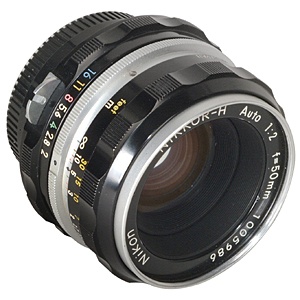
Nikkor 50mm f/2 – a true competitor to Leica’s Summicron. $50 in mint condition.
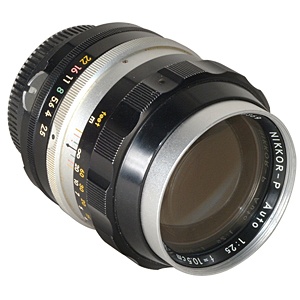
Nikkor 105mm f/2.5. $75.
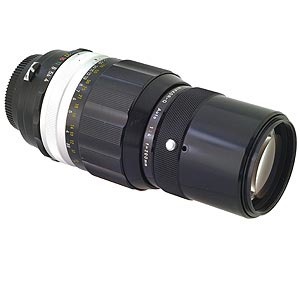
Nikkor 200mm f/4. $40.
So for $315 you get a complete outfit which will do you proud anywhere in the world, provided you don’t mind the absence of autofocus. In the case of these lenses, you can use Aperture priority or Manual exposure measurement. Add $25 per lens if it’s non-AI, to convert it for your DSLR. These lenses have no electronics, but if you want all the bells and whistles offered by matrix metering, want to add Shutter priority and automated EXIF data posting to the picture file, this is done by adding a CPU to the lens and typically runs $80 per lens. A detailed illustration of Nikon lens mounts appears here.
There are some wonderful bargains out there for Nikon users, even if they have bodies which were not even thought possible when these great optics were made.