Category Archives: Software

Printer profiles and root canals

There’s little difference.

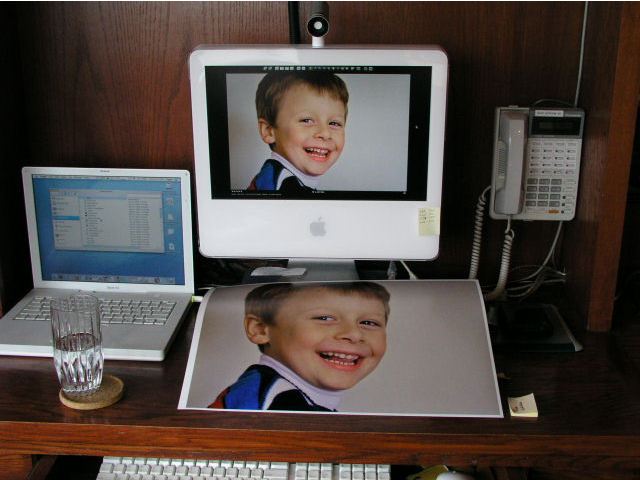
When making a couple of test prints for my son’s annual birthday picture I realized that the prints were coming out far too cool toned compared to the screen image.

Oh! boy!

Something had changed – whether my screen had aged or my HP DesignJet 90 printer has changed, or the Commies had got to it …. or some combination of these calamities.

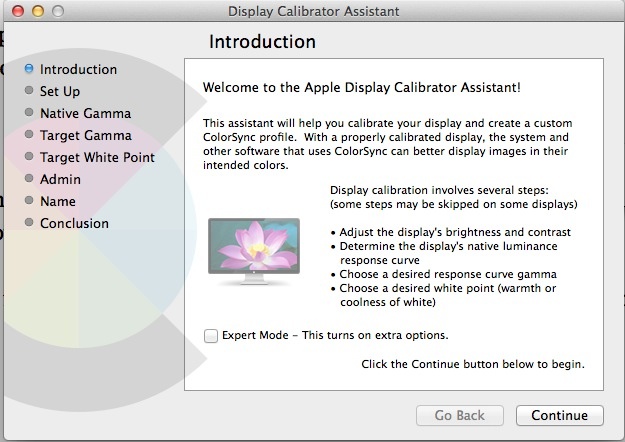
While a colorimeter is a nice tool, you can profile your screen almost as well using Apple’s built in profiler, accessed in System Preferences->Displays->Color->Calibrate:

I find a target white point of 6000K gets me the closest screen-to-print match in my environment. Yours will differ.

Then I loaded the latest, updated drivers from HP. It always pays to have the latest drivers for your paper of choice.

What is surprising about this process is how much the perceived colors of your print will vary as you walk around the house with it. My display space is in a corridor with warm, incandescent lighting, so I have to balance skin colors to be right in that location.

They say that to evaluate a sound system use the voice or piano for calibration because we all know how those should sound. Well, for prints, use a human being whose skin color you know.

The results are worth it:

Some day computers screens and color printers will come with built in colorimeters (the latest professional models from HP now have these built in) so that this sort of thing becomes less of an agony, obviating the need for test prints. Stated differently, printer profiling with the current stage of desktop computer technology compares unfavorably for fun with a root canal.

Pages for books

Another dynamite Apple application for photographers

Now before questionable grammar in the title of this piece suggests that I am a recent graduate of the taxpayer fraud that goes by the name of the California Public School System, let me put you on the straight and narrow.

What I’m talking about is Apple’s Pages application, now in its second iteration and included as part of the software suite sold under the name iWork ’06. When Apple upgraded Aperture to Version 1.5 they conferred minor upgrades on iPhoto and Pages (and lots of other iLife applications) to permit easy interchange of files.

Pages, typifying the ‘think different’ (now that was penned by a CA school grad) philosophy at Apple, is a template driven page composition tool. That sounds pretty grand, but wait. Much more than a word processor, it dictates that you set up templates for various sections of a document or book, then insert text, graphics and pictures into the appropriate template. I don’t know, but I imagine that’s how professional typesetters and bookmakers do it. Like Aperture, the approach takes a bit of getting used to but once it clicks you wonder how you ever lived without it.

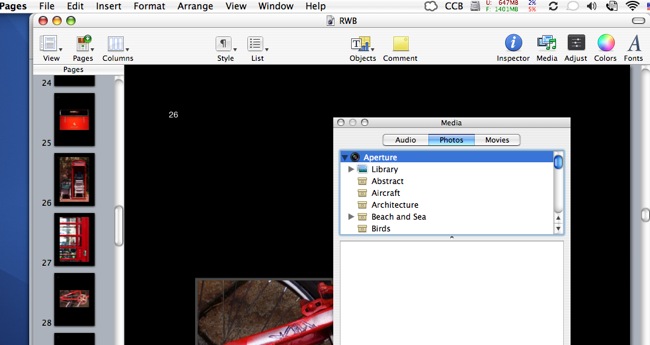
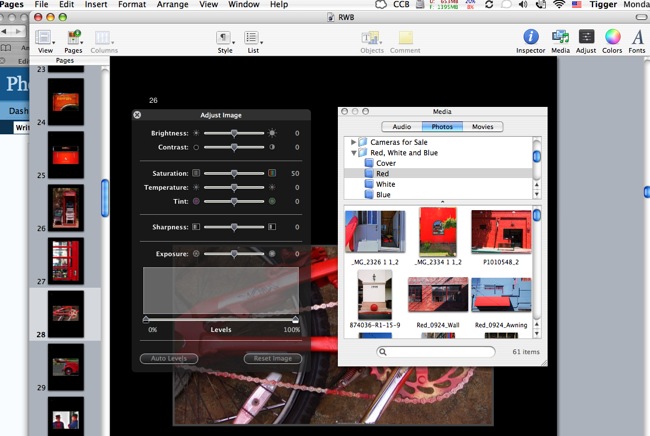
Here’s a screenshot of Pages 2.0.2 showing the integration with Aperture and iPhoto albums – part of the Aperture album is shown.

To the left you can see thumbnails of the pages in the document, which happens to be a book of photographs I am working on. Like Aperture, Pages is no Ferrari on my iMac PPC G5, but it’s OK. Meaning sometimes you have to wait a second or two before things load. So why bother with the learning curve and the modest performance?

Simple. Once you have established your template – say one for the cover, one for the title, one for chapter separators and one for the body/contents, it’s a matter of seconds to drag and drop a picture onto a template page.

Having stored the 125 or so pictures for the book in iPhoto albums (the higher quality available in Aperture is wasted on an 8″ x 10″ book) and having set up my contents template by modifying one of the many included with the application, (a process which took 10 minutes for this less than expert user), it took me but twenty minutes to drag and drop no fewer than 100 pictures into 100 new pages in the book document.

Here is the drag and drop process in practice – you can see thumbnails of the iPhoto album in the ‘Media’ panel (Apple calls it the Media Inspector – not very intuitive); additionally I have pulled up the ‘Adjust Image’ panel now available in Pages, giving me control over contrast, sharpness, tint, etc. in the Pages version of the photograph without affecting the source image in iPhoto.

Reordering the pictures is a drag and drop exercise.

Then you hit the ‘Print to PDF’ button and you have a perfect PDF file ready for distribution, formatted exactly as shown on the Pages screen.

How I ever managed to compose my first book in that horror that goes by the name Microsoft Word I shudder to recall. Pages is a superb application for photographers wanting to create brochures, books and the like. It may not be fast, but then it’s net speed that matters. Try making a 100+ page book with any other application out there in like time.

Quicktime movie enhancements

A bit of coding makes for a better experience.

Apple buries it on their web site, but there’s a lot you can do to enhance the Quicktime experience by adding a few parameters to the HTML code which runs the Quicktime movie. Apple calls this ’embedding tag attributes’ – which sounds pretty offputting.

Click below and, once you are done, click the back arrow to return here.

Click for demo

I have used six Quicktime parameters to enhance the viewing experience. The code looks as follows – I have numbered the lines to refer to them; in practice, no numbers would be used:

Line 1 – This tells your web page where the movie file resides.

Line 2 – The size you want the movie on the screen. 600:338 is 16:9 widescreen.

Line 3 – This sets the background color – red being appropriate to this subject. You can also use standard hex numbers – if there’s a color on your screen you want to match, run Apple’s DigitalColorMeter utility to determine the number and insert the siz aplhanumerics between the quotes.

Line 4 – This is an important one. Once the viewer has finished watching, a single click anywhere on the movie will direct him to this page on your web site – in this example I am redirecting the viewer back to this blog page. Note that the ability to pan with the cursor in all directions and to zoom in and out with the keyboard Shift and Control keys remains unaffected.

Line 5 – This prevents the viewer from downloading your movie and saving it.

Line 6 – All Macs come with Quicktime, so no plugin download is required to watch Quicktime moves if you use a Mac. If you are one of the unenlightened many still using that lock-up device known as Windows, and if you do not have Quicktime on your PC, this line will automatically direct you to the download page of Quicktime for Windows on Apple’s web site.

Line 7 – This scales the movie to preserve its original aspect ratio rather than forcing it to fill your frame.

If you go to the panorama page on my web site and click on any of the thumbnails to watch a movie, you will see these enhancements at work, in full sreen mode.

The full range of Quicktime parameters can be found on Apple’s web site here.

Free Ruler

A great utility program to gauge your picture size.

Free Ruler is just that. A small OS X application that shows a ruler on your screen which can display inches, centimetres, pixels or picas.

Here’s a screen shot in Photoshop S2 with FreeRuler set to show inches:

The ruler can be dragged around with the mouse and either vertical or horizontal rules can be stretched as required or hidden if you prefer.

A quick calculation, for example, in regard to this picture, which Photoshop reports at 21.02% of actual pxel size discloses that an actual pixel print would be 29.7″ x 58.8″ – the 9:16 format of the Panasonic LX1 used to make it.

Some more thoughts on ImageAlign

You can have regular or widescreen flavors.

It’s no great secret that I am very excited after my early experiences with the Canon full frame fisheye lens and ImageAlign software. I discipline myself to think ‘hyper wide’ by venturing out with just the 5D and the fisheye. It’s not a rational step from 24mm to 12mm but rather a completely different way of thinking.

As I have been experimenting with that wonderfully sharp and flare free Canon lens, I have been learning how best to place the subject in the frame so as not to lose things once ImageAlign ‘de-fishing’ is applied. I rarely leave the image with its original fisheye look as it’s a gimmick which gets tiresome quickly. The fisheye + ImageAlign results in a lens with an effective focal length of some 12mm on the full frame 5D.

On a few occasions I have been frustrated with losing corner details using ImageAlign’s adjuster which retains the original aspect ratio of the image when removing the lozenges disclosed at the top and bottom of the frame once ImageAlign is used. Phew! That’s a mouthful. To make things clear, here’s an original fisheye image from my beach series:

Wet suits, Cayucos Beach. Canon EOS 5D, 15mm fisheye, ‘de-fished’ with ImageAlign.

I was just inches from the wet suits when taking this! Someone saw me taking the picture and, judging from their reaction, must have concluded that I was some sort of rubber fetishist, as a regular camera would have captured just part of one of the suits. What we do in the cause of photographs….

Now apply the ImageAlign slider to remove the white spaces (in this example I also had to apply 3.5 degrees of rotation to get the sea level, hence the strange shape of the white sections) and this is what you get:

Wet suits, Cayucos Beach. Canon EOS 5D, 15mm fisheye, white spaces removed.

The image remains in 3:2 format, like that of the 5D’s sensor. But lots of edge details have been lost.

So rather than use ImageAlign’s correction, I took the first image and cut out a rectangle to get rid of the white spaces, but preserving the full width of the image:

Wet suits, Cayucos Beach. Canon EOS 5D, 15mm fisheye, cropped in Aperture.

Quite a difference. And guess what? The proportions are roughly 1.79:1. Now widescreen is 16:9 or 1.78:1 (what you can get with the Panasonic Lumix LX1’s sensor) so you end up with a widescreen de-fished image which preserves far more edge detail – ‘wideness’ if you like – than the constant image ratio version from ImageAlign. Plus that wide look really goes well with beach and sea scenes! If you print to, say, 24″ wide, the image height will be 13.4″. Oh! and your 12mm ‘rectilinear’ fisheye just became a 10mm full frame wide angle lens.