Category Archives: QTVR

QuickTime Virtual Reality panoramas

Candid Virtual Reality

A bit of fun.

When you are fiddling about with that panorama head and tripod it seems you become invisible. I was maybe a couple of feet away from the fat woman with the green blouse in this case. I told her what I was doing after I completed the eight shot routine and her reaction was “You mean we were in the picture?”. Then she returned to her super-sized hamburger.

Click here

The ghostly arm near her results from a child coming/going in between overlapping pictures. I could have taken it out in Photoshop but left it in to illustrate one of the problems with candid QTVR photography and moving subjects.

A (QTVR) brush with the law

Your intrepid photographer gets grilled by the law.

Now I’m not the sort of person to flout the law. Except that I speed, now and then, just like you do, the better to avoid being rear-ended by some poorly endowed guy in the Hummer behind me, I have always believed that doing things the legal way beats the prospect of a stay in the local pokey. Which is why the request that I submit to interrogation, the other day, rather took me aback.

There I was in Morro Bay, a charming little seaside village in central California, wandering among the fishing boats with 5D, KingPano head and tripod poised for action. In as much, that is, that this combination can be poised for anything, tending to the clunky end of the ergonomic spectrum. It’s the nature of the beast. The local Coastguard had raised one of their rubber dinghies out of the water for maintenance and its bright colors and interesting shapes naturally drew me like a magnet. Thanks to the QR heads I have fitted to this kit I was set up and ready to rock in seconds. Until, that is, the long hand of the law intervened.

Now you must understand that the Coastguard exists to prevent Mexicans, seeking to work in the US, from swimming twenty miles up the coast in frigid Pacific waters, in search of $5/hour. True, two million of them elect the land route annually, and if you have ever dipped a toe in the Pacific, you will know why. These fellows are not dumb. Still, should any one of them so much as try the Mark Spitz thing, be assured that the Coastguard and its huge annual budget will be there to protect our women and drive up the price of our vegetables.

“Our captain would like to know why you are photographing one of our boats” the voice intoned.

“Well, I’m not exactly photographing your boat” says I.

“Sir, you are photographing a military vessel. Please report to the office with your camera”.

Let’s step back a moment. We are not talking about the US aircraft carrier The Ronald Reagan here, equipped with a crew of 5,000 and fifty F-14 Tomcats primed with nuclear weapons, ready to destroy any country of choice at a moment’s notice. No, sir. We are talking about a thirty foot rubber dinghy.

En route to the captain’s office I quickly swap the CF card in the 5D with a spare. It’s not that I have any snaps of the dinghy on it, I don’t, but I sure as hell am not having my Limekiln redwoods snaps from earlier in the day confiscated by someone with more authority than the Commissioner of the IRS.

Anyway, after keeping me waiting for what seemed like ages while he finalized the pleasure cruise they were putting on for a local reporter in another Coastguard craft (your taxpayer dollars at work) I am suitably grilled by El Capitano.

After first reassuring him that my tan was acquired in the local vineyard and not in the Middle East, I chose the Obfuscation Route. After explaining that I am an amateur photographer with no thought of gain, I give him five minutes on Virtual Reality and how his boat is but a small part, great grand vessel that it is, of the larger design. He begins to glaze half way through this and lets me go, not before reminding me that “….you can’t be too careful after nine-eleven” you know and “You are dealing with the Office of Homeland Security, here. After all, sir, you are taking pictures which include a military vessel”.

I leave trying hard not to laugh while thinking of that 19 year old German air ace Mathias Rust who landed his Cessna in Moscow’s Red Square in 1986, at the height of the Cold War. Yeah, we won that one, too. One particularly apposite cartoon the next day showed a technical drawing of the plane captioned “Stealth Bomber”. So now I think of the dinghy as the “Stealth Destroyer”.

Wandering back to the dinghy, excuse me, military vessel, I tell the chap who apprehended me that “I have security clearance, you know” (always wanted to use that line) and set up the tripod et al. I take my pictures, after promising the Captain a copy (he says he has QuickTime on the Coastguard’s PCs so that’s something, I suppose), and go on my way, thoughts of hot lights and pentathol still in my head, and deeply reassured that, were we to be invaded by sea, all would be well.

Here it is – The Stealth Destroyer.

Too bad it wasn’t sunny. You can see the Coastguard Office, where I was brutally interrogated, in the distance, half way around the circle. What I’ll do for a picture. Now about that army base nearby….

Finally, a QTVR HDR real life panorama

The whole megillah.

There are times of the year you really do not want to be driving on Highway One in central California. This is one of them. Make it a weekend and you would probably have more fun doing your taxes. You see, for reasons known only to the drafters of the Constitution, RVs and SUVs are allowed on this narrow winding road. As the selfish idiots who drive these vehicles (imagine doing 2 mpg in an RV and having to carry your waste with you) are also incapable of reading, ‘Turnout’ means nothing to them, leaving but three or four legal (and semi-suicidal) passing areas in the 40 miles between Hearst Castle and Limekiln State Park, a trip I took yesterday. This was not helped by the fact that the road was well and truly socked in, fog being par for the course at this time of the year. The only person having fun on this road was the guy who passed me on the double yellow on his Ducati. More power to him.

So my first words to the Forest Ranger on arriving at Limekiln and handing over my $6 were “Boy, there are some bad drivers out there”. “No kidding”, he replied, “two went off the road at night just north of here last night and fell 700 feet to the ocean floor. Both died.” Let’s hope they were driving an RV – nature’s little fix for the gene pool.

Having been to Limekiln many times, the fog left me untroubled, for I knew that some 500 yards from the Pacific all would be sweetness and light. A few seconds in the warming sun and a whiff or two of scented air, and the frustrations of the trip were forgotten.

The goal was simple. I have always been mightily frustrated with my pictures here, for two reasons. First, the insane dynamic range makes preserving of detail in both highlights and shadows very difficult. Second, there is simply no way a static picture can convey the sheer magnificence of a giant redwood forest.

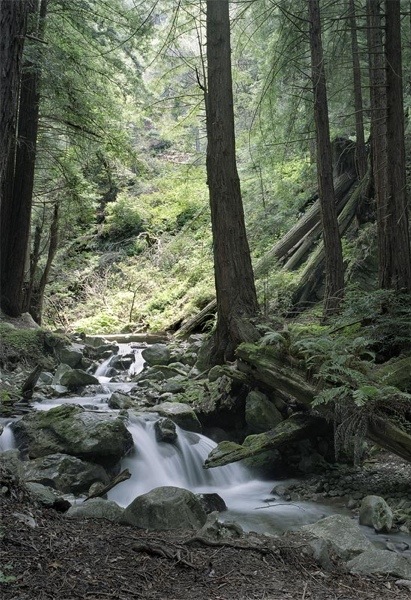
Here’s the sort of thing you get on 4″ x 5″ – at least the dynamic range is OK:

Limekiln. Crown Graphic 4×5, 210mm Sironar, Kodak Portra VC160

But, let’s face it, you are not there.

So after all that work to learn QTVR photography, and tons more to learn HDR, I put the whole thing together after all those tedious tests in the home I have documented here over the past few days.

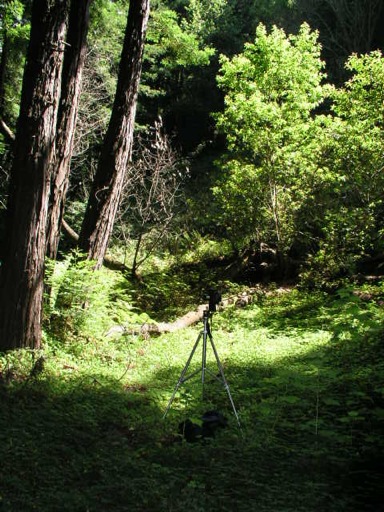
Canon EOS 5D and KingPano at Limekiln State Park, CA, July 17, 2006

I took no fewer than 24 pictures per image. 6 ‘circle’ views with the vertically mounted 5D + Canon fisheye rotated about a vertical axis on the KingPano head, each ‘view’ comprised of three pictures, properly exposed, + 2 stops (actually shutter speeds) and -2 stops. Two more views, each of three images, added the zenith and nadir images.

Back home (I had much fun on the drive back trying to run a pig on a Harley with open pipes – blasting his foul noise into unspoiled nature – off the road) each set of three images was merged in Photomatix into one HDR image which was then tone mapped in the same application. All eight resulting images were then dropped into PTMac, the previously determined lens parameters applied and auto control point generation was commenced. I didn’t even bother to delete the ‘bad’ (meaning big) control points. Saved the TIFF file, into Photoshop for final Levels and Curves fine tuning, a quick check of stitching using the Panagea plug-in, and then on to CubicConverter to save the panorama with the right starting point and zoom settings. This time I used the ‘M (high)’ JPG quality setting on the 5D, meaning each source image was between 3.4 mB and 5.1 mB. For some reason the underexposed ones are larger. Whatever. No need to use RAW – the files are too large for my purposes and I get better tone mapping through HDR than RAW can provide.

You can judge how much HDR adds to dynamic range from this non-HDR extract:

And here is the QTVR HDR result of the 24 constituent images:

Click Here

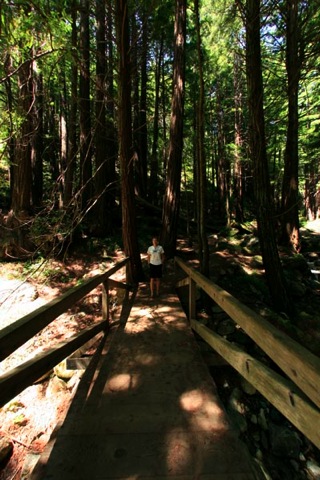
The young girl actually arrived on the scene when I had just finished the ‘circle’ images, so I asked her to stand as still as she could while I took three more to replace the original. As you can see, she moved slightly, but the effect is there. Photographer’s luck. You can’t have it if you don’t take pictures.

The file is some 2.5 mB in size, owing to the high quality of the JPGs used, and I have constrained the zoom range to the point where quality is not compromised on zooming in.

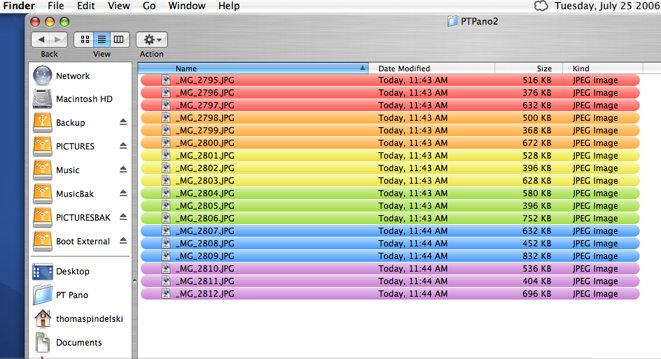
While taking 24 pictures to make one result sounds daunting, once you get the hang of it, assisted by auto over/under exposures and motor drive, and the click stops on the King Pano, things move along very fast. I didn’t even bother re-levelling the rig between shots, the subject being far less demanding for stitching purposes than the indoor scenes used to calibrate the equipment. A check of the time stamps on the files shows that the whole thing was done in two minutes. And do get QR heads for camera->King Pano and KingPano->tripod – the thought of all that screwing (I get enough from the IRS, thank you) in their absence is …. not good.

I hope you have enjoyed this learning exercise in QTVR HDR photography as much as I have.

QuickTime + High Dynamic Range photography

Some serious heaviosity, as Woody Allen once remarked.

Putting it all together calls for one more test; namely, combining High Dynamic Range photography (HDR) with QuickTime panoramic images. Not just a dry academic exercise as I propose to put this to work on my first field trip to the redwood forests where the dynamic range can be simply astonishing. From shadows to highlights can be as much as ten stops. It gets very dark on the forest floor.

What better environment than the home theater with the drapes open to disclose a 100F day and brilliant sunshine outside? Thank God for the sunspot cycle.

I reprogrammed the Custom setting on the 5D’s mode dial to include three exposure bracketing for each picture, meaning normal, +2 stops and -2 stops and set the drive mode on Continuous. That way one press on the shutter fires of three shots in one second.

The eighteen constituent pictures (6 x 3 – I did not take zenith or nadir shots in this test) were then placed in their own folder in the Mac’s Finder and color coded to avoid mistakes (File->Color Label:>).

These are all at the lowest JPG quality setting on the 5D.

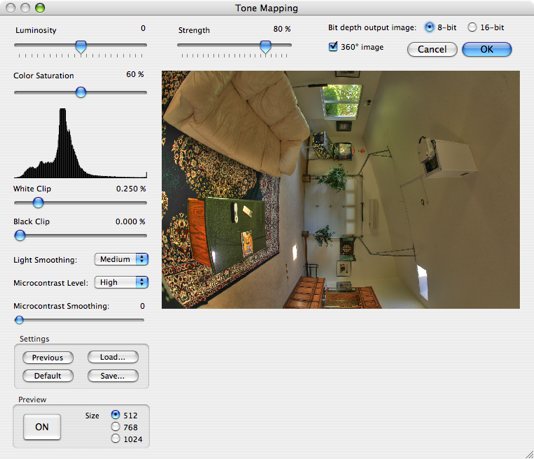
Here’s how the result of the HDR + tone mapping step in Photomatix looks:

I increased the default tone mapping saturation from 50% to 60% and checked the ‘360 degree image’ box – no idea what that does, but it seemed like a good idea. Photomatix lets you save settings to ensure repeatability between picture groups.

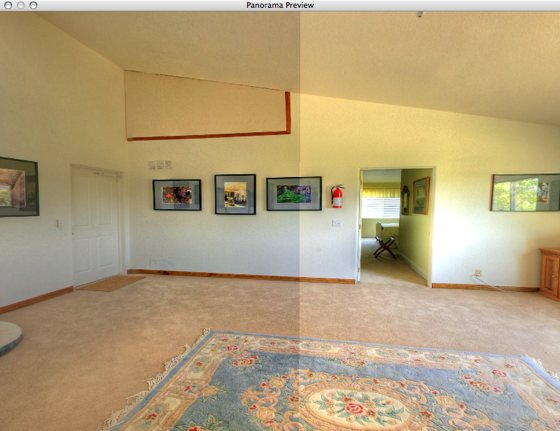
I ran the six HDR pictures through PTMac using the techniques set forth in my previous articles and, sure enough, the first pass was perfect as regards stitching. Except for one thing:

A thumping great big tone discontinuity as clearly visible above. Poking around it was obvious that this was at the junction of the first and last images.

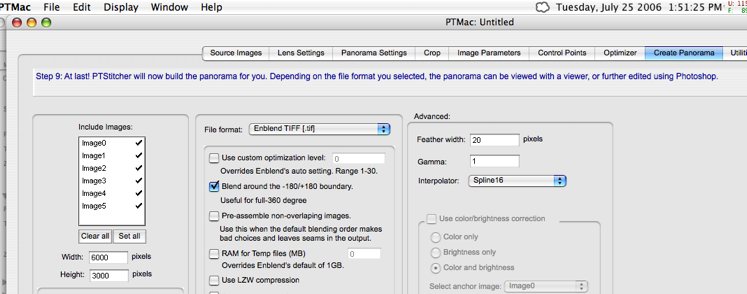
Back in PTMac, I checked the box marked ‘Blend around the -180/+180 boundary’. No stopping me now!

This process generates a lot of files, so orderly housekeeping is in….order. Here’s the result:

The first 18 JPGs are the source images, followed by 6 tone mapped HDRs.The ‘.xmp’ file records the settings made in Photomatix for processing each. The ‘.mov’ file is the QuickTime video, the ‘.ptm’ file is the result of saving all data in PTMac, the ‘.tif’ file is the Enblend TIFF file from PTMac and, finally, the ‘.txt’ file is something PTMac generates and I have no idea what it does!

If you check the times, it’s 108 minutes from taking the first snap to having the movie file completed. (I saved the ‘.ptm’ file later – must be better about that in future).

Before putting the TIFF file through CubicConverter, I adjusted tones a tad in Photoshop then let her rip.

And you can click here for the result. Does Enblend rock or what? Don’t waste your time on non-Enblend stitching.

The home theater doubles as Le Gallerie Pindelski (French gives it that touch of class, don’t you think?). The pictures on the wall are by yours truly, all taken over the past twelve months, and in case you are wondering where my assistant, Bert the Border Terrier is, would you be walking between buildings with a fur coat on when it’s 100F outside? We are talking one pretty smart animal here.

Do I think I am God or what? Or, to once more quote Mr. Allen, “Look, I have to model myself on someone”.

Enough of this testing. It’s time to put all of this into practice. A real live, in the field, photography trip follows. That will involve 360 x 180 HDR pictures in the local redwood forest.

Virtual Reality comes to town

Not something you can print and hang on the wall.

If you had told this photographer a while back that he would be creating three hundred and sixty degree virtual reality pictures with a computer and photo stitching software a year ago, chances are the response would have included a recommendation to visit the local loony bin for an extended stay.

What got me intrigued about the possibility of making a Virtual Reality picture was probably a combination of factors. I had long been fascinated by the Virtual Tours that realtors place on their web sites brokering homes. You click and then pry around some unsuspecting stranger’s home. Shades of James Stewart as the Peeping Tom in Hitchcock’s Rear Window. Later I came across 360 degree VR pictures on the web of landscapes and famous places like the Eiffel Tower and St. Peter’s Basilica and wondered in awe at this new technology for making pictures. I hesitate to call them movies as the viewer is in charge of what he looks at and in what detail. Hose the cursor this way and that with your mouse and you can look around the Sistine Chapel taking in all the details of Michaelangelo’s ceiling painting, or descend to the depths of the Seine at the foot of Notre Dame.

Simply stated, none of this was possible before the days of computers; once digital cameras became affordable anyone could do it. I’m not sure of this, but I believe the technology was invented and patented by Ipix a few years ago, offering true 360 degree views around a subject of choice. Doubtless before long we will have holographic television with the image floating in space and viewable from all angles.

Lots of smart people have worked around the patents to offer inexpensive alternatives to Ipix; meanwhile Ipix books $2mm of revenue a quarter from its great invention. Another cheer for American entrepreneurship.

The poor man’s approach, then, is to take a bunch of overlapping pictures around a horizontal cylinder (you turn the camera from shot to shot using a tripod head) then add one for the zenith (top) and nadir (base). The zenith can be done on the tripod by tilting the camera up ninety degrees; the nadir is taken hand held by removing the tripod and snapping the ground, trying to avoid your toes.

A bit (OK, lots) of research on the web showed that this is still very much a nascent technology when it comes to art photography. No one place really seemed to explain how to do things, but piecing them together and reading bulletin boards and chat rooms got me on the right path.

I thought that a fisheye lens of some sort was essential to making Virtual Reality pictures but it turns out that is far from the case. Any reasonably wide lens will do. The wider the lens the fewer pictures have to be taken to generate the 360 degree whole; for that matter, you do not have to go the whole hog and can simply generate flat wide panoramas for viewers to enjoy. However, as I am having such great fun with Canon’s full frame Fisheye lens I thought I might give the 360 degree rendition a shot in the interest of less work. Less work is always a good thing.

My earlier efforts with stitching flat pictures from my Rolleiflex together into panoramas were disappointing. I used Photoshop and really struggled to get things to line up. So I put the idea to the back of my mind a few years ago. Look at the following picture taken in 2003 and you can see the objectionable bowing out of our house front, not to mention the stitching.

The Atherton estate at dusk. From four pictures on a Rolleiflex 3.5F,
Kodak Portra, stitched in Photoshop CS.

Now the chaps who are really serious about VR photography think nothing of spending $600 on an expensive tripod bracket which allows the camera to be rotated around the nodal point of the lens, rather than around the axis of the tripod bush. The nodal point is the right way to go to minimize distortion. Well, I wasn’t about to blow that sort of coin on an experiment, and after sniffing around a software package or two concluded that as long as you held the camera at the same height when taking the multiple pictures for your VR composition, and didn’t tilt things too much, you stood a pretty decent chance of getting a good result.

What do you need to make VR panoramas?

A camera with a 50mm lens or wider which can be set to manual exposure. Film or digital, though film will be a lot of work.
A tripod or monopod, or a really steady hand and good eye.
Software to stitch the pictures together.
A viewer to allow playback on your computer.

For a camera I used the Canon EOS 5D with the 15mm full frame Canon fisheye lens, using my trusty Bogen/Manfrotto monopod and Leitz ball head to mount the camera at a constant height.

Pictures are taken with the camera oriented vertically to maximize height and minimize the size of the holes at the zenith and nadir of the sphere that have to be filled in. As the Canon full frame fisheye has an effective vertical angle of view of some 88.41 degrees (Canon says it’s 91.73 degrees but that’s incorrect for this use), six pictures will nicely complete a circle with substantial overlap, making stitching easier. From what I have read a circular fisheye needs only four pictures but I would guess that the edge aberrations are significantly worse than with a full frame one. Speculation on my part as I have not used a circular fisheye.

One other thing to remember before snapping the pictures is to switch off auto exposure (you want sky tones constant), switch off auto white balace if using a digital camera (much the same reason) and switch off autofocus. You want a small aperture with maximum depth of field for this to work. Don’t ask…. Exposure has to be determined so as to accommodate the brightest and darkest parts of the scene where details are required. Not as easy as it sounds. I measured both and averaged. Finally, switch off the auto-rotate feature in your camera or you will spend time later turning each picture through ninety degrees – the stitching application does not support auto-rotate so the picture will come in horizontally, which is not what you want.

To keep things simple I set the camera on JPG, not wanting to convert a bunch of RAW images, and opted for the lowest quality setting to keep file sizes down. Each picture file was some 1.3mB in size.

Stepping outside the front door, 5D and fisheye on the monopod, I took ten pictures from one position, generously overlapping each with its predecessor. Ten, as I was not too confident about getting away with six – better too much overlap than none. Then I pointed the camera up and snapped the zenith picture – mercifully the Canon fisheye does not flare into the sun, so I could get away with this. Then taking the camera off the monopod, the nadir image was recorded by pointing the camera down.

The application I used to stitch these together is called PTMac. It costs $59 and runs on Apple Macs only. A downloadable database stores settings for lots and lots of cameras and lenses – here’s just a partial list:
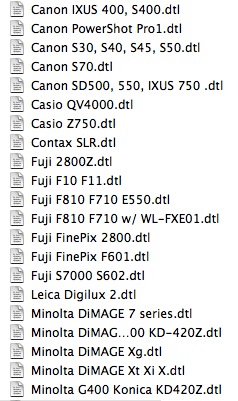
Of course, wouldn’t you know it, the 5D + 15mm Canon EF fisheye is not in the list. After some messing about and help from chat boards, I determined the settings which are as follows – you can save them in a database of your own:

Getting these parameters right is key to a frustration-free path to generation of a VR picture.

Now PTMac is a tad clunky. Little is automated. Sort of like using logarithm tables in lieu of a scientific calculator. Mercifully, the current version (4.x) automates the generation of what the vendor calls ‘Control Points’ – points in areas of overlap between adjacent images which tells the program how to stitch things. It generates no fewer than ten control points for each pair of images – something that would take hours to do manually. When it comes to panorama generation, I save the file in the QuickTime Cubic VR[.mov] format. Control point generation and stitching took some five minutes on my 2 mHz PPC iMac G5 which is equipped with maximum RAM of 2 gB. That’s not too bad when you think of the insane number of calculations the application is going through – witness the loud fan noise from the iMac’s normally near silent self. That CPU is working hard.

To view the panorama you need Apple’s QuickTime which is available free here. There are versions for Mac OS X and for Windows.

I clicked on the generated file and got a somewhat distorted picture:
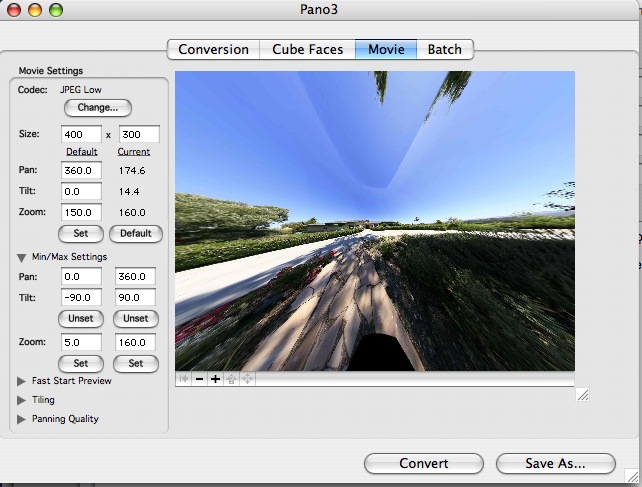
Zooming in fixed that, but I did not want the viewer to have to do that, so after some more hunting around on the internet, I came across Cubic Converter from an Australian company company named ClickHereDesign and after a quick trial I determined you could save a zoomed-in version which was much nicer to look at. Another $49 gave me a license to save the revised file in Quick Time format. Now things looked like this:
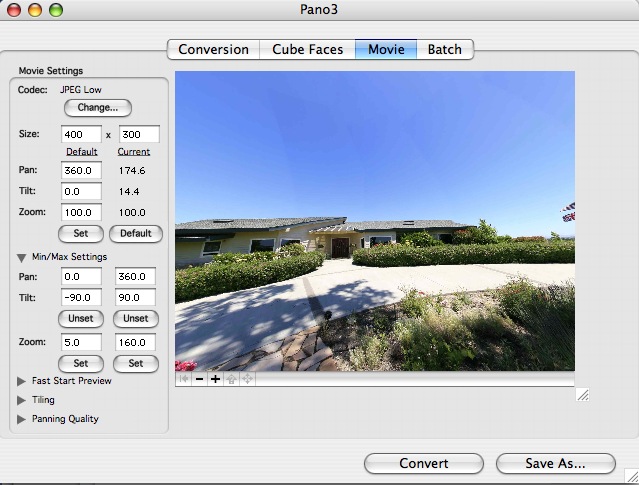
Cubic Converter also has the ability to allow the viewer to start looking at the picture while the file is still downloading, with increasing quality resulting as time passes. Instant gratification in the best tradition of The American Way.

Here is the result – my first Virtual Reality picture. The file is 1.5 mB in size, so a broadband connection is recommended. You can zoom in or out by using the Shift and Control keys or by clicking the + or – signs on the screen.

While some of the limbs of the tree need work, I’m pleased as punch at this first pass and much of the learning curve is behind me. Getting smooth gradation in the sky is no mean feat. Next I’ll get more serious using a tripod with a degree marked pan and tilt head (actually a felt tip pen and some ingenuity, before you get too excited) to get things just so. The $600 fancy tripod head can wait.