Category Archives: QTVR

QuickTime Virtual Reality panoramas

Adding sound to QTVR panoramas – Part II

Batteries not included! Heck, lotsa things not included.

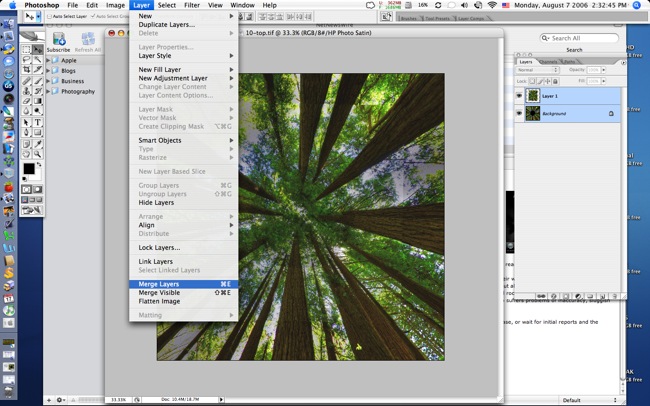
I looked at incorporating public domain sound into QTVR panoramas in Part I. How about recording your own sound track?

Meet the latest addition to the digital household:

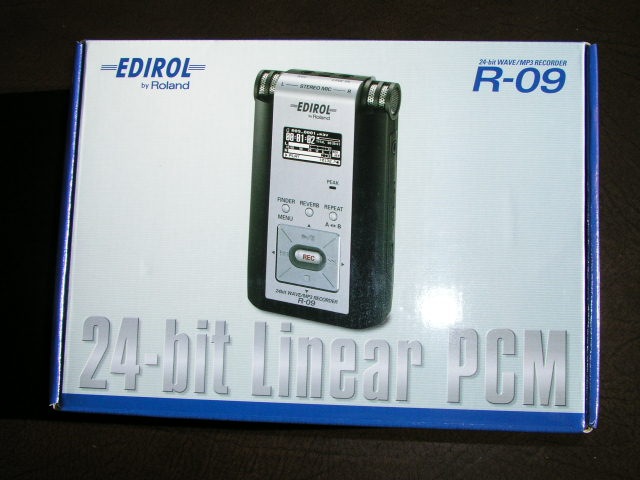
Made by the fellas who gave us all those rock-‘n-roll consoles, Roland, it is mightily costly at $400 (whadya expect? It’s made in Japan, not China), comes with no batteries, an insanely chintzy 64 mB SD card for storing recordings (a leaf out of the digital camera makers’ book – at least Canon has the good sense to include no card with the 5D) and no headphones.

Appropriately enough, Marty Paris, ace acoustical guitarist and local UPS driver, just delivered it so we got to chatting about sound recording. “Wait a minute”, he intoned, “I thought you were a photographer?”. “My dear Marty”, quoth I, with that bemused look of pity and understanding we sound panographers reserve for the unenlightened, “Photography is sound!”. “What?”. “Hey, you know, QTVR and all that. Imagine your band with 360 panoamas and sound, man”. Note the ‘man’ bit. A little bit of hip. Big thing in the musical world, I’m told.

So I open the box and find that this little MP3/WAV sound recorder, which will serve to add sound to my QTVR panoramas – no more public domain stuff for this operator – comes without batteries. Gee, is that cheap or what? No problem. Two AA sized NiMh batteries, which have yet to explode or catch fire, are resurrected from one of the chargers in the ancestral manse, and hey presto!, she fires up.

OK, so the R09 records on an SD card. The 64 mB card included with the R09 can record just about all the true statements from all of the USA’s senators and congressmen made over the past decade, which means 5 minutes’ worth, at best quality. Well, the spare 1 gB card for the Leica DP comes out and truth, justice and the American Way (or, at best, the prospect thereof) are restored.

How large is the Edirol R09? Judge for yourself – that’s the 1 gB SD card on top of the iPod and the picture is about life size on my iMac:

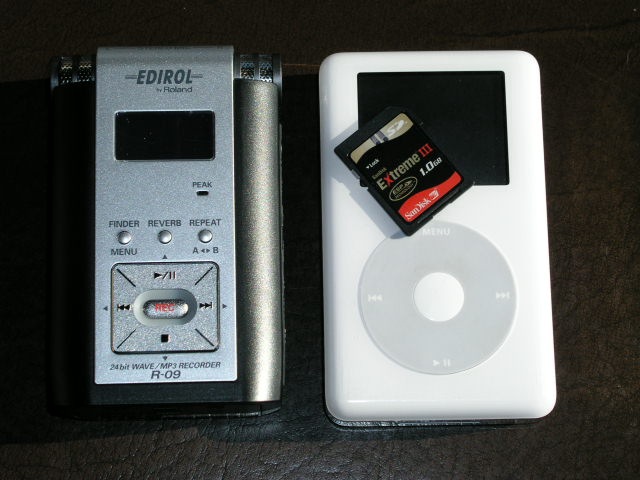
Feel? Positively chintzy compared to the iPod, and the flimsy combined door for the two AA batteries and the SD card is a problem waiting to happen unless it loosens up with use. Indeed, one of the first things you see on opening the box is a warning to the effect that the battery/card door is easily damaged. Not good. How about redsigning it, Roland, rather than hiding behind lawyers and disclaimers? Add the fact that the supplied (useless) charger cannot recharge NiMh batteries in the R09 means the door will get a lot of action as batteries are removed for recharging and replacement. I suppose you could argue the charger can be used for running the R09 off mains power, but given that it’s twice the size and six times the weight of the R09 you know what you can do with it.

Another useless accessory is the provided USB II cable to connect the R09 to your Mac. In practice, you simply remove the SD card and pop it in your card reader which displays all the MP3 or WAV files on the card. Nor do you even need to format the card in the R09, despite dire warnings in Roland’s instruction book. The 1 gB Sandisk Extreme III card formatted in my Lumix worked fine in the R09. Nice. At a pinch you could mix MP3 and JPG/TIFF/RAW files on the one card.

In fairness, one reason for the light weight of the R09 is that there is no hard disk inside, unlike in my 60 gB iPod. Recorded sounds are stored on the miniscule SD card, meaning the device should be fairly shock resistant as there is a near total absence of moving parts.

Roland claims a battery life of 4 hours continuous recording (at least small stereo microphones are built in – you can see them in the snap above) so figuring in the ‘Washington factor’ (when you hear your taxes will go up by 5%, multiply by four) that works out at one hour, which is still a lot, given that the average loop for a QTVR panorama is some 60 seconds long. Even my boy reciting his ABCs takes less time than that!

Monitor your recording or listen to the playback using the R09? No such luck. No earphones are included. Fortunately, I saved mine from the iPod (a device I use connected to the home AV system, not to my long suffering ear drums) and the R09 can be monitored just fine:

Note the sad and unsuccessful attempt to emulate the superb iPod ‘click-wheel’. Aren’t patents wonderful?

So we have here a very expensive, crappy looking device, with a miniscule SD card, no batteries, no earphones, a useless charger, unnecessary cables, no case and the usual 102 page booklet (hell, you press ‘Rec’ and have at it – you need a 100+ pages of legalese to tell me how to work this thing?) So how does it work? Stay tuned for Part III.

QTVR panoramas on my web site

Time to make these a page on the site.

I have assembled some of my recent panoramas on my web site and, to make them easily accessible, have added a Menu option on the Main Page. Click the Menu then click on ‘The Panoramas’.

Alternatively, you can go directly to the panorama index page by clicking here. Recommended especially for Safari users, as this web bowser is especially bad at refreshing its cached history of web pages.

Can panoramas be photographic fine art? I have absolutely no doubt – if art is something that evokes emotions and feelings, then the answer has to be a resounding Yes. Who could not thrill to the strains of Wagner’s Tristan and Isolde in Redwood Valhalla?

Adjusting the QTVR image

Here’s an easy way to make sure all the adjustments ‘fit’.

After you have created your QTVR picture panorama you may want to adjust tone values, colors, etc. in Photoshop.

The worst way to do this is to try to adjust cube faces one at a time or to try and change the zenith and nadir images separately from the ‘circle’ image. You will almost certainly end up with tonal differences between imnage components.

The best way to do this in one pass is to use CubicConverter to generate a TIFF file of the whole movie, including the zenith and nadir images. This assures you of constant tones across the panorama.

Here’s how CubicConverter looks right after the movie has been generated and saved:

Now click on the ‘Conversion’ tab:

Now click on ‘Equirectangular’ and load the movie file you saved above:

The panorama loads and includes the heavily distorted zenith and nadir images:

Now click ‘Save As…’ and save the image as a TIFF file.

The resulting TIFF file can now be loaded into Photoshop for tone, contrast, color, etc. manipulation then resaved in TIFF format. Reimport the revised TIFF file into CubicConverter, regenerate and save the movie and you are done, with all image adjustments applied equally across the full 360 x 180 panorama.

This is what I did with the above camping picture – the original movie was a tad blah as regards contrast and also needed a bit of saturation boost. Not surprising, as the original was done in HDR (3 images per cube face, melded in Photomatix) and I like to go easy on the Photomatix tone mapping settings to avoid the garish ‘chocolate box decoration’ which is so easy to do with HDR. A little goes a long way and the final Photoshop tweak makes things just right. I always find it easier to juice up a flat image rather than try to tone down a too aggressive one. Here is the result:

Click here

HDR does a fine job of controlling the enormous dynamic range in this picture. Even the correctly exposed (for mid tones) original JPGs were not pretty to look at!

If you simply want a flat panorama with no zenith and nadir, you can use the crop tool in Photoshop to cut out the top and bottom as has been done here. Useful if you want to print the panorama, if nowhere near as effective as the QTVR version.

Getting rid of zenith and nadir ‘holes’

The coup de grace of 360 x 180 QTVR panoramas.

Photograph a 360 x 180 panorama with just about any lens, even a fisheye, and you will be left with nasty empty ‘holes’ at the top and bottom, visible when the viewer of the resulting QTVR ‘movie’ scrolls up and down with the mouse to the zenith and nadir. That’s because the lens, even a full frame fisheye, cannot cover enough vertical angle to get everything in, dictating that two more pictures of the zenith and nadir areas be made, with the camera pointed vertically up and down, respectively.

I can think of no fewer than five ways to get rid of the ‘holes’:

1- Avoid the issue by restricting the vertical scroll angle in CubicConverter:

With the Canon 15mm fisheye on the full frame 5D, the vertical angle of view is approximately 136 degrees, meaning that each hole will subtend a 22 degree angle (180 – 136)/2). So if you restrict the Tilt in CubicConverter to +/- 68 degrees (90-22=68) the viewer will be restricted as to Tilt angle and will not be allowed to see the holes, as here:

This is a quick and effective solution where sky or ground details add little to the panorama, as in this 180 x 180 QTVR of a deserted motel:

Click here

I have also restricted the pan settings to 180 degrees as that’s the area in which the most interesting portion of the subject lies.

2 – Use the clone stamp in Photoshop on the top and bottom faces:

If the top and bottom holes are largely devoid of details – say bland sky or grass areas, you can drag and drop the top and bottom cube faces from CubicConverter into Photoshop and simply use the clone stamp to get rid of the black areas, as has been done in this candid panorama:

Click here

3 – Use PTMac to stitch in the zenith and nadir images:

Sometimes this works, sometimes not. I like to select control points to match image overlap manually using PTMac, but on occasion letting the program do this for all eight images works – manual addition of control points for zenith and nadir images is mind bending and very slow, as each image pair requires at least three points, making for 36 in all with a six picture circle. As often as not PTMac goes crazy generating lousy control points for all eight images. In this case I got away with it – I restricted the base tilt in CubicConverter as the image of the wooden bridge is not interesting and detracts from the whole:

Click here

4 – Use Photoshop layers and the transform tool to insert the zenith and nadir images:

If you dislike using layers in Photoshop as much as I do, well, this method is not for you. However, it’s worth the effort, providing the easiest, fastest and best stitch. In addition to Photoshop and CubicConverter, you will also need ‘de-fishing’ software like ImageAlign to get rid of fisheye distortion in the original zenith and nadir images.

I sort of learned this technique from Eric Rougier who shows it in his excellent video here. The issue with that video is that everything is so smooth and fast it’s very hard to follow all the steps as Eric (a great panographer, by the way) does his Photoshop magic at a blinding pace. If you read what follows you will learn exactly how to do this – a process that took me a while to crack, not without a bit of help from a friend who has forgotten more about layers than I ever want to learn!

a) Drop the TIFF file created by PTMac into Cubic Converter thus:

b) Generate the QTVR file and select the zenith (top) cube face as here:

c) Drag and drop the zenith face into Photoshop:

d) Drag and drop the true zenith image you made by pointing the camera up to the sky into Photoshop and de-fish it with ImageAlign – it looks like this after de-fishing:

e) Using the Crop Tool, cut out a central rectangle from this image like so:

f) Switch to the Move tool in Photoshop and drag this cropped image onto the original zenith image – the one with the hole in the middle:

g) Click on the superimposed zenith image – the one without the hole – and hit Apple-T. This enables the Transform tool and allows rotation of the zenith cut-out over the base image with the hole:

h) Place the mouse pointer outside the corner of the superimposed zenith image and it will become two arrows on the ends of a quarter circle. Rotate the image by moving the mouse until something aligns. In this example I have roughly aligned the tree trunks at the lower left:

i) Actuate the Edit->Tranform->Distort tool as shown here. Better still, use Edit->Transform->Warp which gives you finer control. This allows you to drag the corners (+sides if you use ‘Warp’) of the superimposed zenith image to your heart’s content until everything lines up nicely:

k) After a few minutes of clicking and dragging you will be close, like this:

l) Once things are properly aligned, adjust the opacity of the top image using the slider as here:

j) Shift-click both layers to make them mergeable:

k) Now merge the layers like this:

Save the file to the desktop.

l) Go back into CubicConverter, make sure the top cube face is selected, and import the file you just saved to the desktop:

You are done with the zenith image. A like approach can be adopted for the nadir image; in this case, the nadir is a tangle of undergrowth so to speed matters I simply used the clone tool to patch up the hole in the nadir image. Simply drag and drop the nadir image from CubicConverter into Photoshop, do the Clone work, save the file to the desktop and reimport it into CubicConverter to replace the existing nadir image. Now in CubicConverter regenerate the QTVR picture with the new zenith and nadir faces and you are done.

Here is the resulting 180 x 360 panorama:

Click here

You will note that the stitching at the top is not perfect as I jogged the camera resulting in some image blurring – the ‘2 stops under’ image (I am using three HDR pictures for each of the eight constituent images in the panorama) called for a slow shutter speed in the dark confines of the forest. Since then I have been hosed down $45 by Canon for one of their electrical cable releases so this should not recur. (You can buy cheaper afermarket clones on eBay if you want to run the usual eBay risk of fraud and theft). Oh! for the days of old fashioned $5 mechanical Bowden cable releases. I suggest you use a cable release wherever slow shutter speeds are involved as a heavy camera on a KingPano head and a tripod is not the acme of stability.

5 – Tilt the camera up 30 degrees when taking the ‘circle’ panorama images:

This approach will get rid of the zenith hole but will increase the size of the nadir hole, so it may have limited use.

One last thought on taking the nadir shot. This is best done freehand with the camera removed from the tripod. The layer technique illustrated above will fix any alignment problems and you will avoid getting the panorama head and tripod in the picture.

* * * * *

Phew! That’s it. Time to put all this into practice. I hope the above provides some useful options for those photographers seeking to excise those nasty zenith and nadir holes.

[tags]QTVR photography[/tags]

Quality VR photography

Some fine examples of Virtual Reality photography.

As an enthusiastic, albeit novice, panographer – got to watch for typos with that one – here are some example of fine Virtual Reality pictures.

Magnificent European churches are a treat to look at with this technology. If I was marketing religion I would certainly be pushing work like this shot of St. Peter’s Basilica or of Sacre Coeur.

There’s an amazing shot by Gilles Vidal of a rugby scrum (how did he do that?) and some, like this ski scene come with a sound track!

That great panographer Eric Rougier contributes something out of the ordinary in this cartoonish scene while Andre Ilyin makes a fine night time picture of Moscow’s Red Square. Back home you can welcome the New Year in with 10,000 sloppy, sentimental drunks.

These and dozens of great VR panoramas are on the Panoramas DK site which I recommend you take a look at.

[tags]QTVR photography[/tags]