Not just a throwback to the sixties
Update November 2009: ImageAlign is out of business and the plugin described here is no longer available. However, something every bit as good is available. It’s called PTLens and you can read about it here. Lightroom3 also now includes ‘defishing’ controls.
The lengthy list of things best forgotten from the 1960s includes long hair, bad music, revolting students …. and done-to-death fisheye lens images. So you can imagine there was no way on earth I would ever contemplate buying one of these gimmicks.
Yet here was the latest addition to my little outfit yesterday:

Canon EOS 5D, 15mm Canon f/2.8 Fisheye lens
A while back I wrote of the stroke of luck I had when I bumped into a fellow Canon DSLR user at Hearst Castle; he was nice enough to let me take a couple of snaps with his super exotic 14mm f/2.8 ‘L’ lens on my 5D body. This was mightily impressive, the creative opportunities legion, but at some $1,800 for the occasional superwide snap I decided I preferred to keep bread on the table. But that super-duper wide angle view stuck in my mind.
With my standard lens on the 5D being the wonderful 24-105mm zoom, a 20mm, the next widest lens, made little sense. The difference between 20mm and 24mm is not all that great, and I felt pretty happy with the 24mm setting on the zoom. Plus I did not want the bulk of a wide zoom lens. Then I found myself thinking about image correction and how much more of this sort of thing is increasingly being done in processing rather than with the camera’s software. Sharpening, exposure, contrast even lens aberrations can be repaired in Photoshop CS2 and Aperture.
Wait a minute! Lens aberrations? Well, couldn’t you take a cheap fisheye and remove the native barrel distortion, giving you something seriously wide at modest cost? So I typed ‘lens distortion correction’ into Google and one of the first results was for a New Zealand (New Zealand?) company named Grasshopper. Turns out they sell a Photoshop Plug-in named ImageAlign so I did a spot of reading which disclosed that this was a natural match for any number of fisheye lenses out there, making straight that which would otherwise be curved. So I plonked down $650 for the Canon fisheye and took a couple of snaps. No way was Photoshop CS2 able to straighten the curves with its modest range of corrections, so I downloaded the trial version of ImageAlign and, hey presto!, straight lines. So another $79 saw me equipped with what is, in effect, a 12mm wide angle after corrections are applied.
Read that again. A 12mm wide angle full frame lens.
August 2008 update: Grasshopper seems to be out of business but the features of ImageAlign described here are now available in Photoshop CS3.
How does it all work? Well, first you have to overcome the bout of vertigo you get from using a fisheye – a new experience for me. (The fisheye, not the vertigo – I get that every tax day already). Then you have to watch out that you don’t photograph your toes or shadow. Easier said than done. The fisheye fills the frame with its image on the 5D and is very, very wide indeed. Don’t even think of using this lens on a non-full frame sensor camera as your fisheye becomes a 24mm wide, so you might as well buy the equivalent lens (a 15mm non-fish on a 1.6x body) to get straight lines in the first place. But you cannot get this wide with anything except a full frame camera. A 1.6x sensor needs a 7.5mm lens to get this wide and they do not exist.
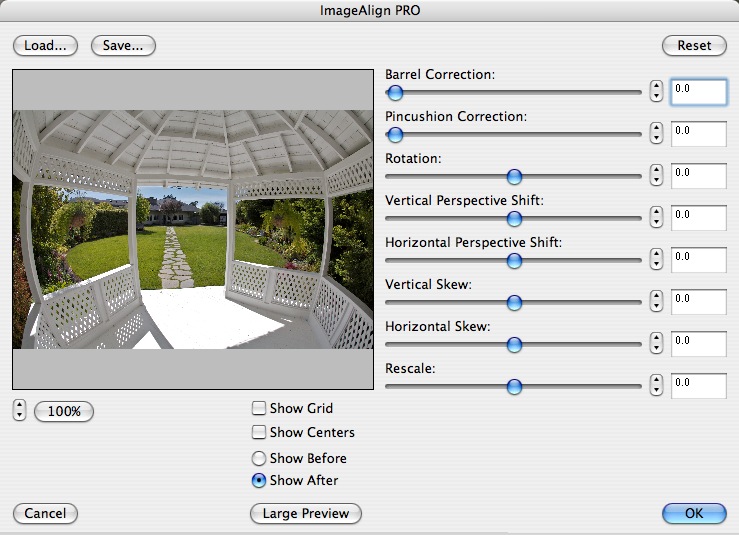
You then load the picture into Photoshop CS2 where the Grasshopper plug-in appears under the ‘Filter’ menu. The interface is everything that Photoshop is not – simple, intuitive and fast. Here is what you see:
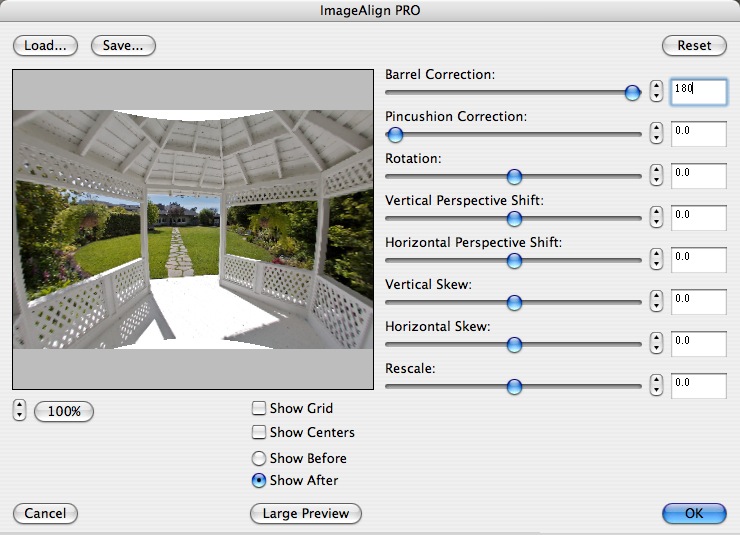
Now to get the curves dead straight, you crank in 180 (max) barrel correction:
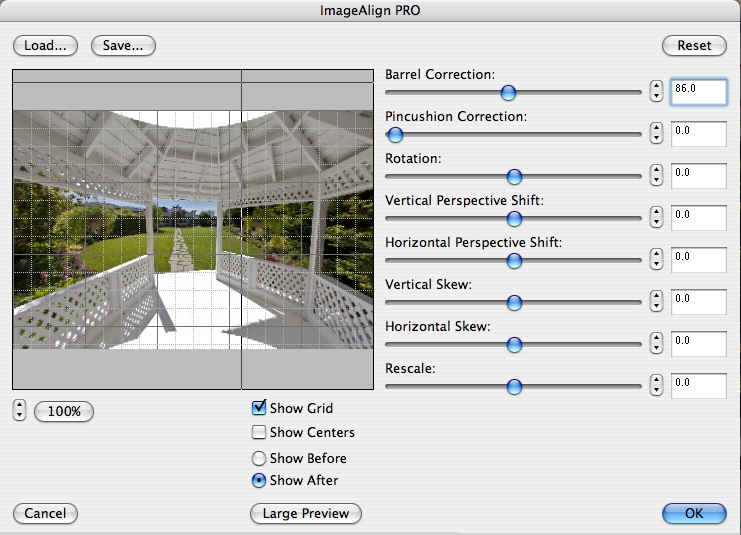
Almost straight, but not quite. Save this and crank in another 86 degrees of barrel correction:
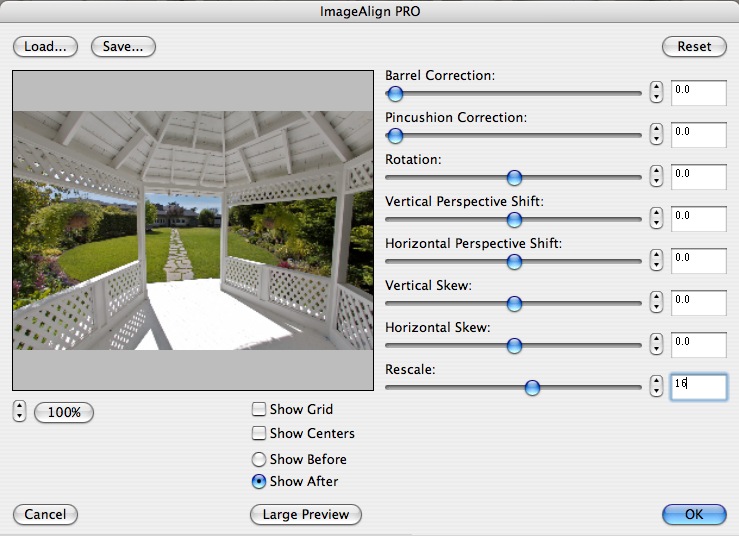
Now things are straight. It only remains to remove the half moons top and bottom by dialing the Rescale slider to 16 and you are done:
Note that in the conversion nothing is lost from the center top and base, but some corner details disappear. That’s distortion correction for you.
How wide exactly is this combination? Well, suffice it to say that every self-respecting realtor should own one of these. Here’s the main corridor in our home with the 24-105mm at 24mm and with the fisheye:


And here is the fisheye version after correction with ImageAlign:
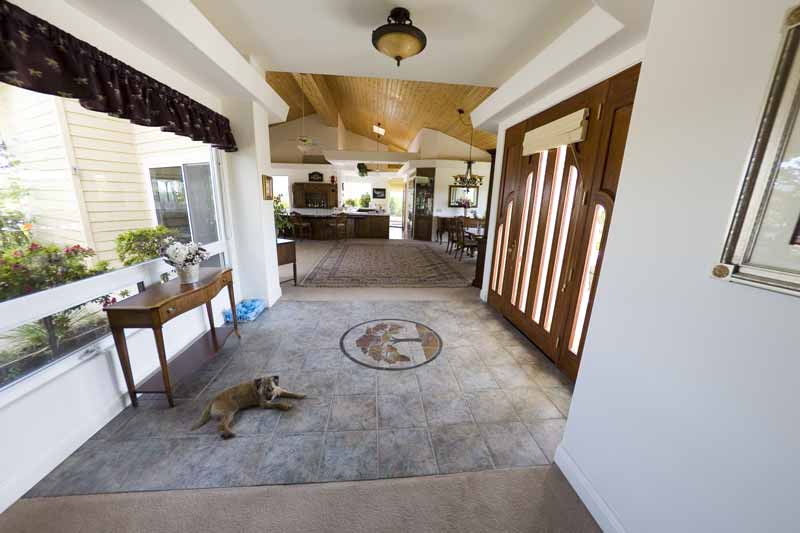
See what I mean? The price of the old estate just doubled.
It should be added that this lens is not easy to use. You don’t have to get close. You have to get intimate with your subject. Not for nothing does this lens focus down to a few inches. Rumor has it that Canon has not changed this lens in twenty years, and I can’t blame them. Edge definition is far superior to the 14mm that I used and while the little focus motor makes a whirring sound, the focus throw is so short that this is simply not an issue. The 14mm ‘L’ lens is silent, by comparison, and weighs twice as much. It also costs three times as much. No one ever said that silence was cheap.
Canon provides a metal lens cap, which is a shame. Plastic, as supplied with the 14mm, resists scratches and knocks far better. And, for once, you have to keep the stupid lens cap with you as there’s no way to protect the front element with a filter.
In practice, I kept feeling that I was looking at Van Gogh’s Yellow Chair or any one of a number of Bonnard paintings, so tilted is the perspective. You can get some sense of this from a few snaps I took down the road at the Cambria Pines Lodge, whose grounds include a beautiful garden, by clicking here. Some of these snaps are corrected with ImageAlign, some are left native where the distortion does not detract.
One other thing to note is that it makes sense to bracket exposure if in doubt. Digital sensors really seem to hate overexposure, reminiscent of slide film, so you want to preserve detail in the highlights and adjust the shadows later when processing. And chances are that you will have a huge contrast range outdoors owing to the enormous field of view of the fisheye. The last picture in the attached slide show, which is the interior of the Lodge’s Lounge, was taken at the fisheye’s full aperture at 1/20th second, with ISO dialled up to 1600, hand held. The glass of wine I had just enjoyed, visible in the foreground, served in lieu of a tripod. Is it sharp? The 13″ x 19″ print lying on my desk would make your eyes pop.
So there you have it – the widest rectilinear DSLR wide angle lens in the world, with absoutely no discernible vignetting, for some $650. Try it. You might like it. Yes, I know there’s a 12mm Voigtlander lens for film cameras, but before you spring for it and its extreme vignetting and poor resolution, let me remind you that Film is Dead.

Cambria Pines Lodge garden. Canon EOS 5D, 15mm Canon Fisheye, sepia toned in Aperture
Part II of this review appears here.
Very nice article. Thanks for sharing it with us. I just bought a Rebel XT and was looking for a cheap way to get a wide angle. Unfortunately I’m still in high school so it will be a while before I finish paying off my Rebel and can think about more lenses.
Herr – thanks. As I mention above, for a 1.6x cropped sensor body like your Rebel, the fisheye is a lousy choice – you lose most of the effect owing to the sensor just using the central part of the image. So you end up paying for something you cannot take full advantage of. Look for a zoom wide – maybe a non-Canon brand – if you want a wide effect on your Rebel. I’ll bet you can get something that goes down to 12mm, which is equivalent to 19mm on a full frame. That’s pretty wide.
I just bought this lens for my Rebel 300D. You do lose the enhanced fish eye look, but you still have a slight fish eye look. It’s wider than my 18mm-55 kit and lines curve slightly. I haven’t used it enough yet, but I didnt know if I would get any fish eye effect. I do – but its not too fisheye so I hope it will work out. Otherwise I will by the EF-S 10-22mm
On a 1.3x crop sensor, the FOV effectively becomes 16mm when the corrections are applied? (15mm x 1.3 = 19.5mm add lens correction for 16.5mm) Or am I missing something?
Ed – your math is correct for a 1.3x sensor. My example, above, was for the more common 1.6x.
Thanks, Tom. This seems like a viable solution for my UWA needs. Having the opportunity to gain a 16mm FOV perspective on my 1.3x crop sensor without vignetting is exactly what I’ve been looking for. Thanks for your time and research.
Great to find your pages, I had fun reading them. It would be worth mentioning that the functions of ImageAlign Pro are now part of Photoshop CS3 (thank god!). CS3 is so great for things like B&W conversion, adj layer and distortion removal that it is the first update really worth getting since version 5.
You can also remove distortion with DxO software, which also corrects for Volume Anamorphosis. It is expensive, but well worth it for difficult images.
You can see my review of DxO Optics Pro Elite (see Comment #8, above) here.