30 diagonal inches of goodness.
For an index of all my Mac Pro articles, click here.
December 2019 update: My beautiful, hard working Apple Cinema Display expired after a hard life of over 10 years. It has been replaced by a BenQ PD3200Q 32″ which delivers similar quality at a $400 cost. I cannot recommend purchase of a used ACD. These are now very old and parts are no longer available. They did look beautiful though, unlike the ugly, industrial-looking replacement.
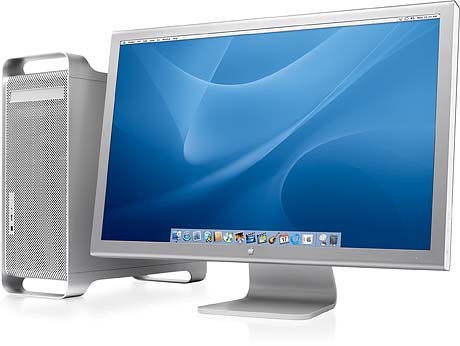
The magnificent Apple 30″ Cinema Display, next to a G5 Mac Pro.
For the last 5 years I have been happily using three Dell 2209WA 20.5″ 1680×1050 matte displays. Not the last word in definition and size, certainly, but workhorses which have proved tremendously reliable, with no dead pixels or fading. There’s a handy dead pixel set of test screens here.
Today I replaced the center one of the Dells with a 30″ Apple Cinema Display (2560 x 1600, it’s actually 29.5″ diagonally, not the claimed 30″) and it’s better in every way. With twice the display area and better definition, it’s a dream solution for demanding photo and video editing, and it was the latter which attracted me. iMovie is pretty tough to use on a 20.5″ screen and pretty much impossible on a laptop display.
The weight and dimensions are: 27.5 lbs., 21.3″ H x 27.2″ W x 8.46″ D. The panel itself is 1.80″ thick.
Two versions:
Apple sold two versions of the 30″ ACD. Through March 27, 2006 the maximum brightness was 270 cd/m² and the contrast ratio was a maximum of 270:1. Thereafter these were increased to 400 cd/m² and 400:1, respectively. You can check the age of the display by inputting the serial number, found on the base of the support foot, into any number of online services which give the age of an Apple device based on the serial number. In practice the enhancements in the second version are of no use – you will never want to run the display with brightness anywhere near 270 cd/m², let alone 400. 120 cd/m² is what is needed for photo processing. And contrast (found in System Preferences->Accessibility) is set well below the limit unless you are vision impaired.
Later Apple displays:
Apple’s display philosophy has been all downhill since the ACD was discontinued in July, 2010. On desktop displays they migrated to the ghastly, glossy screen 27″ LED display, with its poor ability to turn down brightness (always too bright) and there’s nothing good about the glossy screen. A like display is found on current iMacs and it’s every bit as unsuited to photo editing. The discontinued 30″ ACD came with a matte screen IPS display only and has a large adjustment range for display brightness. Dell makes a 30″ display for $1100 or so, but there are many reports of poor quality control, a Dell specialty. Let’s be honest here – they are ugly.
Procurement:
I live in the Bay area, adjacent to Silicon Valley, and there are many of these for sale locally, which is how you want to buy to avoid the risks of shipping and the even greater risks from lying sellers. Mine came boxed and mint from the original owner, an amateur user, and has had an easy life. A quick check confirmed the absence of any fading or dead pixels and, at $400 on Craigslist, was priced at the low end of what these go for, complete with original box. Nice. These originally sold new for $3,300, and some $1,800 when discontinued, confirming that pot smokers abound as much in Cupertino as they do in Apple’s customer base. The most likely failure point is the separate power brick and new ones can still be had for some $185. Jump to the end for other parts sources and repair instructions.
Ergonomics:
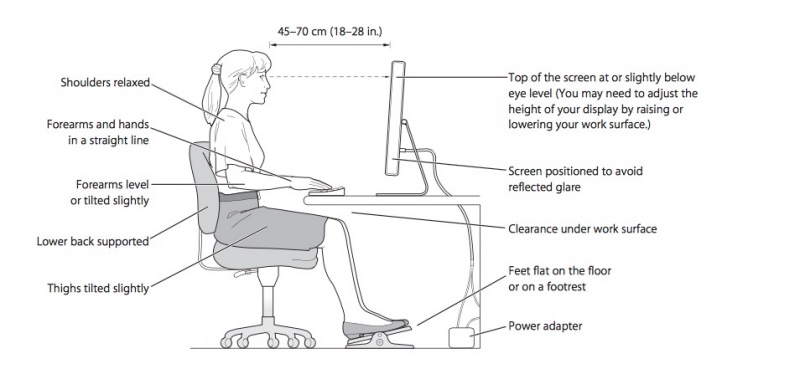
With a display this large, ergonomics become important. Apple’s instructions do an excellent job:
How to get 2560 x 1600 definition:
My first ACD came with both a DVI (dual link) cable and a MiniDisplayPort adapter – the latter is generally missing. I dispensed with the MDP adapter (sold for $50) and connected the ACD directly to the dual link DVI socket (one plug goes in that socket, despite the name – it’s the DVI connector with no pins missing) on my Nvidia EVGA GTX680 graphics card. A separate but integrated USB cable attaches to your Mac Pro to provide power for the two USB2 sockets on the rear of the ACD – useful for powering a colorimeter or microphone, say. Use the included MDP adapter in your Thunderbolt socket on a MacBook or MacBook Air, and it works fine. The current Air uses the excellent integrated Intel HD 6000 GPU and drives the ACD fine. There are also two Firewire 400 sockets on the rear of the display, yet another connection technology sponsored, then abandoned, by Apple. They are useless – USB3 is faster in every way. Note that the USB sockets on the rear of the display will only support USB2, even if the cable at the computer end is connected to a USB3 card.
To enjoy the maximum 2560 x 1600 pixel definition of the 30″ ACD you must use either a dual-link DVI cable (DVI-I or DVI-P) or the Apple dual-link DVI to MDP adapter. If you use single-link DVI to MDP adapter you will be limited to 1920 x 1200 when used with an MDP or Thunderbolt socket. If you are lucky, that is. 1280 max on the long side is not unknown. The premium for a dual-link DVI cable over a single link one is pennies. However, for MDP users the premium for the proper dual-link DVI adapter is substantial.
Here’s what the DVI variants look like:
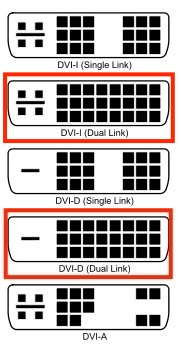
The ones in the red rectangles are what you need – either works.
Issues with the MiniDisplay Port adapter:
The dual-link DVI adapter must be used with computers or graphics cards where either a Mini DisplayPort or Thunderbolt socket is the only connection available on the computer. Typically such an adapter is required with the MacBook, MacBook Pro or MacBook Air. Thunderbolt is a superset of MDP, meaning that MDP works fine when inserted in a Thunderbolt socket but a TB plug will not work in an MDP-only socket.
Here’s the Apple Dual-link DVI to MDP adapter:

There were four versions of firmware installed in this adapter and you need the last – Version 1.03 – if you have a flickering image or ‘wake from sleep’ issues. You can check your firmware version here:
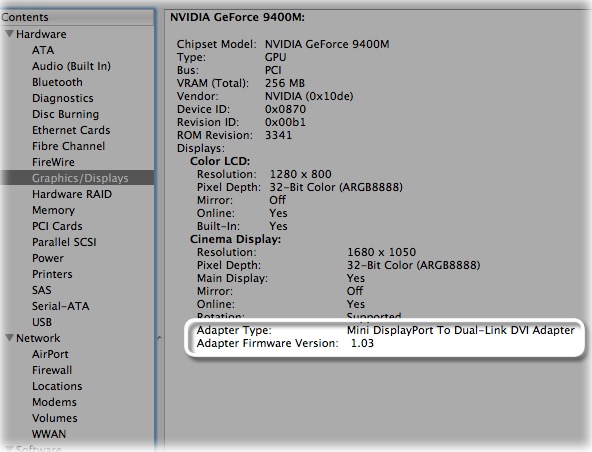
Click the image for Apple’s site.
I do not know of any method of burning the latest firmware into an older adapter. It looks like replacement is in order if yours is below firmware version 1.03 and you have issues.
Early reviews suggest these adapters were suspect, seemingly fixed in later production – likely related to the firmware upgrade. Not cheap at $99. Mine works fine with 2013/2014/2015 MacBook Air laptops – the adapter’s plug fits in the Thunderbolt port on the MacBook Air (and on the like port on the MacBook Pro). The USB cable shown in the image above is a pass through to allow function of the USB2 sockets on the rear of the ACD.
Profiling:
Amazingly, my EyeOne Display colorimeter’s software, last released when OS Lion (OS 10.7.x – Yosemite is 10.10.x) was current, still works in Yosemite 10.10.3 (XRite’s latest download for Mavericks does not work with Yosemite on my Mac Pro) and it was a matter of moments to calibrate the ACD.
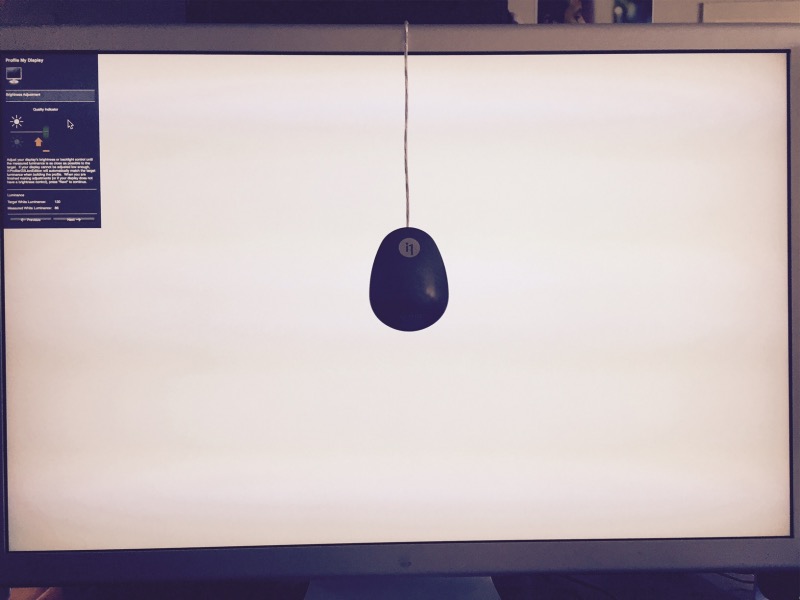
Calibrating the ACD takes a few minutes.
The display brightness is easily turned down to 120 cd/m² using the beautifully engineered electrostatic touch buttons on the side:
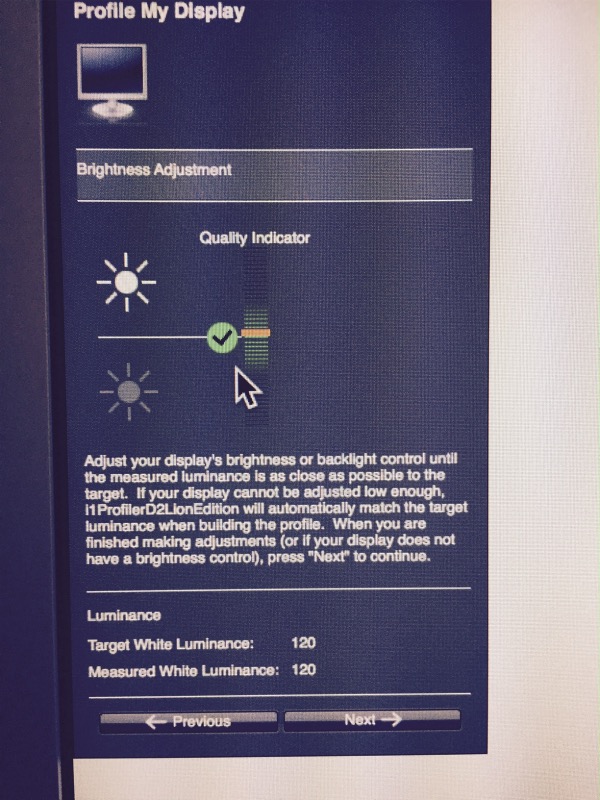
120 cd/m² is all you need. Every modern Apple display is too bright at its minimum setting.
If your touch buttons are faulty – they have been known to fail with age – you can adjust brightness in System Preferences->Displays and the display can be put to sleep using OS X (Apple Menu->Sleep or hit Option-Command-Eject). Contrast is adjusted in System Preferences->Accessibility->Displays, of all places.
The maximum brightness of the ACD is no less than 400 cd/m² (270 cd/m² on earlier models), which is ridiculous. A veritable blitzkrieg of energy of use only in a brightly lit showroom, also known as The Apple Store, and a capability happily emulated by a cynical Apple in later, less competent designs.
Performance and quality:
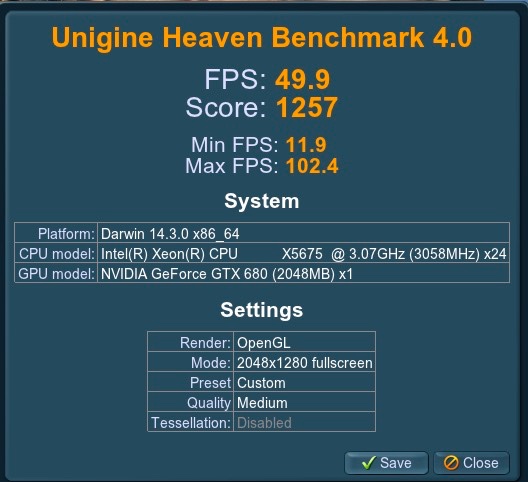
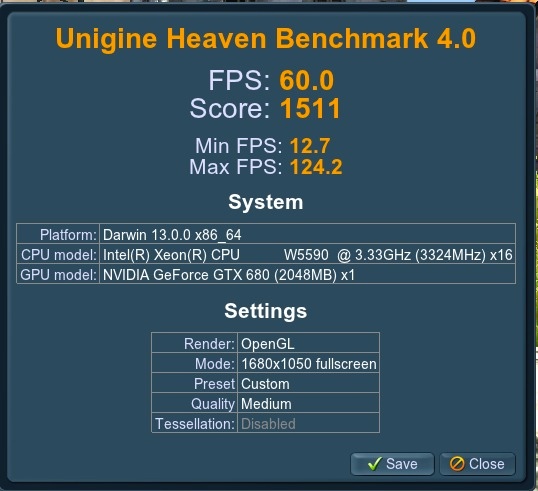
Performance with the GTX680 and Unigine Heaven at 2048 x 1280 is as follows:
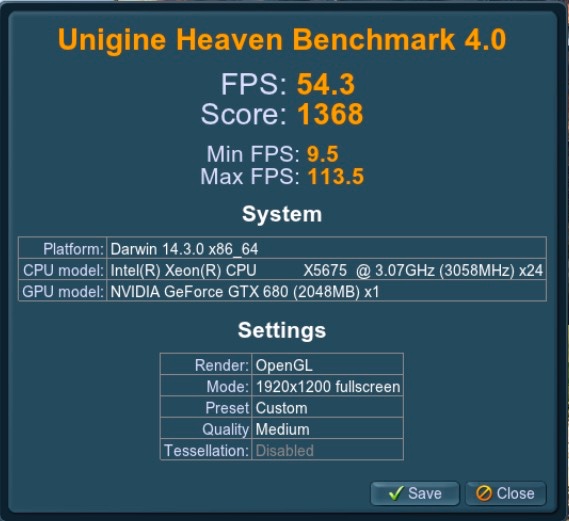
At 1920 x 1200 it is:
Here are the like data for the Dell 2209WA – the ACD has 2.3x the number of pixels..
If higher framing rates are required, a near doubling of throughput can be accomplished by upgrading the GTX680 to the later GTX980, which runs some $550.
Quality of construction, fit and finish are in a different league from anything Dell makes – think Lexus, not Chevy. The display is tall and I dispensed with the stands used with the Dells:
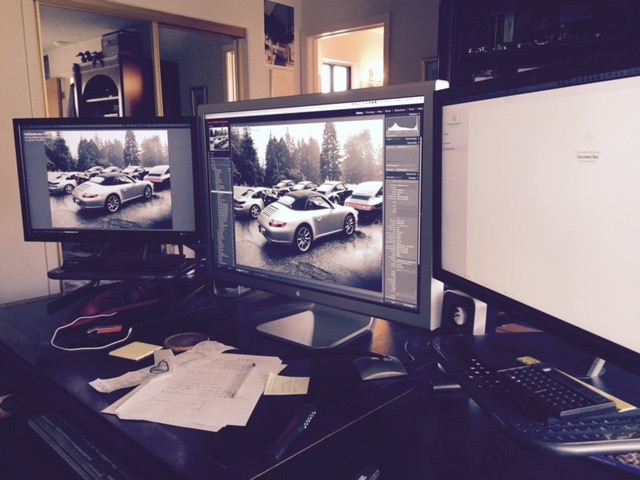
No stand needed. Running LR6 here.
Font sizes and resolution can be easily adjusted. I find the font size at 2560 x 1600 a tad too small for comfort and prefer 2048 x 1280, which can be dialed in using the System Preferences->Displays panel thus:
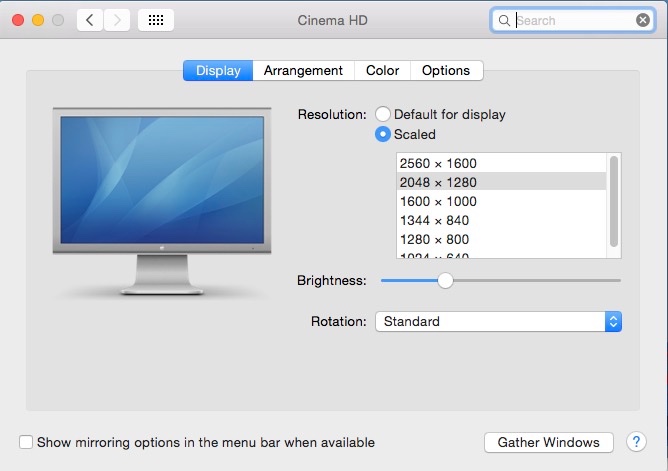
Adjusting resolution and font sizes.
The gain in font size is a worthwhile trade off against the slightly lower resolution in my case.
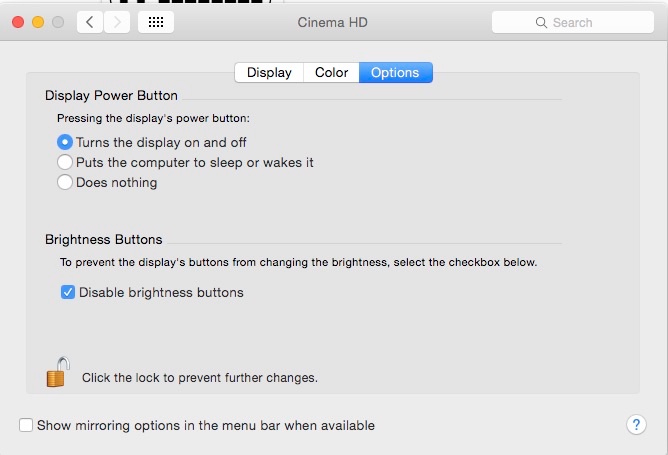
Go into System Preferences->Displays->Options and you can control the behavior of the three right side electrostatic buttons – two for brightness, one for power. I have the former enabled but the latter disabled, as I only ever put my system to sleep, never turning it off (why would anyone want to do turn off their Mac Pro?):
The gain in screen real estate is compelling, the quality excellent. The aspect ratio is the same 16:10 of the Dells, far preferable to the 16:9 in most current displays, allowing placement of the ‘pop-up on cursor hover’ app icons at the base of the screen. For wall mounting the stock foot is easily removed with a 3mm Allen hex wrench, and replaced with a VESA adapter with 100mm (3
.94″) spacing for four screws to attach to your wall mount. The original Apple part number is M9649G/A and you can pay $300 for a used one. Don’t be stupid – get a knock-off.
Famous users!
And if you migrate to the 30″ ACD, you will be in the good company of a distinguished AAPL board member:
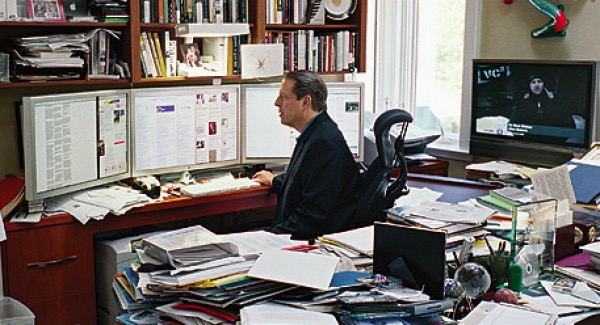
Al Gore with his three ACDs. Looks like some filing is in order here!
4K?
4K, you say? Fughedaboutit. Not ready for prime time – wait for standards to settle and for silly-high prices to drop. How can a 4K computer display cost four times as much as a like-sized 4K TV set?
UHD 3440 x 1440 displays?
Use with multiple UHD displays is addressed here. These are a cost effective solution when lots of screen real estate is required.
Use with the Nvidia GTX980 GPU:
I’m using my two displays with an Nvidia GTX680 card and both will run simultaneously at 2560 x 1600, the highest resolution available. Each is connected directly to one of the two DVI sockets in the GTX680 using the stock Apple cable – one to the DVI-I socket, the other to the DVI-D. No adapters required.
The state-of-the art in Mac Pro GPUs is the later GTX980 card which aftermarket vendors can flash for you so that the boot screen is visible. The card will run at PCIe 2.0, which is the Mac Pro’s limit, whether flashed or not. The Mac Pro does not support PCIe 3.0 which the GTX980 includes. The GTX980 is 50-100% faster than the GTX680.
The snag with the GTX980 (I have examined Asus, EVGA, Gigabyte, MSI, PNY and Zotac variants) is that all but the following come with just one DVI socket, three DP sockets and one HDMI. These are the exceptions which come with two DVI sockets:
- EVGA GTX980 Classified P/N 04G-P4-3988-KR, at Amazon here
- EVGA GTX980 Classified P/N 04G-P4-2986-KR, at Amazon here
- Gigabyte GV-N980WF3-4GD, at B&H here
- Gigabyte GV-N980WF3OC-4GD, at Newegg here
- Gigabyte GV-N980G1 GAMING-4GD, at Newegg here
All the versions linked above have two DVI, one DP (or more) and one HDMI which is the best solution for HD dual display users. The performance differences are minor (I illustrate the two EVGA cards, below; the Gigabytes’ differences are comparably small) so I would buy the cheapest you can find:
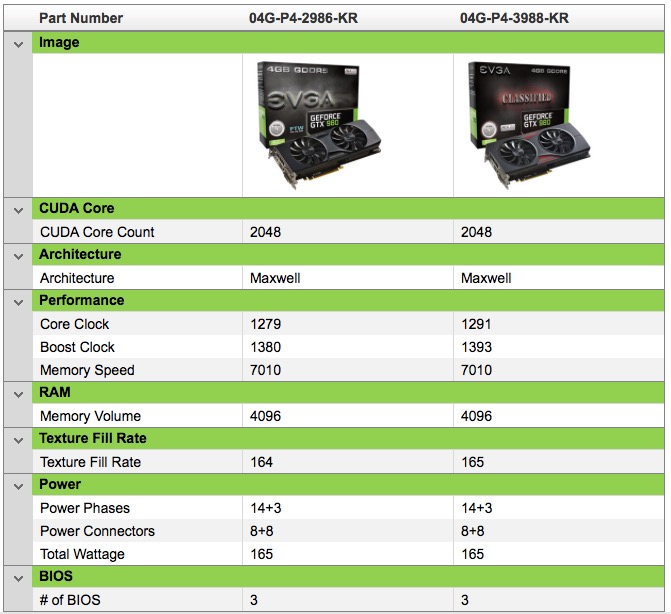
Performance comparison of the two EVGA dual-DVI GTX980 GPUs.
The two EVGA cards with dual DVI sockets both have 8-pin auxiliary power sockets, whereas the Mac Pro uses 6-pin plugs. Thus you will need to use two 6-to-8 pin adapters to power the card.
If you propose using any but one of the GTX980 versions above with two ACD 30″ displays you will need to adapt one of the ACD’s sockets to DVI using an adapter like this Dell active adapter. A passive adapter maxes out at 1920 x 1200; the active adapter adds a USB cable which provides the necessary additional 5 volt source to deliver the full 2560 x 1920. As Amazon reviews disclose, the reliability of these adapters is all over the place so if you need GTX980 performance with dual 30″ ACDs, I recommend you search out one of the GPUs with dual DVI sockets above and avoid the use of any adapters. Have the card flashed if you really need the boot screen. Further the triple DP cards use a mix of auxiliary power sockets – some have dual 6-pin (no adapters needed), others have a 6-pin and an 8-pin (one adapter needed). Be sure you have the right adapters and power cables.
Moom:
It bears repeating that Moom, which will place all your windows just so on those acres of display space, is a recommended app. You set up your windows then tell Moom to save the settings. Thereafter recreating the set up is a couple of mouse clicks away. More here.
Update – a second 30″ ACD:
I added a second 30″ ACD, this one running me just $300 and another local purchase, nearby. In mint condition, the geeky seller even threw in a spare wiring loom/chassis (sold for $50), though the installed one is just fine. It’s good to buy from geeks – they tend to care for their hardware. A touch of superglue fixed a small crack in one of the power plugs and she’s as good as new. My PC GTX680 GPU which has been flashed to show the boot screen (though flashing does not affect the functioning of the card as regards dual displays) happily drives both displays using the DVI-D and DVI-I sockets on the card. Both DVI sockets are dual link (no pins missing); all the DVI-I one adds is the ability to also drive ancient analog displays – both sockets drive digital displays like the ACD just fine.
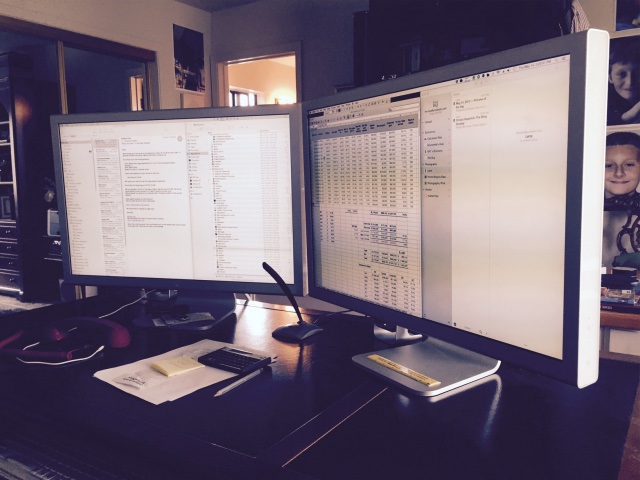
If one is good, two are better!
Apple’s mindless OS X ‘upgrades’:
Mavericks (OS 10.9) finally added a long wanted feature for multiple monitor users on OS X. Multiple monitor support for the menu bar. Trust me, with two 30″ displays you want a menu bar on each. OS X had always supported multiple monitors but you could get the menu bar on one monitor or the other – not both. If you used three then only one could show the menu bar until Mavericks came along. It was well engineered. The menu bar appeared bright at the top of the active display, slightly dimmed on the other(s). If you use a disappearing dock, the dock would appear when cursored-over on the active monitor. Drag an app window to span both monitors and all was well, as they were displayed across the two – and a great, quick visual check on the accuracy of your profiling with instant disclosure of profiling differences.
But it wouldn’t do to leave well enough alone now, would it? So Yosemite adopts a ‘phantom’ partial app window – drag a window across and whichever display has the greater area shows that fractional window in normal form, the other shows it ‘ghosted’. Release the mouse pointer at this point and you only see the fractional window on the dominant display. Useless.
But you can revert to the old proper split display functionality by going into System Preferences->Mission Control and unchecking the box below:
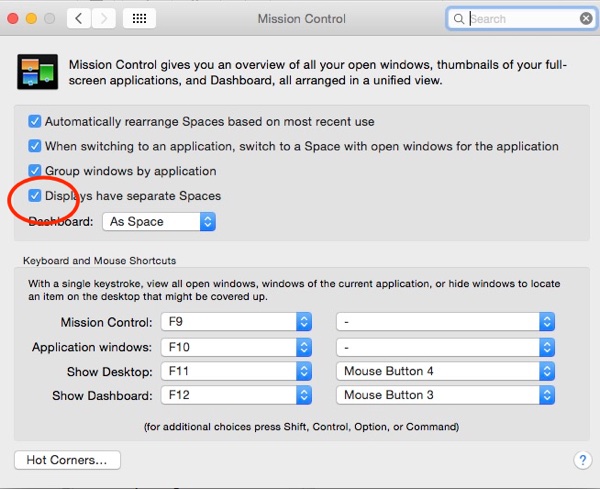
Permitting split screen app window display – uncheck the box.
But …. you now lose the menu bar from the second (and third) displays. Ugh! It’s a mess. How hard can it be to call a working pro, asking what he wants, and fixing one line of code? Another indication of Apple no longer caring about the professional marketplace.
To reduce the irritating default translucency of the menu bar (what idiot thought of that – a 12 year old? The jerk doesn’t even know the difference between transparency and translucency. Move him to watch band design ASAP, says I) check the box below in System Preferences->Accessibility (a location which takes the ‘illogical placement of the year’ award – what’s wrong with putting it in General or Displays?):
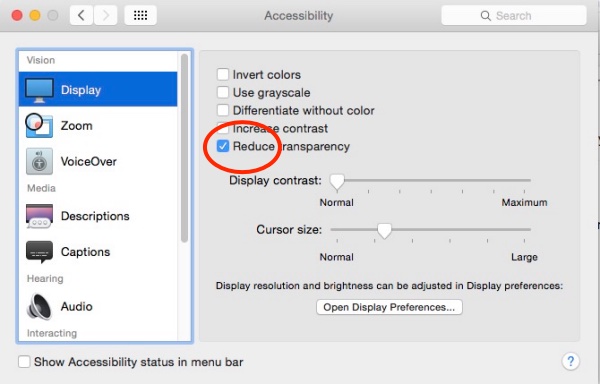
Reducing the silly default menu bar translucency
Repairs:
We live in a throwaway society. American labor is so costly that fixing things rarely makes economic sense, and Apple sure as heck will not fix your obsolete 30″ ACD. But as the alternatives are ugly Dells or costly 4K monitors, assuming you do not want Apple’s glossy Thunderbolt display, I contend that fixing these makes sense and the economics solve if you are DIY-minded.
Thus here are some links which will prove of use as these 5-10 years displays start displaying problems:
- Disassembly: The ACD’s lovely alloy shell is ‘cracked’ and the innards extracted after pulling off the white plastic side panels and releasing some catches. Be careful, as the right side panel has an electrical connector which must be removed and will be damaged if you simply rip the panel off. Click here for instructions – those are for the 23″ ACD, but will work fine for the 30″ ACD as well.
- Failed backlight: If the backlight fails, replacements can be found here. Generic LCD backlight replacement instructions are here.
- Failed voltage regulator: Long-short-long flashes from the white diode on the front panel of the ACD and a dead screen denote a failed voltage regulator. The fix appears here. A replacement voltage regulator can be found here and costs pennies. The issue is more common with the 23″ ACD than with the 30″ version. An alternative fix is to use the beefier 150 watt power brick from the 30″ ACD with the faulty 23″ ACD, which ordinarily uses a 90 watt power supply, but as power bricks run some $150, I would rather replace the voltage regulator for 48 cents!
- eBay regularly has auctions for ACDs with trashed screens. These can be had inexpensively and will likely serve as an inexpensive parts source.
Moniserv is an oft quoted repair place which should have new backlights.
With parts being so inexpensive, and given that the LCD screen itself rarely fails, it seems ridiculous to throw out a superb display when for a few pennies and some sweat equity it can be restored to perfect working condition. And after sale of my old Dells, my 30″ ACDs ran me just $125 each …. what’s not to like?
Replacement power supplies:
The 150 watt PSU runs $150 used and is known to fail. You can use this link to build your own for $20 or so. Another alternative appears appears here.