Three days of hard labor = one perfectly calibrated camera + lens.
There’s little use in setting up the King Pano head correctly if your camera/lens combination is incorrectly calibrated for the PTMac application.
PTMac comes with tons of lens/camera database settings which you can just load, but my experience suggests that you really should calibrate your particular body + lens, as calibration will adjust for your combination’s anomalies as well as for the offset of the sensor in the camera body. I cannot stress enough how important it is to do this, and as I have learned from my mistakes, you should be able to do this in a couple of hours by following the instructions below. This took me three days….
What follows is specific to the Canon EOS 5D + Canon 15mm EF Fisheye lens, but adapting these instructions to your camera/lens combination is a simple matter. It doesn’t help that the one set of lens parameters I found on the web for this combination (it does not exists in the PTMac database) did not work for my particular setup.
The problem with PTMac is that this great application is hampered by confusing instructions. The vendor is clearly very conscientious in responding to queries, but the result is that the magic sauce is in several places – the application’s Help file, the vendor’s forum and various FAQs also on the vendor’s web site, not to mention all sorts of chatter on Google. What follows is self contained – everything you need.
1 – Taking the calibration pictures
With the camera mounted in the King Pano as shown here, go to an indoor setting with as many horizontal and vertical lines as possible. Indoors is preferred to outdoors as you have total control of your environment – no wind movement, constant light, etc. – and you will be much closer to your subject, which makes for more critical calibration and, chances are, the setting will be replete with strong horizontal and vertical lines. Except for geodesic dome types, most homes tend to be rectangular.
I have my 5D’s custom setting (‘C’ on the mode dial) set for ISO 200, 1/125, f/8, color balance set to sunlight (not AWB), JPG quality set to the lowest possible (you want small files to speed up PTMac processing), auto rotate Off and the lens set to manual focus. Set the focus between the 3′ and infinity marks, adjust the shutter speed for exposure, leaving the aperture at f/8 and take a trial picture to check everything is nice and bright and easy to see. One half stop overexposed does not hurt. Now set the KingPano to the zero degree click stop and orient the camera + tripod so that the camera points to the leftmost side of the scene.
You will be taking just three pictures – each three click-stops apart on the KingPano – meaning 22.5 degrees as each click stop is equivalent to 7.5 degrees. Now while the full frame Canon 15mm fisheye will cover a 360 degree circle in just 6 shots (60 degrees between shots), we are opting for a huge overlap in the interest of best calibration.
Now level the camera carefully using the accessory shoe-mounted double bubble level I illustrated here . You want the camera to be level, so disregard the bubble level on the King Pano which will give false readings owing to the slight sag of the assembly from the weight of the 5D. That’s not the manufacturer’s fault. To make the King Pano much sturdier would greatly increase bulk and weight.
Take three pictures spaced three clicks apart.
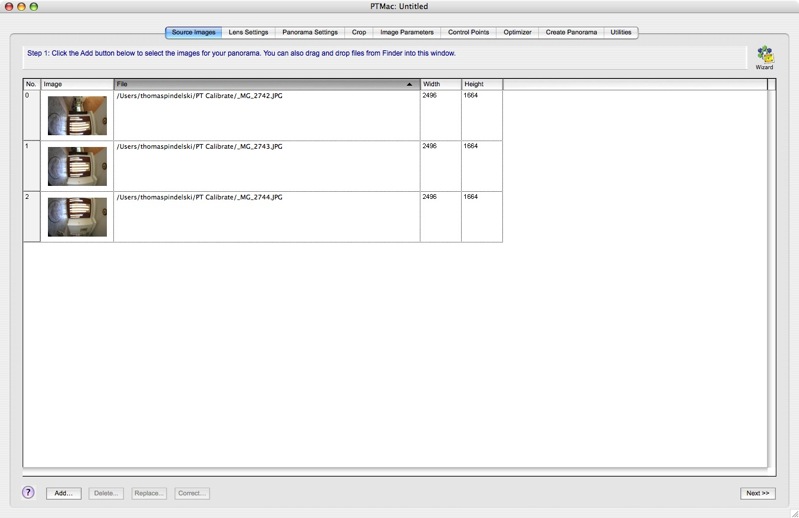
2 – Load the pictures into PTMac:
The screen looks as follows:
3 – Guesstimate the lens settings:
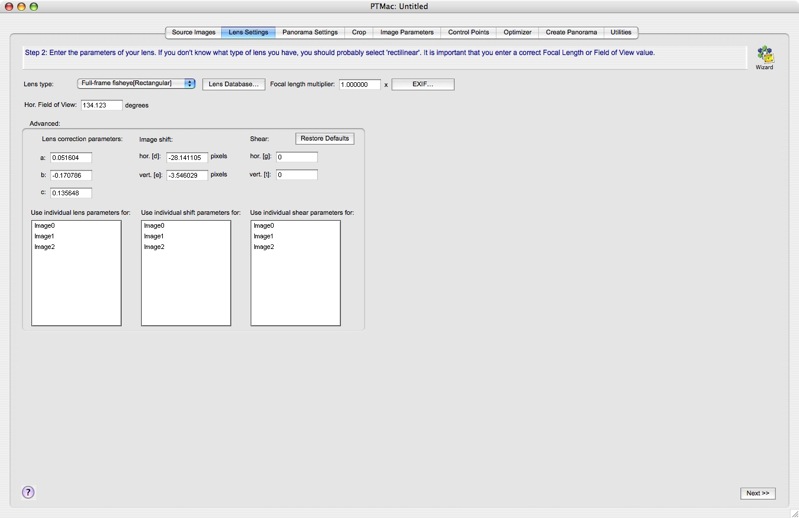
Go to the Lens Settings tab and set the Lens type to Full-frame Fisheye[Rectangular] and the Hor. Field of View to 91.733 degrees. This will change as we calibrate but that’s Canon’s data sheet spec for the fisheye.

Note the Focal length multiplier is set at 1.000000 as the 5D is a full frame camera. Other Canons may be 1.3x or 1.6x, Nikon DSLRs are 1.5x and so on. You know your number. Leave everything else unchanged.
4 – Fix orientation:
Now go to the Image Parameters tab and this is what you will see:
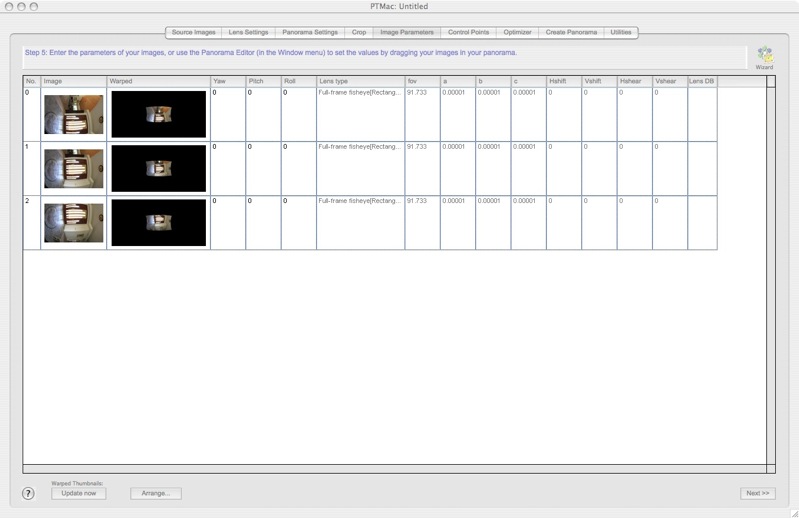
The left hand column of images shows the full frame shot, the next column how these images are aligned by PTMac. Two things are wrong. The images are turned through 90 degrees and all overlap exactly.
Click on Arrange at the bottom of the screen and adjust the variables as shown below:
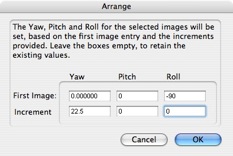
What you are doing is telling the application to turn every image 90 degrees CCW and to make the spacing between each 22.5 degrees, which is what the spacing was when you took the pictures.
Your screen now looks like this:
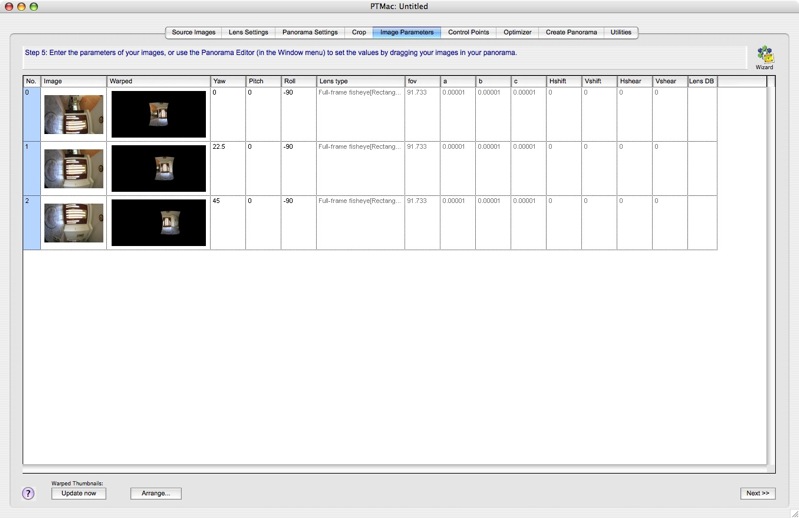
The pictures in the ‘Warped’ column are now turned upright and offset from one another.
5 – Set preliminary Control Points:
Now go to the Control Points tab. A Control Point is nothing more than two indicators – one in each picture – telling PTMac that those points either constitute identical points on those images or are points between horizontal or vertical lines. We will establish vertical line control points first – these tell PTMac about the Fisheye’s distortion.
In the following picture one Vertical control point has been placed at the top left of the vertical door jamb in Picture 1 and the second, in Picture 2 where the door jamb is most bowed from fisheye distortion.
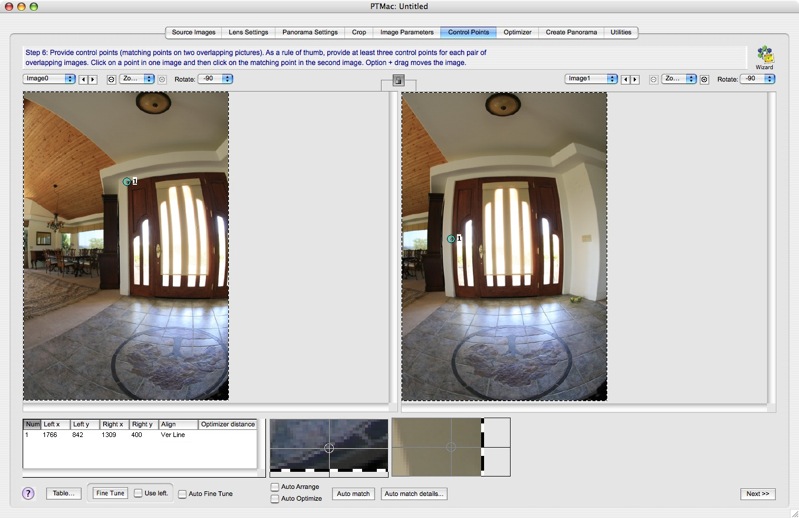
You must also click the entry in the ‘Align’ column in the data box at lower left and choose Vertical Line to tell PTMac this is a vertical line control point pair.
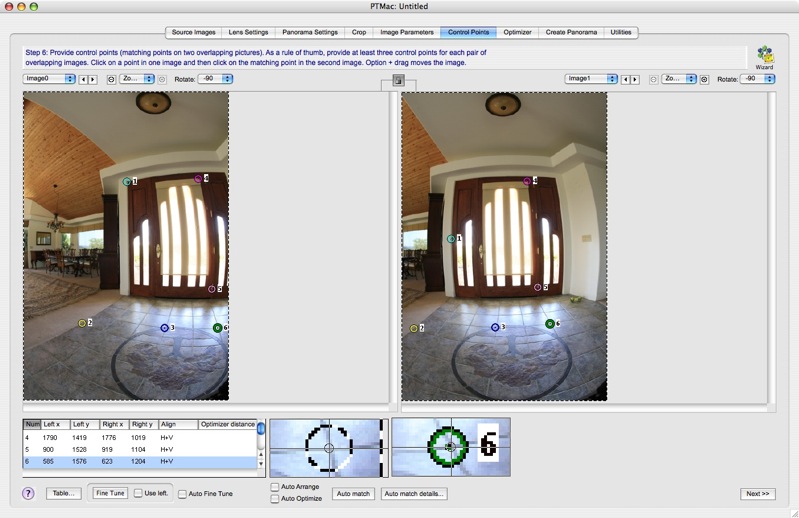
Now you have to add five more control points which are spot Control points – remember to elect the Spot choice (a circle with a dot) in the ‘Align’ entry for the first of these – PTMac remains at whatever Control Point type was previously selected. Once chosen, a spot Control Point will be somewhat confusingly shown as ‘H+V’ in the Align column. No one ever accused engineers or software writers of being good at ergonomics, the guys at Aperture excepted. This is how it looks after adding five spot Control Points between Images 0 and 1 – strongly defined image details have been chosen not too close to the edges. PTMac does a nice job of magnifying the Control Point cursor in the small panels below the pictures as you move the mouse, clicking first in one image then in the other:

Now click on the right arrow key to the right of the Image 0 drop down menu at the top left and Image 0 becomes Image 1 on the left. Image 1, on the right, becomes Image 2. All Control Points have disappeared as none have yet been established between this image pair. Repeat the process – one set of vertical Control Points and five spot Control Points:
Now in each pair of images establish a pair of Horizontal Control Points – the example below illustrates point 7 between Images 1 and 2, at the top of the picture. Remember to elect the Horizontal Line choice in the Align table entry, as has been done here:
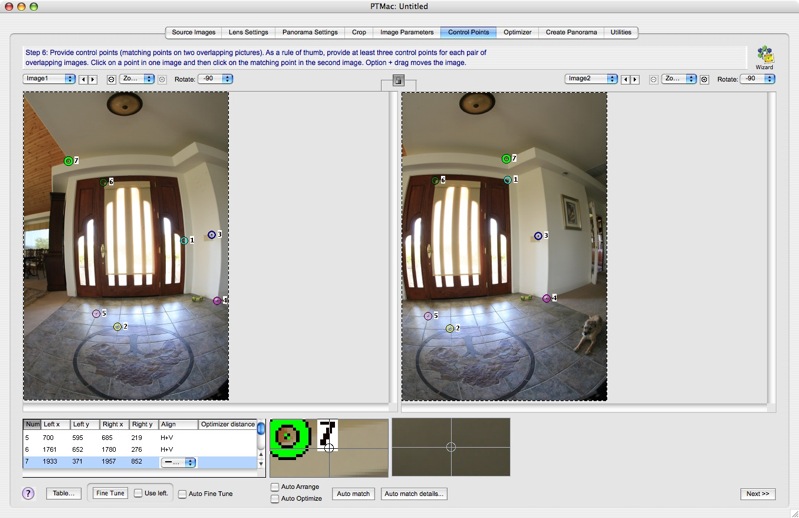
Finally, chose Image 0 for the left hand pane and Image 2 for the right. Create at least one control point which is identically placed between these non-adjacent images. You can do this by virtue of the huge overlap the 22.5 degree spacing affords – common information will apear in each of the three pictures.
6 – First Optimizer run:
The first Control Point pass is done. Go to the Optimizer tab and check the ‘Yaw:’, ‘Pitch:’, ‘Roll’: and ‘Use Control Points of:’ boxes as shown below. You have to click well to the right of the word ‘Image0’ and so on to get the check mark (or ‘tick’ to Her Majesty’s subjects) to show :
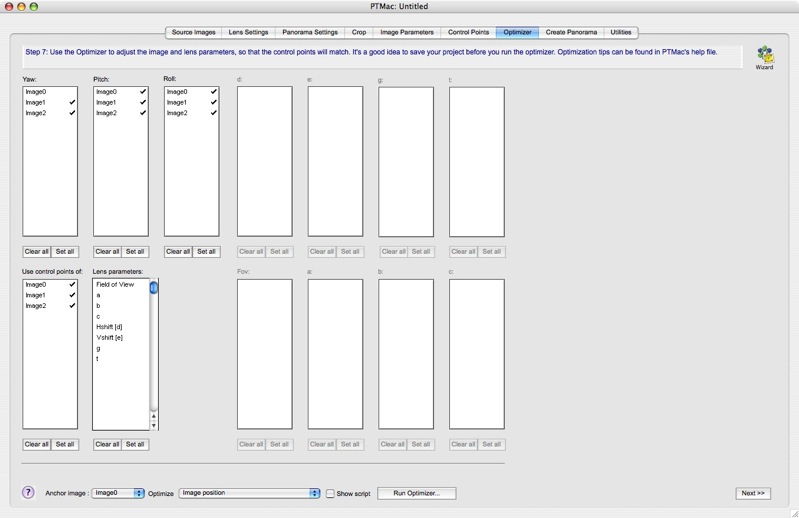
Here’s what the terms mean. Imagine you are on the Titanic, doing your Kate Winslet thing, facing the prow (front) of the ship, your arms outstretched horizontally to your sides, pointing to the horizon on either side. When the ship Rolls, your arms go up and down relative to the horizons. When it Pitches, the prow goes up and down in your dead ahead line of vision. When it Yaws, the prow moves from side to side as you look forward dead ahead. Just don’t ask me about port and starboard.
Click on the Run Optimizer box at the lower right. When the program is done, click the Field of View entry in the Lens parameters: box and run the Optimizer again. Then click the ‘b’ entry and run the Optimizer. Then click ‘a’ and ‘c’ and run the Optimizer. Finally, click both ‘Hshift’ and ‘Vshift’ and run the Optimizer one last time. By running the optimization process in multiple steps you heighten the accuracy of the result, as the program learns about your lens’s distortions and the camera’s sensor offset – the latter a normal result of manufacturing tolerances (Canon is emphatically not Leica in this regard!). Baby (optimization) steps beat one giant leap anyday.
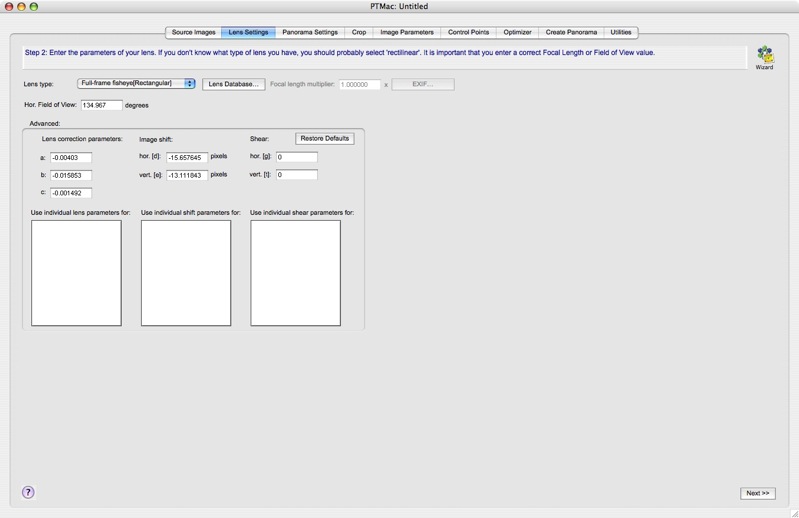
Now take a look at the Lens Settings tab – you will see something like this (your numbers will differ):

Reflecting your optimization, PTMac has entered the various parameters in the boxes for your camera/lens combination.
We are not done. The critical point is now reached where you must fine tune your control points to get them as accurate as possible.
7 – Save your work:
But first, so as not to lose anything, click on the Lens Database box and you will be presented with this screen:
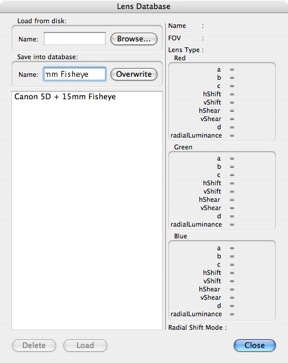
Click on Lens Database again and click on your saved settings’ name and you will see the following:

8 – Fine tune your control points:
Now we need to examine Control Points, so go to the Control Points tab an click on Table at lower left. This is what you will see:
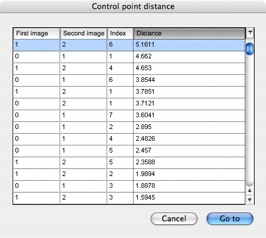
We want to get the amounts shown in the Distance column as low as possible – below 2.0 ideally.
Click Goto and PTMac will go to the the images with your control point pair. Click the box above each picture to choose 100% display – that’s the largest you can get and allows you to critically reposition control points with the benefit of greater screen detail. Here’s how it looks. You can pan around with the slider bars at the sides of the pictures or Option-Drag the mouse cursor to move the image. Click the padlock in between the image tops to decouple their movement.

You can reposition any control point by grabbing it with the mouse pointer and click-dragging it. I cannot stress enough how critical this step is to a proper calibration. Go back to the table, chose the next over 2.0 entry in the list (none change until you re-run the Optimizer) and repeat. Keep doing this until you have addressed all point control points with a distance reading over 2.0. By all means check your horizontal and vertical control points also, but beware that PTMac gives wild readings for these which are not meaningful to the fine tuning process. If they are correctly set – meaning exactly on their respective vertical or horizontal lines – leave them alone.
9 – Now fine tune your Control Points again:
Now repeat the Optimizer routine above, doing it in many steps as before. Check the Lens Settings tab and you will see the data have changed, so resave them as before:
Now go back to Control Points and again re-tune any spot control points over 2.0. Keep doing this until all are under 2.0. It takes time. Believe me, the pay back in time saved from a correctly calibrated camera/lens combination is worth it. Now resave the lens settings.
10 – Preview the panorama on the screen:
You can now preview the panorama on the screen with Command-E, but be warned that the previewer is very crude and does not properly show alignment. On no account should you even think of manually dragging the images in the previewer screen to secure better alignment. You will waste a lot of time and you will fail.
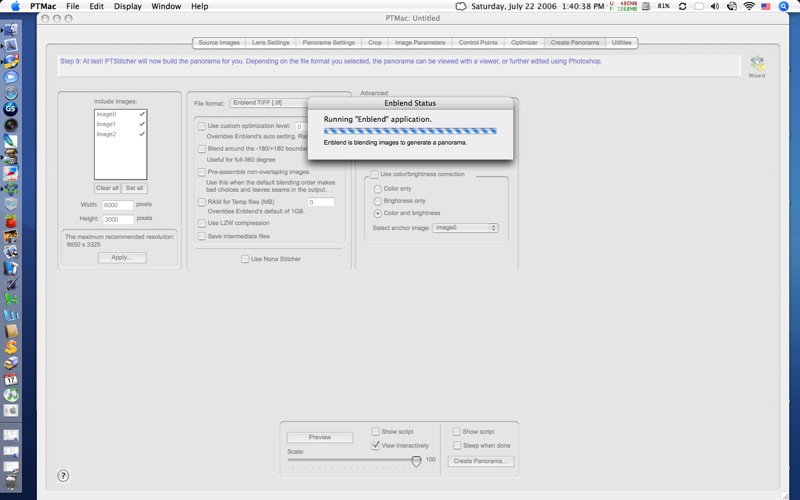
11 – Generate the panorama:
You must have Enblend (on the Kekus.com web site) installed in a directory on your hard drive and you must input the path to Enblend in the Preferences settings for PTMac, otherwise the panorama generation will fail.
Click on the Create Panorama tab and select Enblend TIFF in the drop down box. This is the only setting that results in the best possible blending of stitches between adjacent pictures. Leave everything else alone and click Create Panorama at the lower right.
The panorama creation process takes a while – with these three small files (each ~800k) on my 2 mHz, 2gB PPC iMac it took some three minutes – this is what you will see towards the end of the process:
12 – Get the dog out – sorry, I mean Photoshop:
Load the TIFF file generated by PTMac and Enblend into Photoshop and this is what you will see:
Note that sophisticated man about town, Bertram the Border Terrier, earning his modelling fee. A dog far superior to anything from Adobe/Macromedia. You can use other breeds, of course, but I find the Border Terrier works best.
13 – Install the PanoPreviewer plug-in:
To allow previewing of this in QuickTime format, go to Panagea’s web site and download and install the PanoPreviewer Photoshop Plug-in. Restart Photoshop, reload the image and you can preview the image in its full QuickTime glory by selecting the plug-in from Photoshop’s Filter menu. This is how it looks:
14 – Check for skew and stitching errors:
Pan around and check the whole thing. If your picture is skewed to the horizontal you need to recheck your camera levelling and do this all again. There are no short cuts. If you see any stitching errors, go back and rework the control points. If that still fails, recheck your KingPano setup, especially checking nodal point and alignment settings. The subject above is very, very challenging with a multitude of strong overlapping details very close to the lens. The door is but eight feet from the camera, despite appearances. If it works with this sort of subject, it will work anywhere!
Here are the final Control Point distance statistics (identical to the finally saved data in the lens database on the Lens Settings tab) after all this calibration:

Why PTMac has determined the Field of View (FoV) to be 134.9 degrees when the vertical FoV of the Canon Fisheye is 91.733 degrees beats me but, hey, it works!
You can see that the 5D’s sensor is offset some 15 and 12 pixels from dead center (the Hshift and Vshift numbers). Yours will be different which is why you should calibrate your camera/lens and not depend on someone else’s settings from a table. It may be that full frame sensor cameras with fisheyes are just more sensitive, I don’t know, but it is the only approach which worked for me. The result is simply perfect – the joins are impossible to see.
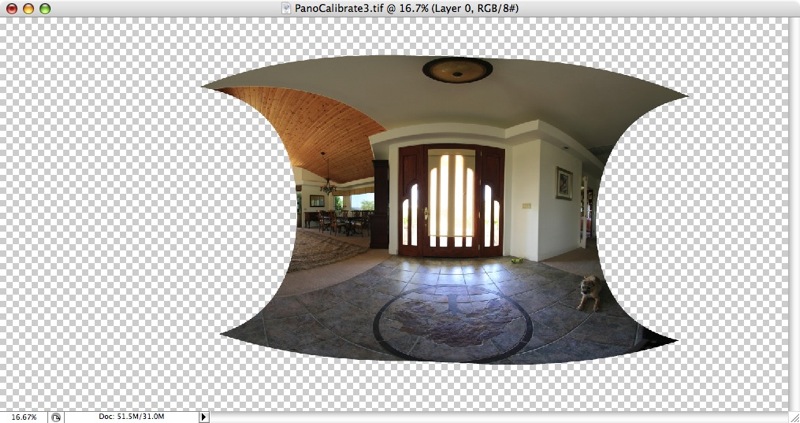
In Part III I will look at creating a full 360 degree panorama using six images at 60 degree angles to one another plus a nadir and zenith image. Right now, if you scroll up or down you will see holes where image data are missing, like so:

By the way, here are my final camera/lens calibrations – these are unique to this particular camera and lens; substituting another 5D body (I should be so lucky!) will not do, as the sensor offset will be different owing to manufacturing tolerances:
15 – View the result:
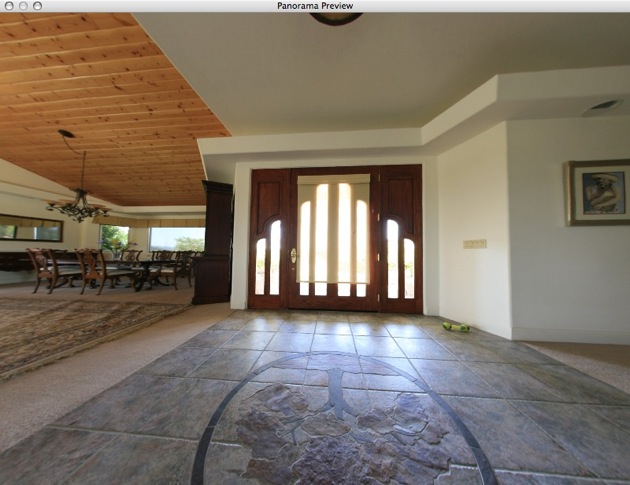
Click here to view the QuickTime movie created from the three images stitched above. The file is 600kB. As you will see, it’s only a partial panorama as images were only taken over a narrow range of Yaw.
There. I finally used a technical word! You can take the lad out of engineering, but you cannot take the engineer out of the lad.
You can pan with the mouse cursor in all directions and zoom in and out with the Shift and Control keys. You will need QuickTime on your computer – all Macs come with it installed.
16 – Buy an Apple computer is you don’t have one:
I believe there is even a version of QuickTime available for download from Apple for those poor unfortunates who have yet to see the light – they are called Windows users – but you need a Mac to use PTMac, so now’s the time to switch to one of these great machines. Each lock-up on your Windows machine costs you 30 minutes. Say your time is worth $50/hour. A new 17″ iMac with the maximum 2 gB of memory installed costs $1,600. So that’s 64 lock-ups or two months’ of use of Windows. Get a grip!