In overexposed highlights, that is
I have written before of the tendency of digital sensors to burn out highlight details. While highlights can be recovered using the Highlights slider in the Aperture Adjustments HUD, this is limited to one stop using RAW, in my experience. Thereafter, not all highlight details can be recovered.
Accordingly, in high contrast situations like outdoor sun, it’s far better to underexpose and use the Shadows slider to bring up shadow detail, rather than trying to recover highlights. The technique is illustrated here. A low noise sensor, like in the 5D, can sustain a lot of shadow enhancement before noise rears its ugly head.
Strangely, I find the large sensor in the Canon 5D more susceptible to highlight burn than the miniscule one in the Lumix LX1. Tfhe 5D’s sensor is some 1/2 stop more sensitive than the indicated ISO, compared with the Lumix. Given that HDR cannot be used with dynamic subjects (the three or five images required dictate the use of a tripod on a stationary subject) I simply underexpose by 1-2 stops in high contrast situations. Single image tone mapping can help, but it adds maybe half a stop at best; any more and the effect is garish. Canon provides exposure compensation on the 5D but is is horribly documented in the miserable book with a miniscule typeface that passes for instructions that comes with this camera. For $3,000 for a body only, this has to be the height of cynicism. Canon, please exclude accountants from the design of your machines and instruction books.
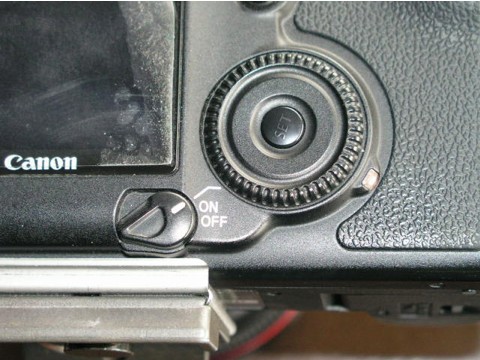
The 5D has a two position power switch, illustrated above. (The peeling on the screen is my stick on protector, not delamination of the LCD!). Normally, the switch is clicked up one notch to ‘On’ when using aperture priority – Av on the top left dial. Click it up one more notch to the line and the rear wheel activates exposure compensation, visible on the bottom of the viewfinder. It’s also displayed on the top LCD screen which is much easier to see than the viewfinder readout. By the way, a Manfrotto QR tripod plate is visible in this snap, permanently attached to the 5D’s base. Highly recommended – this is the ‘Architectural’ version with an alignment lip to preserve its position on the relatively heavy 5D body.
Click the on-off switch to the line, take a first pressure on the shutter release button, and rotate the wheel while looking though the viewfinder or at the top LCD screen. You can elect 1/2 or 1/3 stop intervals using the custom functions in the camera’s software. 1/3 is confusing precision with accuracy in my book, so I have it set to 1/2 stop intervals. I dial in the camera to, say, -1.5 stops, then immediately move the switch back to the regular On position to preclude accidental adjustment – the compensation setting wheel is disabled in this way, although the setting you dialed in is preserved. Better still (or not, if you forget), the setting survives switching the camera off. Power up and there is your setting, preserved.
I prefer to use average exposure metering in fast paced outdoor settings (Canon’s matrix metering leave me unimpressed) as there’s rarely time to take a proper exposure reading in the interest of capturing the moment. With this approach, you gain a stop of highlight adjustment while preserving some three stops of shadow recovery. Now that’s what I call dynamic range.
Here’s an example taken in bright sun yesterday:
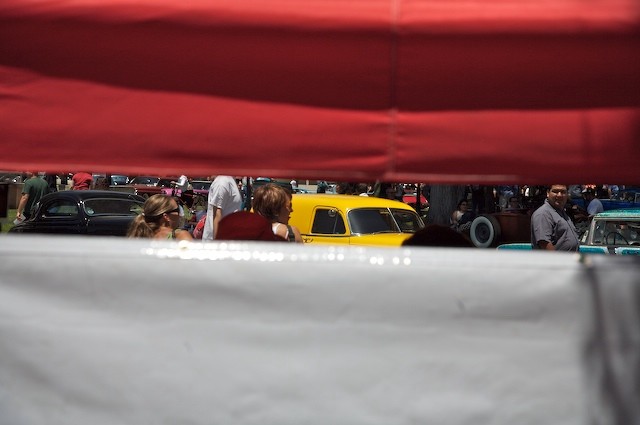
5D, 24-105mm at 70mm, ISO 250, 1/3000, f/5.6, one stop underexposed
Without the underexposure, the white sheet would have been comprehensively burned out. Here, detail is preserved.
How does this relate to the general dictum “Shoot to the right”?
e.g. here
Is it that Canon has already pushed too far to the right on the 5D and so we need to underexpose?
Thanks in advance!
Arun –
I don’t know and, frankly, I no longer read LL owing to their dishonest reporting on the Leica M8. When I want fiction I don’t go the the fact section. How can you ever trust this fellow ever again when he as much as admits to being in the pockets of the makers?
However, it’s probably a combination of the fact that the 5D’s sensor is 1/3 to 1/2 stop more sensitive than indicated (maybe the exposure determination discounts this?) and older sensor design. It’s interesting to note that the specs of the yet to be released Canon 1D Mark III provide for dynamic range extension with the push of a button – they illustrate it at work with a bride’s wedding dress. Dynamic range extension has to be the next step in sensor design (I hope) – meanwhile, I stick with underexposing on contrasty subjects.
We will see.
I’m sorry, I did not know that about LL. So, on to another source. On this Adobe page http://www.adobe.com/products/photoshop/cameraraw.html there is a link to “Linear gamma”, by Bruce Fraser. Seems to be saying what you did – but I’m very new to all of this.
I hope having inadvertently reminded you of something annoying, I’ve provided some reasonable reading compensation 🙂
Indeed. Thanks for the link – an interesting read. Fraser is an excellent writer who makes technical mumbo-jumbo (almost) intelligible.
He does refer to the ‘real sensitivity’ of a sensor which may be the same thing I’m saying, but I’m an empiricist where he is an engineer.
Simply stated, I know it comes out better in high contrast situations when I underexpose one stop in the 5D then use Aperture to restore the shadows. Try it and see.
Another alternative with high contrast scenes is multiple image HDR but, let’s face it, it’s a real pain to do, and limited to stationary subjects.