It’s the enlargement ratio.
A friend has set himself the goal of making good 13″ x 19″ prints from a 1/8″ sensor-equipped digital point-and-shoot. Look here and you can see the various sensor sizes. A so-called 1/8″ sensor is 7.2mm x 5.3mm. The more common cropped APS-C DSLR sensor is 22mm x 15mm (most DSLRs), whereas a full frame one is 36mm x 24mm.
So, to get to a 13″ x 19″ print, here are the enlargement ratios for the three sensor sizes:
1/8″ P and S: 65x (yes, 65x!)
APS-C: 21x
Full frame: 13x
Thus, that old 35mm film rule of thumb that you should use a shutter speed no longer than the reciprocal of the focal length (e.g. no longer than 1/500th with a 500mm lens) is nonsense. What’s good for a blur-free 8″ x 10″ print from a 24mm x 36mm negative is not the same as what is called for from the miniscule sensor in modern point-and-shoot digitals. Film just starts to lose it with a 35mm original at 13x enlargement. Full frame digital (based on my 5D) begins to struggle over 24x. Read on how to make the small sensor in a P&S work for you.
My rule of thumb is that the things that most contribute to – or detract from – a good big print are, in decreasing order of importance:
- Absence of camera shake (solution: tripod, IS, fast shutter)
- Over exposure which generates noise and blows out highlights (I underexpose 1 stop)
- RAW not JPG
- Slow ISO
- A good lens ($$$)
- Sensor size (the bigger the physical size the better; forget megapixels)
You can do an awful lot to improve things with the small sensor. First, you need to record images in RAW, not JPG, thus bypassing the excessive smoothing small sensor cameras apply when generating JPGs. The only snag is that the camera concerned is Canon’s A720IS (8 megapixels – some $190 at B&H) and Canon does not include a RAW mode. They prefer to make that available in the far costlier G9 ($450) which has the same lens, the same sensor and replaces the plastic body with an alloy one.
Bad choice.
Metal provides far inferior shock absorption when dropped and will dent. Further, the added weight will simply increase contact force when dropped (force is mass x acceleration, so it’s directly proportional to weight in this example). A G9 is 11.3 ozs, the A720IS is 7.1 ozs, so when you drop the G9 it will suffer 60% more force on impact compared with the A720IS). Plastic is superior in every way in this application except that its light weight connotes poor quality. Wrong! More about serial dropping here.
No RAW in the cheaper camera? Just Google for Canon RAW hacks and you will find an installable hack that opens up the crippled firmware and gives you full RAW capability for a fraction of the price of the G9. The cheap camera has IS to reduce camera shake which, as the data at the start of this piece disclose, you really need to minimize to make big prints. The hack is free and allows all sorts of G9 features to be added to the A720IS.
So now we had RAW installed on the A720IS and could do JPG to RAW image comparisons.
Here they are – the print size equates to about 24″ on the long dimension:
In the two examples below, the RAW/DNG file is on the left (“Select”):
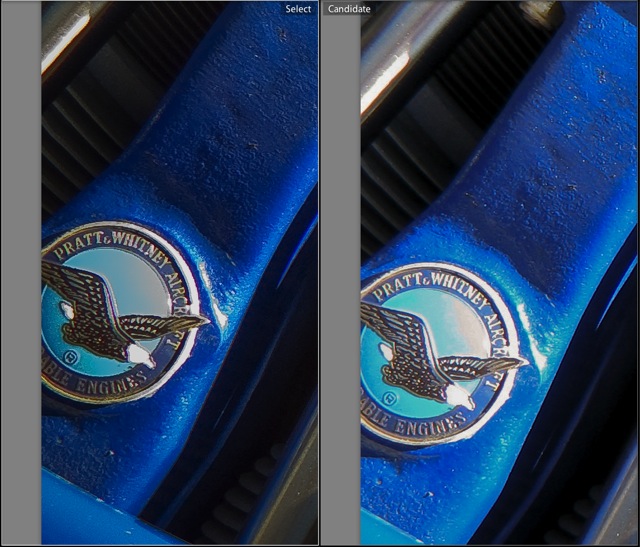
Edge detail. I could not recover the highlights any more in the JPG version.

Center detail. Even on a small computer screen, the increased sharpness of the RAW version is obvious.
Are the big prints as detailed as those on the 5D + Canon 100mm macro + ring flash, as discussed here? No. But absent an A-B comparison, you would be quite happy at 13″ x 19″, provided you refrain from really sticking your nose in them.
I have processed both to be as similar as possible. The detail differences are that the RAW original has superior dynamic range (better shadow and highlight details) and is far sharper given the absence of in-camera compression. With good originals, preferably underexposed by one stop, and bright lighting, a small sensor can produce decent 13″ x 19″ prints; turn down the light, make shutter speeds slower and add the need for a large aperture and, well, you are out of luck. A larger sensor is dictated.
Interested in screen display only? Any camera costing more than $150 is a waste of money, unless you must have a fast motor drive and need exotic lenses. Small computer screens will not show any difference otherwise. Save your money.
And if you need a very capable, small, inexpensive digital which will yield exhibition size prints, consider the Canon A720IS or cheaper variants (but do look for IS, as discussed above) and install the free RAW hack to really make your originals sing. I have no axe to grind for Canon and I’ll bet like results/hacks are to be had from most of the big names out there.
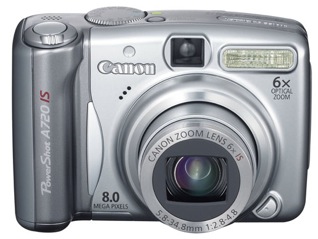
Bargain of the year – the Canon A720IS.
The lens displays a fair bit of color fringing but a quick tweak in PS or Lightroom puts paid to that in short order. Plus you get a real optical viewfinder, not the abomination that is the LCD screen, though you get one of those too.