Yearly Archives: 2008

Redrum

A memory of a tour de force.

I suspect many might agree that the scariest film ever made is Kubrick’s ‘The Shining’ with a manic Jack Nicholson generally waging mayhem in an off-season holiday hotel.

For fans of Diane Arbus’s work there’s an image of the two little girls side by side, just like in her photograph. Right before the room fills with blood, that is.

The opening scene, where the camera seems to go off a cliff while the car it’s following proceeds straight on, is one of the first uses of the Steadicam in motion pictures. Right at the beginning, it will have you gripping your seat for the next 2 hours. I saw ‘The Shining’ in 1980 when it came out and am still too scared to risk it again. But the many images in the movie have stuck in my unconscious, not least the child on the tricycle mouthing “Redrum, redrum”. Check it in the mirror ….

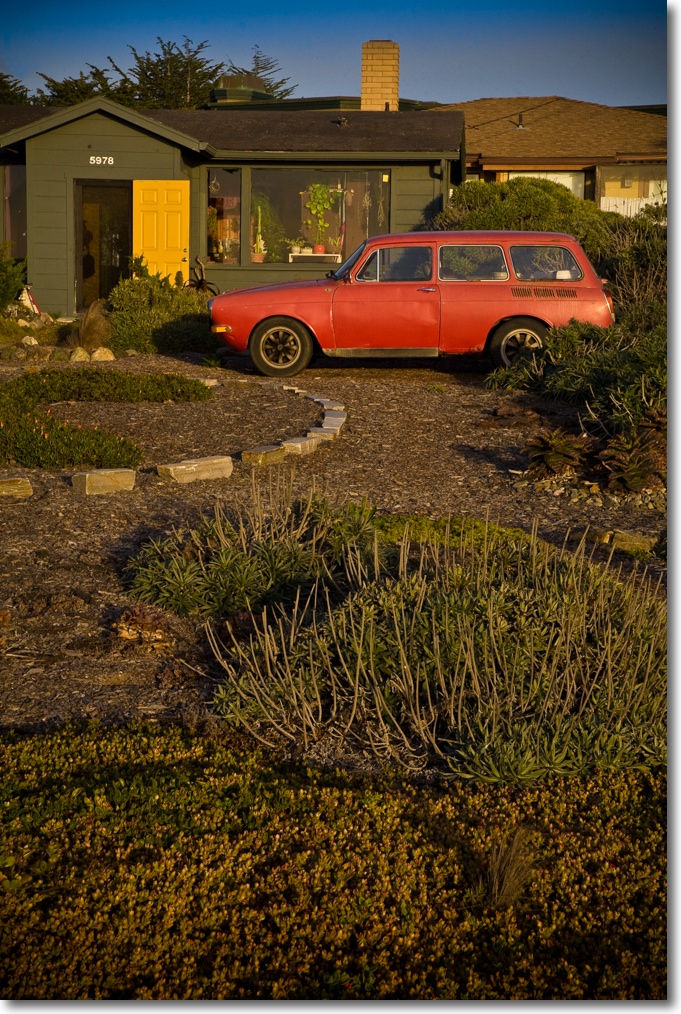
Well, I still have Redrum Moments of flashback to the movie and the latest happened the other day in late sun.

5D, 24-105mm at 73mm, 1/180, f/16, ISO 400

Quite what this bizarrely colored VeeDub was doing in someone’s garden beats me, but you cannot beat the scary contrast of colors, pretty much unretouched. And that open door does little to calm the tension.

Lightroom 2: Keywording

I have been putting this off for too long.

I have been putting off adding keywords to the pictures in my Lightroom database in much the same way as stock market investors prefer denial to fact. Open that statement in the mailbox and, yes, you too will be apprised of this year’s 40% drop in value. That’s the result of the foolish “stay fully invested” mantra of the past two bull decades which has been brainwashed into your psyche by amoral advisers seeking only to maximize their fees. This is by no stretch of the imagination a financial blog – though I do like to point out photography equipment bargains when I see them – but suffice it to say that after the 1929 crash the Dow index did not return to pre-1929 levels until …. 1954. So the ‘fully invested’ bunch, or what was left of it, had to wait out a war and 25 years later they had devalued dollars equal in amount to their 1929 investment.

But, like that reluctant letter opener, I have preferred to fool myself that my Lightroom cataloging system, which heretofore has avoided the use of keywords, would serve me well, added by a solid dose of good memory to help find things in a trice.

Wrong.

I am now finding that it’s getting increasingly difficult to locate a treasured snap in short order. Was that picture of my sweet little boy, Winston, under ‘Playground’ or ‘Winston’ or ‘Birthdays’?

Here’s how I have ordered my folders:
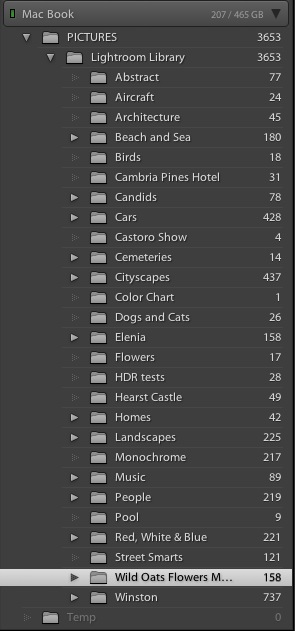

In LR2, the green light refers to the active drive. The numbers indicate that I have 207gB left on a 465gB drive

Click on, say, the ‘Beach and Sea’ containing folder and you get:

Well, you get the idea. As long as you remember that the snap you want is in ‘Beach and Sea’ the rest is plain sailing. Snag is, sometimes it’s simply not where you would logically place it today and memory tends to fade.

Now that Lightroom 2 has made key wording easier and faster, if no less tedious, I have resolved to add keywords to as many of my pictures as makes sense and I am disciplining myself to do a hundred or so a day. Rather than doing this one by one, I assemble those that need generic keywords – ‘monochrome’ or ‘grain effect’ for example – and do a batch add of the relevant words. In a final pass I will add image specific keywords where warranted, the goal being that a keyword search renders a handful of results.

A related motivating factor is that my catalog of images (the keepers, that is) is growing faster than in days past, owing to the higher success rate of digital technology and greater availability of time for my hobby compared with those days when I was putting in 60+ hour weeks on Wall Street.

Here are some of the keywords I have added – note that I have replicated the folder names in case I ever decide to scrap or revise the folder structure. I have then started adding new keywords like ‘Red’ which identify pictures with strong red content:
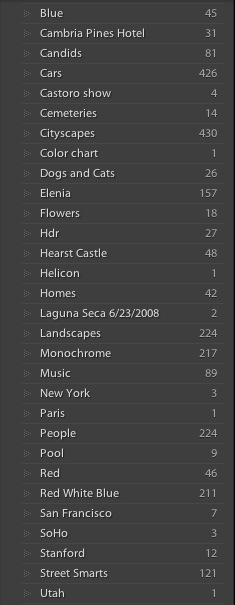
LR2 allows you to drag and drop keywords onto image(s) so the process is fairly fast. The tricky bit is coming up with image specific words that make sense. “How would I think of this image were I looking for it?” is the recurring question.

Now when I wish to locate all files matching a specific keyword, I go to the right hand panel of LR2, highlight the word and click the arrow to the right – here’s the result of clicking on ‘Cemeteries’:
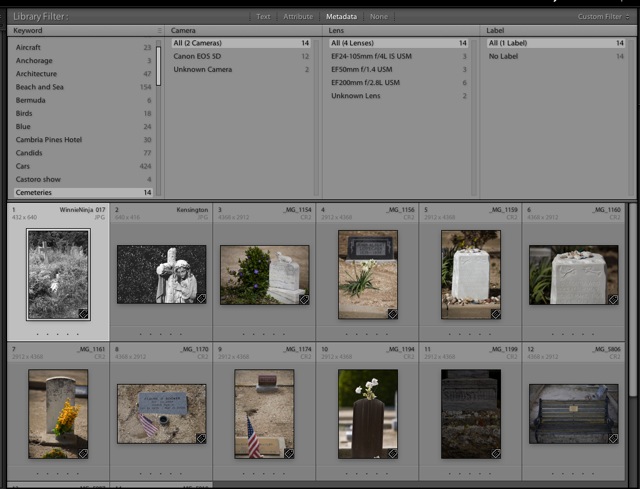
Keywords can be stacked for compound searches, though the technology in LR2 still trails Aperture’s where you can select a filter with boolean keyword input, using ‘if’, ‘and’ and ‘or’ logic. I have no doubt that this will eventually come to Lightroom.

So far I have encountered one snag. If you stack images of like kind (I stack composite HDR images for example as all go towards one result once merged) and leave the stack closed when keywording, only the top picture in the stack will be keyworded. If you subsequently change the top picture in the stack you will not be able to find the new one if you forgot to keyword it. To work around this I simply open all the stacks in the Library before keywording, so that all pictures in a stack have the keyword applied.

I have been banging away at LR2, moving files and folders, stacking, copying, processing, exporting and adding keywords for a while now and have had no lock-ups. The only time the application really bogged down was when I tried using the adjustment brush with auto-masking switched on to paint in a large, irregular sky area. I got the spinning beach ball while the overtaxed, modest GPU (Intel GMA 3100) in my MacBook did the data crunching. Mercifully, this is not something I expect to do often. At 4 megabytes of RAM it’s not like I’m hurting for CPU memory so I’m blaming the graphics processor for this one!

If I decide to upgrade to LR2 (I’m using the 30 day free trial which comes fully featured) I’ll give it a run on our old iMac G4 ‘screen on a stick’ which continues to soldier away as a great Internet browser. That will answer the question of how well LR2 runs on older PPC CPU Macs. I can confirm that LR 1.4.1 runs well on this computer if nowhere as fast as on the MacBook. It remains more than useable for those looking for a low entry price to the world of Lightroom processing. The latest version of Aperture does not run at acceptable speeds on older machines like this one, whose G4 CPU runs at 1.25gHz and has just one core compared to the Intel’s two. One of the most distinguishing features of LR 1.4.1 is its speed on these old but still useful machines. Let’s hope that has been retained in LR2.

By the way, for those readers into this sort of thing, here are some interesting statistics on LR vs Aperture users from the Adobe blog. Probably self-serving given that this is Adobe’s data, but interesting all the same. Sample sizes are not stated in this survey:
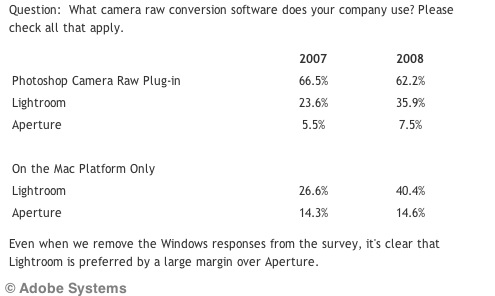
I have questioned Apple’s commitment to Aperture before (no critical mass, no significant profit) and have little reason to change that opinion. And as I can testify, the conversion process from Aperture to Lightroom is not pretty. So the sooner you switch, the better. Adobe does this for a living; to Apple it’s a rounding error.

Enough talk. Here’s a snap from the beach, a composite of four images combined using Helicon Focus:


Kelp. 5D, 100mm macro and ring flash, 1/100, f/22, ISO400. Composite of four images using Helicon Focus.
Sensor cleaning on the cheap

Don’t be ripped off.

It’s no great secret that the sensors in earlier DSLRs can get awfully dirty, the resulting blobs of black on your image testifying to the need for lots of retouching. Just like in the film days when you received your precious emulsion back from the processing place only to find that they had a party during which they stomped on your images with hobnailed boots.

So those of us not blessed with the latest in sensor dust removal technologies (meaning 5D Mark I and like vintage camera users) have to subject their camera to a nervy-dervy sensor cleaning to get the muck off and obviate the retouching. In the Canon 5D the sensior is protected by a sheet of quartz crystal – both hard and dust attracting. Now you can play into the hands of those marketers selling you Genuine Sensor Cleaning Kits for hundreds of dollars and what do you get?


A fool and his money are easily parted.

Why, a brush with some mumbo jumbo about how it’s grease free and assembled by Chinese virgins, and a bottle of isopropyl alcohol. Enough for ten cleanings.

Well, let me introduce you to Dr.Pindelski’s $15 DIY Economy Sensor Cleaning Kit. Enough for 10,000 cleanings.


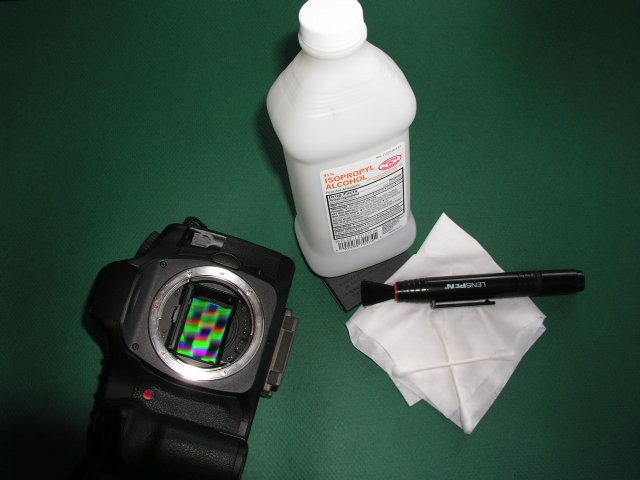
The Dr. Pindelski $15 Sensor Cleaning Kit. The moiré pattern on the sensor is caused by the point-and-shoot used to take this.

Start with a Pearstone brush for $10, add a bottle of 91% Isopropyl Alcohol (you want the most concentrated, to avoid water deposits) and some Q tips from the bathroom – the genuine soft ones, not the hard generics. Do not use Kodak Lens Cleaner – this is a very poorly thought out product and is guaranteed to leave water stains on your sensor and those will be clearly visible, and near impossible to retouch, in your images.

Go outside, take a snap of the sky at a small aperture (set the camera to manual focus if the shutter refuses to fire) and load your CF or SD card into Lightroom. Increase contrast to the maximum and all the dirt blobs and deposits will show up clearly. Remember that what you see at the top right of the picture indicates dust at the lower left of the sensor and so on, as the image on the sensor is flipped and reversed once it has passed through the lens.

Now moisten a Kleenex (use plain ones, not those infused with lotions) with the Isopropyl and dab a Q tip in the moist area of the tissue, so that the Q tip is just moist. Do not touch the cotton on the Q tip with your dirty, greasy fingers. Sensors don’t like grease – or maybe they love it too much. Set the camera to Sensor Cleaning, remove the lens and dab the area concerned based on the sky picture you just snapped.. Then, holding the camera upside down, sensor pointing to the floor, brush the sensor with a flicking action using the brush. Reinsert the card and lens and take another picture. Repeat until clean.

My last cleaning dictated no fewer than four passes, the sensor cover glass being simply filthy after a couple of days snapping at the beach.

How hard to press on that Q tip? Well, the cover glass on the sensor is very tough and it would take a Mack truck driver to damage it, but pressure is not the answer. Gentle application in the right area is the secret. You want to dab and flick, not scrub. What I studiously avoid is using a blower brush on the sensor. All that does is stir up any existing dust in the body cavity only to propel it at 100mph+ into your sensor. You don’t really want to do that, do you?

Now you can apply that $245 saved to that new lens you were dreaming about.

If all you do with your images from that wonderful DSLR is to place them on the web at some 640×480 pixels, well, you can dispense with sensor cleaning as the dust spots will not show. Your DSLR is just like the Ferrari of the guy who runs it to the supermarket to be seen and to get some milk. Feels nice. Waste of money. Probably can’t drive either.

Warning to Leica M8 users: Early versions of this faux pas of a camera came with an unprotected sensor, under the guise of superior image quality or some such rot. If you have one of those, enjoy paying Leica $500 for a sensor cleaning because I doubt I would try that on an unprotected sensor in a $6,000 body. Later M8s come with a protective glass (New! Improved! etc.) once the factory realized its error, so the above technique should be fine. You will have to do something because the chances of Leica coming out with a self-cleaning sensor are about as likely as a black man in the Oval Office. Hey, wait a minute ….

More Helicon macros

Make your macros sing.

I wrote about Helicon Focus recently and for this new inductee to the macro world it’s fair to say that the software opens up new realms in macro photography. This application requires that you take several pictures of your subject, each focused slightly differently, after which it applies some serious processing to stitching together the sharp zones of each into one sharp whole. Magic!

Now your subject must be still and you need to use a tripod (unless you are very lucky doing this handheld, which I think is a long shot) to permit proper stitching of the sharp zones from your constituent images.

I import the originals into Lightroom in the normal way and stack them using the ‘time between pictures’ slider, which allows automatic stacking of pictures taken close together. I then export the stack in TIFF, making sure there are no export size constraints in the Image Sizing section of the export panel. The exported images are then dropped into Helicon Focus, I hit ‘Run’ and ‘Save’, then import the composite image back into Lightroom where it is added to the top of the stack, like so:

The deeper the required depth of focus the more images you need. For reasonably square on subjects with some depth I find 3-5 images works fine. For more drastically sloped ones, more may be needed. Digital film is cheap! Take too many rather than too few. The processing times in Helicon on my MacBook (C2D) are short – four uncompressed 72 mB TIFFs are combined into one new one in the space of thirty seconds. These are full frame TIFFs generated by Lightroom from the RAW originals taken on my Canon 5D.

Even though these images were taken at f/22, the close focus distance and the 100mm focal length of the Canon macro lens make for very shallow depth of field, so I simply set the lens to manual focus, focus on the nearest part of the image and take a picture, repeating with a small adjustment of the focus ring every 8 seconds, the time it takes for my ring flash to recycle to full power. That’s important – you really want your images identically exposed.

And here is the result – taken yesterday after more time spent wading in the tide pools at my top secret Highway One location on the Pacific coast, 22 miles west of home. This chap was hanging out on the underside of a big boulder waiting for high tide. If you do this sort of work, check the tide tables before you go – the best being revealed at low tide. He is maybe 3″ in diameter.


Starfish. 5D, 100mm macro and ring flash, 1/60, f/22, ISO 400, tripod. Four constituent images.

Do this sort of thing at sunset with glancing rays from the sun and add a touch of ring flash to reduce the contrast range and make all tones easily visible (much easier than doing HDR), and you get something like this:


Kelp at sunset. 5D, 100mm macro and ring flash, 1/45, f/22, ISO 400, tripod. Five constituent images.

It’s no surprise if I tell you that the Canon Macro plus Helicon Focus are in the running for my Best Gear of 2008 award.

If you want to see Helicon Focus applied in the more traditional area of photomicrography, take a look at the beautiful images crafted by Charles Krebs.

Paris by Night

One of the finest photography books ever.

I wrote a couple of years ago about Hungarian master photographer Brassaï and made mention of his great book Paris de Nuit in that piece.

I finally tracked down a remaindered copy of this book and the first word that comes to mind is electric, for that best describes the emotive power of these images.

Originally published in 1933, I recall first seeing it in the Kensington Public Library in West London around 1965 or so and recall well how thrilling the work was. This edition includes 62 gorgeously reproduced plates on very heavy, black paper, and you really have to look at the photographs in daylight to get the full depth of tones, all the way down to the inkiest of blacks. This friend of over 45 years remains as fresh and exciting today as it was all that time ago and, were I to compile a list of the ten most essential books of photographs, it would be there without a doubt.

These images speak not just of superb technique but to the work of one of the greatest photographers of the time who preserves the wonderful city of Paris for modern times. Mercifully, the French have done relatively little to destroy their city (can you say Musée Pompidou or I. M. Pei’s ghastly Louvre pyramid?) and in many places it probably looks little changed today.

Whereas O. Winston Link, the other great night photographer, used his own lighting, Brassaï uses what the city gives him, to haunting effect.

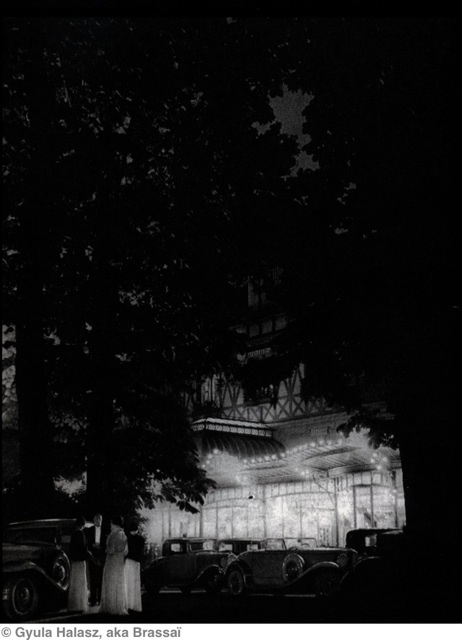
This scan scarcely does the original justice, but the atmosphere is so powerful I swear you can smell the women’s scent when you look at it. Magic.

No wonder that Paris was such a magnet for artists between the wars.