Smoke and mirrors.
You see them all the time in the Bay Area of San Francisco. Little Hondas with a gigantic and noisy tailpipe, invariably driven by someone about five feet tall, almost hidden behind the wheel. Lots of chrome, lots of noise, not all that much ooomph to show for it.
It’s an image which kept coming to mind as I tested Perfect Resize 7 which, in a past life, was better known as Genuine Fractals. The product’s stated aim is to allow you to make monster prints from small files, with the best possible quality, better than your regular processing application can achieve.
PR7 claims to get a quart out of a pint pot, just like that Honda driver, and it can’t be done. As the old car guy saying has it, there’s no substitute for cubic inches or, in the case of digital imaging, large sensor sizes.
PR7 retails at a costly $70-100 and installs as a Photoshop, Lightroom 2 or 3 or Aperture 2.1 or later plugin, accessible from within each application. Alternatively, you can open your file in the stand-alone variant which comes with the download. The download is 38.5mB and there’s a useful base tutorial; the others refuse to open (and they want how much?) owing to carelessness by the makers, but use is intuitive ebough. I tried PR7 in LR3.
After checking that it’s correctly installed as a plugin in LR3 –

– I invoked it using a favorite Canon 5D file of our son. The app opens within LR3 thus –
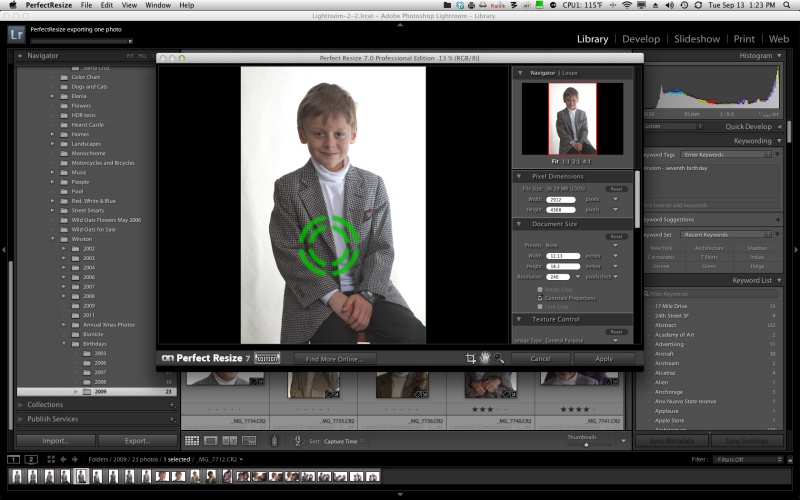
– and the controls are self-explanatory. I took the image from its (approx) 13″ x 19″ native size and enlarged it 4 times to 26″ x 38″, saving it back into LR3. The difference in the 5D RAW file size and the PR7 file size is startling –
– fully 19.4 times the size! Generation of the PR7 file took 45 seconds on my speedy Core4Quad 3.6gHz Hackintosh – a very fast machine. Do this a lot and you will be buying more hard drive storage fast. And if your computer is slow, be prepared to wait while PR7 does its non-magic. Is it worth it?
In a word, no.
Here are side by side screen shots of the 5d original and the PR7 versions:
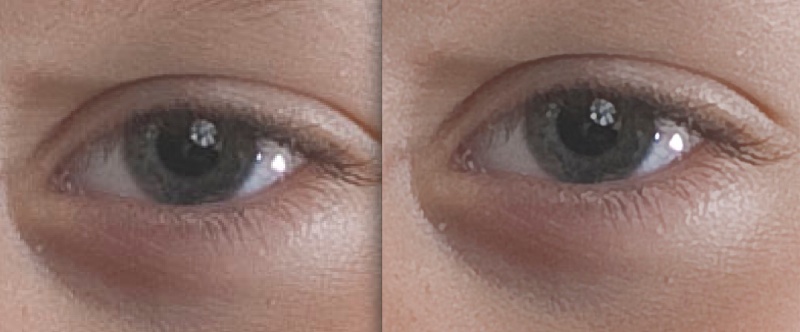
5D original RAW image on the left; 4x PR7 on the right.
In addition to tweaking the micro-contrast (something LR3 can do with the Clarity slider), color balance changes slightly, as visible above – not good – and noise is reduced.
The original, taken on the superb 85mm f/1.8 Canon EF lens with my Novatron studio flash clearly shows the flash umbrella reflected in the eye. So does the PR7 version but the details are fuzzed in exchange for reduced noise and pixelation. It’s far clearer with full screen display of the original images than in the reduced size here. Frankly, you can get as good or better results using LR3’s native noise reduction tools with a touch of sharpening, without the nasty color shift PR7 introduces. You profiled that monitor for a reason, no?
So if you want wall sized prints – and PR7 does offer a nice tiling option but not something I would blow $70 on – and don’t want to be buying ever larger hard drives for the ridiculous file sizes created by (not so) Perfect Resize 7, save your money and use LR3 as is. Further, the tiling option does not work properly with LR3 – I told PR7 to make a tiled print with two constituent images of 18″ x 24″ each for a 24″ x 36″ original on two prints. When reimporting back and trying to stack the modified file into LR3, a single image is saved even though I told PR7 to ‘stack with original’. Save it to your desktop and you get the two images required which then have to be reimported into LR3 – a royal pain. It’s simply faster to tell LR3 to print a 24″ x 36″ original and do it in two passes.