Yearly Archives: 2011

The Hackintosh gets a speed boost

35% faster on graphics. Cost – zero.

Background:

This is going to sound like an ad for hair restorer, weight loss or one of Steve Jobs’s rollouts of Apple’s latest piece of hardware, but bear with me and read on.

One of the beauties of the CPU + motherboard in my Hackintosh is the ability to overclock the CPU with great control over dozens of settings – meaning to run it at a faster clock speed than the stock 2.83gHz. I have run mine stock until now, almost two years, and decided it was time to speed things up in light of the improvements in the latest CPUs and to counter the small 2-3% speed loss with the Lion upgrade in case that gets worse with newer versions of Lion.

To do this, I changed some settings in the BIOS on the motherboard after studying overclocker fora (!), and applied a modest overclock of 27% – thus increasing the stock CPU clock speed from 2.83gHz to 3.60gHz, or some 27% faster. This is conservative compared to what the hard core gamers on these fora with liquid cooled (!) CPUs do – they take it as high as 4.50 gHz or + 60% over stock.

The new settings can be saved as a separate set in the BIOS of the Gigabyte EP45-UD3P motherboard, so reverting to stock is a simple matter of recalling your stock settings when restarting. The Gigabyte’s superb dual BIOS (meaning there’s a backup if the main one blows) can store nine different sets of settings if you are that way inclined. On the handful or really warm days here (95F) I would simply restart the HackPro with the stock settings to keep things cool – we have no air conditioning. I simply take note of the Temperature Monitor reading for CPU1 in my menu bar – CPU1 always runs the hottest on the multi-core CPUs I have used.

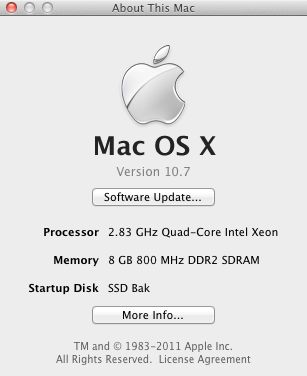
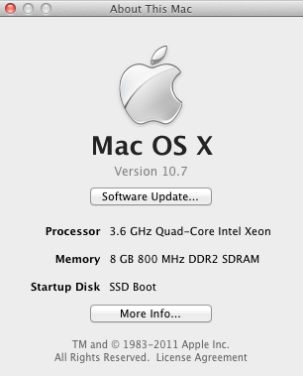
System Profiler before and after. The CPU is actually a Core2Quad, Q9550 Yorkfield.

Geekbench Before and After:

Geekbench is the objective way of testing CPU speed and is recognized as the standard by many geeks. The pictures below are using 10.7.0 Lion measured in Geekbench 64-bit mode.

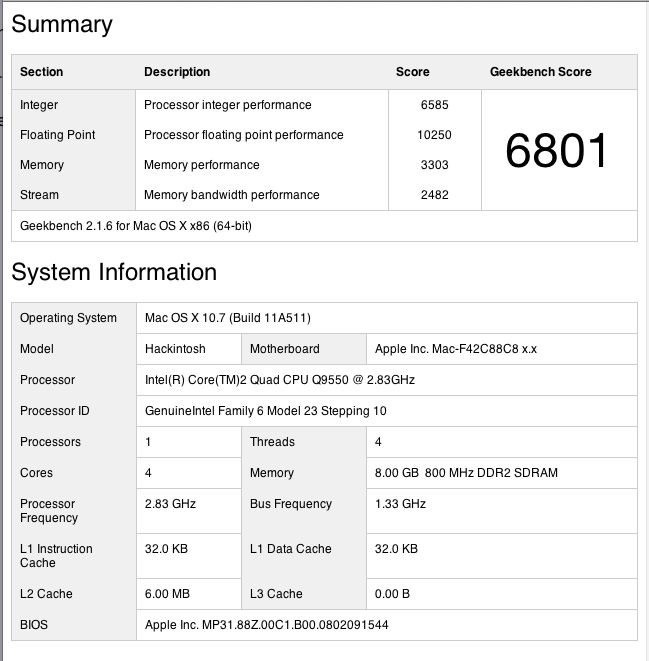
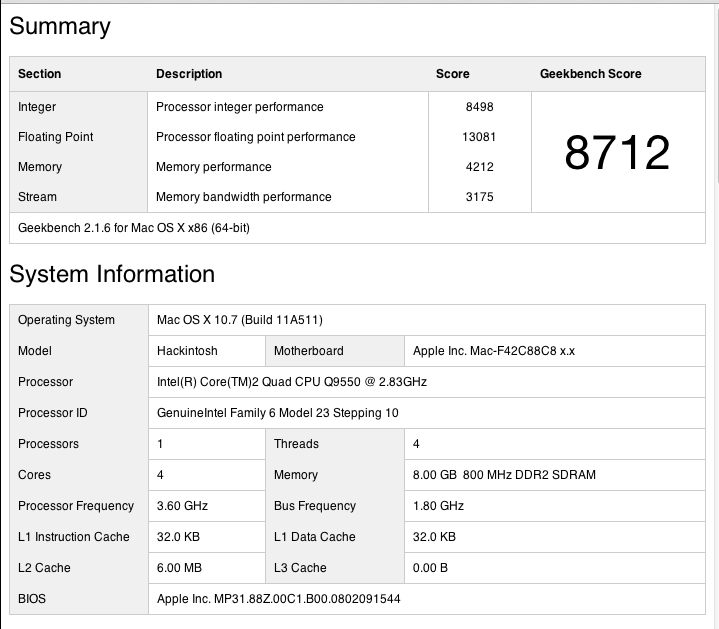
Core2Quad CPU at 2.83gHz and 3.60gHz, respectively.

That’s 28% faster compared to the theoretical 27% (3.60/2.83).

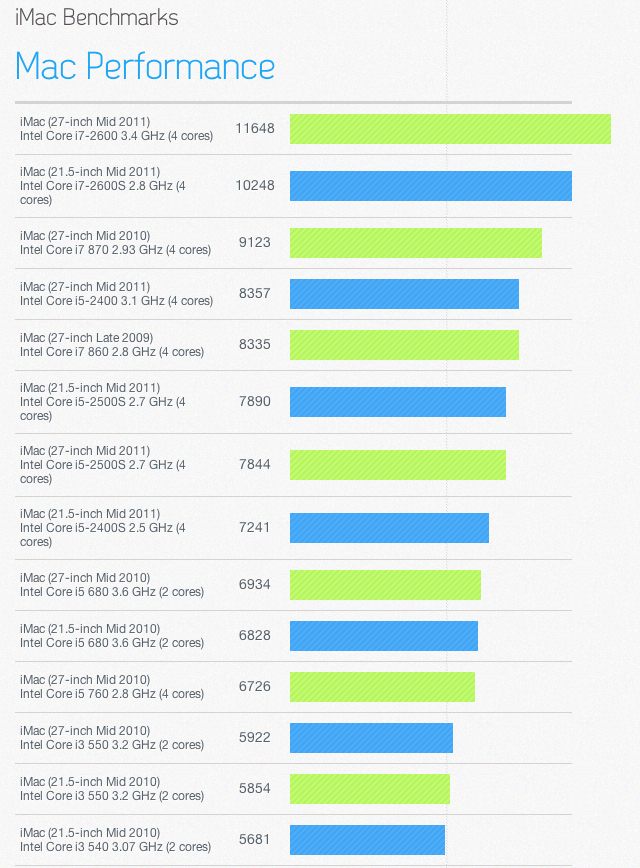
Comparison with latest iMacs with i5/i7 CPUs:

The above Geekbench score compares very favorably with the iMacs sold in the past year – HP1 has gone from bottom to top quartile:

Cinebench Before and After – GPU:

Cinebench is a commonly accepted GPU test for graphics rendering.

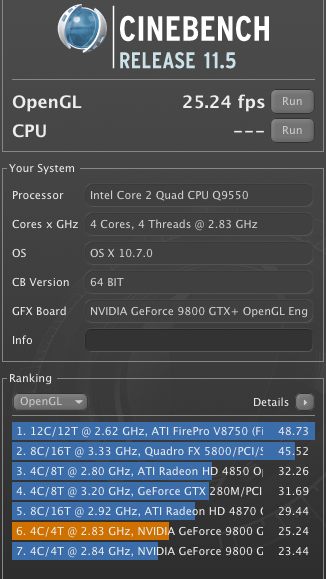
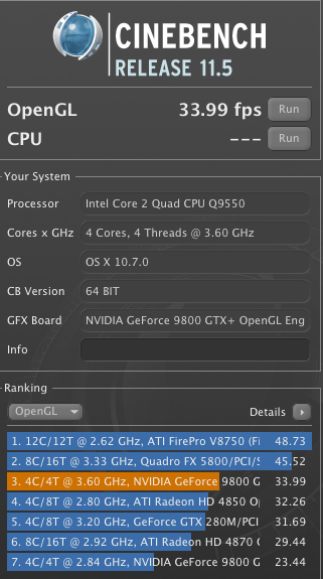
Cinebench reports a 35% increase in framing rate.

Both Geekbench and Cinebench tests were made using the 64-bit versions of the applications.

Subjective ‘feel’:

I hate subjective data. This is an engineering process, not an exercise in emotions. Subjective clap trap is about as reliable in the computer world as in the stock market. Just because you saw the Apple store full of people doesn’t mean the stock will take off. For all you know they were having a fire sale.

Still, in LR3, the sliders reflect changes even more immediately – almost a ‘real time’ experience. Enough with the subjective stuff.

Trade-offs:

What are the trade offs?

  • Stability. The built in CPU/BIOS failsafes may kick in and switch your machine off. I have run this (modest) overclock hard with no issues.
  • Heat. HP1 was running its CPU1 core at 115F. With this setup it jumps to 138F, still well below the 176F service limit for the Core2Quad. Still, that’s higher than I like so I opened up the case and …. lo and behold …. found that the cable for the CPU fan, attached to the Coolermaster radiator was detached! This must have occurred when I was installing the SSD drives. I reattached it and the ambient CPU1 temperature in overclock mode dropped immediately to 115F. So heat is not an issue if your CPU is properly cooled – my Hackintosh’s CPU has run in the 106-115F range for two years without one problem.

How hot can the Core2Quad be allowed to get?

In my original Hackintosh piece I stated that Intel’s specs dictate a core temperature no higher than 160.5F. That translates to an external case temperature maximum of 185F, as evidenced by Intel’s static storage data:

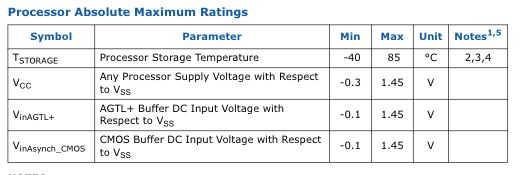
How hot can the outside get?

Temperature Monitor reports the outside case temperature, so a reported 185F (85C) is the same as the 160F core limit. On heavy Handbrake video conversion I have seen an indicated 169F (CPU cooler fan disconnected!), which is still 16F below the service limit. Limits on Core2Duo CPUs are higher – you can find them on Intel’s web site.

And this is what I mean by properly cooled – not the wimpy, stock Intel fan but something that really works:

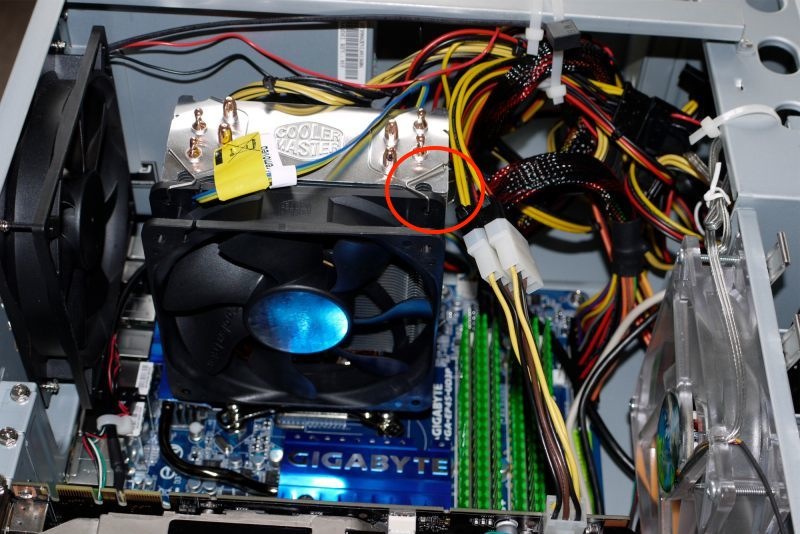
Coolermaster 120mm variable speed fan in place. The red circle denotes the proper installation point for the fan clips.
Case exhaust fan on the left, HDD fan on the right.

Given the low cost of these after market fans – $30 for this radiator and fan – there’s no excuse for not installing one. I would not risk overclocking if I was using Intel’s stock CPU fan. In the chart below, you can get a sense of CPU1 temperature when doing a common task – exporting an image from Lightroom3, after converting the 12 mB RAW original to TIFF, to Photoshop CS5, doing heavy manipulation of the image and then re-saving the 80mB TIFF file back to Lightroom3. The temperature rises to 136F and quickly drops back to the steady state 115F.

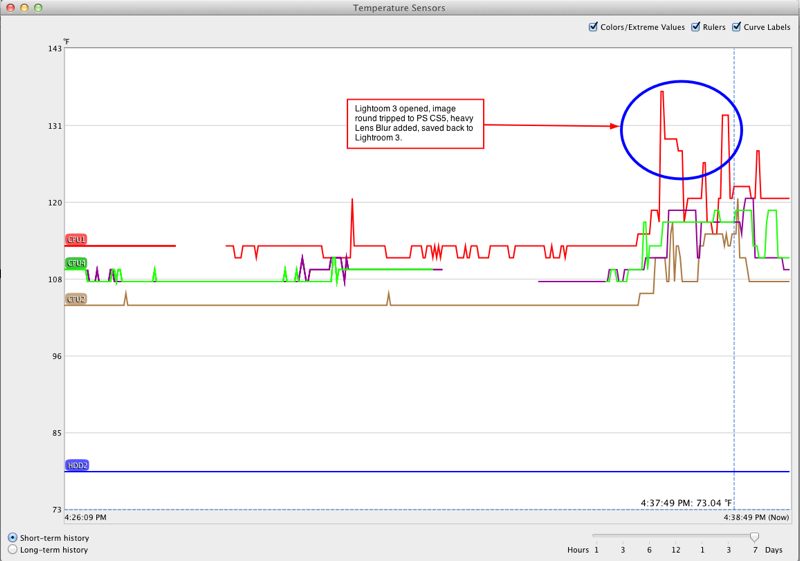
Temperature changes in LR3 and PS CS5.

Stress test:

To stress test the system I ripped a double layer 7.4gB movie DVD using RipIt!; this took a scant 12 minutes, for a maximum CPU temperature rise of just 2F. I then compressed that ripped movie down to a 1.26gB .m4v file, using Handbrake, another 40 minutes, for a temperature rise of 20F to 133F.

Rip = green box; compress = red box.

Nothing to be worried about here. By the way, the comparable times for this task on my MacMini (Core2Duo, 1.83 mHz, 320M GPU), were 30 and 75 minutes, respectively, albeit with the CPU temperature soaring to 169F.

BIOS settings:

You can see all the revised BIOS settings on the Gigabyte EP45-UD3P motherboard by clicking the picture below. The RAM is Patriot DDR2/800mHz. This board uses the 775 socket common to many Core2Duo and Core2Quad CPUs from Intel. The latest i3/i5/i7 CPUs use a different socket and require a different motherboard and upgraded memory. Changes from stock are marked with green arrows:

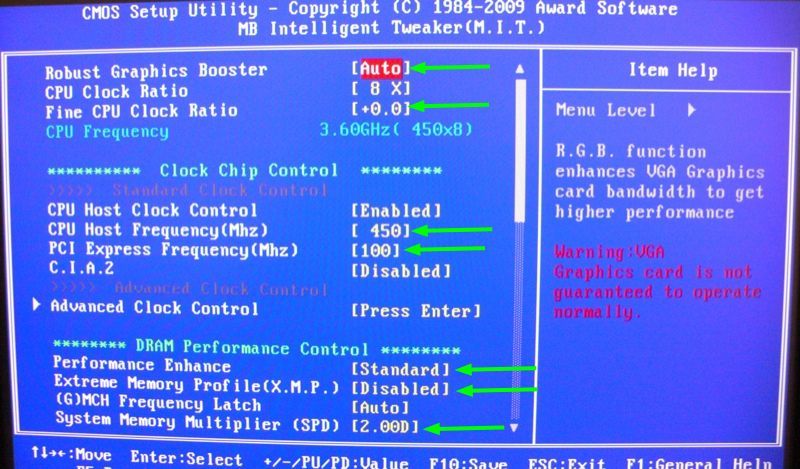
Click the image to see revised BIOS setting slides.

To make things easy, as your Hackintosh will be disabled while you are in the BIOS, follow the above pictorial on your iPad while making these changes.

Gigabyte EP45-UD3P motherboard:

When Adam Pash at Lifehacker conceived the design of the HackPro over two years ago, he choose the Gigabyte EP45-UD3P motherboard (775 spec CPU socket). A wise choice as this electronic hardware is a masterpiece of design and flexibility. While it’s no longer available new, there are many used ones on the market available for around $100, and you can download the related manual by clicking below.

Click to download the Gigabyte motherboard manual.

I would guess you could build the HackPro using its previous generation parts with two 1tB HDDs for $500 today with mostly used parts, before adding displays, and have performance as good as the latest iMacs, with far superior engineering design and longevity for heavy users. A good new Dell IPS display 1920 x 1080 widescreen, like the U2211H, will add $250 – it’s probably too great a risk to buy a used one.

Overclocking:

Intel has realized that the overclocking/gaming fraternity is a meaningful business segment to market to, so in their latest i5/i7 CPUs they sell ‘locked’ and ‘unlocked’ versions; the latter can be overclocked and are $10-20 more. Such distinctions were not available for the earlier CPUs like the Core2Quad and Core2Duo used in the HackPro, all of which could be overclocked, so it’s more than likely that the three year warranty on your CPU will be rendered invalid if you overclock. However, if you use a competent motherboard like the Gigabyte, above, your risk of damage should be greatly reduced owing to the many failsafes in the motherboard’s code, or BIOS. Just avoid getting greedy and don’t use voltages which are too high. My selected speed of 3.6gHz is a fine trade off between the last word in speed and long term reliability.

Upgrading to iPhoto ’11

Don’t pay twice!

Until I downloaded OS Lion on my MacMini a week ago, I had never made an online OS X AppStore purchase. So while the experience was painless, and I suppose over-the-air app downloads make sense for all but those cursed with bandwidth limits or poor broadband, I was still fighting an old prejudice whuch has it that you really want DVD versions of all your software in case something blows.

This is really a dated view and when I thought about it I realized that I have been buying and updating key applications from the likes of Adobe for at least a couple of years. My Photoshop CS5 upgrade from CS2, large as it is, was by download and if the installed app ever fails I can simply download it again, the input of my serial number ensuring that the replacement is at no charge.

And it’s time to move to the AppStore way. The iPad works flawlessly with the iOS AppStore and on the occasions the AppStore goes down a restart of a download has never resulted in any additional charges. Still, at almost 5gB, Lion did give me pause.

The AppStore approach for OS X devices brings with it Apple’s rapid obsoleting of the DVD drive. Having been among the early adopters of shipping software on DVDs, they have pretty much said the DVD is now dead. The MacBook Air has no DVD drive, the latest MacMini has removed it (causing much angst for Netflix mail renters) and I would expect it will not last long on the iMac either. For those pining after the DVD there’s a $100 plug-in DVD drive available at your local Apple Store and, to be fair, the latest non-DVD Mini is $100 less. Indeed, when Apple releases a ‘hard copy’ of Lion next month it will come on a minuscule USB flash drive, not on a disk. By the way, until streaming movie databases improve, I’m sticking with Netflix mail rentals where the 120,000 movie catalog compares favorably with the 12,000 or so available for streaming. Worse, owing to licensing agreements, the streaming catalog frequently drops movies. So for movie fans, the DVD is far from dead.

Whether you like Apple’s pushing of the limits here or not, there’s everything to like about their new licensing approach for software. Simply stated, any software purchased can be used on any Mac you own at no extra charge. So to test this out I went to the AppStore on my MacBook Air and bought the latest iPhoto ’11 for $15. No problem. I did not have to buy the whole iLife suite, as the AppStore lists the component parts separately.

Then I hopped over to the Hackintosh, and into the AppStore, but when I went to the iPhoto page it was asking me for another $15. What gives?

Call it poor instructions or user error; what you have to do is click on this icon in the AppStore application:

You will then see all your purchased/installed apps and subsequent downloads – click on the word ‘Installed’ – are free.

I suspect iPhoto is looked down on by many serious snappers as so much of an amateur toy. That’s doing it an injustice. The processing (Edit) controls have steadily improved, the integration with book making and card creation is excellent and it’s just the ticket for family snaps where Photoshop or Lightroom are overkill. Exporting to your web site is easy as can be. I have been using the BetterHTMLExport plugin with iPhoto for many years and am pleased to report that iPhoto ’11 is the first version which did not require reinstallation of the plugin.

The processing controls in iPhoto ’11.

Hit the option key on your keyboard and the ‘Exposure’ slider, top right, becomes a highlight recovery slider. Very handy and very fast and easy to use. iPhoto ’11 has no problems handling RAW files – the image above is from my G1 and the original is RAW, as indicated in the histogram.

My iPhoto library contains some 20,000 snaps and the update of the database to iPhoto ’11 from ’09 took some 15 minutes on my HackPro.

One week with Lion

A hype update, so far.

The real story of Lion.

While committed Mac OS X users have little choice but to update to Lion sooner or later and, at $30 it’s hardly a big deal economically, how much better is Lion than its rock stable predecessor, Snow Leopard?

I think there are two answers to this. For the casual user who grew up with iOS on the iPhone or iPad and who has a Mac laptop or is willing to spend another $80 on a trackpad for his desktop Mac, Lion probably works well. Many of the familiar iPad gestures are there, software is available by download only from the Mac store and eye candy in the guise of Mission Control and the like is there in abundance. Further, if you like the rendering of ‘Conversations’ in Apple iOS Mail, where it’s easy to scroll through a thread of exchanges, then you will also like this added feature in Lion.

But for longer time users Lion is nothing more or less than a pain in the you-know-what. You lose all your prized PPC applications, Apple having deleted the Rosetta emulator to force those with PPC iMacs to upgrade their hardware and software, making Lion the most expensive OS upgrade ever for these users. If your broadband is slow or bandwidth limited, forget about downloading the OS and many of the larger apps from the App Store. Life is too short and the telcos and cable companies too greedy. And if you use peripherals which require dedicated drivers, then you are going to be hunting around for these – or waiting for them to be released – before your hardware can be ‘un-bricked’. This happened to my external USB wireless dongle and my third display driven by a USB-to-DVI adapter. Mercifully, both vendors were really on the ball, and new drivers have been installed and functionality recovered. Also, thankfully, my Brother HL-2170W and HP DesignJet 90 printers continue to work every bit as well as they did with Snow Leopard.

Those suffering from confirmation bias – you paid for it so it must be good – will regale you with tales of how much faster Lion is than Snow leopard. Utter nonsense. Objective test measurements show it is 2-5% slower and your machine will run 5-7F hotter. Good luck if you are using one of Apple’s cooling-challenged iMacs where sleek design has made CPU and GPU cooling an afterthought. And if you choose to install your own SSD, search out TRIM Enhancer for garbage management because Apple has made sure that Lion’s built-in TRIM capabilities will be denied you, reserved for Apple-installed overpriced SSDs only. An indicator, if ever one was needed, of the growing ‘make a buck at any cost and squeeze your customer until the pips squeak’ mentality becoming increasingly pervasive at 1 Infinite Loop.

And those same long time OS X users will find they have to spend time reversing all the garish, dumbing down of Lion to make it look and feel like what was so well done by Snow Leopard. I address many of the more common issues here.

So what’s good? After one week of intense use with many applications I have had no lock-ups or glitches on any of my HackPro (Core2Quad 2.83gHz, 8gB RAM, Nvidia 9800GTX+ graphics, 2 SSDs, 2 HDDs), MacBook Air (11″ mid-2010 Core2Duo 1.4gHz, 2gB RAM model with integrated Intel 320M graphics. SSD) or Mac Mini (2010 model, Core2Duo, 5gB RAM Intel 320M, HDD). On my main work machine, the HackPro, hacking Lion for installation was the easiest yet, Hackintosh support having improved mightily in the past few years. Further, running a half-dozen big apps simultaneously is no big deal. This includes Photoshop CS5, Lightroom 3, iPhoto, Safari, Firefox, iBank, Word 2008, Excel 2008, Numbers, Pages, you name it. Just like Snow Leopard.

For that we should be truly grateful. Most of the other ‘enhancements’ are simply a waste of time – the time it will take a demanding user to reverse them. But if you do not want to be locked out of the Apple ecosystem and its upcoming iCloud, updating to Lion becomes a requirement.

Lion with three Dell 2209WA displays.

Haeber and his team in Detroit

Urbex at its finest.

I suspect a key reason that urban exploration photography so appeals to me is that you see the recent past through the mantle of a veil of decay and decrepitude. What was once vibrant and magnificent is now sad and rotted. The decay somehow heightens the sense of a locations magnificent past. It’s also no surprise that probably the best urbex work is being done in America for no other nation places so little value on the appearance of its land. A car is old? Dump it in the field. A factory closed? Place barbed wire around it and let it rot. Cheaper than flattening it. Seldom, it seems, is any attempt made to raze and redevelop the land which created so much wealth back then.

Jonathan Haeber, that prince of urbex artists, took his team to McLouth Steel in crumbling Detroit. He relates that McLouth was once one of America’s largest steel producers. The photographs accompanying his article are outstanding and very worthy of your time. Click his magnificently lit picture below to see more.

Click the picture for Haeber’s documentation of McLouth Steel.

If you are interested in American industrial history, there’s no finer way of getting a snapshot than the chart put out by Financial Graph & Art of the changes in the Dow Jones Industrial Average of common stocks from its inception in 1896, when it numbered 20 stocks. Today it’s 30. You don’t have to be a money management maven to appreciate what this chart shows. For example, in 1896, fully 50% of the Dow was comprised of metal, mining and rail, with agriculture the runner up at 25%. America made things. Finance (which produces nothing) and retail (which has us spending what we do not have) were mere slivers. Today? Finance – one third. Retail – one third. Everything else – the remainder. America borrows to buy garbage. The chart also shows how very few businesses survive for long and just how wild some of the market’s swings have been through our never ending booms and busts. I gaze at this chart often and never fail to learn something new. Just like Haeber’s photographs.

An efficient Lion installation

Saving space.

If you use a Solid State Drive for your Mac OS and apps, then you know that the small, costly SSD can fill up quickly. If you download Lion from the App Store onto a machine with Snow Leopard installed, the download is what Apple calls an ‘incremental’ one. Only changed files are updated. OS X aficionados swear than the only real OS X installation is a ‘clean’ one, meaning you install Lion on a fresh drive or partition and then migrate over from your Snow Leopard drive or partition just what you need. I have never seen any comparative performance measurements to substantiate this claim so, until I do, I disregard it as so much urban myth.

So assuming you do an incremental install, one thing the installer will not do is erase apps and files you no longer need.

Which are these?

First, any PPC app – one written to run on Apples using IBM G3/4/5 CPUs, will no longer run. The brilliant PPC emulator software known as Rosetta, included through the last version of Snow Leopard, is no more. Which of your apps are PPC? Go to Applications->Utilities->Activity Monitor and click on the ‘Kind’ column heading to sort your apps by Intel, Intel (64 bit) and PPC.

Activity Monitor displays which CPU apps run on.

Well, guess what. As long as you have copies of your PPC apps in a Snow Leopard disk or partition, you might as well delete these from your Lion installation because there’s no way they will ever work.

Well, how about all the other crud which has built up from generations of machines? Time to fire up the free Omni DiskSweeper which, after a few minutes grinding (or few seconds if you use an SSD) will tell you where all your files reside, sorted by size in decreasing order. Now you can get serious about purging stuff, but do make a backup before you go ballistic.

Here’s my Users directory – the biggest part of which is MobileSync (backups of iPad/iPhone etc which could be erased); Music can be moved to an HDD. VirtualBox is only needed if you must run Windows. That lot comprise some 18gB of the 30.3gB,meaning you only really need 12gB for Users:

Add to that Applications, which means Applications+Library+usr:

All the Lion stuff adds another 5gB.

Here are my biggest Apps:

From the above approach you can figure what you need on an SSD boot drive which is to contain OS Lion + Users + Apps/Library and hence how large the SSD needs to be, allowing +10% for free space used for temp/scratch files, Mac OS X updates and any new apps you decide to add.

I suspect that, unless you have tons of big apps and/or a huge mail database, 40gB will do it nicely for you – meaning use 36gB and keep 10% free. My SSDs are 120gB but if I was normal you wouldn’t be reading this.

Update:

Reader Fazal Majid has pointed out below in his Comment to this post that there’s a free app named Monolingual which does all of the above and more. I used it and gained 0.51gB on my SSD (Monolingual erroneously reported a gain of 1.0gB) compared to the status immediately after upgrading to OS Lion. It took a couple of minutes to run and I could see it extracting PPC code from many current apps like iPhoto and Lightroom. The apps remaining on my HackPro continue to run fine.

You can download Monolingual by clicking below:

Click to download Monolingual.

However, a check of the Library->Application Support directory disclosed that related files in this directory were not removed. They are, for the most part, small, but it’s a shame the app authors did not go all the way. Still, the price is right.

Thanks Fazal!