Winston at ten!
The D700 and 85mm lens arrived just in time for our son’s tenth birthday and the obligatory annual studio portrait, so it was out with the Novatron gear. I decided to shoot tethered to the MacBook Air, connecting the D700’s mini-USB socket with a USB cable. This gives large screen previews of exposure etc. Lightroom 3 makes this easy, yet my first attempt returned an error message saying “No camera detected”. I rummaged in the garage cardboard box where the mess of cables makes its home, and found several with the requisite connectors. The second one worked fine and continued to do so when extended with a further cable. No need for ‘factory authorized’ this or ‘premium priced Nikon’ that.
First I snapped a couple of test shots to see what the D700’s sensor, with its modest pixel count, can deliver. On paper, it should yield prints three times the size of those I get from the 16mp MFT sensor in the Panny G3, which allows for grain-free prints sized 24″ x 16″. That sensor is one quarter the area of the D700’s, so ‘stretch’ those pixels over 4 times the area and you get 4mp effective density. The D700 is some 12mp, or three times the enlargement for the same pixel density, meaning 72″ x 48″.
I tested that on my Dell 2209WA displays and, indeed, the definition held up fine even at 90″ x 60″ effective size. large enough for me, making me wonder who on earth needs the 36mp of the just announced D800? Not to mention a monster file size which takes three times as long to download. Whatever.
A little more tweaking to establish the optimum settings for import sharpening with the 85mm f/1.8D Nikkor yielded the following, required to counter the Anti-Aliasing filter in front of the sensor, there to prevent ‘jaggies’. Using RAW, with 1:1 previews in Lightroom 3, I settled on the following:
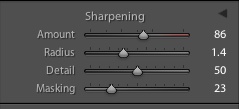
D700 LR3 file import sharpening settings.
That’s a bit more aggressive than the Canon 5D needed and may, of course, vary between lenses, but it’s just right, and at the cusp of where sharpening artifacts just start to appear. This is not prescriptive – each to his own. Color rendition seems neutral with default body settings, so no changes there. These were determined using LR3 using the 2010 Process. LR4 introduces yet another Process (will Adobe ever stop this nonsense?) and the Beta version is buggy. As a fellow photographer (and many on the web) report, try converting 2010 process files to 2012 and LR4 crashes, in both Windows and OS X. So I’m sticking with LR3 for now, especially as the changes in LR4 are aimed more at Adobe’s P&L than photographers’ needs.
One unexpected benefit of tethered capture is that the subject can see the results withing a couple of seconds on the laptop’s display. 10 year old boys aren’t exactly renowned for having great attention spans when their pictures are being taken, but this mechanism both kept Winston interested and helped him with posing. Neat.
We took about four dozen snaps and maybe six or so were ‘keepers’. This one stood out.

Winston Howard Hofler, aged ten.
D700, 85mm f/1.8 at f/5.6, ISO100.
The highlights in the hair are from a boom mounted top light, in the style of the great Hollywood photographer of the stars, George Hurrell. In addition to the boom, two other strobe heads, in umbrellas, were used. A related benefit of strobes is that you don’t get the huge retinas that strong incandescent lights cause.
Excellent result Thomas – handsome young fellow indeed, wish him Happy Birthday!
I’ve used the tethered D700/Lightroom/MacBook combo several times, sitters really appreciate it although I find we end up taking approximately 100% more shots than I would left to my own judgement! The results pay off though.