A versatile bellows and lens pair.
For an index of all Leica-related articles click here.
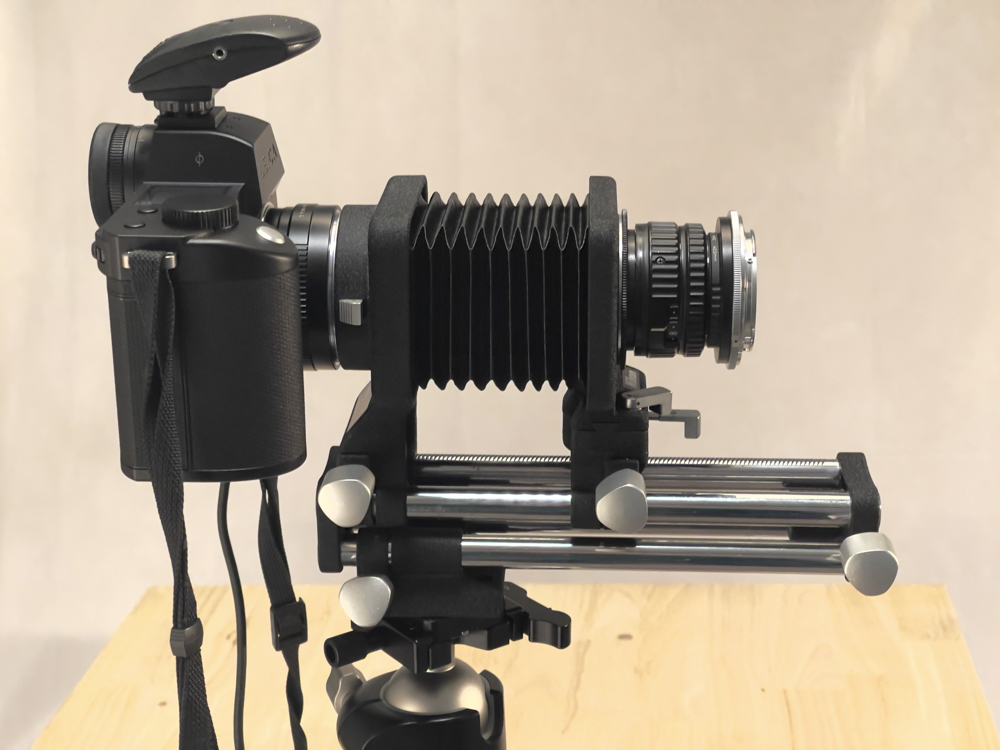
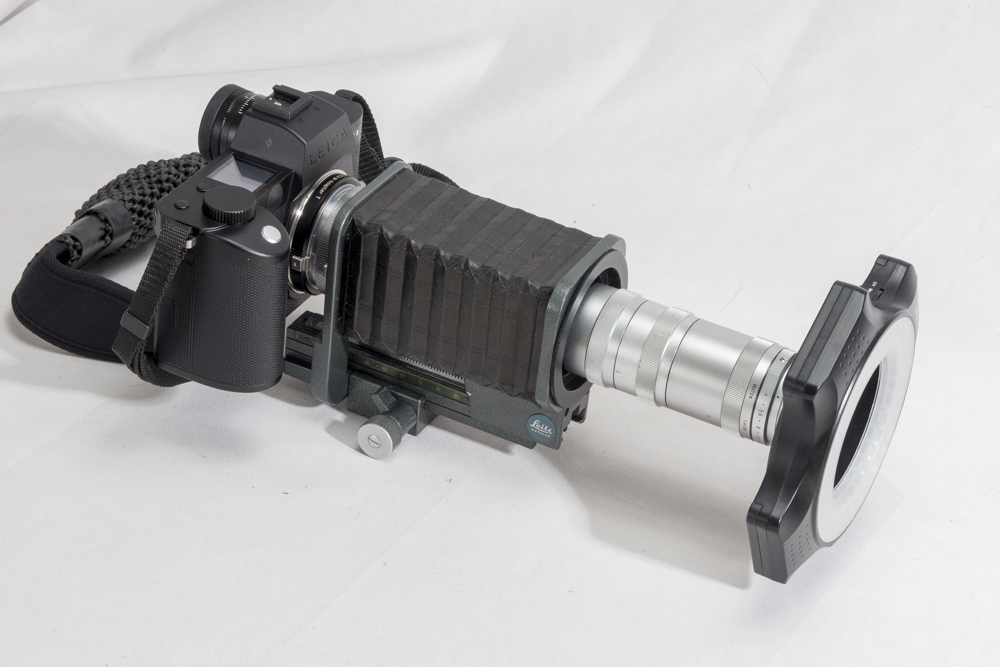
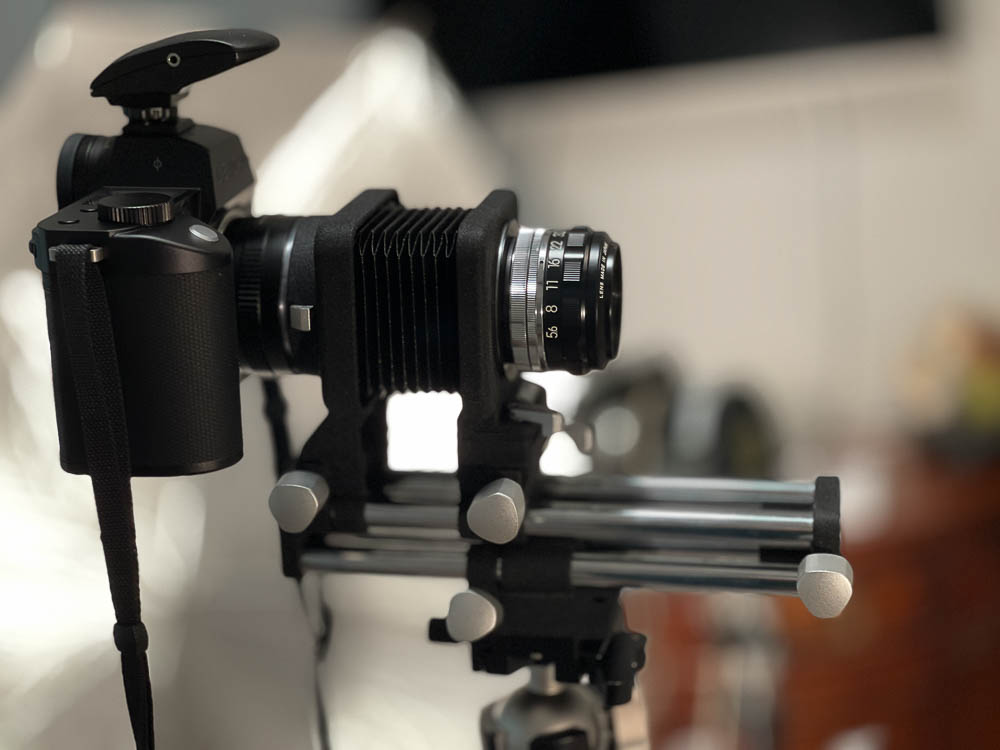
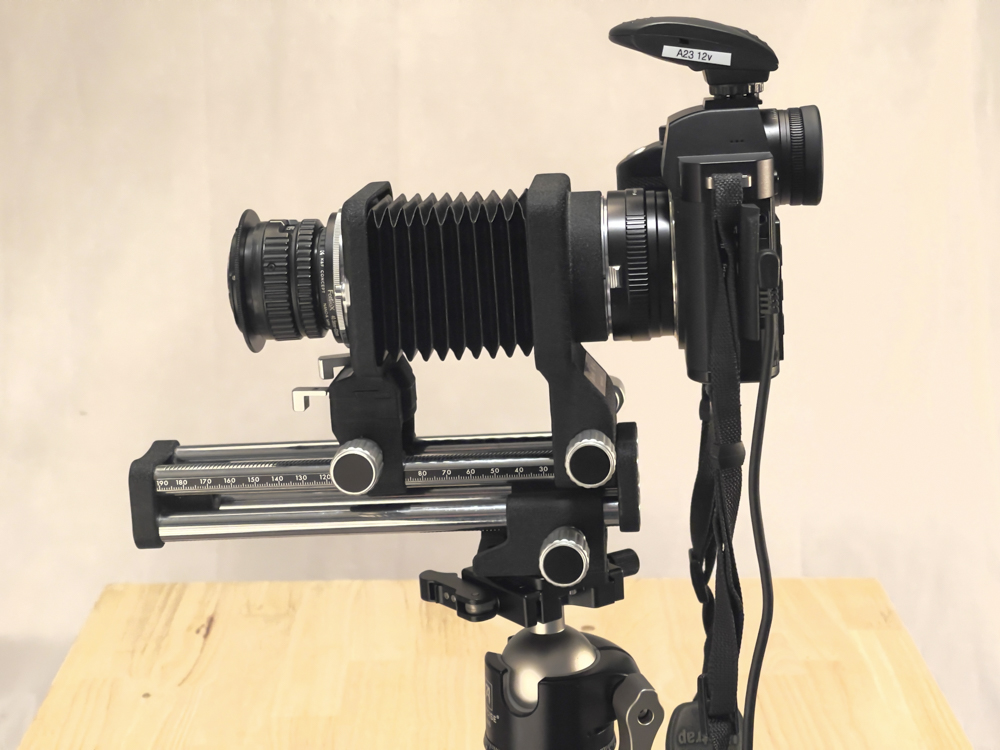
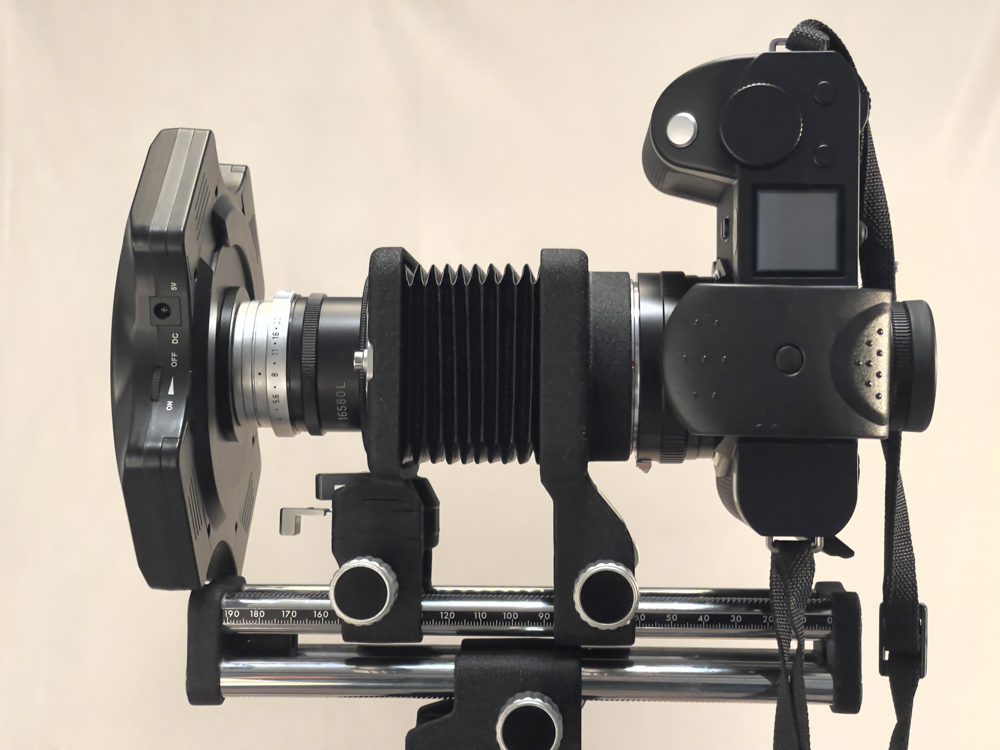
The 80mm f/5.6N El Nikkor on the PB-4 bellows and the Leica SL2-S.
The reversed 80mm f/5.6N El Nikkor on the PB-4 bellows and the Leica SL2-S.
Bellows variations and history:
My macro hardware journey continues apace, with the Leitz Focusing Bellows II being replaced by the Leitz Bellows-R with the fine 100mm Macro-Elmar-R lens head.
But when it came to bellows it was Nikon who knocked it out of the park. After earlier simpler versions they came up with the PB-4 which is not just a bellows but rather a bellows system. The lower rack provides a large 152mm/6″ movement range, the bellows extension range is a huge 43-185mm/1.9-7.3″ and, wait for it, the front stage offers both tilt/swing and shift movements! With some of the attributes of a 4×5 field camera in a 35mm bellows device, this not so little hummer weighs in at 2lbs 12 ozs. By contrast the lower rack movement of the Bellows-R is 68mm/2.7″.
A bellows system:
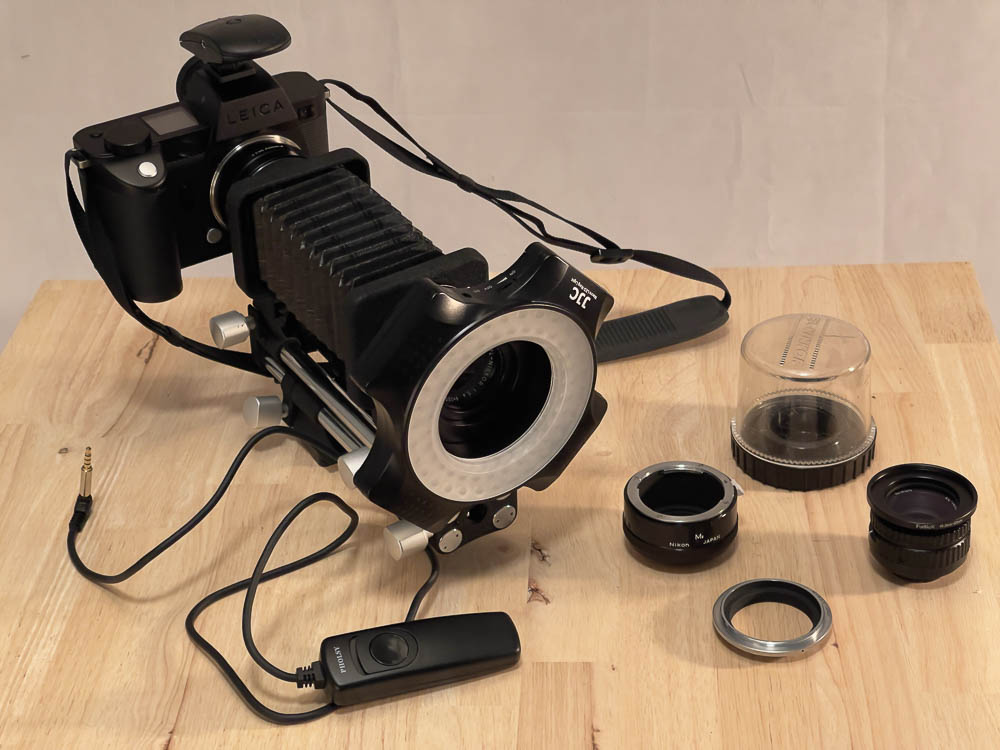
System, you ask? There were two film holder attachments, one for rolls (PS-4), the other for mounted slides (PS-5). There was the E2 extension ring with an aperture opening device for ease of focusing back in the bad old film days, and there was the Extension Tube set K if the 6″ maximum bellows extension proved insufficient. There was a repro copy stand for copying of flat subjects, the Model PF, and a waist level finder for the Nikon F body along with a special purpose focusing screen. Last and not least there was the reversing ring BR-2 (later BR-2A for lenses with CPUs) which has a 52mm thread on one side and a Nikon F bayonet in the other. This allows the lens to be reversed on the bellows for best definition when the reproduction ratio is life-size or larger. There was a host of other BR rings for reversing lenses and controlling the aperture.
Additionally my PB-4 came with a Nikon M2 extension tube which provides 27.5mm of extension. Handy, if hardly essential.
Later versions:
Nikon made two more bellows following the PB-4. The simpler PB-5 which dropped the tilt and shift function and removed the lower rack (boo!) and the PB-6 which adopted a monorail design in lieu of the four rails of the PB-4, but also dropped the tilt/shift front stage, while retaining the lower rack. The PB-6 had one advantage in that the rear stage was even more elevated, allowing clearance for camera bodies which had a motor drive attached or are simply very tall, like the D1/2/3/4/5/6. Further a bellows extension could be attached to the front for a truly gigantic extension range.
Why yet another bellows?
My reason for this acquisition is that I find I am regularly frustrated by the relatively short lower rack fore-and-aft movement range of the Leitz Bellows-R, especially when subjects with significant depth are involved where you want to focus stack to get everything sharply defined front to back. With the PB-4 almost tripling the lower rack range that issue goes away. Further the relatively high stand-off between the rails and the camera mount means that fore and aft movement of the rails is unimpeded (both front and rear standards can be moved independently) and the camera body can be rotated through 90 degrees on the rear standard without impediment.
Optimizing the use of the tilt/shift function – the 80mm El Nikkor:
How best to exploit the handy tilt/shift front stage? Well, normal lenses need not apply as their image circles are too small. Tilt and/or shift that front stage and you quickly start impinging on the edges of a regular lens’s image circle, where definition is poor. No, what is called for is a lens with a large image circle, and none is finer than the 80mm f/5.6 El Nikkor of May 1966 which was computed as an enlarging lens for coverage of film up to 6x7cm. Nikon made a large range of El Nikkors all the way up to a 360mm f/5.6 monster, used to enlarge images on 11″ x 14″ film. Wow!
The 80mm f/5.6 is a six element design, an improvement on the 75mm f/4 four element variant. The 80mm lens comes in M39 Leica Thread Mount and the image circle is a large 65mm, meaning no edge issues even at full tilt and/or shift. Further, in the absence of tilt or shift you are using the center of the image circle, which is the sweet spot. The lens is an optical unit only, meaning it has no focusing helicoid. The 1966 design was revised in 1980 for yet better performance, now named the 80mm f/5.6N EL Nikkor.
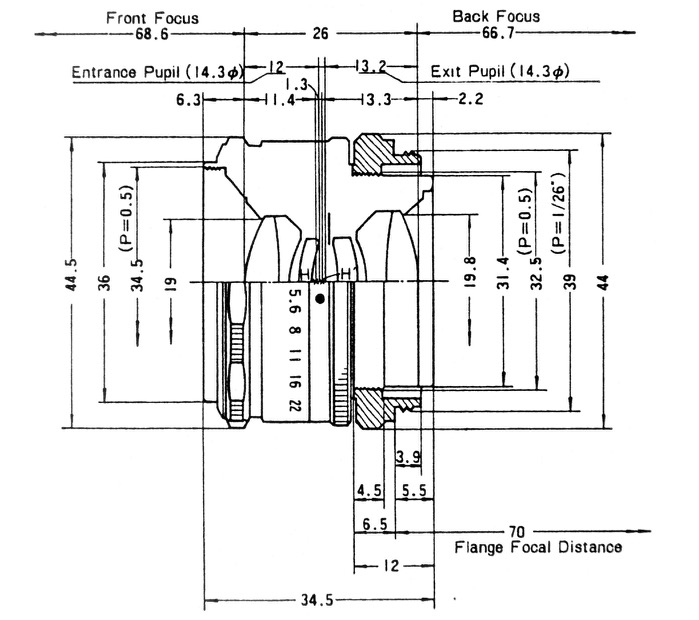
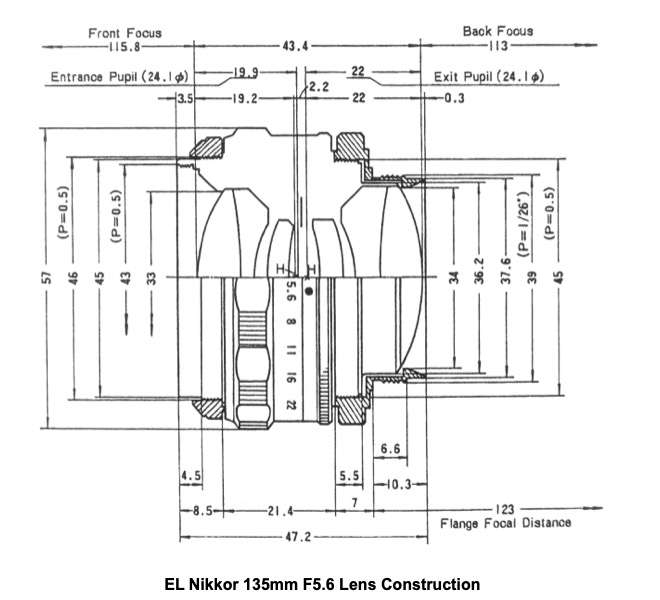
Construction of the 1966 80mm f/5.6 El Nikkor.
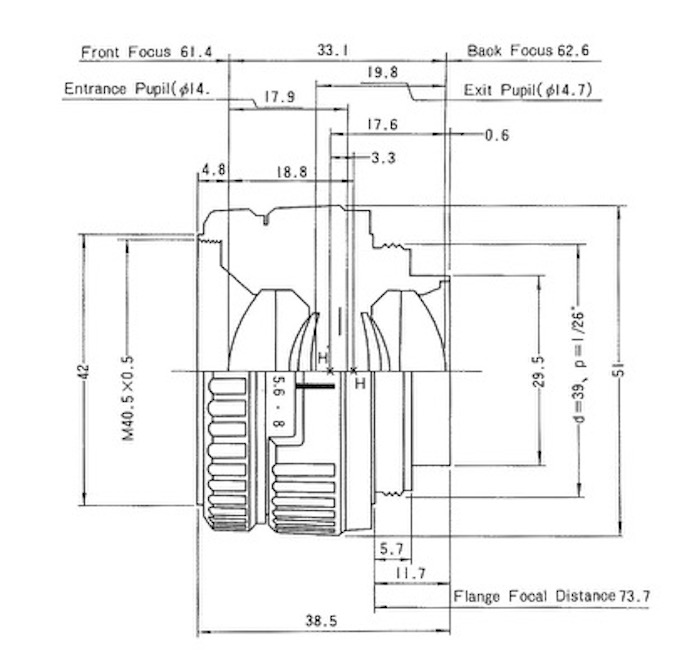
Construction of the 1980 80mm f/5.6N El Nikkor.
40.5mm filter thread replaces the 34.5mm of the original
and apertures are illuminated for darkroom use.
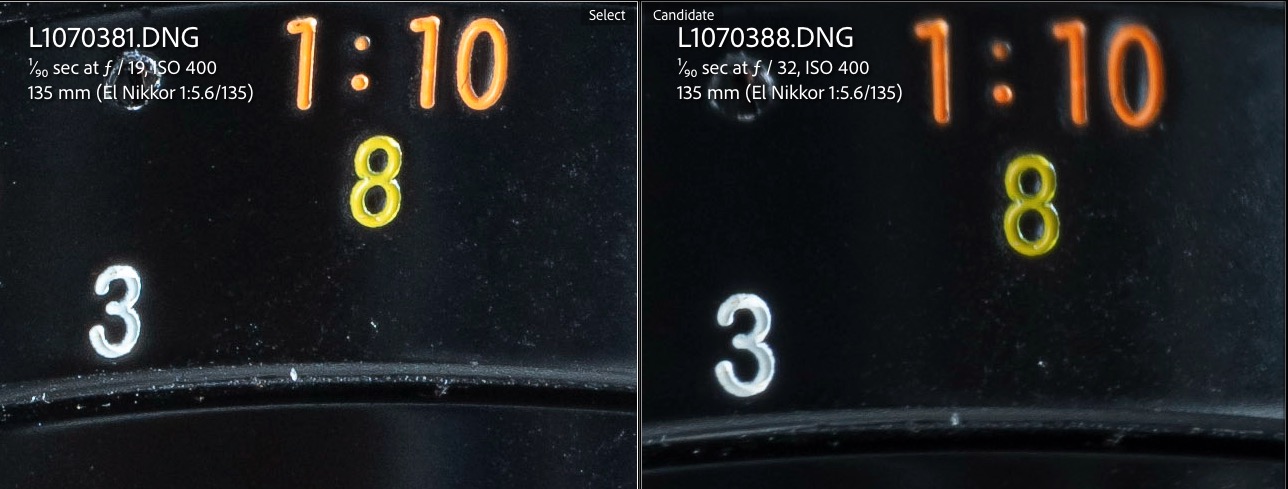
Note the increases in the entrance and exit pupils in the later design. This is much more than an exercise in ‘badge engineering’.
As regards the illuminated aperture dial, Nikon states: “N-type EL-Nikkor lenses have a window that lets light through to the aperture value when the lens is mounted on an enlarger. While this mechanism is very convenient for darkroom work, it causes light leak when used as a photographic lens, and must therefore be covered.”

The arrow indicates the illumination pass-through window for darkroom work.
A small piece of black electrical tape takes care of the light leak.
You can read Nikon’s amusing history of this lens here. The article primarily addresses the redesigned late ‘N’ version.
Adapters required for use with the Leica SL2-S:
The PB-4 has Nikon F mounts front and rear so a Nikon F-to-Leica L mount adapter is required at the rear of the bellows and an M39-to-Nikon F adapter for the front stage, where the rear of the lens is attached.

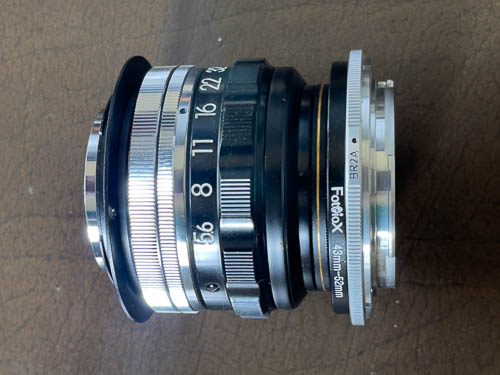
The 80mm f/5.6 El Nikkor. On the left (rear) the M39 LTM-to-Nikon F ring.
On the right a 40.5mm UV filter, the 40.5mm-to-52mm step-up ring
and the Nikon BR2A reversing ring. This setup allows the lens to be mounted
either way on the PB-4 bellows.
One especially neat feature of the 80mm El Nikkor is that it has a second set of click stops which allows the lens to be rotated once mounted so that the apertures are optimally visible. Neat.
How about the 135mm Elmar lens head?
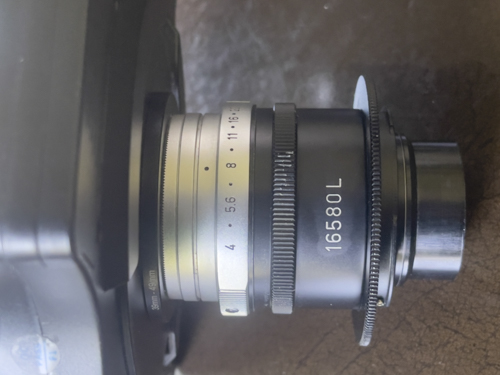
The fairly rare 16580L Leitz adapter is required to convert
the 135mm f/4 Elmar lens head to M39 LTM, which can then
be screwed into the M39-to-Nikon F adapter for bellows use.
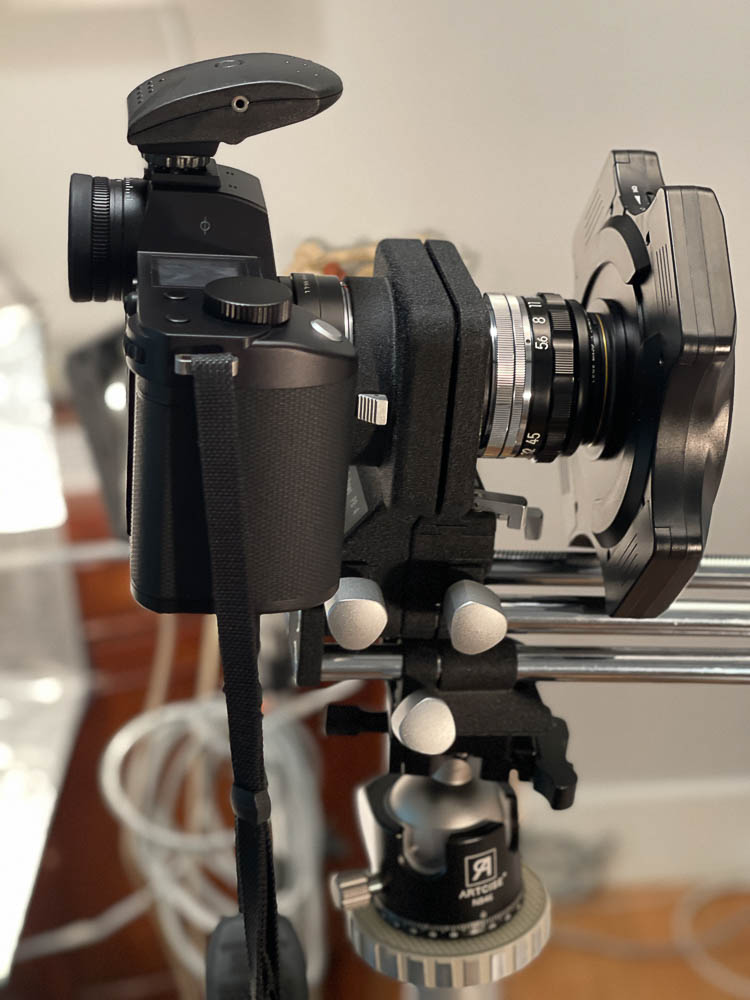
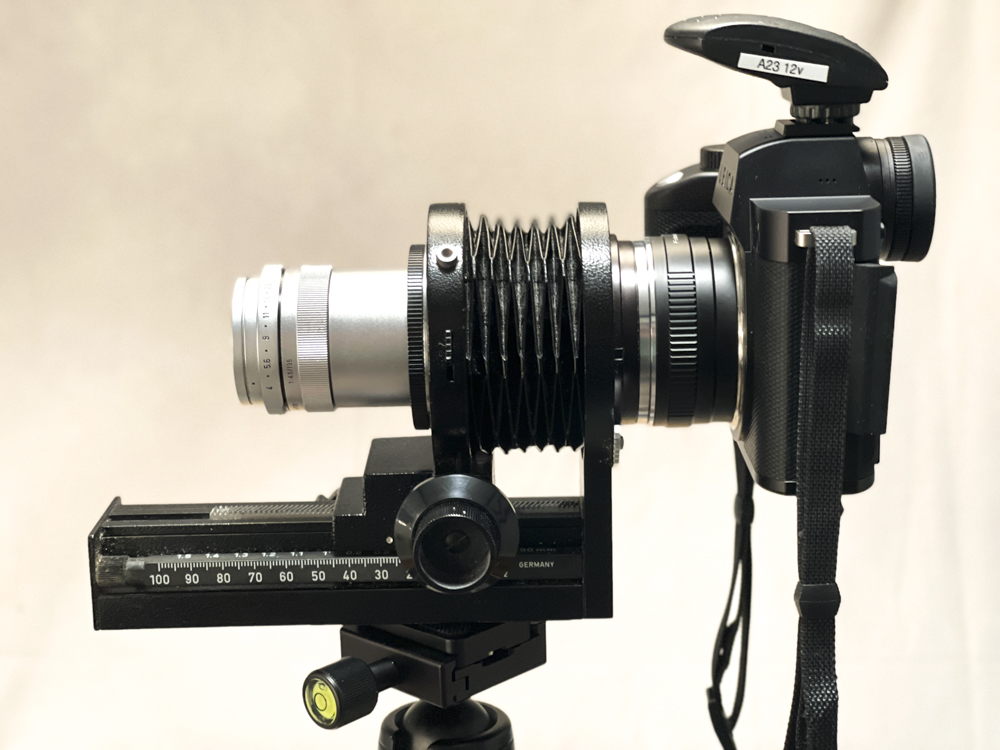
The 135mm Elmar lens head on the PB-4 bellows with
ring light attached. Note the clearance between the camera’s body
and the ring light from the bellows’s rails.
With the 135mm Elmar mounted in the 16580L adapter the magnification range with the PB-4 bellows is from infinity (bellows collapsed) to 1/2 life size (bellows fully extended). Thus the combination of the 80mm and 135mm lens heads yields a range from infinity through 2.5 times life size.
Cost:
It pays to be patient as prices are all over the place. I paid $156 for the PB-4 with the M2 ring and $76 for the 80mm f/5.6N El Nikkor. The ‘N’ denotes the later redesigned version of the lens which is reputed to be the finest optically. The filter thread size is 40.5mm, an improvement on the quirky 34.5mm on the original 80mm El Nikkor lens. Good luck finding a step-up ring or UV filter in that size.
Alternative lenses with a large image circle:
The German manufacturers Schneider (Componon) and Rodenstock (Rodagon) also made fine 80mm f/5.6 enlarging lenses during this era, both 6-element designs and covering a large image circle. Mint samples can be found for around $100. Schneider Componons are frequently plagued with element separation so check carefully before purchase. The likely causes are use of incorrect balsam and the considerable heat generated in a traditional film enlarger.
The Scheimpflug Principle:
For maximum depth of field with subjects which are not plane to the camera you want plane lines for the digital sensor, the lens and the subject to coincide at one point when the front stage of the bellows is tilted. This is known as the Scheimpflug Principle. In practice, with the outstanding EVF in the Leica SL2-S, trial and error, aided by the finder magnification function to check focus, is the quickest way to go. As the front stage is tilted the shift function can be used to restore centering of the subject in the viewfinder.
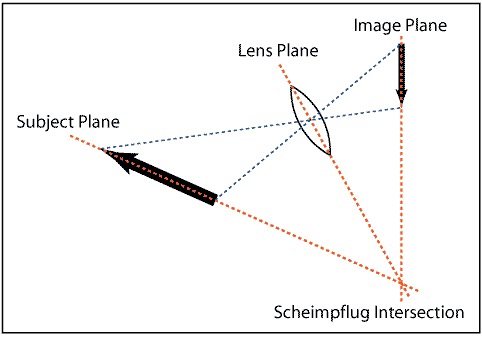
The Scheimpflug Principle illustrated.
This is how focus is optimized when the subject is not parallel to the sensor.
Using the tilt/swing front standards can greatly reduce the number of images required for a sharp overall focus stack. For example, where a flower stem leans away from the camera, the tilt feature, the sensor and the stem are aligned using the above illustration.
Tilt or swing?
When mounted normally on a tripod the front panel swings about a vertical axis. To confer tilt, which is arguably more useful, the whole rig – camera body and bellows – must be turned through 90 degrees whereupon the front panel now tilts about a horizontal axis.
A first result:
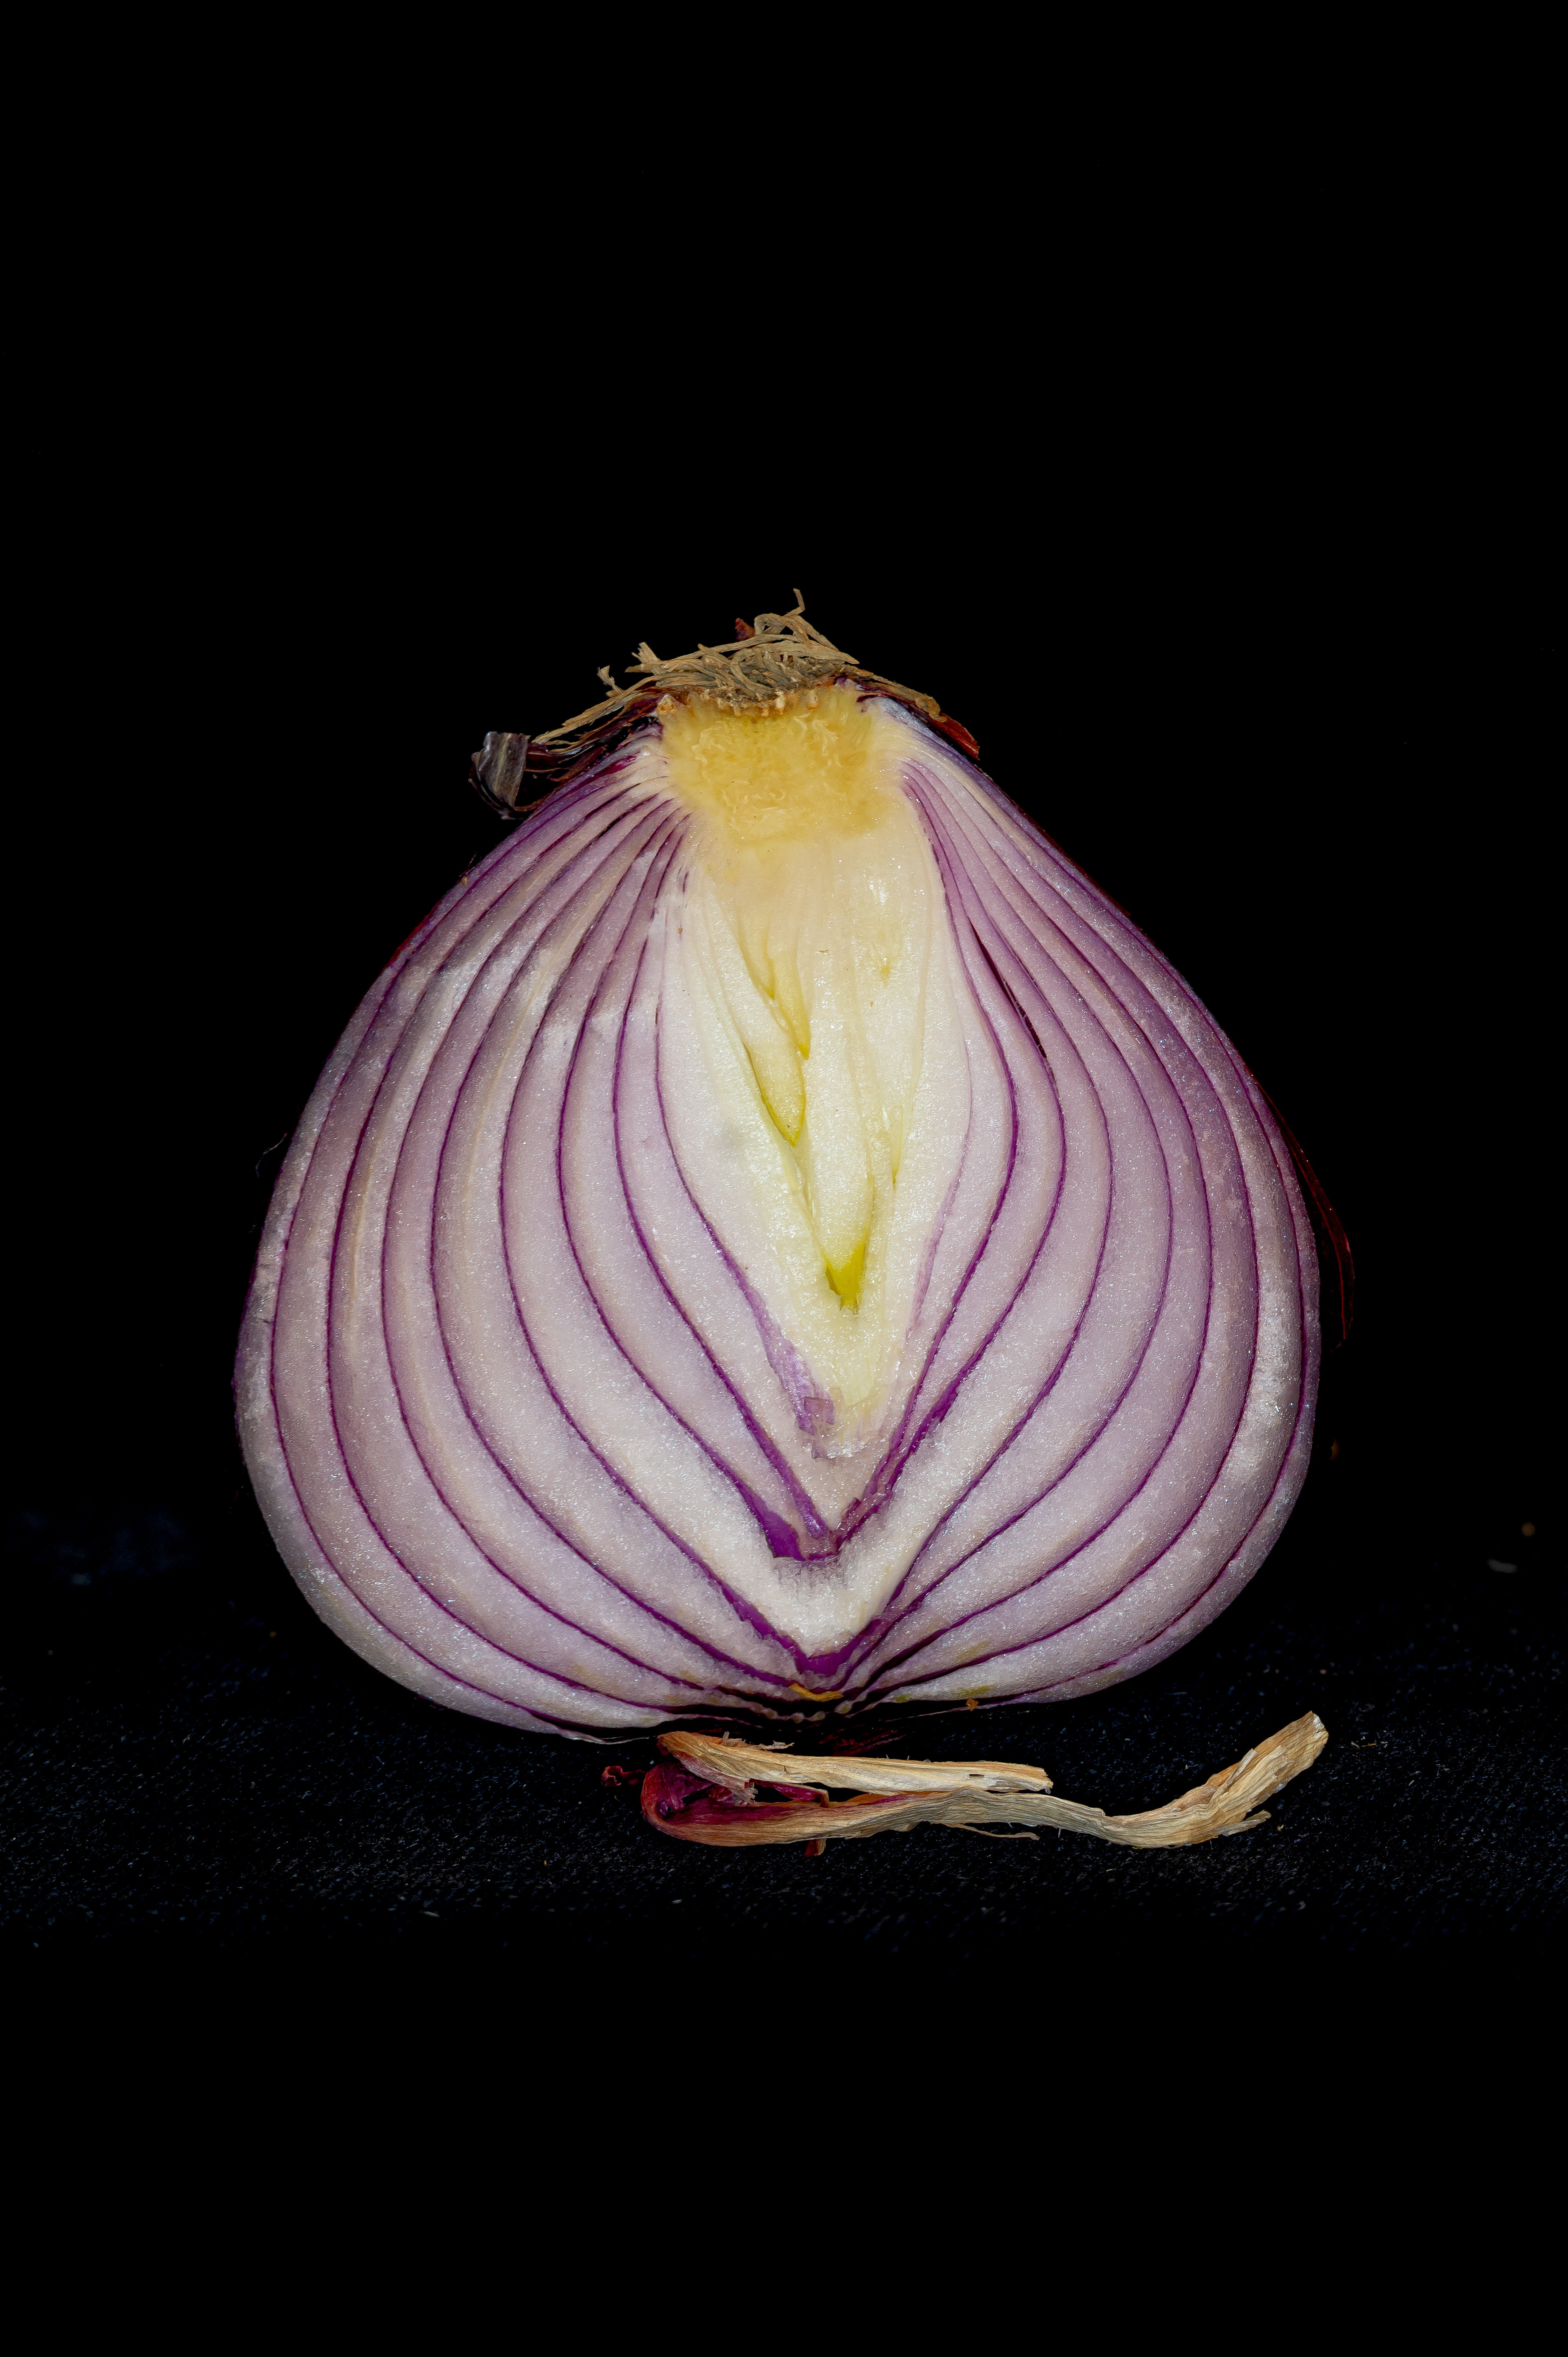
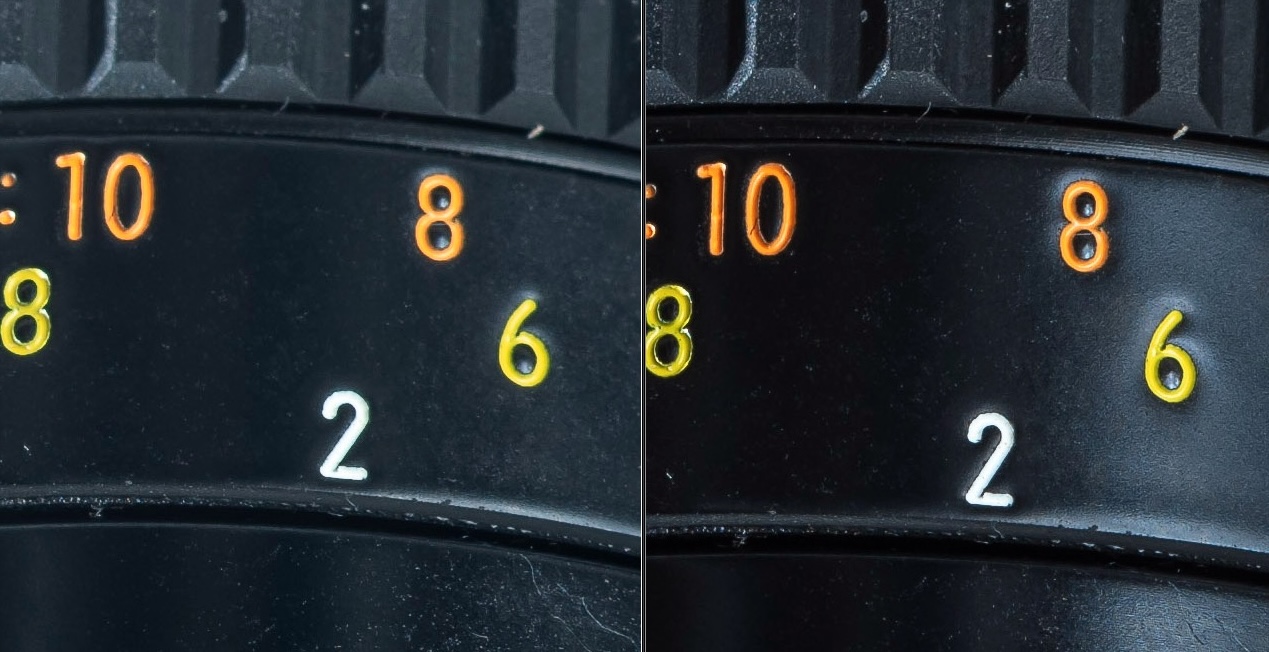
The El Nikkor on the PB-4 offers a magnification range from approximately 1/3rd life size when fully collapsed to 2.5 times life size when fully extended, in either regular or reversed lens mount. This image was taken at 1/3rd life size:

Click the image for a larger version.
Leica SL2-S, 80mm El Nikkor f/5.6N at f/11, ISO400, three strobes. Composite of 37 images focus stacked in Helicon Focus. The long lower rack movement of the PB-4 is a real boon with this ‘deep’ subject. Looking at the enlarged version you can see where a bug explored various parts of the center between exposures!