As sharp as it gets.
Nikon has long made some of the best macro lenses on the planet, and mine, the 105mm f/4 is a design dating from 1970, this specimen having been made in 1982. Production ceased in 1983. I bought the Ai-S version as I want to add a CPU and that works best with Ai-S variants. The lens came in non-Ai, Ai and Ai-S models, all optically the same. It was replaced by an f/2.8 version in Ai-S, then AF D then G mounts, all differing optically from one another and from the f/4.The current G model runs $900, hood extra. Mine cost me $235 with front and rear caps in mint condition, from the nice people at KEH.com. This lens, and the many variants of the 55mm Micro-Nikkor, is abundantly available on the used market.
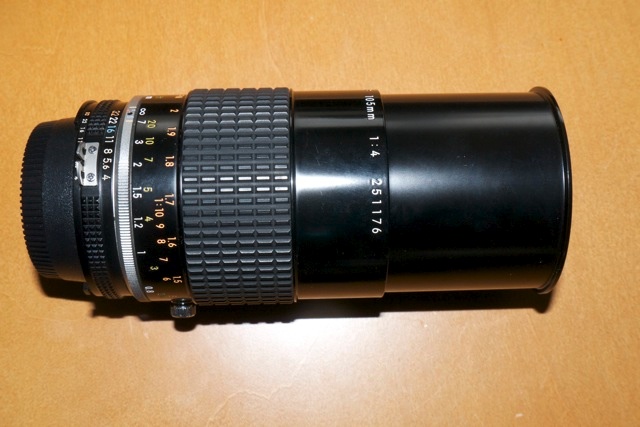
The 105mm f/4 Micro-Nikkor Ai-S macro lens.
The hood is built in and if you contemplate carrying the lens in a bag with no front cap, as I do, use a filter. With the hood retracted, the front element is very exposed. It’s manual focusing but AF is hardly missed with macro subjects. The lens focuses down to half life size and will go closer with extension tubes.
Focus throw is very long, almost full circle, as befits a lens where fine focusing is critical. The 105mm length is easier to use than a 50mm macro as it allows the camera to be further away from the subject to permit better lighting.
Definition and contrast are stellar. There is no noticeable distortion at any setting and if there is the most minor vignetting at f/4 it’s easily removed using the custom lens profile I append below. Diffraction sets in at f/22, denoted by a minor drop off in fine detail, but it’s not a deal breaker. Construction is like they used to make them – engraved alloys, no plastic in sight other than on the focus grip. There’s a focus lock screw underneath, just visible above, but I have not found any need for it – the lens stays where focused. This lock is on the Ai-S version only. At the closest focus distance with the hood extended it’s 7.5″ long. Reproduction ratios are clearly marked on the barrel.
Lens correction profile:
You can download the ACR lens profile by clicking here. There is very minor vignetting at full aperture which this profile corrects. The lens has negligible distortion.
This profile works well with FF sensors. APS-C sensors do not need it.
Installation and use of the profile are addressed here.
I’ll post some results soon. This lens is recommended without reservation for cheapskates who want macro focusing and will not miss AF.
Adding a CPU to the 105mmm f/4 Micro-Nikkor Ai-S:
The rear baffle on this lens is 1.621″ in external diameter. That is too large to permit a simple glue-on installation of a CPU. The internal baffle diameter is 1.400″ which is what is required, meaning an arc of the baffle’s alloy must be completely removed for CPU installation.
The baffle is retained with three radial countersunk Philips screws. First, place the CPU with the fourth pin from the right aligned as shown in the second picture below and mark its extremities with a scribe on the baffle. Make another scribed mark around the periphery where the baffle abuts the bayonet chrome mounting flange. Remove the three screws but leave the fourth – a slotted protruding one – untouched. With the three screws removed the baffle can be extracted.
The circumferential scribed mark is critical. Remove material below this and you will destroy one of the three retaining threads for one of the retaining screws.
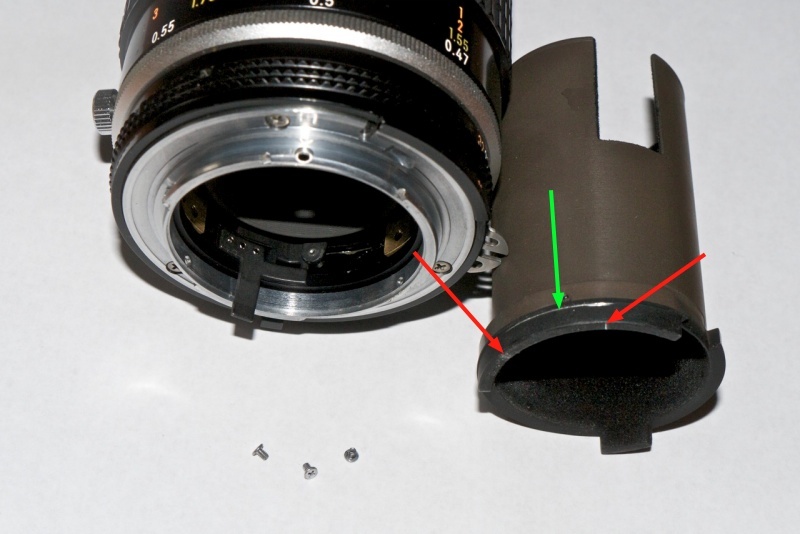
The baffle removed. Red arrows denote limit marks for longitudinal cuts,
green arrow shows scribe to denote depth of cuts required.
Remove the arc of alloy delineated by the scribed marks. I use a Dremel tool fitted with a cut-off wheel. Professionals will use a mill. I make the arc slightly wider than required to give me ‘wiggle room’ when glueing the CPU in place. Any gaps are filled in with epoxy for a robust finished product.
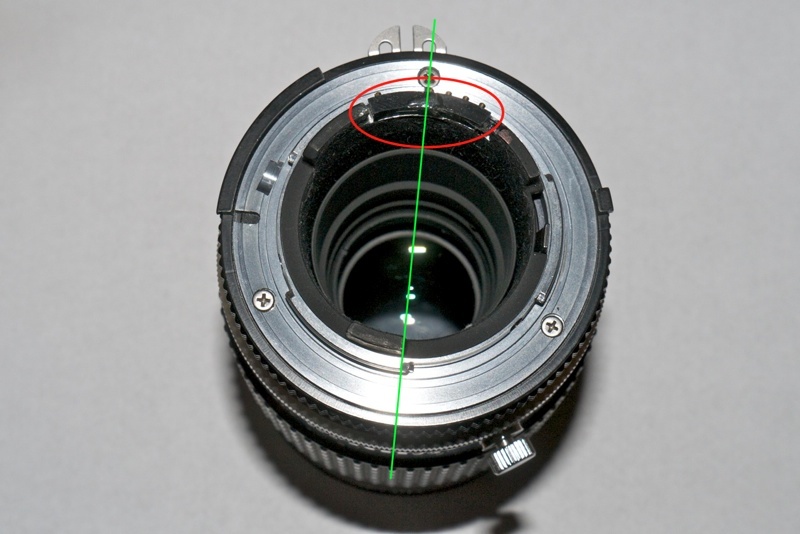
Red oval shows the CPU in place. Its top surface is plane with the rear of the baffle.
Green line denotes alignment of the CPU – the fourth pin from the right is aligned with the flange screw.
The position of the aperture ‘claw’ is irrelevant.
CPU programming instructions appear here.