Yearly Archives: 2012

If caps could talk

Everything that’s wrong with today.

Adding those mechanical era Nikon lenses for pennies to my arsenal makes me reflect how much computer technology has breathed new life into optics almost 50 years old. A CPU is easily added conferring proper EXIF data on every file. A tailored lens correction profile can be made in minutes and will recognize the lens in Lightroom using the newly found EXIF data. Searches on focal length are now made possible – it’s a common search field for me when I ‘lose’ an image despite fairly decent keywording. I often find that I can easily recall which focal length was used to make an image in the catalog. Superb new processing technologies, such as the enhanced Clarity slider in LR4, add microcontrast where there was none. Sharpening technologies make the mushy pop, and you can even add lens blur easily in Photoshop. All of these technologies make something very old, in photographic terms, new again and lenses long ago forgotten are resurrected to once more work their magic.

That appeals mightily to the engineer’s soul in me.

No one would deny that the latest Nikon AF D and G series lenses are masterpieces of the optical designer’s art. Or maybe one should say masterpieces of the computer programmer’s code. We have optics like the 14-24mm ultrawide zoom whose performance, by all accounts, improves on its prime competitors from the same maker. And while not cheap, try buying the constituent primes for less. But the problem with these new lenses is that their settings are awful. Plastic this, resin that. The controls grind rather than rotate, nylon gears abound and the whole thing feels like the kit lens off lower end budget models. And while the materials used appear not to lessen performance – indeed, lightning fast autofocus is a modern miracle which only ever helps matters – I believe that a well made lens can improve a photographer’s output in much the way a Porsche makes everyone a better driver. Eventually.

And nowhere can you find a more succinct summary of what ails modern designs than in the humble lens cap.

1965 and 2012 Nikon rear caps.

With three real oldies in my collection, all from around 1970, I thought it only appropriate to track down period rear caps. Those three lenses – the 50mm f/2 Nikkor-H, the 105mm f/2.5 Nikkor-P and the early four element 200mm f/4 Nikkor-Q – have an aggregate age approaching 130 years. The last, incidentally, though a simple four element Sonnar design, is probably the standout of the three, which is saying something given the prowess and renown of the first two designs. It’s only fair to grace them with period caps. And just look at those caps – the 1965 model is bakelite and has large, deep and long ridges which makes one-handed removal easy, because it is correctly shaped. The 2012 variant makes no such concessions to function and proves that if you can get everything wrong in something so simple, modern designers will find a way. The milling is pathetic, pure decoration without function. Then, to make absolutely sure that the thing is as slippery as a snake, the milled surface is inclined, making it almost impossible to remove the cap with one hand. Finally, well, there’s no other way to say it, it looks like the crap it is.

Here are those three Nikkors with which I am gradually getting acquainted, each superb in its own right and optically equal to the latest resin mounted horrors. Sure you have to turn the focus collar and, yes, I have installed CPUs in all three, as you can see, but the sheer pleasure these confer on this photographer’s snapping makes for better pictures. And $200 gets you the lot.

50, 105 and 200mm Nikkors from the last great era of lens making.
All have been Ai converted and have CPUs installed.

Bringing an old lens back to life. CPU installed on the 105mm Nikkor.

Transamerica from Columbus Avenue – 50 years old this year! 105mm Nikkor-P – a spring chicken at 42.

Sometimes old can be better.

Caffe Roma

For the criminal justice set.

Should you ever find yourself at the Hall of Justice in San Francisco, probably not a good thing, you could do worse than repair for lunch to Caffe Roma across the road, at 7th and Bryant Streets. The sandwiches, served on various Italian breads, are fresh and delicious and there’s a good selection of salads. If you are a coffee maven they roast their own here.

The interior is clean and spacious and you will likely find a mix of attorneys, process servers, bail bondsmen (they’re the ones with the gold chains and bulging suits) and working girls inside:

I had the Torino sandwich, served with chips, and a glass of water for all of $7.50. Half the sandwich is all you need, so you get dinner included in the bargain!

Click for the full menu.

Caffe Roma. Favored hangout of cops and the shyster set.

All snapped on the D700 with the 20mm f/3.5 Ai-S MF Nikkor, using my custom lens profile.

Out and about with the 20mm Nikkor

Just a delight to use.

I rambled on about the old MF Nikkor 20mm f/3.5 lens I picked up the other day here. Autofocus is really not missed at this focal length and such vignetting and distortion as there is can be easily corrected using the tailored lens profiles I provide here.

So the other day when a break in our unusually rainy weather opened up, I shot off to the city with the 20mm bolted on to the D700 (‘bolted on’ seems in keeping with that body’s macho ethos) and I thought it might also be fun to try out that little GPS logger and receiver mentioned yesterday, while I was at it.

I set off boldly heading west on foot along Harrison Street to the Hall of Justice, surrounded (in order of decreasing morality) by mendicants, zonkers, auto bodyshops, cops, whores, pimps, bail bondsmen and criminal lawyers. Firing up the GPS, here’s my out and back route as shown in Lightroom 4’s map module. I headed back after a sandwich at Caffe Roma at Seventh Street, taking Bryant Street:

As seen in LR4. Flags are numbered when the photo count exceeds one.

Hover over a flag in LR4 and you see the snap:

Cursor hovers to disclose picture in LR4.

Until I figure out some way to add a map when the cursor is hovered over an image, you will have to take my word for it that these were snapped on the route shown. And while the area may not be the greatest, there are probably more cops per square mile here than anywhere else in the city. They are needed to protect the shyster lawyers from their abused clients. Thus, it’s actually pretty safe.

The GPS performed very well. There was one small blind spot, maybe half a block long, where no coordinates were recorded (the GPS flag in the D700’s LCD display was extinguished), probably caused by a skyscraper obscuring the satellite, but the data were easily interpolated using LR4’s ‘drop-on-map-to-record’ option. Built up cities with high rises are the severest test. Open countryside is no problem.

The lens acquitted itself well. Fine detail is there in abundance across the frame and a click in LR4 applies the lens profile in cases where the distortion is objectionable. More a fetish than a requirement much of the time, to be honest. Where you see vignetting it has been added by me, not by the lens.

The Endup. Grunge added in Snapseed.

The wave.

Bail bondsmen. My favorite shingle is ‘Ballestrasse’. What could be more appropriate?
Looks like a business divided along ethnic lines – these presumably service Jews, Germans and Italians, respectively.

SOMA Artists Studio. Arrow points the wrong way ….

Green door and wall on Bryant Street.

Plant on Bryant Street.

Yup, that little 20mm is a keeper and is ideal for subjects where sidewalks are narrow and you have no choice but to be close. What I think of as an ‘environmental lens’ and a favorite focal length. And GPS works fine – a couple of dead spots where there was no reception, with coordinates easily backfilled in LR4. The unit is completely unobtrusive and I paid it no attention on this little sojourn. It delivered in (accurate) spades. It nails locations within a couple of yards.

The Nikon D700 and geotagging – Part II

Simplicity itself.

Update 2/22/23: A superior geotagging technique using Lightroom, a plug-in from Jeffrey Friedl and your cell phone is addressed here.

I detailed the components for adding geotagging to a late Nikon or Fuji DSLR in Part I. The idea was to avoid wires, and not to use any GPS power hungry device which would derive power from the camera’s battery. And the whole megillah had to be small, unobtrusive and attention free. The solution was a remote GPS data logger which has its own battery and communicates with a small wireless bluetooth receiver attached to the camera’s ten pin socket.

I had done a lot of research in determining the right hardware and had dismissed both the poorly designed and costly Nikon GPS receiver and Rube Goldberg solutions using remote GPS loggers in combination with software. These demand additional labor to match the GPS data with the picture files from the camera, using the camera’s inaccurate time clock as the lookup field. From my perspective, it either works with minimal post-processing labor or I’m not interested, as I much prefer to spend time taking pictures than playing at code monkey. Add the fact that many Nikon DSLR bodies have GPS connectivity built-in makes my solution a no brainer.

Accordingly, the solution proposed here is elegant, requires a minimum of user intervention and is inexpensive.

The total investment of $106 proves to have been money well spent; you can find the hardware sources in Part I. With the camera receiver finally arriving after a 17 day wait for the mail from Hong Kong, I plugged it into the ten pin socket on the Nikon D700, enabled GPS in the camera’s Setup menu, switched on the data logger and a few seconds later the ‘GPS’ icon illuminated on the LCD screen and the camera was ready to receive and save GPS data. 30 seconds is the manufacturer’s claim for initial acquisition of GPS coordinates; I have generally found that to be correct, although sometimes it takes a mere 10 seconds from powering up the logger for the camera to recognize GPS coordinates. Go figure. I told the camera to use the GPS time clock, not the poor one in the camera itself, renowned for drift. The D700 can adjust for Daylight Savings time, true, but if your camera cannot, you have been warned. The chances are high that you will forget and any solution which depends on memory in our data-fevered world is not robust.

If you cannot wait the 2-3 weeks the camera receiver takes to ship from the Far East, you can get hosed down at B&H for some $190 more for the aptly named Foolography Unleashed unit and have it in a few days. Or you can pay Amazon $120, which is $60 more than I paid. A fool and his money are easily parted ….

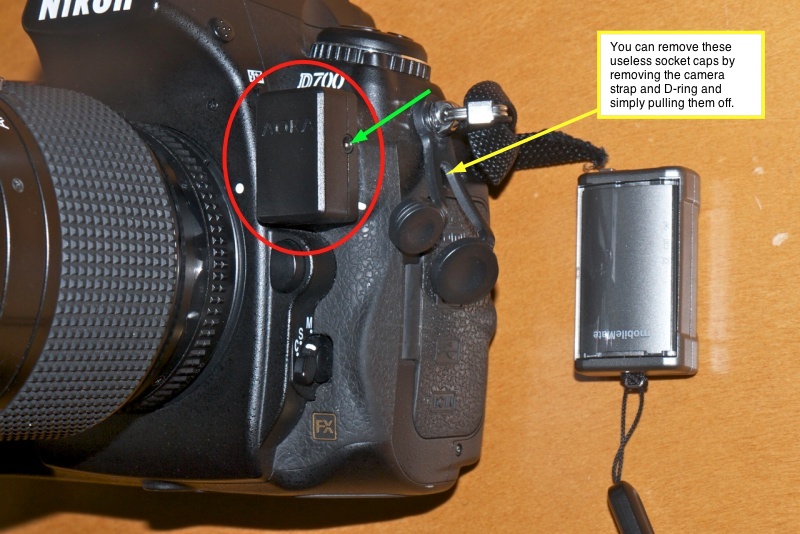
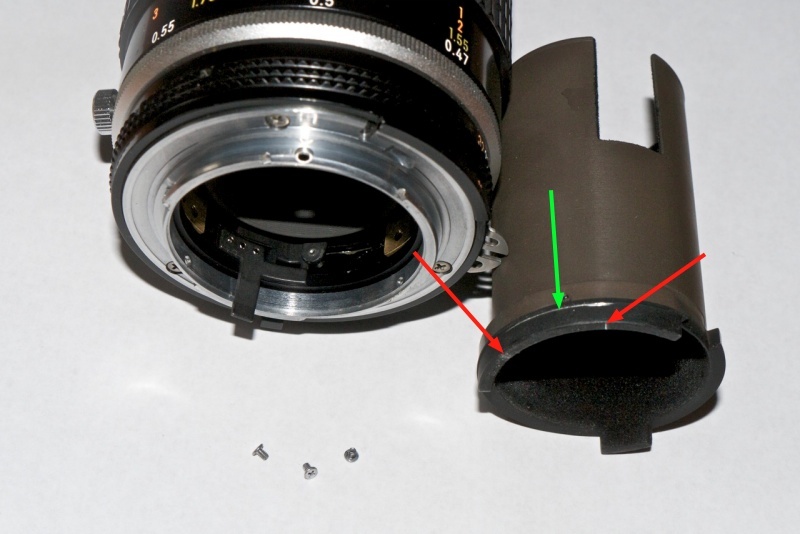
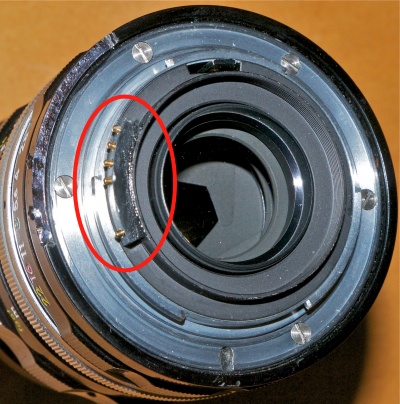
The AK-4N bluetooth receiver, circled in red, plugged into the D700.
The green arrow denotes the 2.5mm pass through port for a wireless remote.
The wireless i-Blue MobileMate 886 Mini GPS data logger is on the right.

Mercifully, unlike Nikon’s wired unit, the receiver on the camera is completely devoid of any controls or flashing lights.

How well does it work?

To quote from ‘My Cousin Vinny‘, where the tool in question was an automotive torque wrench:

Lisa: “Dead-on balls accurate.”
Vinny: “Dead-on balls accurate?”
Lisa: “It’s an industry term.”

The addition of enhanced mapping in Lightroom 4 makes the retrieval and presentation of GPS locations trivial. Here’s my first effort

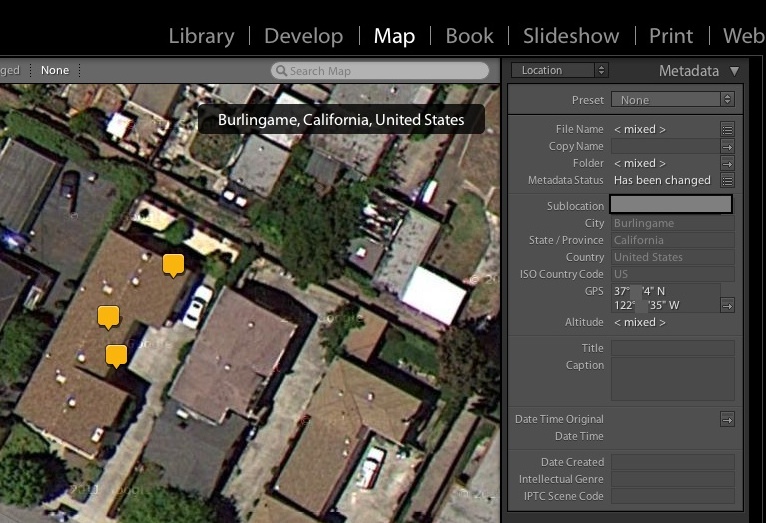
GPS at home – loft, bedroom, office.

As you can see, even movements of the GPS unit of a few feet are distinguishable on the LR4 display. I have blurred out part of the GPS coordinates as doubtless there’s at least one psycho with an Uzi reading this intent on wreaking revenge for all those Anselites in denial of my bad experiences with the man, and I would rather not make his job any easier. As for the white car in the driveway, it’s a loaner. My Ferrari Enzo was in the shop when this was taken. Nothing serious – regular oil change, $5,000.

Power draw? The logger runs 10 hours on a charge and comes with both USB and car adapter charging cables. The camera receiver’s data sheet states that its power consumption is 10mA – a local Bluetooth connection only. The D700’s standard battery stores 1500mAH, so if you kept the receiver on for 10 hours straight you would use almost 8% of the battery’s capacity. In practice, the receiver only comes on when the camera’s LCD is lit by a first pressure on the shutter button, meaning that GPS is available to the camera within 1 to 1.5 seconds of touching the release button. The D700 also has an option to keep the receiver powered all the time, but I have not found it necessary to use this. When the camera is turned off, the receiver does not draw any current from the camera’s battery, contrary to what the data sheet states. The logger, which takes 30 seconds to first acquire a signal, is on all the time, thus avoiding any delay in use. It refreshes data from the GPS sateliite(s) every few seconds.

So the camera receiver is a set-and-forget device. Small and unobtrusive, you will forget it is there and, unlike with the Nikon unit which mounts on the accessory shoe, you do not lose the use of the built-in flash and need no connecting cables. With a 30 foot range, the data logger can be kept in a pocket or in the camera bag.

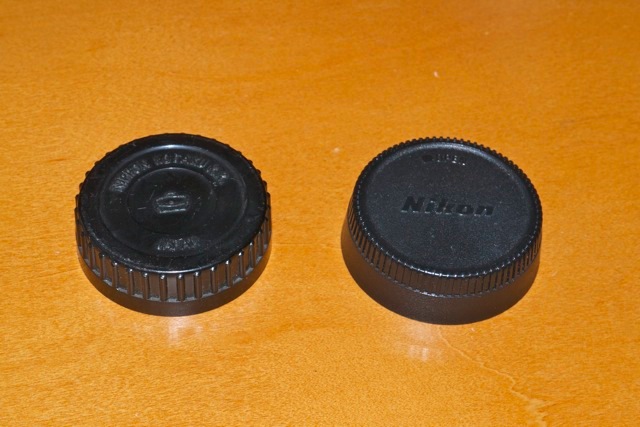
The small 2.5mm pass through coaxial socket on the side of the receiver accepts a short coaxial cable to connect with the wireless remote whose stock cable can no longer access the ten pin socket. The silly Nikon socket plugs can be removed as they only get in the way and are frightfully badly designed. I pulled mine off – a process which took far longer, what with all the futzing with the strap and D-rings, than getting GPS to work. The receiver does not interfere with the camera’s handling in any way and is a very tight fit, so the absence of a locking ring is not an issue. It’s not about to be knocked off. It does block the coaxial flash socket, so use a hot shoe adapter if you use wired flash or, better still, a radio trigger for studio strobes.

Short 2.5mm male-to-male coaxial cables are hard to find for those needing the wireless remote to work. I bought mine from Summit Source for some $4.95 shipped, and it’s 18″ long. Neither Radio Schlock or Amazon stock what is needed.

The receiver’s data sheet states that it works with the following camera bodies: Nikon D200, D300, D300s, D700, D2X, D2Xs, D3, D3X and Fuji S5Pro. The new D4 and forthcoming D800 and D800E appear to use the same ten pin socket and none has built-in GPS, so I would guess this device would work equally well on those bodies, but I have not tried that.

Here is the data sheet for the receiver:
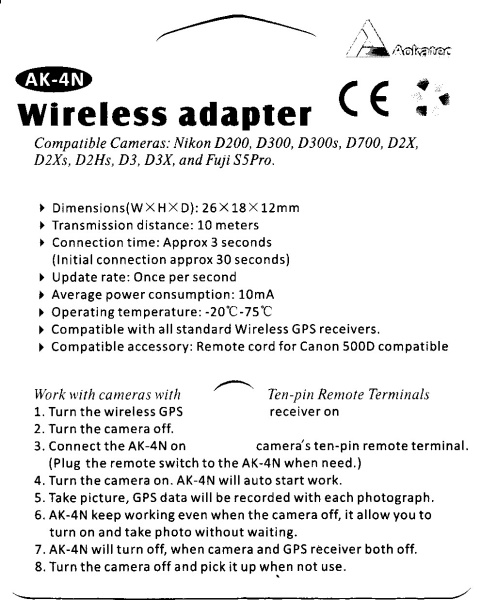
AK-4N data sheet.

There is still one dependency on memory – you have to remember to turn the data logger on at the start of the shooting session! The camera’s GPS flag on the LCD is small, so I have added a white paint reminder to the accessory shoe protector:

Aide memoire and camera’s GPS flag.

I hope I remember what that means ….

I’ll publish real world results tomorrow.

GPS receiver – October 2012: A reader has advised that the receiver I refer to above has been discontinued and recommends this one.

Update October 2012: Having just added a Nikon D2X to my hardware collection I purchased another Aoka camera receiver to permanently install on that body – the 10 pin fitting is identical to that used on the D700 and the existing Aoka works perfectly with the D2X.

Try as I might, I can only get one camera to record GPS data using the one GPS data logger. If I turn on both the D2X and the D700 simultaneously, the D2X grabs the signal first, displays the ‘GPS’ flag and prevents the D700 from getting it. If I turn the D700 on first, then the D2X, the D2X cannot see the data logger. By the way, the much older D2X ‘sees’ the data logger far faster once turned on than the D700 – a second or two – I can only think the larger D2X body has room for a superior antenna. So much for progress.

So it seems the logger ‘locks on’ to one camera receiver and is incapable of driving two at the same time.

Oh well.

I suppose if you are using both cameras together, you can always look up the GPS data on a picture taken from the other at about the same time. Not ideal. Or get a second GPS data logger.

Nikkor 105mm f/4 Micro-Nikkor Ai-S macro lens

As sharp as it gets.

Nikon has long made some of the best macro lenses on the planet, and mine, the 105mm f/4 is a design dating from 1970, this specimen having been made in 1982. Production ceased in 1983. I bought the Ai-S version as I want to add a CPU and that works best with Ai-S variants. The lens came in non-Ai, Ai and Ai-S models, all optically the same. It was replaced by an f/2.8 version in Ai-S, then AF D then G mounts, all differing optically from one another and from the f/4.The current G model runs $900, hood extra. Mine cost me $235 with front and rear caps in mint condition, from the nice people at KEH.com. This lens, and the many variants of the 55mm Micro-Nikkor, is abundantly available on the used market.

The 105mm f/4 Micro-Nikkor Ai-S macro lens.

The hood is built in and if you contemplate carrying the lens in a bag with no front cap, as I do, use a filter. With the hood retracted, the front element is very exposed. It’s manual focusing but AF is hardly missed with macro subjects. The lens focuses down to half life size and will go closer with extension tubes.

Focus throw is very long, almost full circle, as befits a lens where fine focusing is critical. The 105mm length is easier to use than a 50mm macro as it allows the camera to be further away from the subject to permit better lighting.

Definition and contrast are stellar. There is no noticeable distortion at any setting and if there is the most minor vignetting at f/4 it’s easily removed using the custom lens profile I append below. Diffraction sets in at f/22, denoted by a minor drop off in fine detail, but it’s not a deal breaker. Construction is like they used to make them – engraved alloys, no plastic in sight other than on the focus grip. There’s a focus lock screw underneath, just visible above, but I have not found any need for it – the lens stays where focused. This lock is on the Ai-S version only. At the closest focus distance with the hood extended it’s 7.5″ long. Reproduction ratios are clearly marked on the barrel.

Lens correction profile:

You can download the ACR lens profile by clicking here. There is very minor vignetting at full aperture which this profile corrects. The lens has negligible distortion.

This profile works well with FF sensors. APS-C sensors do not need it.

Installation and use of the profile are addressed here.

I’ll post some results soon. This lens is recommended without reservation for cheapskates who want macro focusing and will not miss AF.

Adding a CPU to the 105mmm f/4 Micro-Nikkor Ai-S:

The rear baffle on this lens is 1.621″ in external diameter. That is too large to permit a simple glue-on installation of a CPU. The internal baffle diameter is 1.400″ which is what is required, meaning an arc of the baffle’s alloy must be completely removed for CPU installation.

The baffle is retained with three radial countersunk Philips screws. First, place the CPU with the fourth pin from the right aligned as shown in the second picture below and mark its extremities with a scribe on the baffle. Make another scribed mark around the periphery where the baffle abuts the bayonet chrome mounting flange. Remove the three screws but leave the fourth – a slotted protruding one – untouched. With the three screws removed the baffle can be extracted.

The circumferential scribed mark is critical. Remove material below this and you will destroy one of the three retaining threads for one of the retaining screws.

The baffle removed. Red arrows denote limit marks for longitudinal cuts,
green arrow shows scribe to denote depth of cuts required.

Remove the arc of alloy delineated by the scribed marks. I use a Dremel tool fitted with a cut-off wheel. Professionals will use a mill. I make the arc slightly wider than required to give me ‘wiggle room’ when glueing the CPU in place. Any gaps are filled in with epoxy for a robust finished product.

Red oval shows the CPU in place. Its top surface is plane with the rear of the baffle.
Green line denotes alignment of the CPU – the fourth pin from the right is aligned with the flange screw.
The position of the aperture ‘claw’ is irrelevant.

CPU programming instructions appear here.