Back to the Future.
For an index of all my Mac Pro articles, click here.
As instructed by FU Steve yesterday, I dutifully called a Craigslist vendor, and drove down to Palo Alto in Silicon Valley and picked up a 2009 Mac Pro 8-Core. The seller recycles machines from Stanford University and this one is so pristine, nary a scratch, that opening it up disclosed not one dust mote. It even smells new inside.This machine weighs 40 lbs and the thought of shipping it is not encouraging. Try to buy locally, though that’s easy for me to say a few miles from Silicon Valley.
The contrast with my (excellent) Hackintosh could not be more stark:
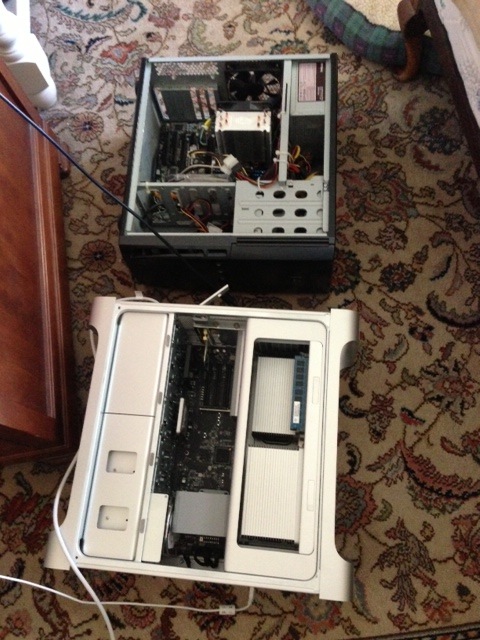
Beauty and the beast.
At $1,100 it was a bargain, and the 2009 8-core machines are not that easy to find. That’s the model you want if you are going to get radically serious about upgrading.
I quickly set to a fresh OS X 10.8.4 installation on my backup SSD, migrated over the Users and Applications from the main SSD and was up and running with the Mac Pro in a few hours.
It’s a very warm day here – ambient over 85F – and the CPU reported 113F, so the 104F or so I am used to in the Hackintosh should be seen on a regular day. So cooling is excellent, and without the attendant jumble of wires the Hackster requires.
For now I’m running with the stock 6GB of RAM the machine was sold with in 2009, and will see about upping that to 16GB soon. The Mac Pro had no Airport installed so I simply transplanted the excellent TP Link wi-fi card from the Hackintosh to one of the PCIe slots and wifi was up and running. I’ll do a proper Airport installation soon.
A quick Geekbench run reported truly startling performance for a 5 year old machine:
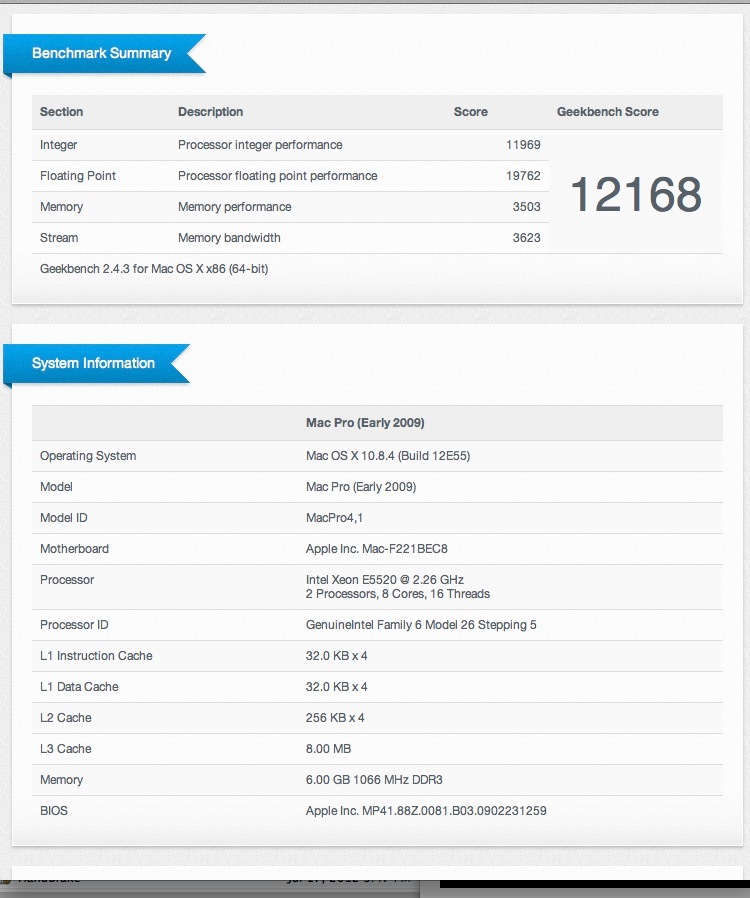
Mac Pro 2009 stock Geekbench performance.
That compares with the 12,500 with the Sandy Bridge i7 in the Hackintosh, which I can get to 15,500 with overclocking. So stock performance of the 2009 Mac Pro is much the same as the Hackintosh. And that’s with only 6GB of RAM and two 2.26GHz processors in lieu of one 3.40GHz in the Hack. Very exciting.
Graphics performance is a different story, as the Mac Pro is currently running the ancient nVidia GT120 GPU, and the awful Cinebench numbers confirm that. It’s half the speed of the 2013 MacBook Air which uses an integrated HD5000GPU and one quarter the speed of the GTX660 in the Hackintosh:
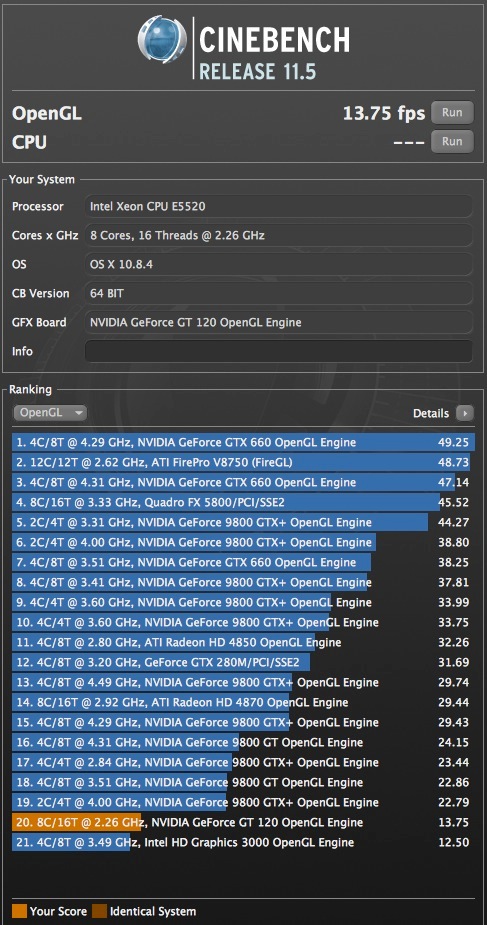
Cinenbench on the Mac Pro 2009.
I’ll fit the nVidia GTX660 from the Hackintosh soon, but first I have to figure out where to tap six-pin power for the card; the source is likely buried somewhere within the power supply section of the innards, all screened away from prying eyes. That should quadruple the speed!
But there is one overwhelming impression I simply must share when it comes to the Mac Pro. I have never seen better construction quality in a computer, and seldom in other machines. Everything is thought out to the nth detail, cams and latches lock or free up removable modules and the whole thing screams quality. The box is so beautiful it’s worth spending a few dollars more for a really clean one, in my opinion.
Once I get the better GPU working and upgrade the two Xeon CPUs to better ones (some $450 for the fastest 8-Core versions), I expect Geekbench will approach the magic 20,000 mark and Cinebench will be much improved.
An important note if you are migrating from a Hackintosh:
Hacks have lots of additional files to work with OS X and it’s important to remove these before migrating your disk to a back-up start-up disk. Once you have done that the original Hack start up disk can be erased and all apps and data restored to it.
Here’s the way to do that:
- Install a fresh Mac OS onto a clean drive, after downloading it from the AppStore.
- On your Hack, erase the directory /Extra. That’s for Hacks only.
- On your Hack erase the directory System/Library/Extensions.
- On your Mac Pro, after installing a fresh OS, use Migration Assistant to bring over everything from the Hack drive you just modified in the steps above.
- Test your new Mac Pro.
- If all is well, erase the Hack drive and use Carbon Copy Cloner or SuperDuper to clone your newly created Mac Pro drive back to the now erased Hack drive.
- Tell the Mac Pro (System Preferences->Start Up Drive) to start from the drive to which you just cloned everything.
I neglected to follow the above procedure and was getting bad Shut Downs and errors on Restart. After doing the above, my new S/L/E from the clean install contained 213 kexts. The old Hack S/L/E contained no fewer than 247 kexts! Now some of those probably just carried over from the old iMac days which preceded the Hack, but several will have been kexts specifically modified to make the Hack work. Now I have clean starts, shut downs and no issues.
Cable ‘dots’:
Well, that’s what I call them.

Cable dots.
Few areas of industrial design have seen as much to detest as that of computer connectors. Be it USB, Firewire 800 (figure out which side is up with that excrescence), original iPhone, VGA, DVI (a real stinker, especially when you are down on your knees under the desk), MiniDisplayPort and on and on, almost every connector designed over the past few decades has seemingly been intended to make it as hard as is humanly possible to correctly guess the correct orientation. And given that any change to a new computer will involve much plugging and unplugging of cables, something really needs to be done to salve the pain and aggravation.
My solution is above, and all it takes is one of those white ink pens you can get at any office supply store. Once done, the guessing game goes away.