Adding USB3 and Blu-Ray.
For an index of all my Mac Pro articles, click here.
Adding USB3:
It’s premature to say that Intel’s Thunderbolt will become the standard for connecting external devices to computers. The PC world, with its huge – if falling – volume has not exactly embraced the technology and until it does price will remain stratospheric. External TB enclosures are very costly and, for most, USB3 is just fine offering half the speed at a fraction of the cost.
Apple was especially lazy in upgrading the Mac Pro, with the 2009 model profiled in these articles identical to the 2012 except for CPU upgrades (thank you, Intel) and one firmware upgrade which allowed the use of 1333MHz memory and accepted 12-core CPUs. Other than that the 2009 and current 2012 machines are identical a fact which, once I spotted it, clued me in to the tremendous value proposition offered by the 2009 model.
However, in its apathy, Apple missed adding some modern technology to the Mac Pro from which it can benefit. At this time there are no PCIe cards which provide TB, but there is a handful which easily add USB3. This article only addresses users of Mountain Lion 10.8.3 or later, which comes with drivers for the Fresco chipset used by the card I have installed.
This is the card we want – it comes in 2-port and 4-port versions:
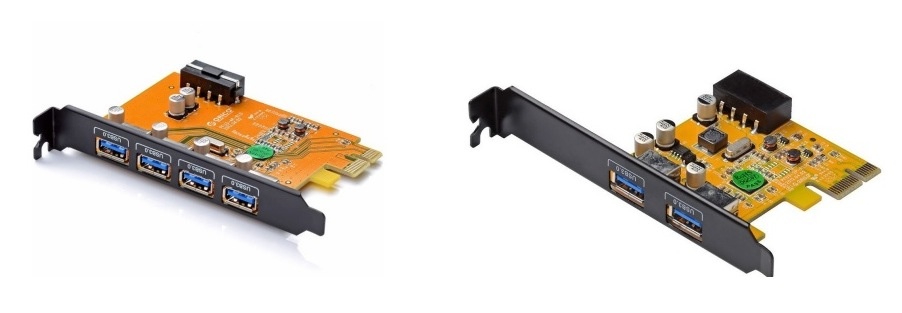
The Orico PFU3-4P or 2P Four/Dual Port USB3 PCIe card for the Mac.
This version of the Orico uses the Fresco chipset and can be found at Amazon in the 2-port version for $18, or the 4-port for $33. The ‘F’ in the model designation refers to the Fresco chipset. The big black cuboid at the top of the card is a 4-pin Molex male socket to which we will have to route power.
System Profiler will recognize this card once it’s inserted in a free USB3 slot. The card may work but, if it does, it will be well below capacity. The PCI slots provides insufficient power and a power line has to be run to the card’s male Molex socket for best functioning. I illustrate this below where I do an import of 50 Nikon D3x RAW files using an unpowered and a powered USB3 card. Unpowered it performs no better than USB2. Powered it’s twice as fast. Don’t fool yourself. You need to route power to the card.
The easiest way to power the card is to run a cable from the optical drive area. If you only have one optical drive in there then there will be a spare, combined SATA data and power socket available and you can tap into that using a SATA to female Molex cable. However, if you have already used the spare cable to power an SSD, as I illustrated in Part V, you will need to use a cable splitter to provide power for the USB3 card.
In either case you can use a cable which splits the existing cable in the optical drive bay into two power and two data feeds, leaving one free for subsequent use if you decide to relocate an SSD into the optical bay area. They can be had from Lindy-USA for $14 plus a thorough hosing for shipping of $13 and a one week wait. Appalling.
Finally you will need a short Molex male-female extension cable to reach the short USB3 PCIe card, and Monoprice will get it to you cheap and fast for a couple of dollars.
You should know that Molex pin connectors are a very poor design. The pins and sockets wobble and are easily bent if you are ham handed when assembling junctions, so do a fair bit of your own wobbling to make sure the pins find their mark before mashing the two together. In what follows I used the 2-port card, as my primary USB3 need is for an external card reader; all my disk drives reside inside the Mac Pro case where they are connected using speedy SATA technology. You can choose the 4 socket version if you like or add an external USB3 hub for additional needs. As the USB3 card we are installing in the Mac Pro is powered, an external hub will be driven just fine. Multi-port USB3 hubs can be had for well under $50 and all USB3 sockets are backward compatible with USB2.
Whatever you do, do not power the USB3 card from any available backplane board socket which is ordinarily used to power graphics cards. The voltage is incorrect and you may end up frying your computer.
The pinouts for the 4-pin Molex connector are shown here, for those interested.
Conflicts:
There are many reports of interference between unshielded USB3 cables, as used here, and Bluetooth. These show up in jerky mouse pointer action. If you do use BT, shield the connecting wires. I have long considered BT a deeply flawed, poor range technology and avoid it like the plague. If you must use a wireless mouse, use one which uses an RF sender/dongle, like many of those from Logitech or Microsoft. Shock news, I know, but MSFT actually does make something which ‘just works’.
Also, avoid using an USB3 card with comes with the NEC chipset. You need one with the Fresco chipset with Mountain Lion. The native drivers were probably added for the forthcoming OS 10.9. Fresco cards use these native drivers and avoid the use of aftermarket drivers which frequently bring stability issues with them.
Finally, if you want to boot from a bootable external drive, that drive cannot be connected to an USB3 card. The USB3 sockets are not ‘live’ until after booting, so drives connected there are not bootable.
Installation:
It’s tough to route power cables from the optical drive area to the USB3 card. The only unobstructed passageway through the firewall between the power supply and the PCIe area is through a small opening at the base of drive caddy #3 (third from the left as you face the drives’ labels), and the quickest and easiest way of accessing that passthrough is to remove the power supply unit.
To connect the Lindy splitter cable with the female Molex extension cable, in addition to a cable cutters and a crimping tool I used some 16 gauge crimp connectors and a cable stripper. The cable splitter as provided by Lindy has an unused Molex and an unused 4-pin fan plug and I wanted to get rid of as much cable clutter as possible – making the run ‘SATA (optical drive) to female Molex (USB3 card)’ directly. Thus I cut the Lindy splitter cable and crimped the cut ends together after getting rid of the excess connectors and cabling, illustrated below:
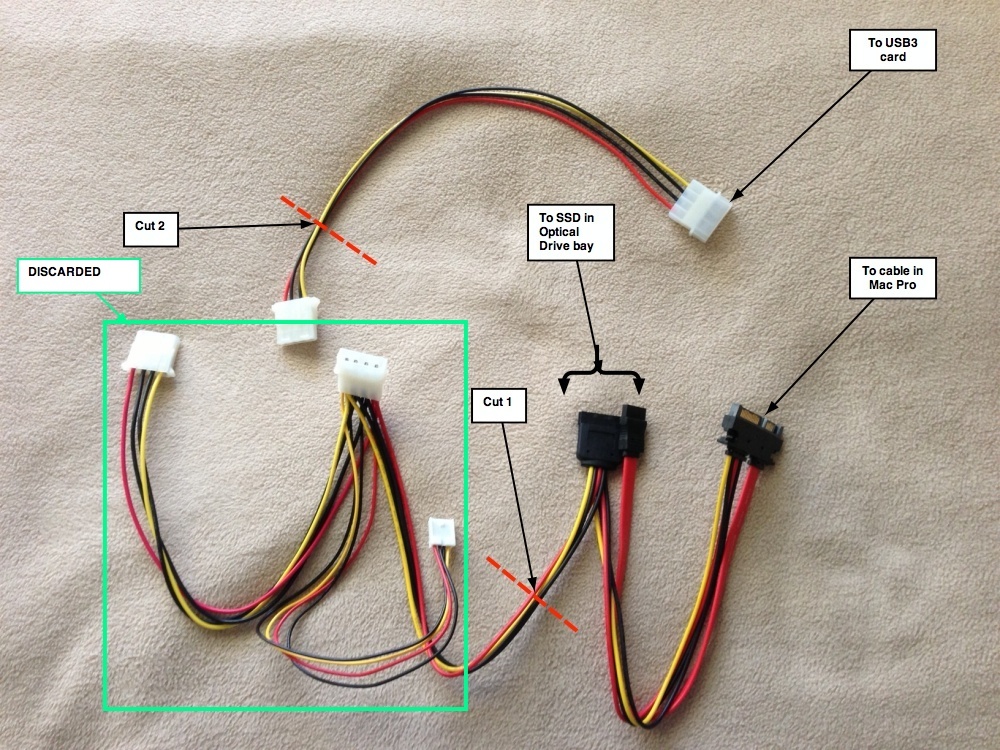
Removing excess connectors and cables. Lindy SATA splitter is the lower of the two. Molex extender above.
After making the two cuts (4 cables each), you join the cut cables with cable strippers and a crimping tool, respecting colors, after threading them through the firewall, which I describe below. Both black connectors are ground, so it does not matter if you mix these up.
You will need a short 2.5mm Allen wrench and a magnetized #1 long Philips screwdriver. Remove the optical drive assembly by pulling up on it, disconnecting the plugs to the DVD drive (and the SSD if you installed one there). Using the screwdriver, remove the two screws holding the alloy shelf and remove the shelf:
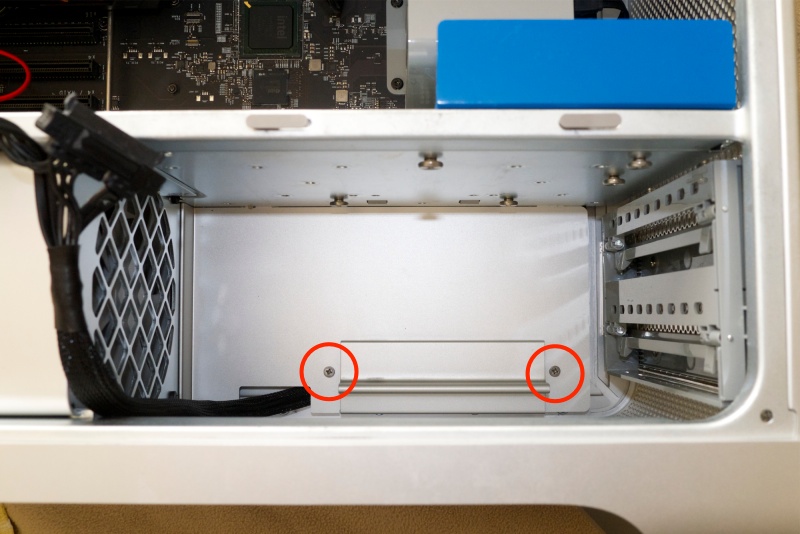
Shelf retaining screws. Use a magnetic screwdriver.
The plug for the PSU will be disclosed. Pinch the ends and pull it:
Remove the PSU plug.
Now remove all the disc drives in their caddies to give you working space, and undo the four screws, circled, to free up the PSU. Use the 2.5mm Allen wrench, and avoid using a rounded end wrench which will not make your day when you round the hex inside the Loctite-retained screws:
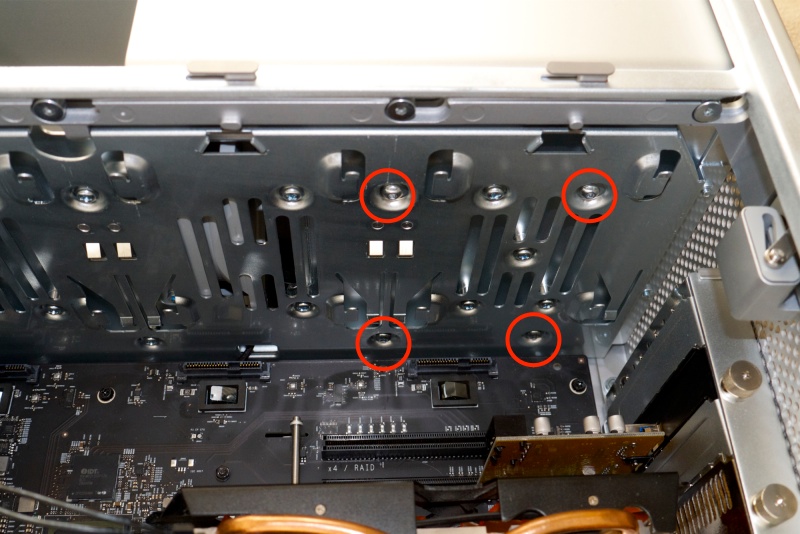
Retaining screws for the PSU. Use the shortest Allen wrench you have.
Contrary to the Service Manual, these are alloy and will not respond to a
magnetized wrench, so do not drop them.
The PSU can now be removed by sliding it a tad to the left then lifting it out, being careful to help the cable and plug along with the other hand:
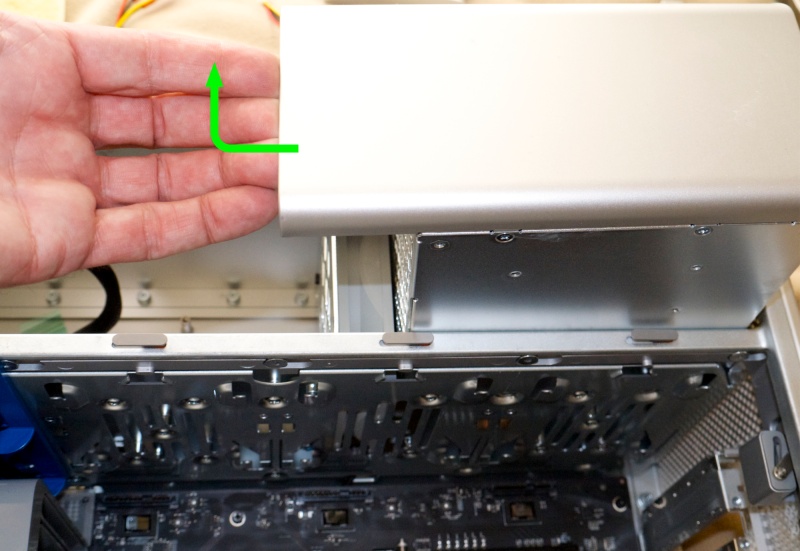
Removing the PSU.
Should you ever need to replace it, here’s the label:
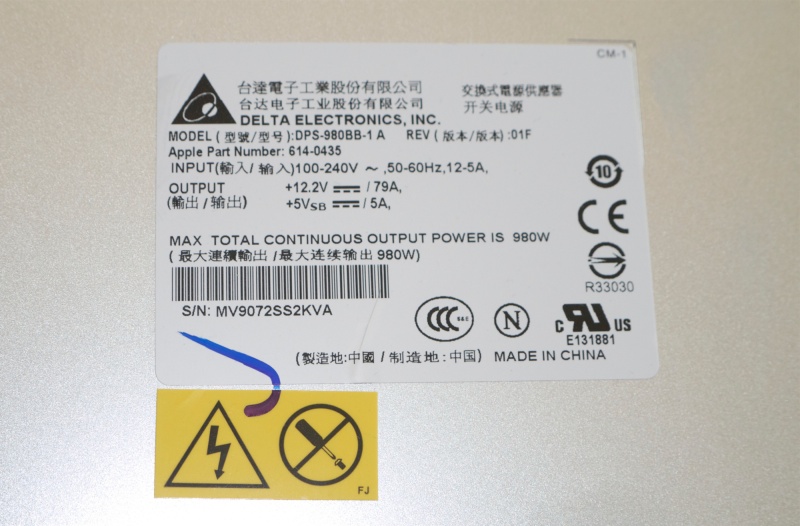
PSU label. 980 watts of power!
You can now thread the wires through the opening – it’s the same one used by an existing cable:

USB3 wires passed through the opening.
Replace the PSU, carefully threading the plug through to the optical drive area, reconnecting it and refastening the 2.5mm bolts after making sure the shelf is properly aligned – there are two tabs which slot into the firewall:
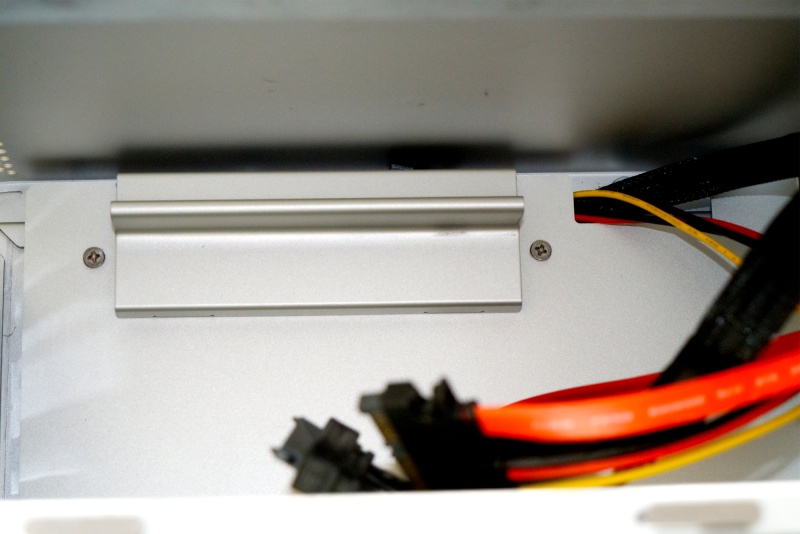
Wires threaded into the optical drive area.
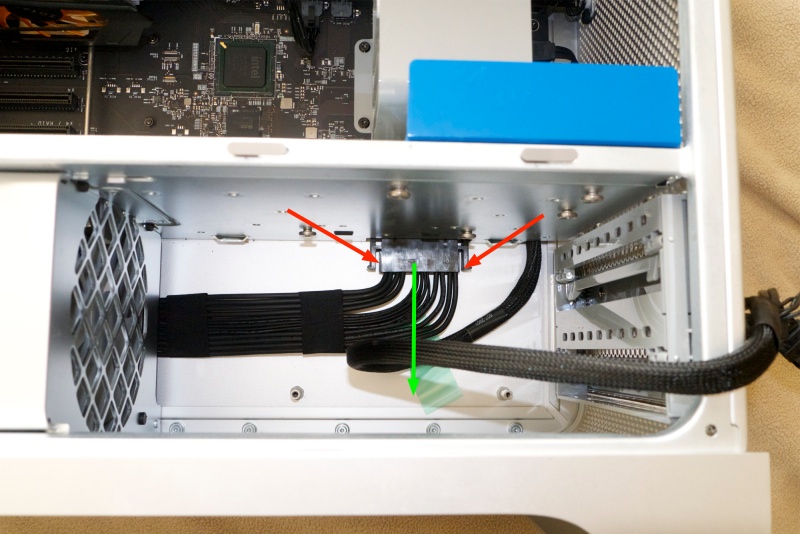
Here’s a view of the backplane area with the USB3 card in place:
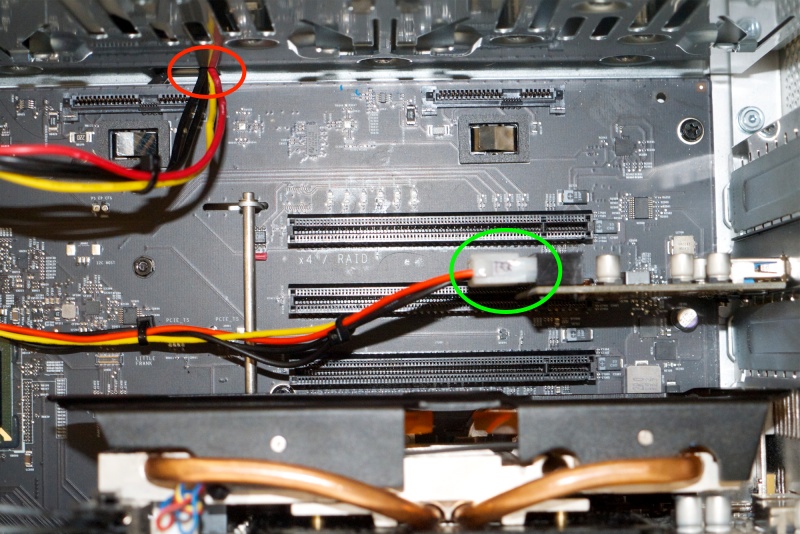
USB3 card in place with Molex connector (green), with the power wires threaded
through at the base of drive #3 for connection to the optical drive area (red).
Don’t worry, drive #3 will fit fine.
Be generous with the cable length so that there is no issue with any later PCIe cards you may elect to install. Note the small, black cable ties used to keep the wiring harness tidy:
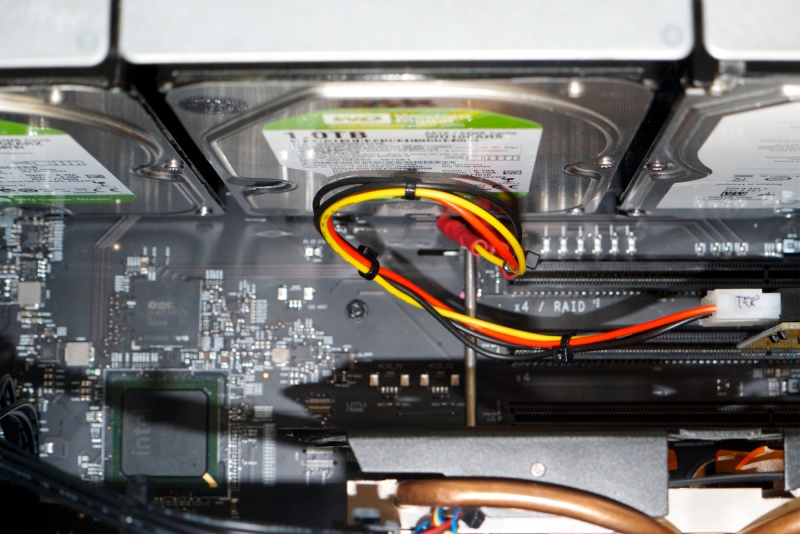
Cable ties in place.
Mac Pros and untidiness do not go together, so spend a few pennies on 1/4″ cable sheath to tidy up those ugly wires for both the USB3 card and the power cables for the GPU:
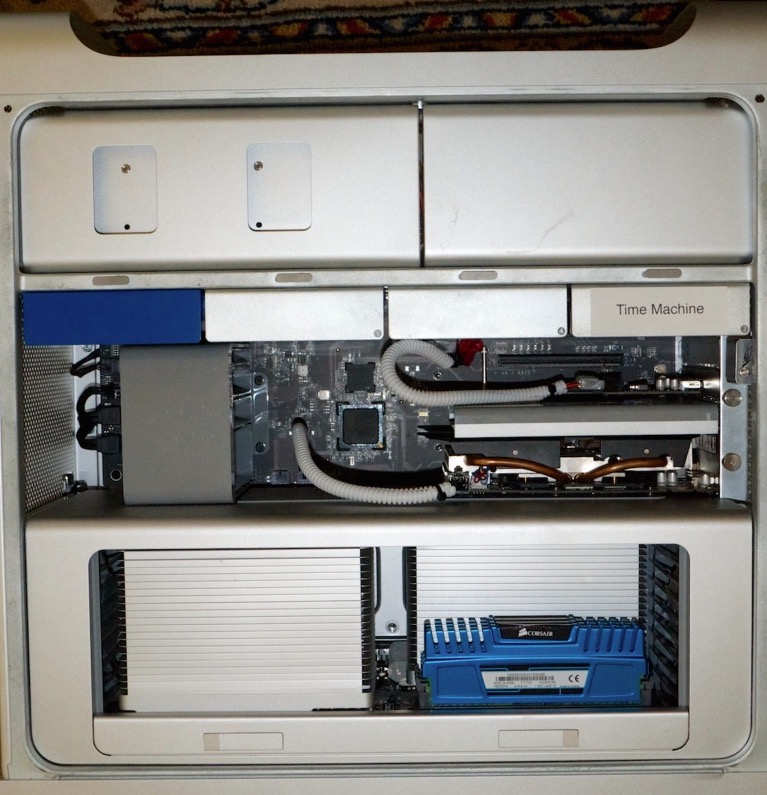
Cables neatly dressed.
You are done.
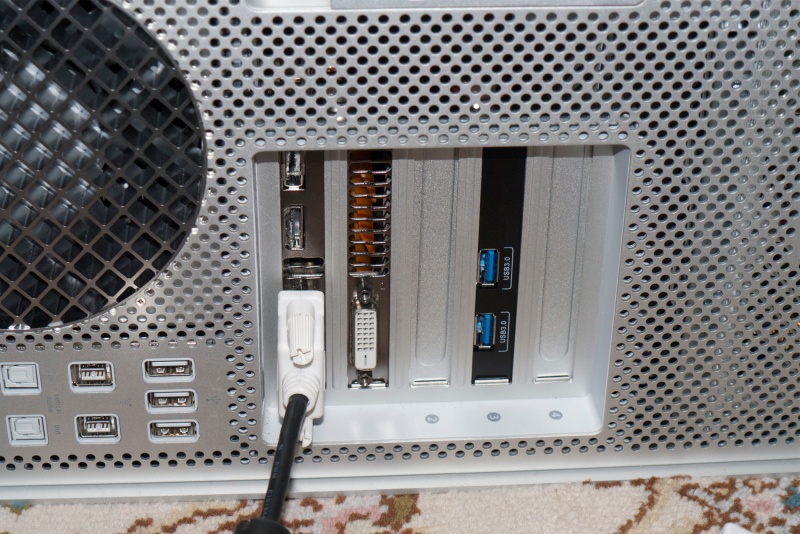
PCIe card in place showing two USB3 sockets. Use PCIe socket #3 (shown)
or #4 to the right for the card, both 4-bit. #2 is 16-bit and is wasted for this purpose.
Confirmation of function:
Here’s System Profiler after installation:
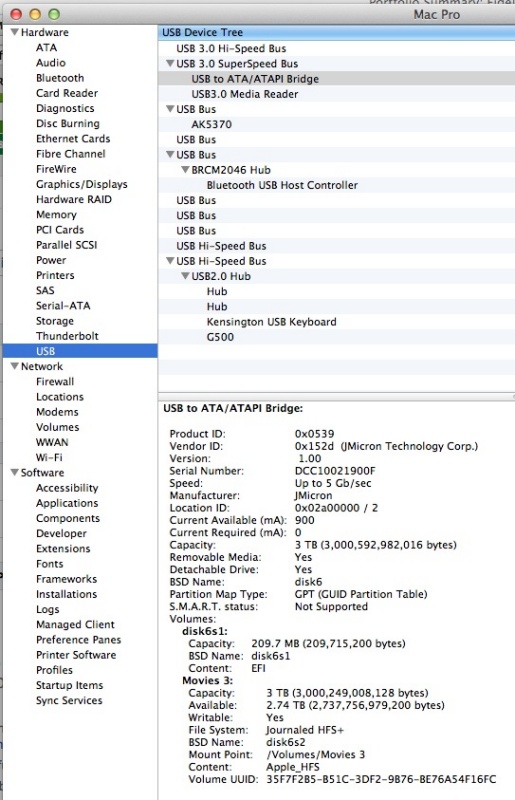
After USB3 installation. This shows an
external 3TB USB3 drive connected.
Performance comparisons:
First I ran the Xbench disk test using a Mediasonic external enclosure with a 7200rpm HDD.
Using USB2:
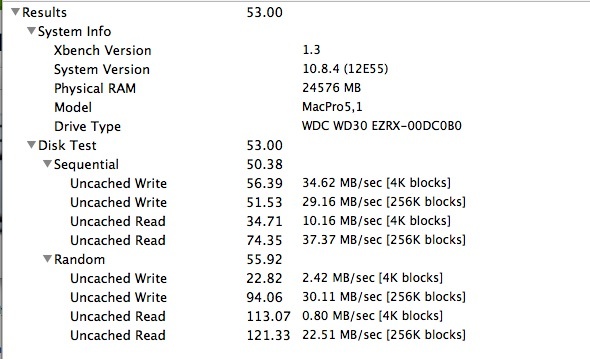
Xbench – USB2, external drive.
Using USB3 – 1.7 times as fast as USB2:
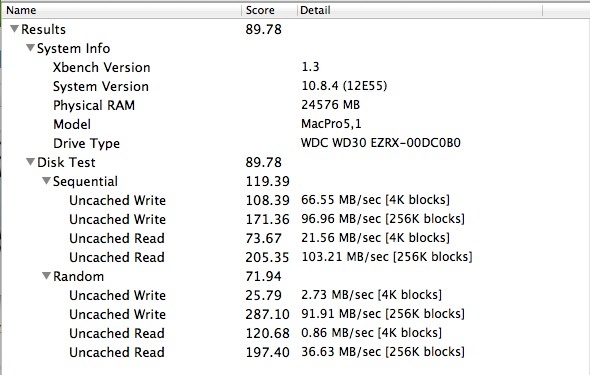
Xbench – USB3, external drive.
Then for reference, I ran Xbench on the internal Sandisk 120GB boot SSD, which is in a different league altogether:
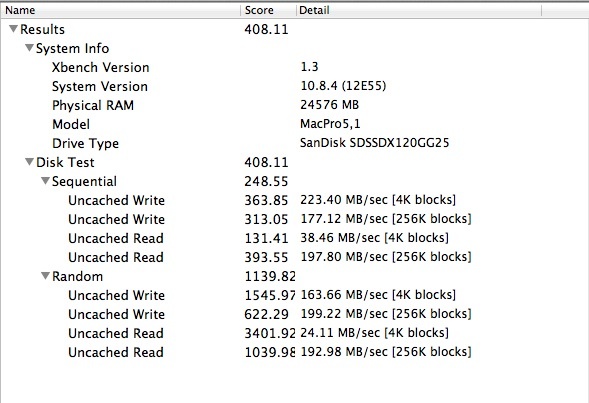
Xbench – SSD, internal drive.
Now xBench is a fairly dated benchmarking tool, and has not been updated in years. A more modern test is BlackMagic’s DiskSpeedTest, and here the results are more compelling, using the same Mediasonic enclosure.
Using USB2:
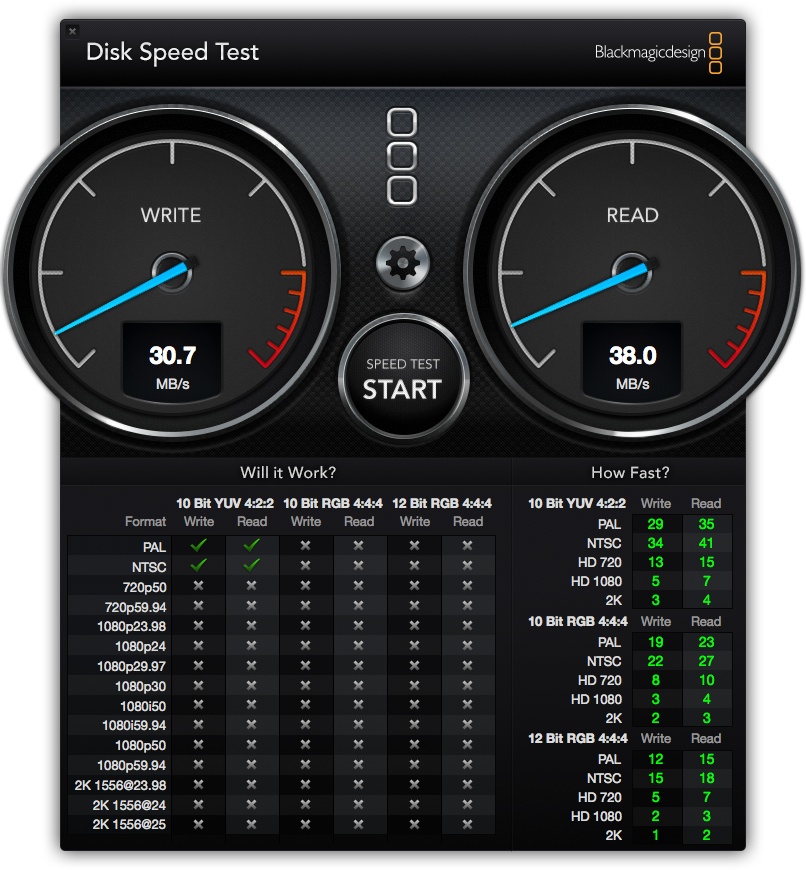
BlackMagic DiskSpeedTest – USB2.
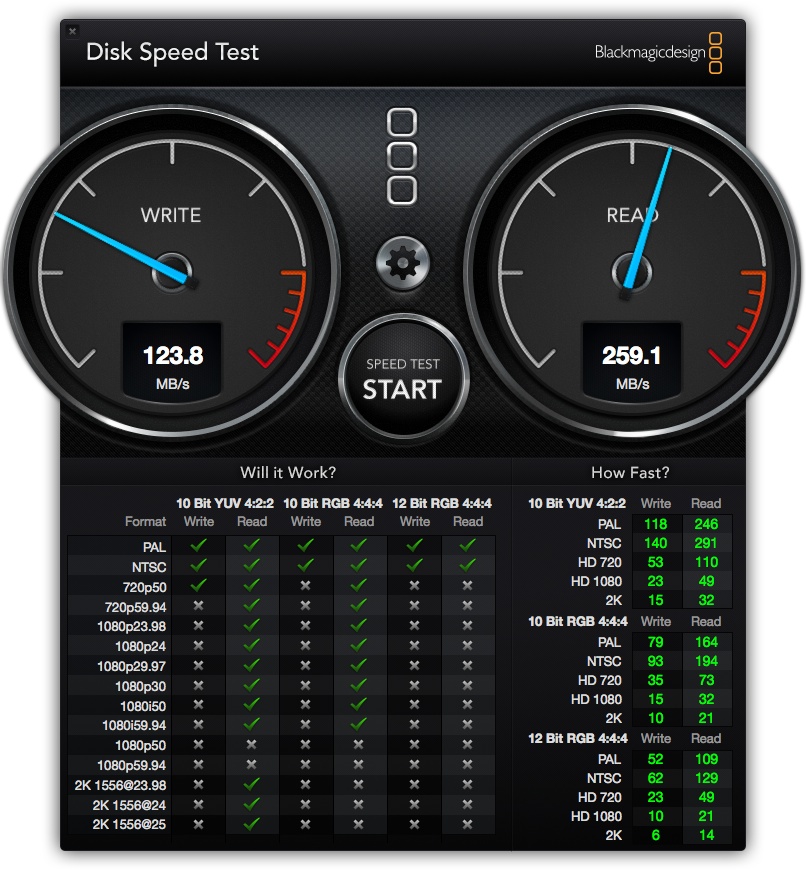
Using USB3:

BlackMagic DiskSpeedTest – USB3.
That’s 5x the speed for Write and 4.4x for Read. That’s more like it!
And for the SSD boot drive:
BlackMagic DiskSpeedTest – SSD.
The conventional, spinning disk actually has faster Write performance than the SSD.
I then made a simple import of 50 RAW files from my Nikon D3x, a real world test. What follows is import time only – no generation of previews or application of lens profiles which processes have nothing to do with import speed. I used a Kingston FCR-HS3 USB3 card reader and a Lexar Professional 400x 8GB UDMA CF card.
Import time for 50 RAW files using USB2: 52.7 seconds
Import time for 50 RAW files using USB3: 52.1 seconds – with no power feed to the USB3 card
Import time for 50 RAW files using USB3: 28.1 seconds – with power connected to the USB3 card – 87% faster than USB2
While my 2 socket card is recognized by OS X with no power provided (I cannot speak for the 4 socket, not having tried it), the card is starved of power and performs far slower than a powered card.
Here is what you are looking for in System Profiler for a USB3 card with card reader attached:
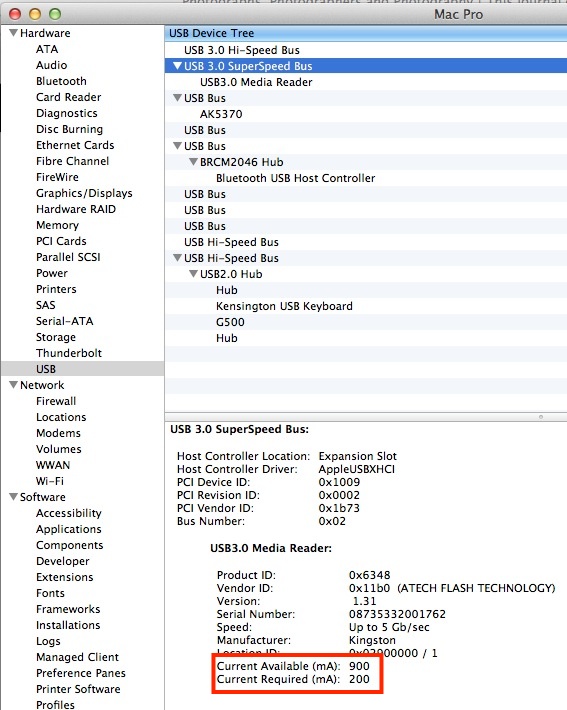
Ample excess current capacity is available for a powered card reader.
Next I connected my Mediasonic USB3 movie storage box which contains 4 x 3TB 7200rpm HDDs. I copied a 5.75GB movie over from the Mac Pro’s SSD to one of the HDDs in the Mediasonic.
Export time over USB2: 172.5 seconds
Export time over USB3: 51.9 seconds – 3.3 times as fast
Import time over USB3: 52.0 seconds
So here USB3 really works, but compared to the theoretical limit of 5 gigabits/second (Gb/s), which is 0.625 gigabytes/second (GB/s), I am only realizing 0.11 GB/s, or 18% of the maximum. Still, it’s a lot faster than USB2. Further, whereas a ripped Blu-Ray movie will not play without stuttering over USB2, it’s fine over USB3, so this effort is not wasted.
One anomaly: A friend reports that if he leaves an external USB3 drive connected to the USB3 card, if the Mac Pro goes to sleep a disk ejection error (“The disk was not ejected properly”) pops up on wake. This is a non-functional error as the Mac Pro will have been inacrive when it went to sleep, so there is no risk of data loss.
USB3 update – April, 2014:
Technology marches on. A recent Mac Pro I upgraded saw me installing the Inateck 4-port USB3 PCIe card:
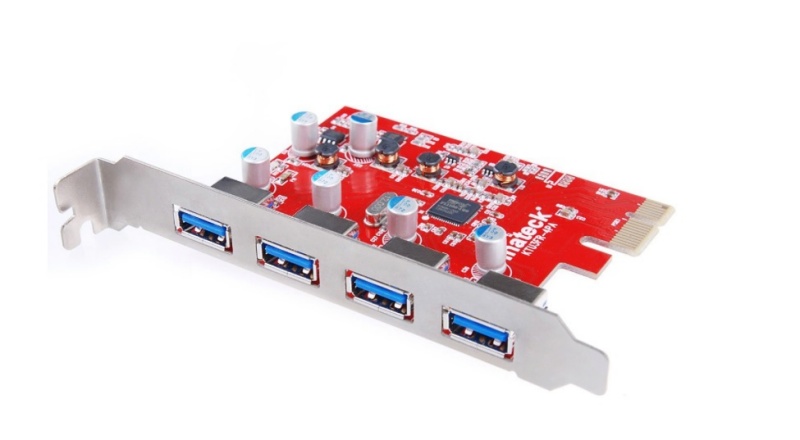
Inateck 4-port USB3 card. Click the image to go to Amazon.
The beauty of this card is that the maker claims it requires no additional power supply to function properly and my tests confirm this is true. That’s a great time saver and removes wire clutter from inside the Mac Pro’s case or, if you prefer, frees up the power supply source you ran earlier for additional HDDs, etc. The price is a mere $27 and my speed tests suggest the card is maybe 2-5% slower than the powered Orico installed above. That’s a worthwhile trade-off for USB3 speeds with far less work.
USB3 update – June 2015:
The Sonnet 4-controller USB3 4-port card.
Sonnet manufactures a 4-port USB3 PCIe plug-and-play card which has four controllers, compared to one for the Inateck. This means that if you simultaneously use more than one USB3 connected device, there will be no performance penalty as the controller is not shared between all four ports. The Sonnet Allegro Pro (must have ‘Pro’ in the name to get the four controllers) retails at $130 and only makes sense compared with the much cheaper Inateck if you propose to use more than one USB3 connected peripheral simultaneously and can tolerate no performance hit. I have not used the Sonnet but the maker has a good reputation. I’m sticking with the Inateck as I mostly use it to download image and video files from the cards in my digital cameras, using only the one port.
Adding Blu-Ray:
You can buy a Blu-Ray internal drive for under $70 from Amazon. Take a straightened paper clip, insert it in the small ejection hole to the lower right of the front tray and push to release the tray. (Good to know if a DVD ever gets stuck in the drive, and not something you can do with the miserable slot-loading drives fitted to many iMacs, MacMinis and MacBooks). Turn the drive upside down and you will see two small clips retaining the front tray bezel, each one third of the way in. Push away and down (in that order) from the tray’s front and the bezel will slide off. The drive is now ready for installation.
While you are in there connecting the USB3 power circuit, you can undo the four side screws retaining the dated and slow Superdrive (a standard drive with Apple hype added), replace it with the Blu-Ray drive and slip on the integrated SATA power and data cable. This really could not be simpler. That tired old Sony/Toshiba/Hitachi ‘Superdrive ‘ has no resale value – recycle it.
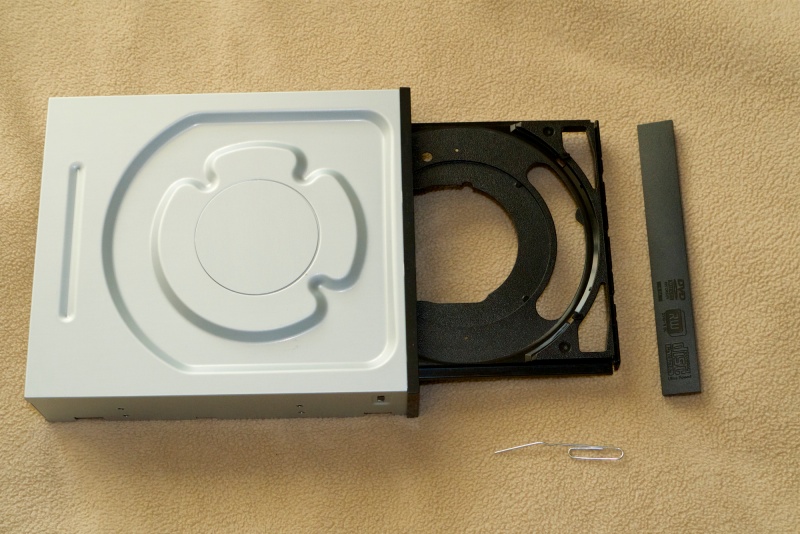
Tray bezel removal. Not nuclear physics.
OS X Mountain Lion works fine with Blu-Ray and you can learn about Blu-Ray players here and about the excellent MakeMKV ripping application here.
Here is what you have to look forward to with a modified 2009 Mac Pro:
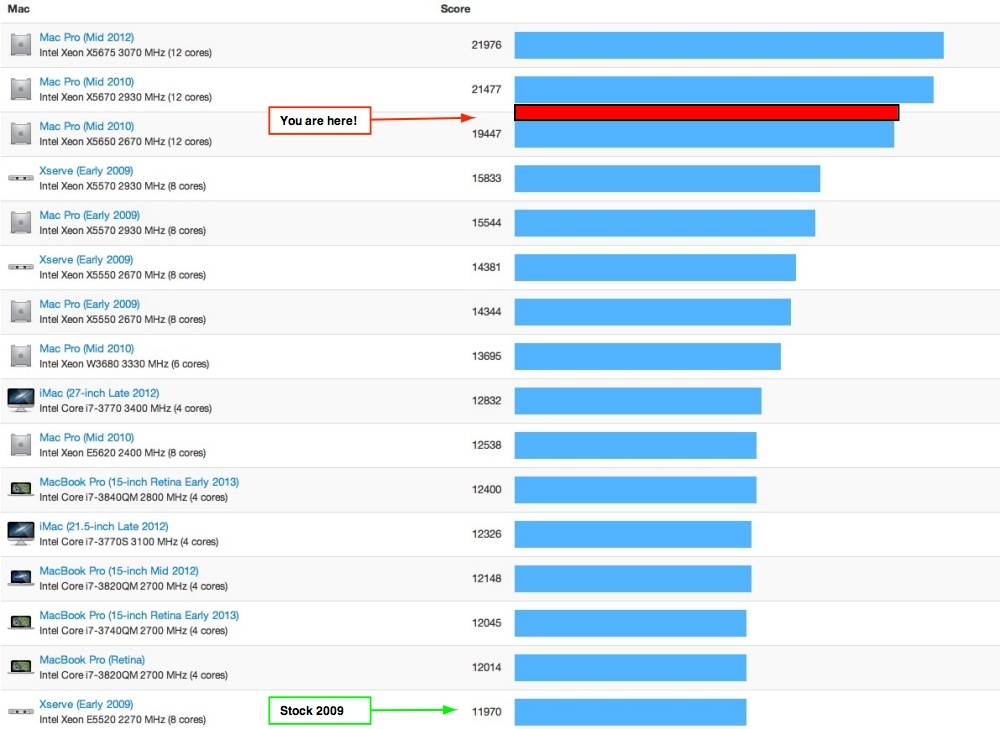
Mac Pros in Geekbench.
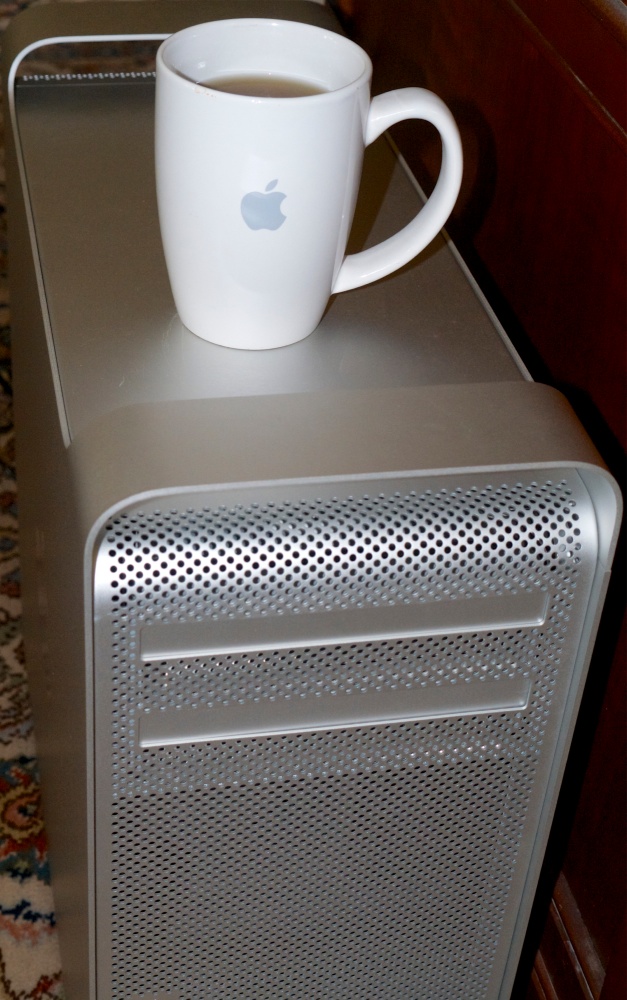
Fanboy heaven. The mug comes from the mothership itself, 1 Infinite Loop, Cupertino, CA.
The computer is how they used to make them.
Backing-up:
Here is the back-up strategy I adopt – 5 drives in the Mac Pro’s case and Cloud storage off site:
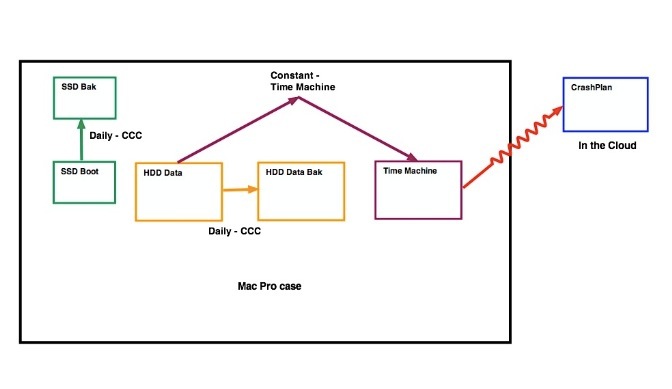
Mac Pro backup strategy.
Daily backups of the SSD Boot drive (OS X, applications and the Lightroom catalog/previews) and the HDD Data drive are made using CarbonCopyCloner. CCC is set to wake the sleeping Mac Pro so that it can do it’s job, as you cannot do backups with a sleeping computer.
Constant versioned backups are made using TimeMachine – very handy for recovering older versions of files.
Daily backups are made to CrashPlan in the cloud. The fifth drive – SSD Bak – resides in the optical drive area, as I illustrated earlier. If the Mac Pro fries, CrashPlan can ship you a disk with all your files overnight; the alternative of restoring over the air can take many days for large data sets.
When I travel, I pop open the Mac Pro’s case and pull the TimeMachine drive after first ejecting it in Finder, taking the drive with me.
This is a simple and robust back-up strategy. Crash Plan is essential as all the local drives are in the case and thus exposed to fire, earthquake or a power supply failure.
Finally, at some $1,100 a pop for a 2009 Mac Pro, there’s no excuse for having just one:
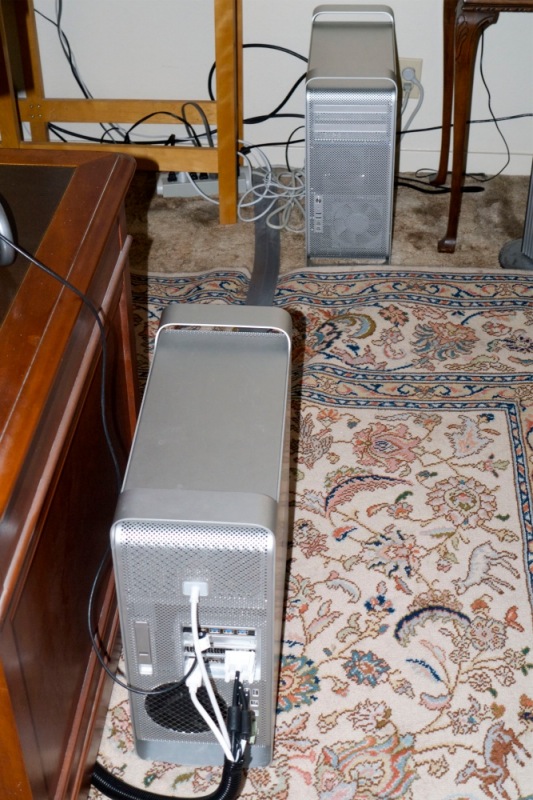
I really need to clean up those cables on #2 ….
Awesome Article! Thank you! I am planning to do the same, but since I have an unused spare drive bay will take the sata power from there – is there any issue with the power there being ok – since you mentioned not to take any power from those on-board plugs meant from gfx card ??
The sole issue is the loss of a drive bay. If that works for you, it’s fine. – Ed.
Thank you for the best how-to I’ve ever seen for adding a card to a Mac Pro. The clarity and precision of the text and photos are exemplary. It’s a pleasure reading the work of someone who is articulate and takes the time to sweat the details. I followed the URL back to the other sections of your website and look forward to reading your blog and checking out your photos. Thanks again.