A neat technology which preserves the Recovery Partition
For an index of all my Mac Pro articles, click here.
If you are looking for the highest disk speeds in OS X then the way to go is either:
- A Samsung/Apple blade SSD in a PCIe slot – $800/TB with a limit of 1TB per PCIe slot. 1400MB/s.
- Two 2.5″ SSDs on an Apricorn Duo card, RAID0, in a single PCIe slot – $400/TB with a limit of 2TB per PCIe slot. 650MB/s.
- The Addonics mSATA card, RAID0, in a single PCIe slot – $400/TB with a limit of 4TB per PCIe slot. 700MB/s
I favor the last solution because of the maximum potential capacity, and to further speed things up from the stock 450MB/s I pair the SSDs on the Addonics in RAID0 using Disk Utility, which doubles the capacity (2 x 256GB SSDs become one 512GB drive with a 56% speed gain to 700MB/s).
But there is one snag with using RAID0 and it is that you lose Apple’s invaluable Recovery Partition technology.
Apple states the benefits of a Recovery partition are (my emphasis – that’s the option I really want):
- OS X Recovery includes a built in set of utilities as part of the Recovery System. You can use OS X Recovery to do the following:
- Restore your Mac from a Time Machine backup.
- Verify and repair connected drives using Disk Utility.
- Check your Internet connection or get help online using Safari.
- Install or reinstall OS X.
The complete Apple advisory is here.
Think of the Recovery Partition as the last resort when all else is lost and as one more invisible sentinel looking out for your interests.
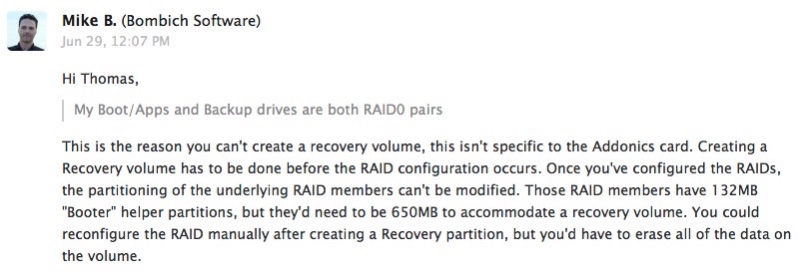
I contacted Mike Bombich, the estimable author of CarbonCopyCloner – who else on earth could know more about this sort of thing? – and got the following explanation as to why I could not see a Recovery partition on my RAID0 paired mSATA SSDs:
Mike references this article on setting up of Fusion drives with two disks after the Recovery partition has been established. Adopting a Fusion Drive solution sidesteps the disappearance of the Recovery Partition in RAID0, albeit at the sacrifice of some speed. Read on.
You can create a Fusion Drive from any two internal disks; Apple cautions against doing this with external drives. Apple uses a largish SSD (larger than that found in hybrid drives) and a big HDD. I’m using two SSDs which act as my daily OS/Apps backup and that is where the Recovery Partition will be created before the rest of the drive pair is recreated as a single Fusion Drive. The Recovery Partition is invisible to Finder but can be seen as a boot drive if you do a Cmd-R or Option-boot start of your Mac Pro. The linked Apple document, above, tells you which version of OS X is required.
Set forth below – long and geeky – is the process of combining two mSATA SSDs mounted on the Addonics PCIe card into one Fusion Drive with a Recovery Partition. Without Mike Bombich’s help none of what follows could have been done.
Step 1 – Prepare two of the drives on the Addonics:
Format each drive in Disk Utility as OS X (journaled) – that’s 2 x 256GB drives in my case.
Step 2 – Install OS X on one of those two drives:
You cannot create a Recovery Partition on the drive until OS X is installed.
Step 3 – Create the Recovery partition on the OS X drive:
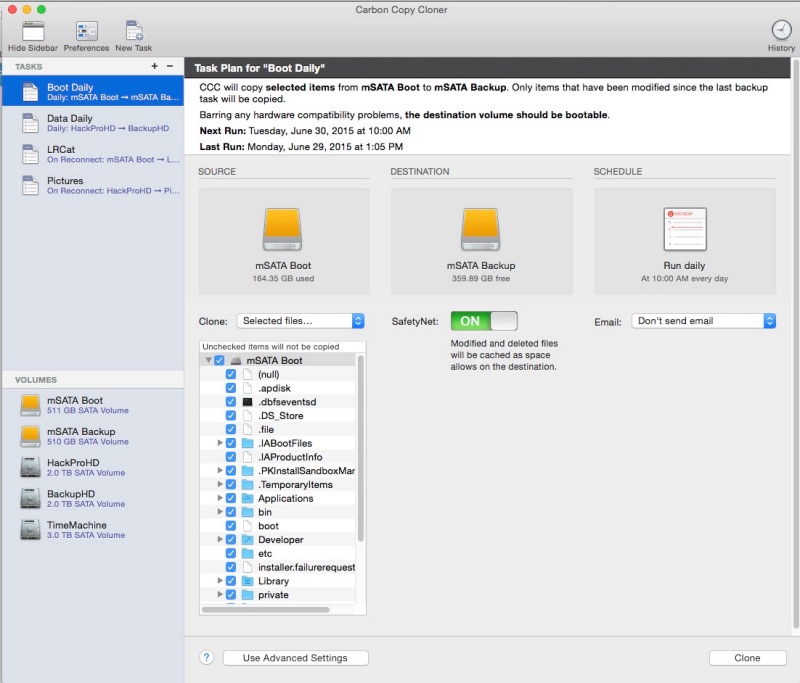
You use CarbonCopyCloner to do that; it create an invisible partition in Yosemite some 790MB in size in Yosemite.

Step 4 – Note the file names:
Go into Applications->Utilities->Terminal and note the drive names:

The SSD with OS X and the Recovery Partition is shown in the red rectangle (‘mSATA_BAK1’). One partition on that drive will become part of the Fusion Drive. The one in green is the second SSD, all of which will become part of the Fusion Drive (‘mSATA_BAK2’). Fusion Drive component drives do not need to be like sized to avoid space wastage, unlike with RAID0 where the size of the smallest drive dictates total space.
Step 5 – Create the Fusion Drive:
This process concatenates (strings together in sequential order) the two large open spaces on the two mSATA SSDs. It’s key to follow the instruction set in Terminal below (blue rectangle) – we are concatenating only the open partition of the first SSD (red, above) with the whole of the second drive (green above). The blue rectangle below is all you type, then hit enter. If you simply combine both drives the Recovery Partition will be erased (‘disk2 disk3’ instead of ‘disk2s disk3’):
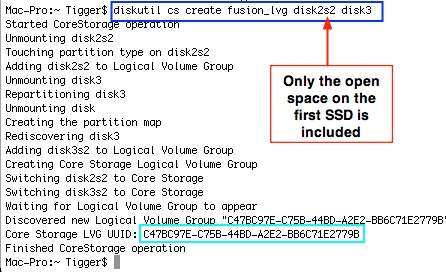
Do NOT exit Terminal. You need that cryptic drive ID (cyan rectangle) in the following instruction.
Step 6 – Create the Fusion Drive volume:
Type the instruction in the cyan box and hit enter; it’s best to copy (Cmd-C) and paste (Cmd-V) the UUID to avoid typos. Hit enter:

Step 7 – Check in Drive Utility:
Go into Drive Utility and you will see:
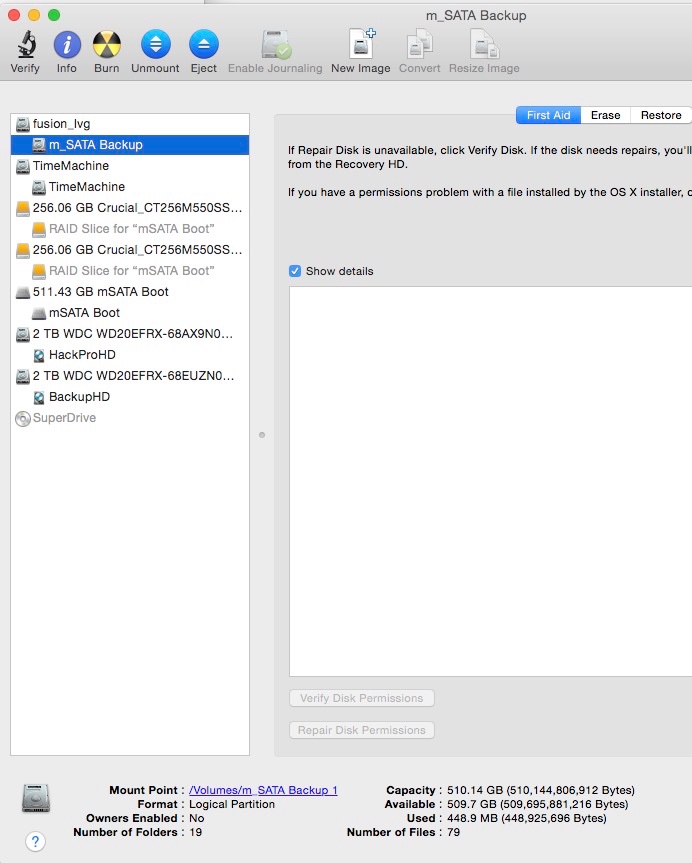
In the above I have renamed the Fusion Drive to ‘m_SATA Backup’ for clarity.
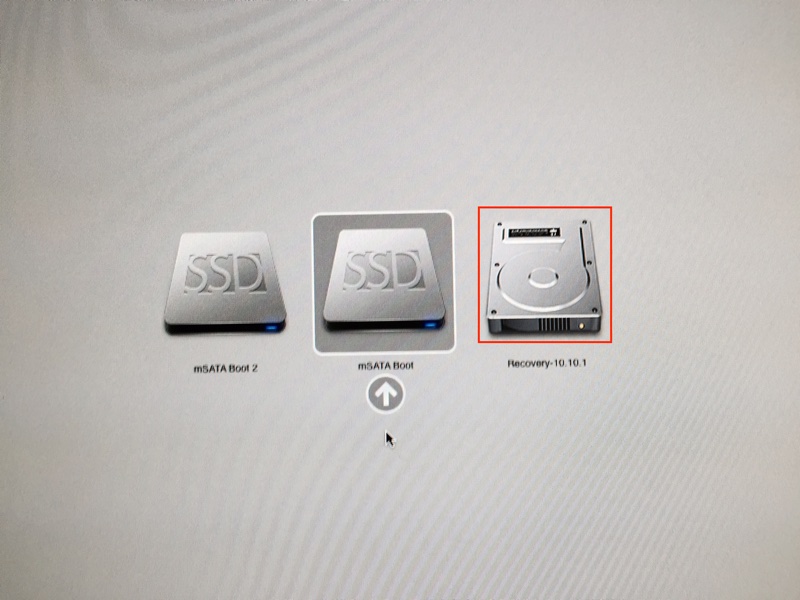
Step 8 – Check on the Recovery Partition:
Restart while holding down the option key. You should see the Recovery ‘disk’. Click on that and you will enter OS X Disk Recovery Utilities which offer all the disaster recovery choices shown in the introduction to this article:
Step 9 – Add a nice icon:
My Desktop looks like this – before doing a full clone of the boot to the backup drive:

- mSata Boot is a RAID0 pair of mSATA SSDs on the Addonics PCIe
- HacProHD and BackupHD are two large WD 2TB Red spinning HDDs for data and data backup, respectively
- TimeMachine is the (restorable) 3TB WD Red HDD with sequential backups
- mSATA Backup is the Fusion Drive with the Recovery Partition created in this article.
Step 10 – Backup:
Boot into your usual boot drive and back it up using CarbonCopyCloner to the Fusion drive.
You are done.
Speed tests:
The Fusion Drive is a concatenation of two drives – they are strung end-to-end. This is unlike a RAID0 array where the two drives are written to in parallel – simultaneously – which results in far higher drive speeds than with concatenation. As speed is not of the essence in a backup drive, the lower performance is no big deal – compare to the 700MB/s I get with the RAID0 pair:
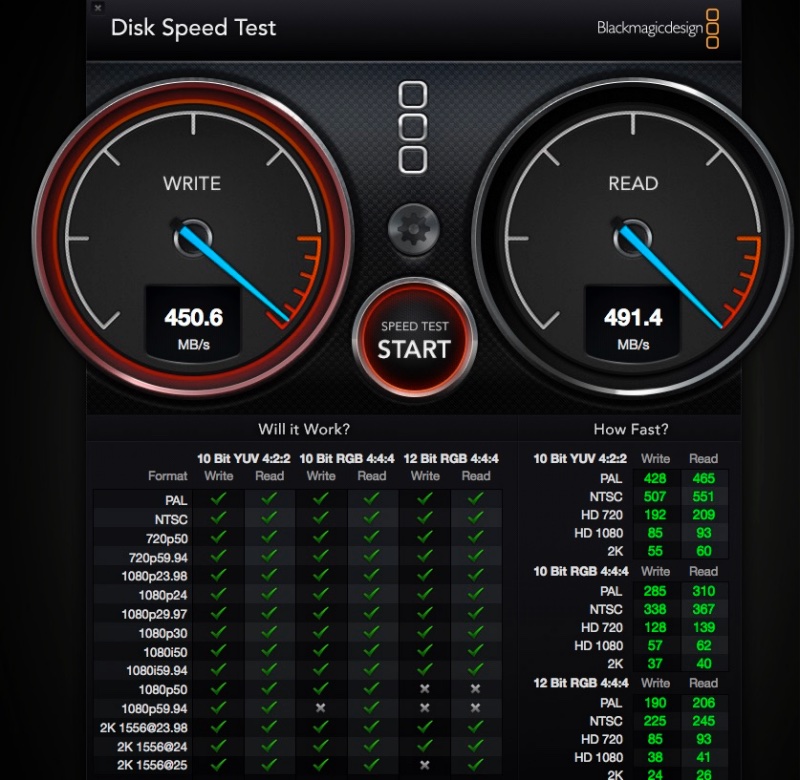
Speed of a dual SSD Fusion Drive.