Monthly Archives: June 2018

The Nikon D700 revisited

An old flame.

Back in 2012 when I was racking out my Nikon D700 I wrote:

“It’s large, noisy, crass, threatening, bulky, heavy and few need it. Like an SUV, its owner is likely a poseur. One who extols off-road capabilities when he will never leave asphalt. The other boasts of professional gear quality when he would get better results with a point-and-shoot. For most, the D700 fulfills “wants” not “needs”. And while the SUV is a pain in the neck when you cannot see past one in traffic, the D700 with a “pro” zoom is quite literally a pain in the neck after you have schlepped it around for a few hours, as I did yesterday.”


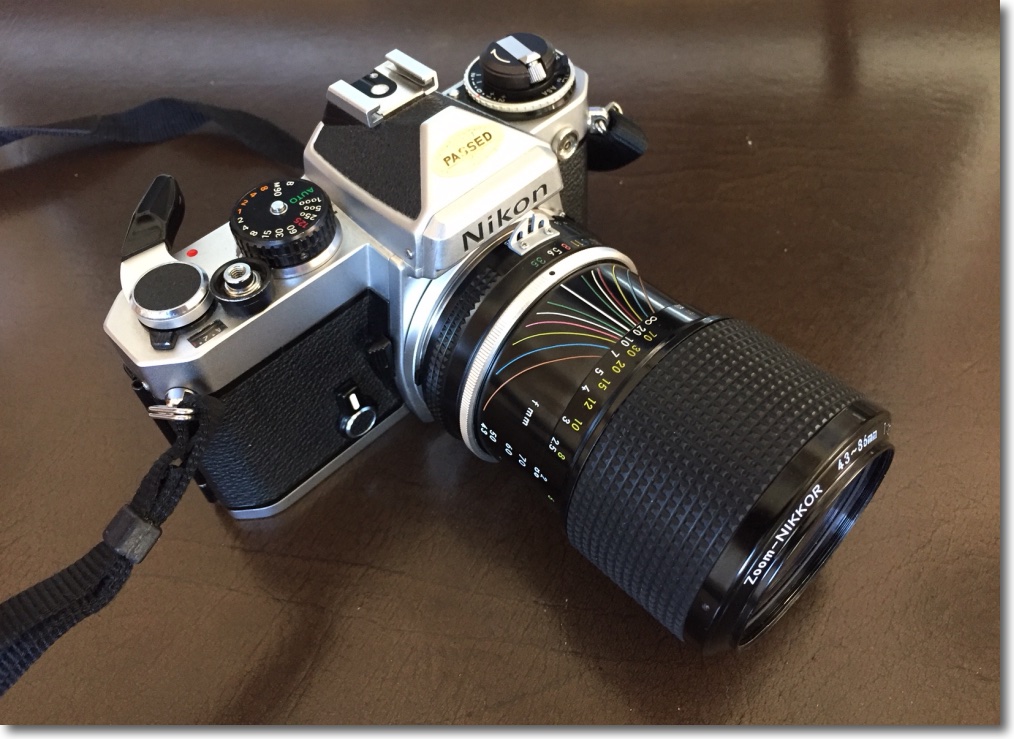
Fitted with a classic era 50mm f/2 HC Nikkor and period correct HS-2 hood. Crass strap will go.

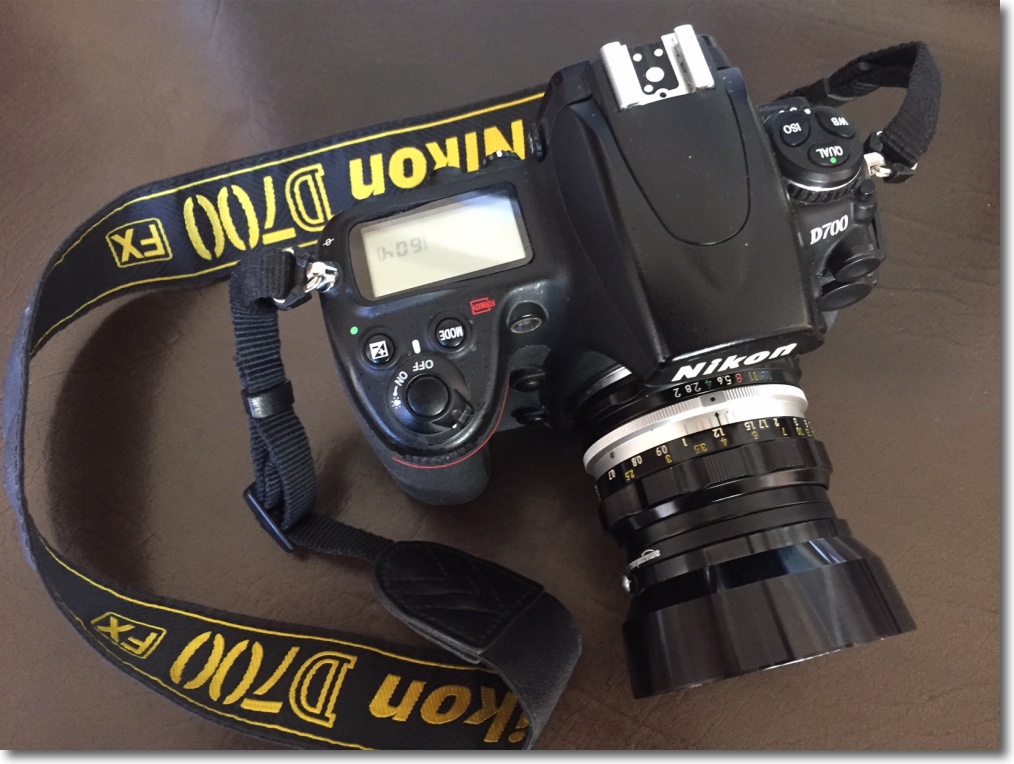
All of this remains true yet, having sold mine when the D3x came along, I now find another in my hands! Looking at the Metadata in my LR catalog I find that I have more images saved from the D700 than from any other camera. There’s a reason for that. While no miniature, it is much smaller and lighter than the D2x/D3x and its modest 12mp sensor delivers tremendous dynamic range and very low noise. 40″ x 60″ prints from the full frame Nikon sensor are par for the course when used with good lenses.

Now a quick word of advice. You really want to buy a legal USA import version, not a grey market camera. The reason is simple. Nikon USA will not service grey market bodies. Yes, that’s asinine, but that’s their stance. It’s not possible to recognize USA imports by number as the serial number ranges were never published. But there are two easy ways.

First, look for the ‘Nikon USA’ sticker disclosed when the battery door is open and the battery removed:


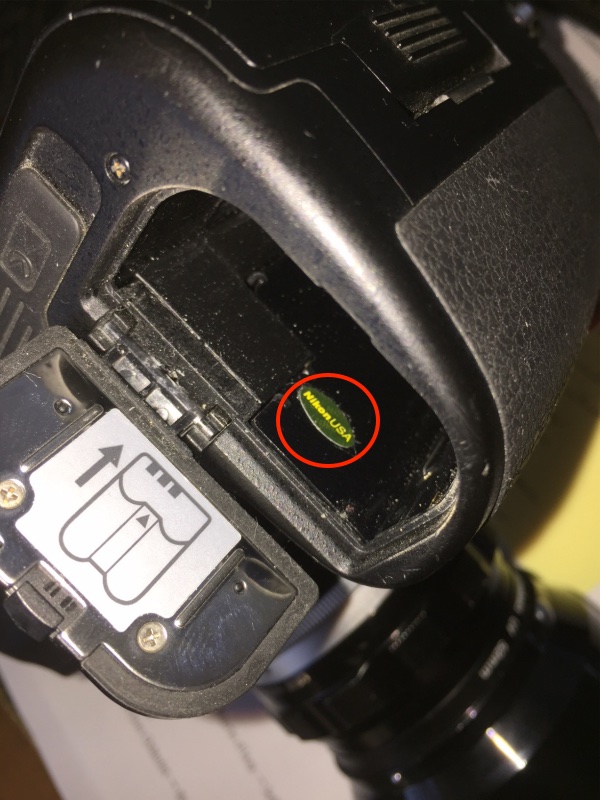
‘Nikon USA’ sticker inside the battery compartment.

Second, if your body came in the original box, looks for the ‘(U)’ on the label and the matching serial number:


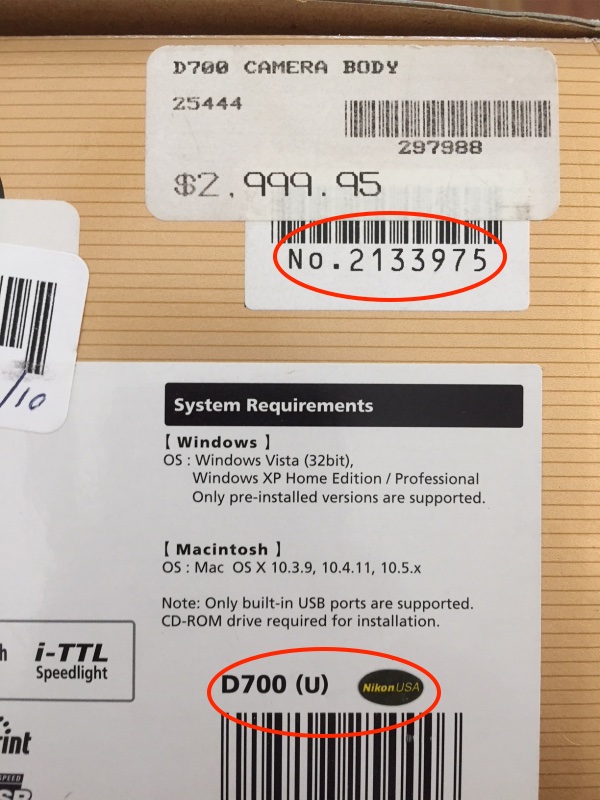
Eye watering original sticker price and all!

If neither of these two methods yields an answer, call Nikon USA with the serial number and ask before plonking down your hard earned cash. Yeah, and good luck with that. And the amount you plonk down today is modest indeed. Mint bodies sell for under $600. Again, as with lenses, saving a few dollars on a beater is senseless. I paid $575 for mine, USA import, with two brand new Nikon EN-EL3a batteries (a $100 value), and stated by the seller to have been recently refurbished by Nikon. That compares with the similar used first D700 I owned, sold in 2012 for $1600. Digital bodies are most certainly not a storehouse of value.

You also want a body with a low shutter count. Nikon’s stated mean time between failures for the D700’s shutter is 150,000 exposures. Mine had just over 35,000. Here’s the quickest way of determining the shutter count – tell your seller and have him put it on the record so you do not get cheated. Shutter replacement costs money, around $300. Load an image into Apple’s Preview App, then go to Tools->Show Inspector, then click on the Nikon tab, and you will see the shutter count. Shutter count has nothing to do with frame number which can be reset manually:


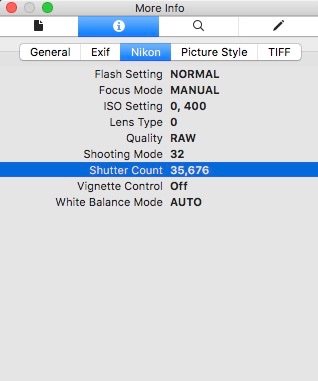
Shutter count – exactly as advertised.

So I got a mint, boxed, factory refurbished D700 USA import body for $550 with some 75% of its life, or over 110,000 exposures left on the shutter, a limit I will not be threatening in my lifetime. And two new Nikon batteries! Avoid after market batteries. There are too many stories of jams and fires to risk your camera.

Pictures from the D700 will be cropping up in this journal again. I splashed out $18 on a SanDisk 16GB Ultra CF card which store 606 14-bit, lossless compressed RAW images (the battery is good for over 1,000 images a charge – Panasonic, are you listening?) and a further $8 for a tempered glass rear LCD protector to replace the ghastly, grainy translucent plastic one provided by Nikon with the BM-9 model number. My host of Nikkors, both MF and AF works perfectly on this high quality, rugged body which does everything I need. It will not take videos which is fine with me, and the small, built-in pop up flash does a nice job of filling in shadows on bright days. Yes, there’s a motor drive attachment (MB-D10) to be had for under $100 used, but then you are back to D2x/D3x bulk and weight. Do you really want that? As a poor man’s D3 that works, for the sensor is identical. I don’t need one.


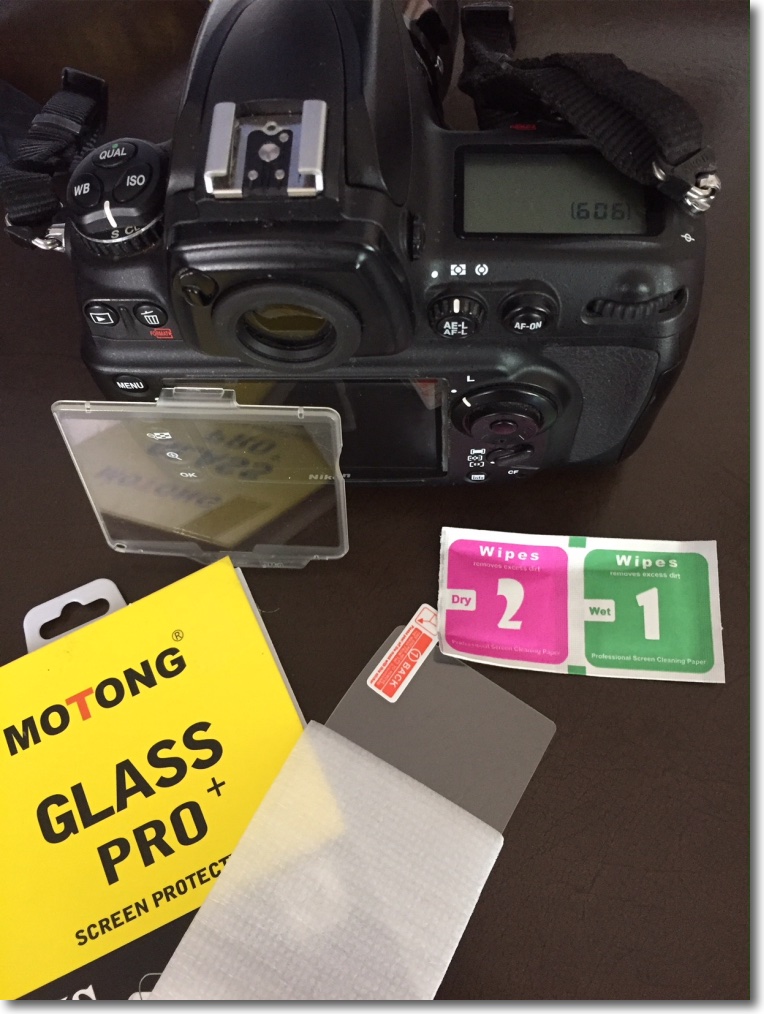
Tempered 0.3mm protective glass replaces the ghastly Nikon plastic version.


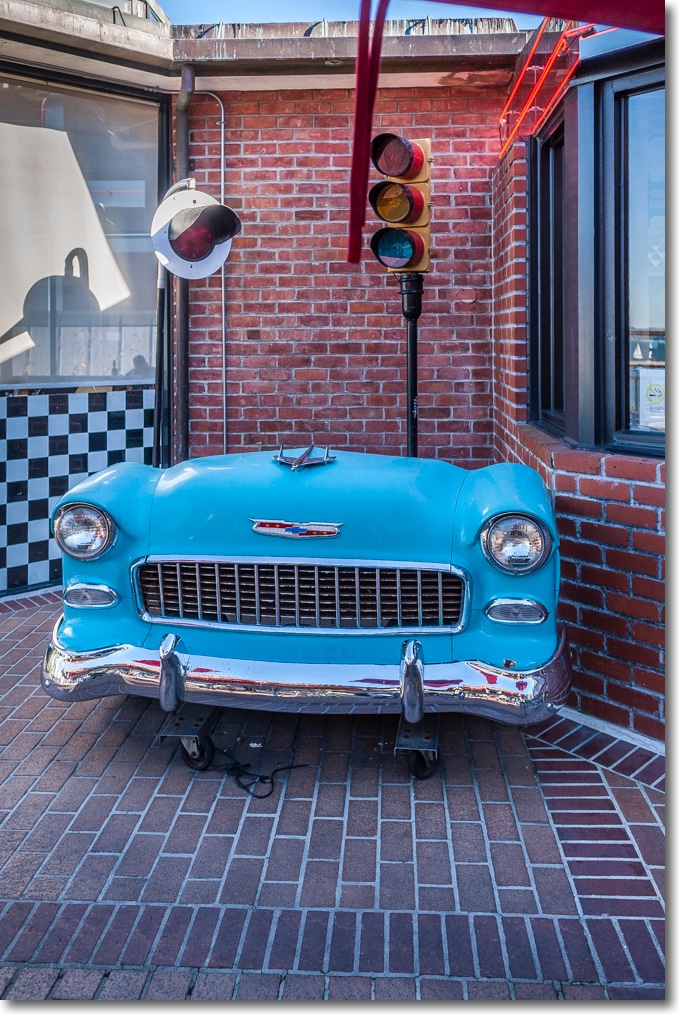
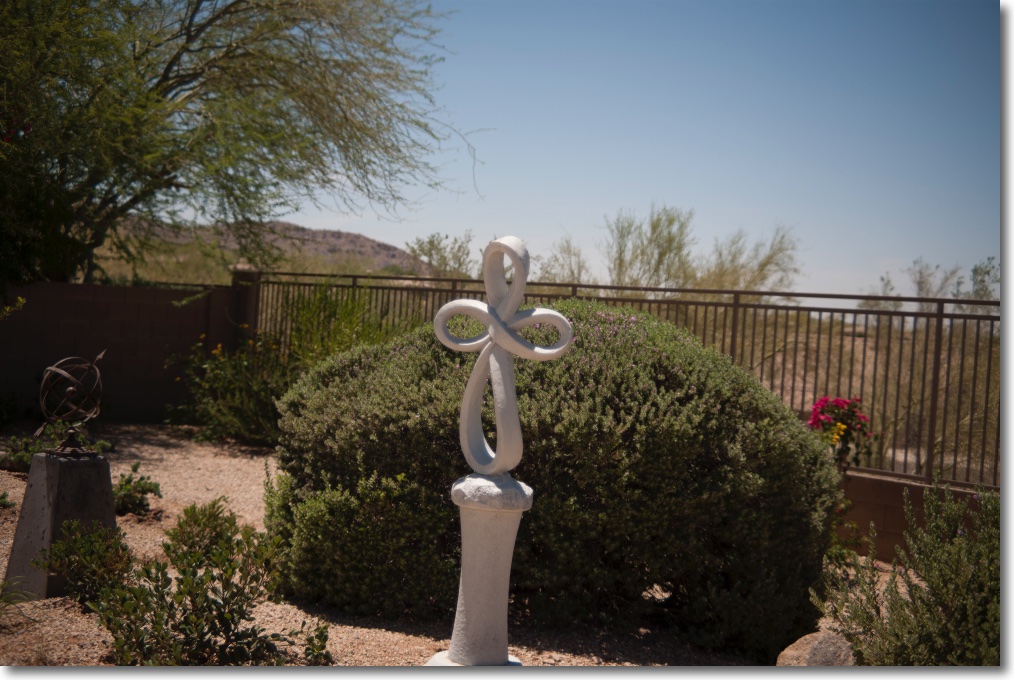
Ghiradelli Square, December, 2012. D700, 28mm f/2 MF Nikkor.

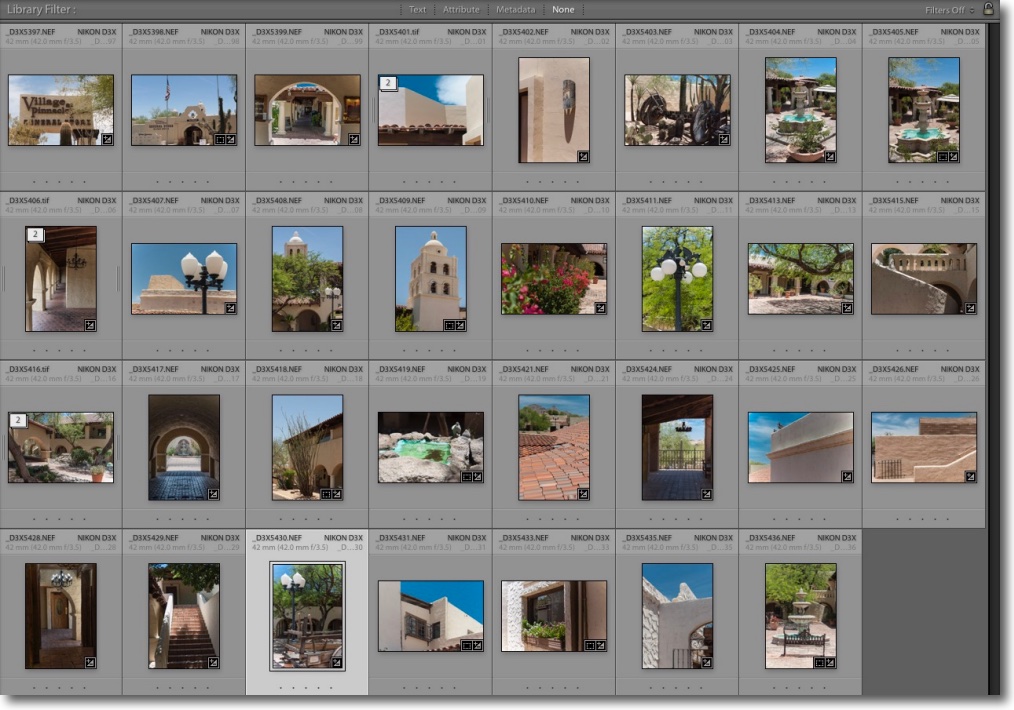
Here are the key settings from the Import dialog in Lightroom – a tad more sharpening than stock is just what the doctor ordered for the D700’s sensor:


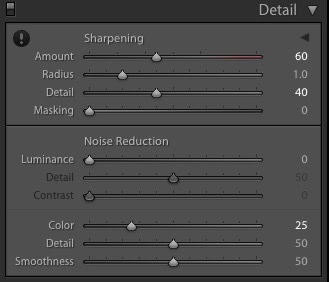
File import dialog for D700 images.

First film results

A mixed bag.

For an index of all my Film related articles, click here.

I sold my first – and last – Leica 35mm film camera 12 years ago after 35 years of use, and that tragic tale is related here. Maybe the lesson from that experience is that no modern camera is going to last 35 years as technology marches on, for in all key regards film camera technology did not improve after the first Leica M3 was introduced in 1954. Heck, you might argue that the outstanding Zeiss Contax II really defined the genre, and that was in 1936! The only material improvement added in the M3 was the suspended, illuminated frame lines, admittedly a stroke of design genius.

When my first serious digital camera came along, the magnificent full frame Canon 5D it was clear that film was toast. The flexibility and resolution of that 12mp Canon sensor was an order of magnitude above anything film could do, even if it was Kodachrome in a Leica with a Summicron lens fitted. And the sensor in that 5D delivered excellent colors, to boot. And booting was never necessary as this complex machine was as reliable as a hammer.

So it was with some apprehension that I awaited the processing of my first two rolls of Kodak Gold 24 by TheDarkroom.com, exposed primarily to check for any malfunctions in my newly acquired $100 Nikon FE body. I say that but a related goal was to take good photographs and hope that nothing went wrong.

I opted for the highest resolution 6774 x 4492 byte scans, which figures to a 30.4mb file though Lightroom reports less, likely due to compression of continuous tone areas:


Theoretical and actual scan sizes.

Exposures seem to be bang on using the camera’s Auto function, and no light leaks were noted. Maybe 1/4-1/2 stop over-exposed, but nothing to worry about. The scans are clean, scratches notable for their absence.

Anomalies? One frustrating finding is that the perspective correction controls in LR (Lens Correction->Basic->Level/Vertical/etc. are useless. They simply do not work with the film scans making a hash of things, so you have to round trip the image to Photoshop which works fine. Mystifying. These LR controls work perfectly with original digital images from any number of cameras and I use them often in architectural images. Frustrating and mystifying.

How is the resolution? Meh. It compares to a decades old 5mp Olympus C5050 point-and-shoot digital with a stated stated 1920 x 2560 byte sized image coming out at just 2.3mb in the file below. In the images below I have selected enlarged sections which would, as a whole deliver prints sized 60″ x 40″. In other words, very large. There is more detail in the film image but also a lot more grain.


Olympus C5050 at 40x.


Kodak Gold 200 at 40x.

The digital image shows pixelation, the film one coarse grain.

The film image was from the Nikon FE using a superb 135mm f/3.5 Nikkor stopped down to f/8 and correctly exposed.

Practically speaking the film image would deliver a decent 16″ x 20″ print, but forget selective enlargement or pixel peeping.

Here are some images from that first outing, all snapped in downtown Phoenix:


Sheraton downtown. 135mm f/3.5 Nikkor Q.


Crooks’ HQ. Grain in the sky is visible
even at modest enlargement. 135mm Nikkor Q.


Hyatt with trumpeter. 135mm Nikkor Q.


ASU. 135mm Nikkor.


Ambulance chaser. 35-70mm f/2.8D Nikkor.


Vet. 35-70mm Nikkor.


Basketball. 20mm UD Nikkor.


Art Deco. 35-70mm Nikkor.


Red. 20mm UD Nikkor.


Central Avenue. 20mm UD Nikkor.


Signature cocktails. 135mm Nikkor Q.


Downtown Deli. 35-70mm Nikkor.


Adding EXIF data:

I like to have camera and lens data in the EXIF data for each image as that’s how I tend to remember images, rather than through clunky keywords.

As scanned the EXIF data shows the name and model of the Noritsu film scanner used by the lab.

To confer proper camera and lens data I purchased an app named ‘EXIF Editor’ from the OS X App Store. It’s a tad clunky but can be integrated into LR for the roundtrip in Lightroom->Preferences->External Editing:


EXIF Editor set as an external editing option.

Then, after restarting Lightroom, choose the photo or photos (this functionality permits batch processing in EXIF Editor) to be round tripped thus:


Here is an example of ‘before’ and ‘after’ EXIF data:

I generally find that you have to restart LR with each batch of images to be round tripped; while EXIF Editor is clunky, you can set up presets with favorite camera/lens combinations, electing the preset once the image batch is in EXIF Editor. Hit ‘Process’ and the images will be saved as additional photos in a stack for each image in LR. The originals in LR can then be deleted as they add no value.

Here is the LR metadata display after adding correct camera/lens data for the folder:

Once you establish a workflow it’s less effort than it seems and, after all, there are one 36 images on a roll!

TheDarkroom.com:

This film processing and scanning service is in Los Angeles and came recommended. Their 6774×4492 scans are the largest HQ ones I could find and unlike other services I looked at, TheDarkroom.com offers online image download from their servers which store your images for 60 days, unless you want to pay for extended storage. This is what you see once your scans are on their server:


Scanned images ready for download.

There were two snags. First this, which is simply inexcusable:

I selected just two images and got this idiotic message:

That means you have to download one image at a time.

Second, the selection box for checking images to download returns a green check mark when clicked but then clicking ‘Download’ does nothing. I managed to beat direct download links out of them – after two tries for they sent me the wrong ones. Next time I’ll take my business elsewhere. Meanwhile, they got what they deserved in my Yelp review:

Nikon 43-86mm f/3.5 in use

An excellent mid-range zoom.

For an index of all my Film related articles, click here.

Technical considerations underlying the use of the Nikon Zoom Nikkor 43-86mm f/3.5 single ring zoom are addressed here.

In field use I found the lens has a relatively long focus throw, making critical manual focus using the focus confirmation light in the finder of the Nikon D3x a simple matter. Balance on the big D3x body is just fine, the lens presenting a very solid, yet compact, bundle in the user’s hand.

The Village at Pinnacle Peak in Scottsdale is over 25 years old and was the only construction at the time in what was undeveloped desert. It’s absolutely gorgeous, an unspoiled expanse of Spanish architecture, beautiful to behold. I racked out the 43-86mm there.


The contact sheet. All have my lens correction profile applied
and minor shadows/highlights tweaks. No sharpening used.


Click the image for the map. At f/11.


At f/8. Rare clouds in the Arizona sky.


19th century ox cart. At f/11.


Cloisters. At f/11.


Staircase. At f/16.


Fountain. At f/16. There is no diffraction fall off at small apertures.


Roof. At f/11. McDowell mountains in the background.


Bird bath. At f/3.5.


Geometry. At f/8.


Ox cart/test target. At f/8.


Display plaque on above, greatly enlarged.


Stucco. At f/8.


This is a wonderful walk-about lens and highly recommended. Heck, at $30-60 a pop, get several!

Nikon 43-86mm f/3.5 zoom lens – Part II

CPU installation, lens correction profile and tests.

In Part I I looked at the early history of zoom lenses on 35mm film cameras and at the Nikon Zoom 43-86mm f/3.5 optic, noting how the poor reputation for performance of the Mark I design had affected resale values of the improved Mark II version, which we are looking at here.

In this posting I address the installation of a CPU, examine the need for a lens correction profile to fix this optic’s barrel distortion and chromatic aberration, and provide some test images.

CPU installation permits the recording of EXIF data and automatic invocation of the appropriate lens correction profile when images are imported to Lightroom.

First the lens mount has to be removed, 5 screws. This will disclose shims both above and below the aperture ring. Be careful not to lose these and note how many are above and below the aperture ring.


Alloy will have to be removed in the area denoted.


Bayonet mount removed for grinding. Note the relatively fragile claw which mates with the aperture
follower deep in the lens’s barrel. Replace this mount incorrectly and you will lose aperture control.

For this lens, installing a CPU is difficult as a fair amount of alloy has to be removed from the rear of the lens mount to ensure the CPU does not protrude too far and damage the camera’s contacts in the lens throat. There is no easy way to access the area to be machined and while, once removed, the mount can be further dismantled I did not have the tools to do this. If you are not comfortable using hand machine tools you should delegate the work, as it’s not that difficult to mess things up here.


Shims disclosed when the bayonet mount is removed.

Dremel to the rescue. I found a Dremel tool, #7144 in 1/8″ shank at Home Depot for $8. This grinding tool has a very fine pointed diamond encrusted cutting surface and is just what the doctor ordered for grinding away the alloy on the rear of the lens mount to accommodate the CPU.


With the lens mount removed – 5 screws – and securely clamped in a vise, the Dremel 7144 tool goes to work.
Note the ear protectors to avoid loss of hearing. Blue masking tape denotes machining limits.

The correct positioning of the CPU is addressed here and is marked beforehand on the mount. The blue masking tape denotes the machining limits. A super smooth surface is not essential as the J&B Weld two part epoxy used to glue the CPU in place will fill in any irregularities. What you do want on a test fitting is a CPU whose electrical contacts are concentric with the lens mount and do not protrude above the extremity of the bayonet mount.

After the requisite 24 hour period to allow the epoxy to cure, excess glue was carefully removed with a sharp knife and miniature Nicholson file and abraded areas touched up with black matte modeler’s paint.


Be sure to align the fragile shims with the screw holes.
Unusually for a Nikkor, the five screws are equally spaced.
There are six holes in the shims, only five accept screws.


The CPU is installed. About 2 hours of work. If you get any glue on the sprung gold contact pins, the CPU is toast.

The CPU is programmed in the usual way as explained here, conferring maximum and minimum apertures, minimum focal length (I used 42mm as 43mm is not available in the CPU) and transferring aperture control from the camera body to the lens to avoid non-linearity issues as explained in that link.


EXIF data correctly reported in Lightroom
after CPU installation.

Lens profile:

Well, this is a surprise. I found that chromatic aberrations and barrel distortion in this lens to be so low that even without a lens profile results are fine.

However, I developed a lens correction profile in the usual way and this is automatically invoked in Lightroom if you install a CPU. The CPU’s program data tell LR which lens correction profile to use, something which will be done automatically if your image import dialog checked the lens correction profile when you created it. You can download the profile here. The profile file contains corrections at f/3.5, f/8 and f/16. The closest to the aperture used will be invoked automatically.

Here’s the Develop dialog from LR:


The profile invoked in LR.

While developed using a Nikon D3x, this profile will work fine with any Nikon digital camera, FF or APS-C.

Performance:

I was very pleasantly surprised by the performance of this optic, finding excellent center and extreme edge definition at 43mm and 86mm fully open and even better at f/8 where the lens peaks. Thereafter, it’s just fine all the way down to f/22. It mystifies me what all those years of opprobrium and trash talk directed at this inexpensive lens are all about.

The images below were reproduced without invoking my lens correction profile (see above) and mild chromatic aberration (color fringing) is visible. This completely disappears when the lens correction profile is used.


Test scene, Nikon D3x, 43mm full aperture.


Center definition at f/3.5. 40x enlargement.


Extreme edge definition at f/3.5. 40x enlargement.


Extreme edge definition at f/8. 40x enlargement.

Compare these test images with those from the 50mm f/2 HC Nikkor, one of the best lenses ever made. Impressive, huh? Also note the gentle rendering of out-of-focus areas.

Conclusion:. If you want a mid-range, constant aperture Nikkor push-pull zoom for very little money, snap up the Type II version of the 43-86mm f/3.5. The results are excellent and the ergonomics, fit and finish are unequalled in any zoom lens I have used.


Gear used for the above, including a $6 Amazon Basics UV
filter and a Nikon HR-1 folding rubber lens hood.

On an APS-C format Nikon, where the extreme edges are not used, this makes for a fine all purpose 65-130mm, high definition optic. In fact I did the CPU programming on my D2x, which is APS-C, sporting a 1.5x magnification compared to the full frame D3x.

The story here is similar to the one for the 500mm Reflex Mirror which, were all those purported ‘experts’ to be believed, is not worthy of serving as an ashtray.

Nikon 43-86mm f/3.5 zoom lens – Part I

Not totally awful.

The early history of zoom lenses on 35mm film cameras is long and not distinguished.

It starts in 1959 with the 36-82mm f/2.8 Zoomar which mounted on the contemporary Voigtländer Bessamatic SLR. The Bessamatic used a leaf shutter inside the lens mount, a fact which made it difficult to make really wide lenses for it, but kudos to the company for retaining American Zoomar to design a zoom lens, and one with a fixed, large aperture at that.


Bessamatic with 36-82mm f/2.8 Zoomar mounted. No strap lugs on the body ….

This monster lens was an ugly duckling with styling nothing like the nicely finished factory lens range (35mm all the way through 350mm) and performance was so-so, but you could claim to be the only one on the block with this ugly duckling. Plus, the optic came with this comical depth-of-field calculator so that you could be sure of getting it right despite the multiple aberrations:


Included with every Zoomar, this DOF calculator. Reminiscent of Dr. Strangelove’s circular slide rule.

Nikon was a far better lens designer than American Zoomar, so when they first marketed their 43-86mm f/3.5 Nikkor Zoom in February, 1963 it was elegantly executed and matched, as a whole, the rest of the burgeoning Nikkor lens range:


Mark I of the 43-86mm Nikkor.


Nikon’s elegant solution to the depth-of-field riddle.

And the elegant solution to depth-of-field determination with those lovely curving, colored lines, was a first. A tad different from the Zoomar’s calculator!

Arguably one of the most beautifully executed of all Nikkors its performance was, by general agreement, the worst of any lens Nikon ever sold! Despite that, over 150,000 made it out the door at Kogaku, Tokyo. The lens was compactly sized and beautifully made, not to mention revolutionary, building on Voigtländer’s pioneering lead with something far more useable. This design comprised 9 elements in 7 groups and as Nikon’s site attests, the manufacturer was rightly proud of its achievement. The irony of the lens’s poor optical performance is that 99+% of images are now displayed on small computer or cellphone screens, for which purpose it’s perfectly adequate.

Nikon had another go at the design, releasing Mark II in November 1975, now with 11 elements in 8 groups, the description of the lens was moved from inside the filter ring to around the outside barrel, making identification easy. This was a much better optical formula and the beauty of the marketplace is that the curse of the earlier design similarly affected the market price of used Mark II lenses, meaning all are dirt cheap. Mine ran me $69 shipped, in ‘as new’ condition. Many of these have been really beaten up and I simply cannot see saving $30 on a beater when your pride and joy in a mint example can be had for little more. It probably makes sense to use a lens hood for protection as well as flare control, given how prominent the front element is, and the standard Nikon 50mm collapsible rubber hood HR-2 can be found new for under $20. Amazon lists an ‘Amazon Basics’ 52mm UV filter for further protection for under $6. I bought both.

An even greater number of the Mark II variant was manufactured with the last versions – mine – coming Ai equipped from the factory. The cut-outs in the aperture ring’s coupling claw for old Nikon Photomic metered prisms and cameras like the Nikkormats are there to throw as much light as possible on the smaller duplicate rear aperture scale which is read through the finder via a reflecting mirror in later bodies like the FM and FE. Nikon called this ADR or Aperture Direct Readout, a clunky solution to seeing the aperture in the viewfinder. It works …. in good light. As usual I will be discarding the claw after installing a CPU, which will allow the recording of EXIF data on digital bodies.


My ‘as new’ condition 43-86mm Zoom Nikkor on the Nikon FE film body.

Mounted on the small FE body the fine ergonomics of the body are nicely complemented by this compact and beautifully made zoom lens. The construction quality of the lens is exceptional as regards fit and finish, no wobbles, no rattles and the optic feels like one solid piece of glass and metal. Those are real, paint filled engravings you see, not screen printed garbage. Gorgeous.

I discuss lens correction profiles and CPU installation in Part II, along with test images.