Tiny and accurate.
Finding a working and accurate Leicameter light meter for the Leica M2/3/4 is an exercise in frustration. The earlier selenium cell batteryless ones are mostly dead, their cells exhausted after some 70 years or more on planet earth. Search long and hard for the later Leicameter MR or MR4 and one in twenty auction listings will actually include words that the device has been tested and is accurate. Why even bother looking at the others? And then it’s far from inexpensive. Reckon on $200 for a decent one which does not look like a survivor of the Tet Offensive. And if you have fitted your Leica M2 or M3 with a rapid rewind crank or you use an M4 with the stock canted crank, then you must opt for the Leicameter MR4, over the earlier MR, to provide clearance for those cranks, or be prepared to remove the meter every time you have to rewind a roll of film. So now your chances of finding a good MR4 are further halved. Ugh!
The advantage of the Leicameter is that it couples to the Leica’s shutter speed dial and provides its own considerably larger dial for adjustment of shutter speeds.
But if you have despaired of finding a good one there is a host of inexpensive aftermarket alternatives, any one of which will fit in your accessory shoe and which can be found for under $100. Downside? None couples to the shutter speed dial. B&H lists no fewer than seventeen choices from the overpriced Voigtländer at $225 to the Reflx for $50, and it’s the latter I’m writing about. It’s what I chose because its size and looks most closely conform to the Leica film camera ethos. The fitment and positioning are just right.
It ships without a battery so buy a CR1632 when ordering the meter. The meter uses a silicon cell (so does not suffer from the excess red sensitivity of the Cadmium Sulphide cell in the Leicameter MR/MR4) and like the MR/MR4 measures over a center weighted 30 degree angle. It is small, encased in alloy and looks just perfect on my Leica M3. The accessory shoe foot can be mounted in one of three positions and is shipped centered. Looking from the back I had to shift the foot to the right whereupon the meter aligns perfectly with the shutter speed dial.
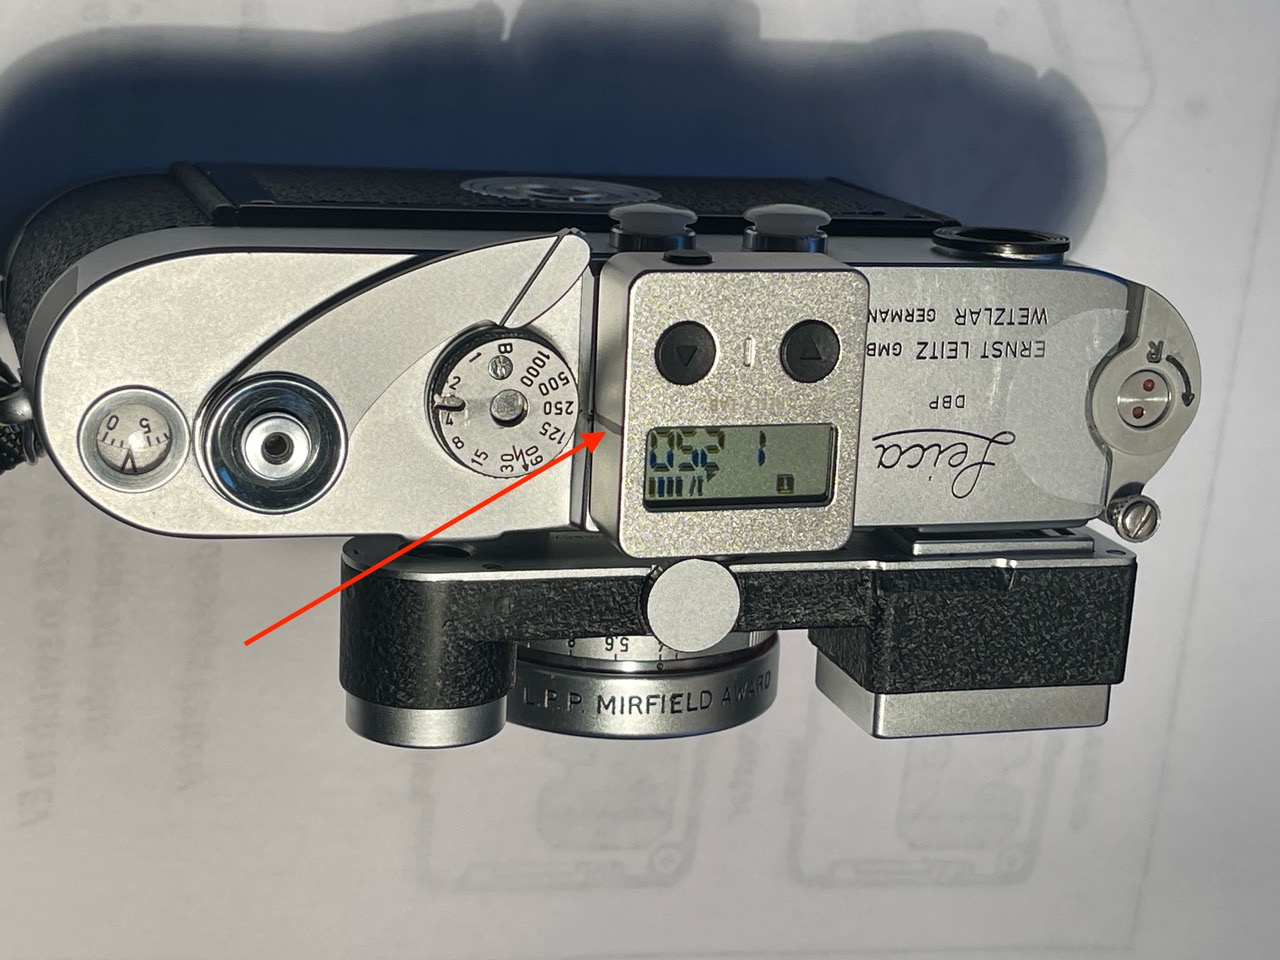
Perfect alignment with the shutter speed dial.
Fitment and positioning are just right.
Note the black felt tip shutter speed indexing line (red arrow), added by yours truly.
The meter ships with a spare battery holder – it’s hard to remove for battery insertion and requires that you push the flexible tab away from you and then tug on the door to the right. Broken fingernails are likely so I used a plastic pointer (for the tab) and spudger (for the holder). The battery goes in with the + sign showing, when the meter is upside down. Reflx provides a spare battery holder as well as two spare mounting screws for the shoe and a small slotted head screwdriver. They claim a battery life of one year. The screws are a tight fit and are unlikely to come out. Should they loosen I will apply a tiny drop of blue Loctite thread locker #242 to each to confer safety.
Is the chrome plating on the meter as good as that on the Leica? No. It’s coarser and slightly differently colored. Nothing compares with the chrome plating on a Leica.
The Reflx meter weighs 19 grams, or 2/3rds oz. By contrast the Leicameter MR4 weighs 76 grams (2 2/3rds oz.).
The included instruction sheet is printed in such a small typeface that it’s next to useless. I went to the maker’s web site and enlarged/copied the instruction sheet there. Even so, it could be less confusing.
Here’s what you need to know.
After inserting the CR1632 battery, mount the meter on your camera. On my M3 it’s a reassuringly snug fit. No way it’s going to fall out, even if brutally nudged. Now single press the black button on the rear. The LCD display will show the ISO you have set (it ships set at ISO100) then switches to aperture (left) and shutter speed (right). Nice that you get this ISO reminder. That single press locks the exposure reading so if you need a new reading simply depress the rear button again – whether the meter is on or off – being sure to point the meter at your subject area.
For street photographers who need to be unobtrusive, a light meter should be decipherable when looking down on the camera. Many shoe mounted meters have the display in the back which defeats the unobtrusiveness goal. With the Reflx you look down. By the way, the single biggest complaint I had with my Leica M6 (apart from the lower build quality compared with my M2 and M3) was that its built-in TTL meter could only be set with the camera to the eye. The diodes indicating exposure were in the viewfinder. There was no top plate readout of exposure. So you had to raise the camera to your eye to first measure the light, then take the picture. Completely wrong. Are you a street snapper? Get a meter you look down on to take the light measurement. An iPhone metering app is almost as obtrusive as that Leica M6 of old.
To change the ISO, after a single press on the rear button hold the right top Up arrow button for three seconds and then increase or decrease the ISO using the two top arrow buttons.
The worst description in the instructions is the meaning and use of the Aperture Priority and Shutter Priority modes available. You switch from Aperture Priority (‘A’ at top left of the LCD display) to Shutter Priority (‘T’). with a double press of the rear button. In ‘A’ mode the meter will restart showing the last aperture you used. In T mode the meter will start showing the last shutter speed you used. For street snapping I ordinarily leave the shutter speed fixed – say at 1/250th of a second – so I set the meter to T mode and to a shutter speed of 1/250 using the Up and Down button on top. Then taking a light reading becomes a one button press affair, every bit as fast as the Leicameter. Point the camera at the area to be measured, press the rear button once and transfer the indicated aperture to the lens. No need for any other button presses as long as you stick with the shutter speed dialed in on both camera and meter.
This single button press method is quite different from that used by the costly Voigtländer or the TT Artisan $62 knockoff of that design. On those you have to turn either a top mounted physical click stopped aperture or shutter speed dial until the center one of three LEDs alights. Far less elegant, though analog dials and click stops are always nice for an analog human being.
Finally, a long single press on the rear button puts the Reflx into exposure compensation mode, adjustable with the top buttons in 1/2 stop changes. A separate flag notifies the user that EV mode is engaged. This is actually quite handy should you find that your meter is reading incorrectly compared with one of known accuracy, allowing for one – albeit across the board – exposure correction without having to input a misleading ISO value for film speed.
Accuracy? Dead on. I checked it against the meter in my Nikon D800 with the zoom lens at 90mm and in averaging mode, which approximates the measurement angle and method of the Reflx and in both weak interior and a variety of bright exterior lighting the Reflx was in agreement with the Nikon.
Display size? Though the Reflx is very small indeed the aperture and shutter speed display is easily large enough for stress free reading, and much larger than the engraved digits on any Leicameter.
Battery life? I have no idea. There are four bars showing at the top right of the meter with a fresh cell but it remains to be seen whether the one year life is accurate. These trend down to three or two bars after one minute of use suggesting either excess current draw or incorrect calibration of the battery strength indicator. Let’s hope it’s the latter, because I really do not want to remember to carry spare batteries. (The display pops right back to four bars after a minute or two of rest). You can turn the meter off with a three second press on the Down button or it switches itself off after 55 seconds (during which time the battery is working only to power the LCD display, not the light measuring circuitry so current draw should be light). The instructions confusingly refer to this as ‘sleep mode’. If you turn the meter on again in under 5 minutes the ISO display, which is otherwise the first thing you see, is turned off. No biggie, as it’s unlikely that you will change the ISO setting by accident. After a 5 minute off period the ISO display will show once more on start-up.
One missing feature is no provision of an illumination option for low light use. The black on grey figures in the LCD display get hard to read in poor light. Well, there’s always the flashlight in your cell phone, I suppose, a sub-optimal solution at best. In this regard the white galvanometer needle in the Leicameter is superior. Further, there’s no continuous reading option available in the Reflx like there is in all Leicameters (with the black side button depressed with the MR/MR4, by default in the M and MC). One press of the rear button of the Reflx and the light reading is locked. To take another reading you have to press the rear button again.
One other missing feature is the absence of any warning that you have reached the limits of the meter’s range. For example, in very poor light the meter will show an aperture of f/1 in shutter priority mode whereas in fact something even faster than f/1 is called for. It would be nice if the manufacturer would revise their software to flash the aperture symbol at the limit, warning you that you need a far slower shutter speed for a usable aperture. A like issue affects the shutter speed setting in aperture priority mode. I get around this by reminding myself that if a ridiculous aperture like f/1 is indicated (see the image above) that I need a far slower shutter speed setting. Not a big deal.
Leica ethos, you ask? Well, small, silver chrome, accurate and unobtrusive, not to mention fast. And, unlike that Leica, inexpensive. What’s not to like?
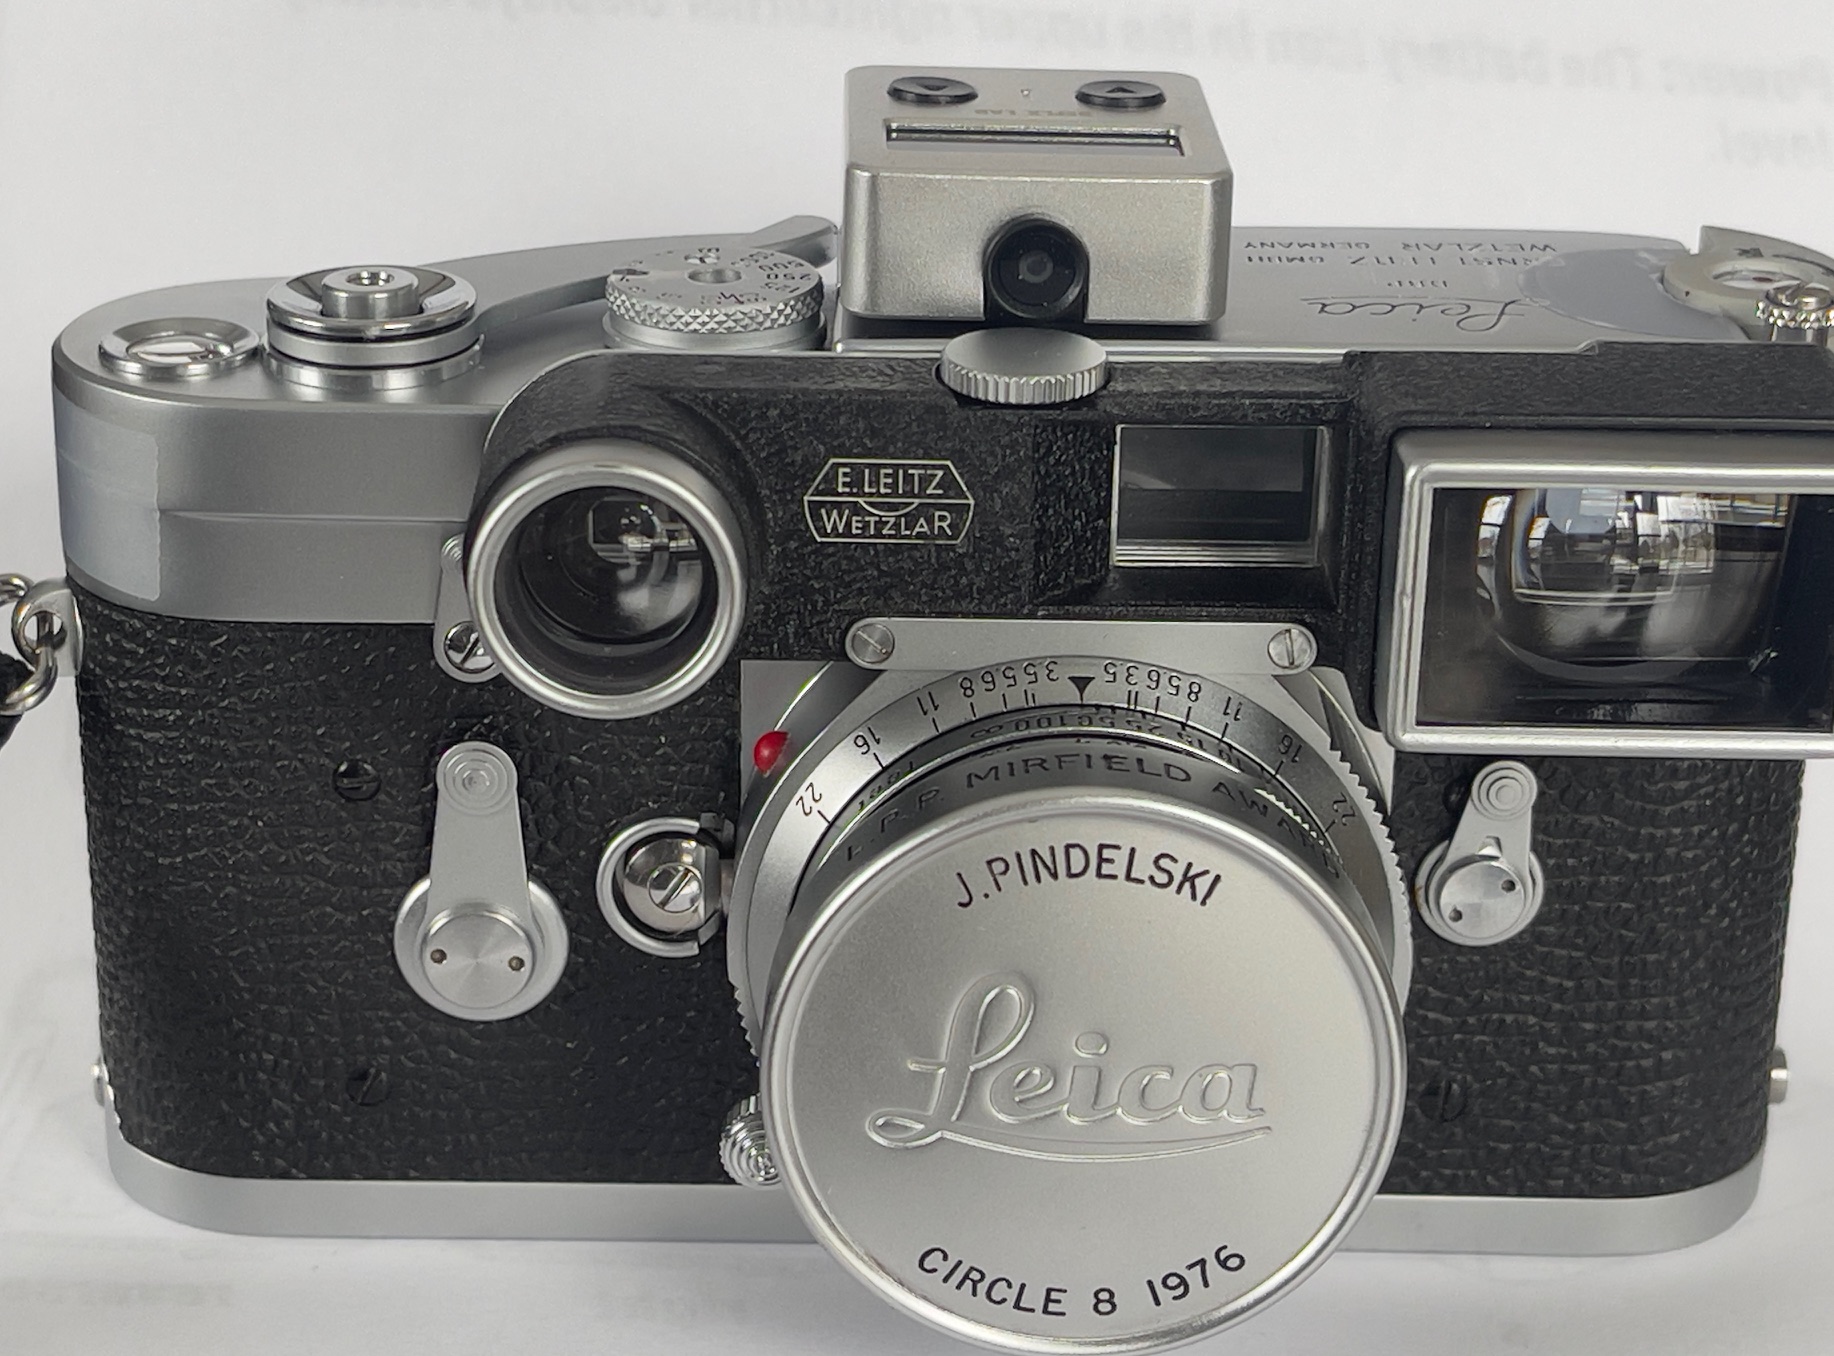
Is this a match or what?.
Plus, unlike that Leicameter of yore, it’s easily pocketed for use on any camera without an accessory shoe and far easier to use ‘off camera’.
One last thought. Many aver that black and white film has such a broad tolerance of incorrect exposure that no meter is needed. This is pure rot. Expose even monochrome film stock incorrectly and definition goes down, highlights or shadows get lost and grain shoots up. There is no excuse for poor exposure whether with color or black and white stock, and there’s simply no way, regardless of how experienced you are, that you will nail exposure without a meter. Would you rather have great originals with a $50 additional outlay or crap that cannot be printed larger than 5″ x 7″ from your $2,000 piece of hardware? And if you do not regard large prints as your goal, why are you wasting money on gear?