6-bit coding and other arcana.
For an index of all Leica-related articles click here.
In Part I I recounted the not always happy history of Leica’s digital M camera designs.
In this piece I address 6-bit coding for non-Leica branded lenses, proper rangefinder alignment and sundry other bits and bobs of interest to current and prospective owners of this fine camera. There’s some pretty heavy sailing in what follows but for the most part these are ‘one off’ fixes and the migraine will pass.
6-bit coding: There are good reasons to add 6-bit coding to lenses without it. First, when the camera ‘sees’ the code on the lens’s mount (think of it as a simple variation of the ubiquitous bar code) its software will correct for geometric distortion. More importantly it will correct for color fringing with wider lenses near the edges of the frame, caused by the oblique angle at which light rays are striking the sensor. And for those who use EXIF data as a cataloging and retrieval aid, coding adds the lens name, focal length and aperture used, all missing with uncoded lenses. You can do all of this in Lightroom, of course, where the lens correction profile can correct geometric distortion and LR’s (not very good) chromatic aberration correction function can sort of correct for color fringing. And you can laboriously add EXIF data manually. For me time spent processing is time wasted and I would rather have the camera do all these things.
All the digital Leica models have ‘6-bit’ lens coding which adjusts the output from the various pixels based on the angle of incidence of the light rays. The closer the rear element of the lens is to the sensor the more obliquely will light rays strike the periphery of that sensor. This causes potential color casts, so it’s important to correct for this effect to maintain the lens’s performance at its best. Leica does this using code via colored pits on the mounting flange of the lens known as the ‘6-bit code’. There’s an aftermarket in cheap adapters that you can code with a Uni Ball pen and the databases are out there for all sorts of makes, including Zeiss, Voigtländer/Cosina, Russkie garbage …. but not old LTM Canons! ‘Experts’ claim that coding makes little difference with focal lengths of 50mm and up when it comes to correction of optical aberrations, but is increasingly important as lenses get wider. I find this claim to be bunk. See my results with the 50mm f/1.4 Canon LTM, below.
The design of the microlenses on the sensor differs from the normal approach, as is illustrated in this schematic from the manufacturer CMOSIS:
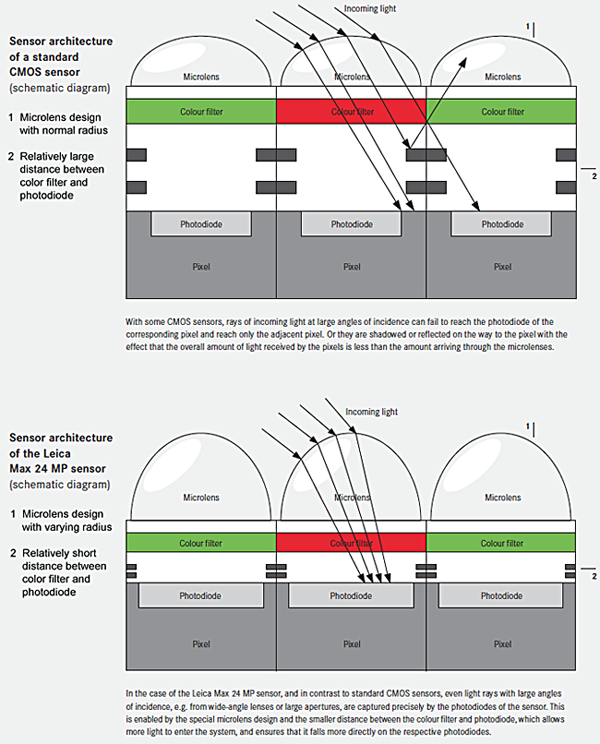
Microlens design comparisons – Leica below.
The shape is distinctly stretched upwards to better capture light rays striking the lenses at oblique angles, and the photodiodes are closer to the lenses. Ingenious.
DSLR lenses do not suffer from this problem as the clearance required for their flapping mirrors dictates lens designs with greater clearance between the rear element and the sensors, so less oblique peripheral light rays strike the sensor. On the other hand it’s common for users to adapt M lenses to their mirrorless digital bodies and as these do not include the 6-bit/software correction of the Leica sensor I have to wonder how much of the blame for coma and chromatic aberration results from those optics’ rear elements’ close positioning to the sensor.
Below I explain how I upgraded my two Leica Thread Mount Canons, the 35/2 and 50/1.4, after experimenting with the various code/lens choices in the M10:
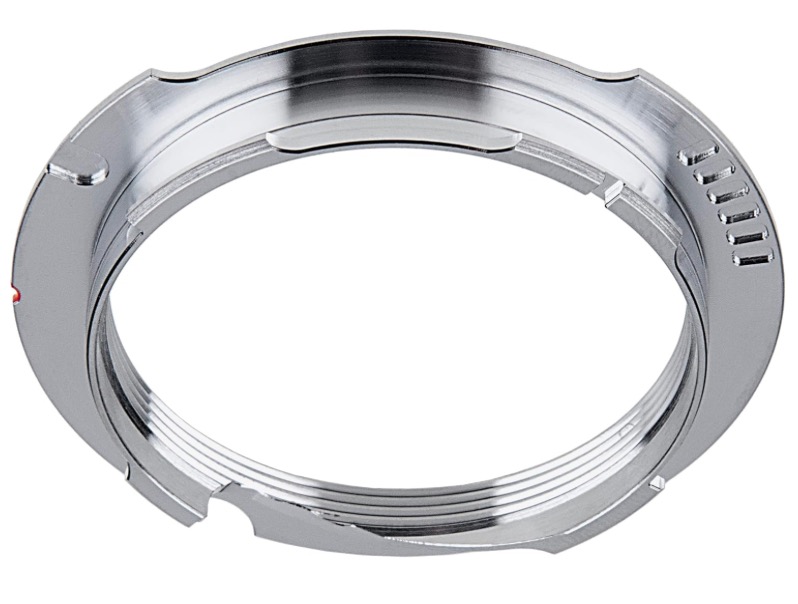
The 6-bit version of the Fotodiox LTM-to-M adapter.
You fill in the appropriate pits per this table, from the Fred Miranda site.
A ‘1’ indicates black ink filling; a ‘0’ means do nothing. The codes read clockwise as you look at the back of the lens. For example, for the Summilux-M 35mm f/1.4 ASPH the most counterclockwise pit would be blank, the second would be black, the third black, and so on. Refer to the image of my 90mm Tele-Elmarit below for greater clarity. Here are the codes for 35mm and 50mm Leica lenses:
Lens type: Leica item number: 6-bit code
35mm lenses:
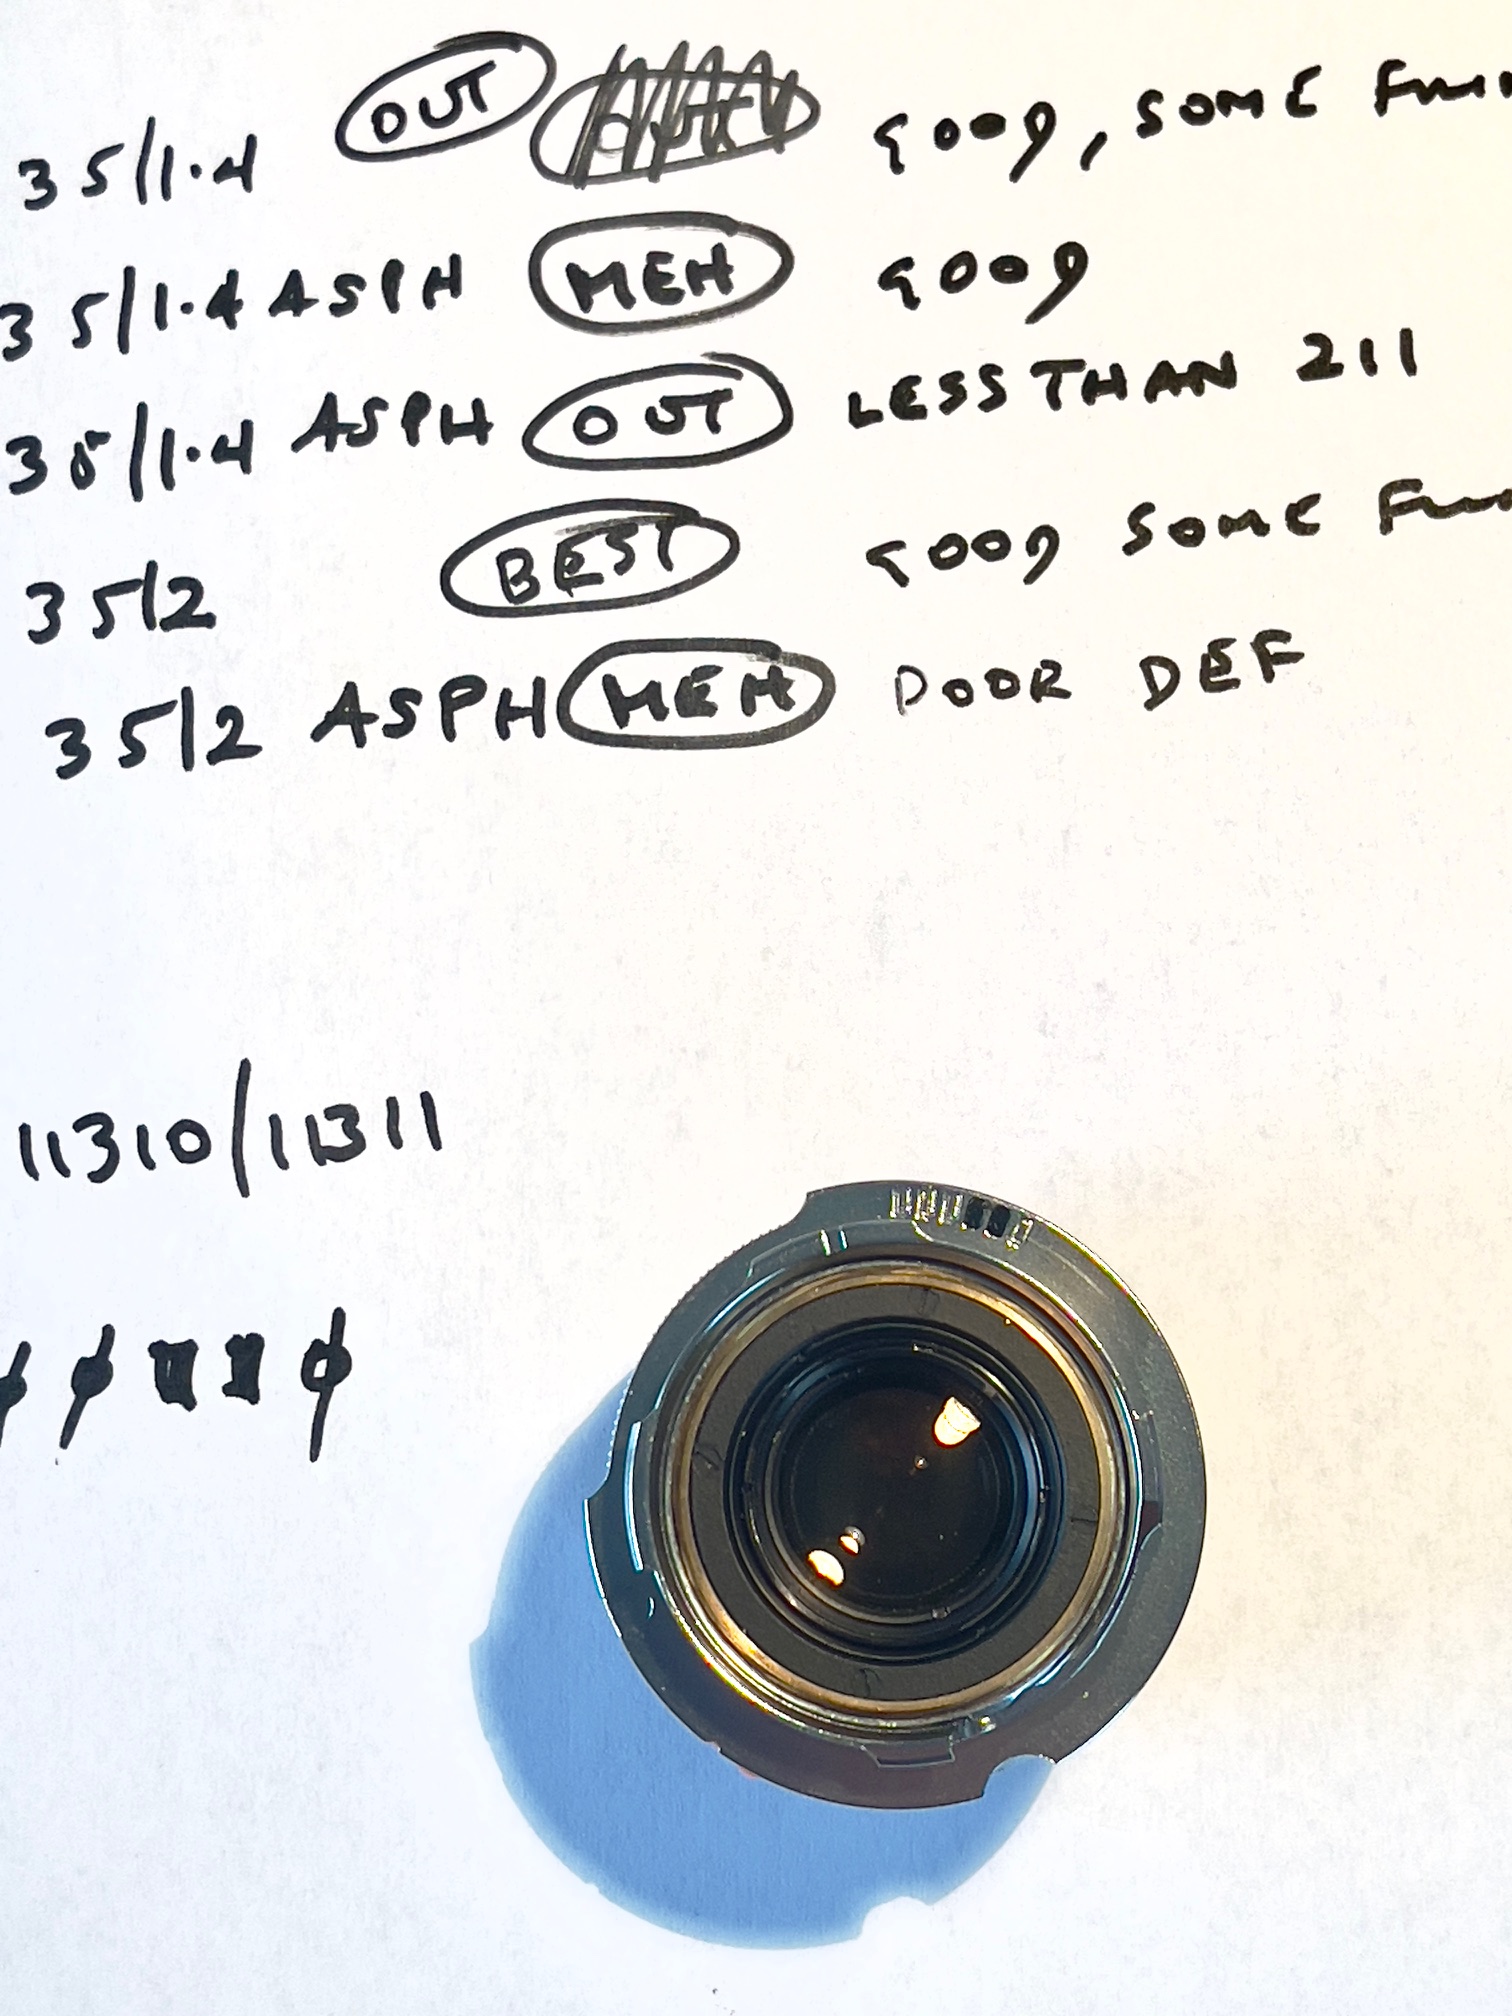
Summilux-M 35mm f/1.4 steel rim (re) : 11300, 11301 (chrome) : 001100
Summilux-M 35mm f/1.4 ASPH : 11874, 11883 (chrome) : 011101
Summicron-M 35mm f/2 (IV) : 11310, 11311 (chrome) : 000110
APO-Summicron-M 35mm f/2 ASPH : 11699 : 001101
Summicron-M 35mm f/2 ASPH : 11879, 11882 (chrome) : 01111
Summarit-M 35mm f/2.4 : 11671 : 010001
Summarit-M 35mm f/2.5 : 11643 : 101011
Five of these appear in the manual choices in my M10 which you can dial in if your lens is not coded.
50mm lenses:
Noctilux-M 50mm f/0.95 ASPH : 11602 , 11612 (titan), 11667 (chr : 110001
Noctilux-M 50mm f/1 : 11821, 11822 : 011111
Noctilux-M 50mm f/1.2 ASPH (re) : 11686 : 001110
Summilux-M 50mm f/1.4 (II) : 11868, 11856 (chrome) : 000101
Summilux-M 50mm f/1.4 ASPH (I) : 11891, 11892 (chrome) : 100000
Summilux-M 50mm f/1.4 ASPH (II) : 11728, 11729 (chrome) :
Summicron-M 50mm f/2 (III) : 11817 : 010111
Summicron-M 50mm f/2 (IV) : 11819, 11816 (chrome) : 100001
Summicron-M 50mm f/2 (V) : 11826, 11825 (chrome) : 100001
APO-Summicron-M 50mm f/2 ASPH : 11141, 11811 (black chrome) : 101001
Summarit-M 50mm f/2.4 : 11680, 11681 (chrome) :
Summarit-M 50mm f/2.5 : 11644 : 101100
Elmar-M 50mm f/2.8 : 11831, 11824, 11823 (chrome) : 100010
Eight of these appear in the manual choices in my M10 which you can dial in if your lens is not coded.
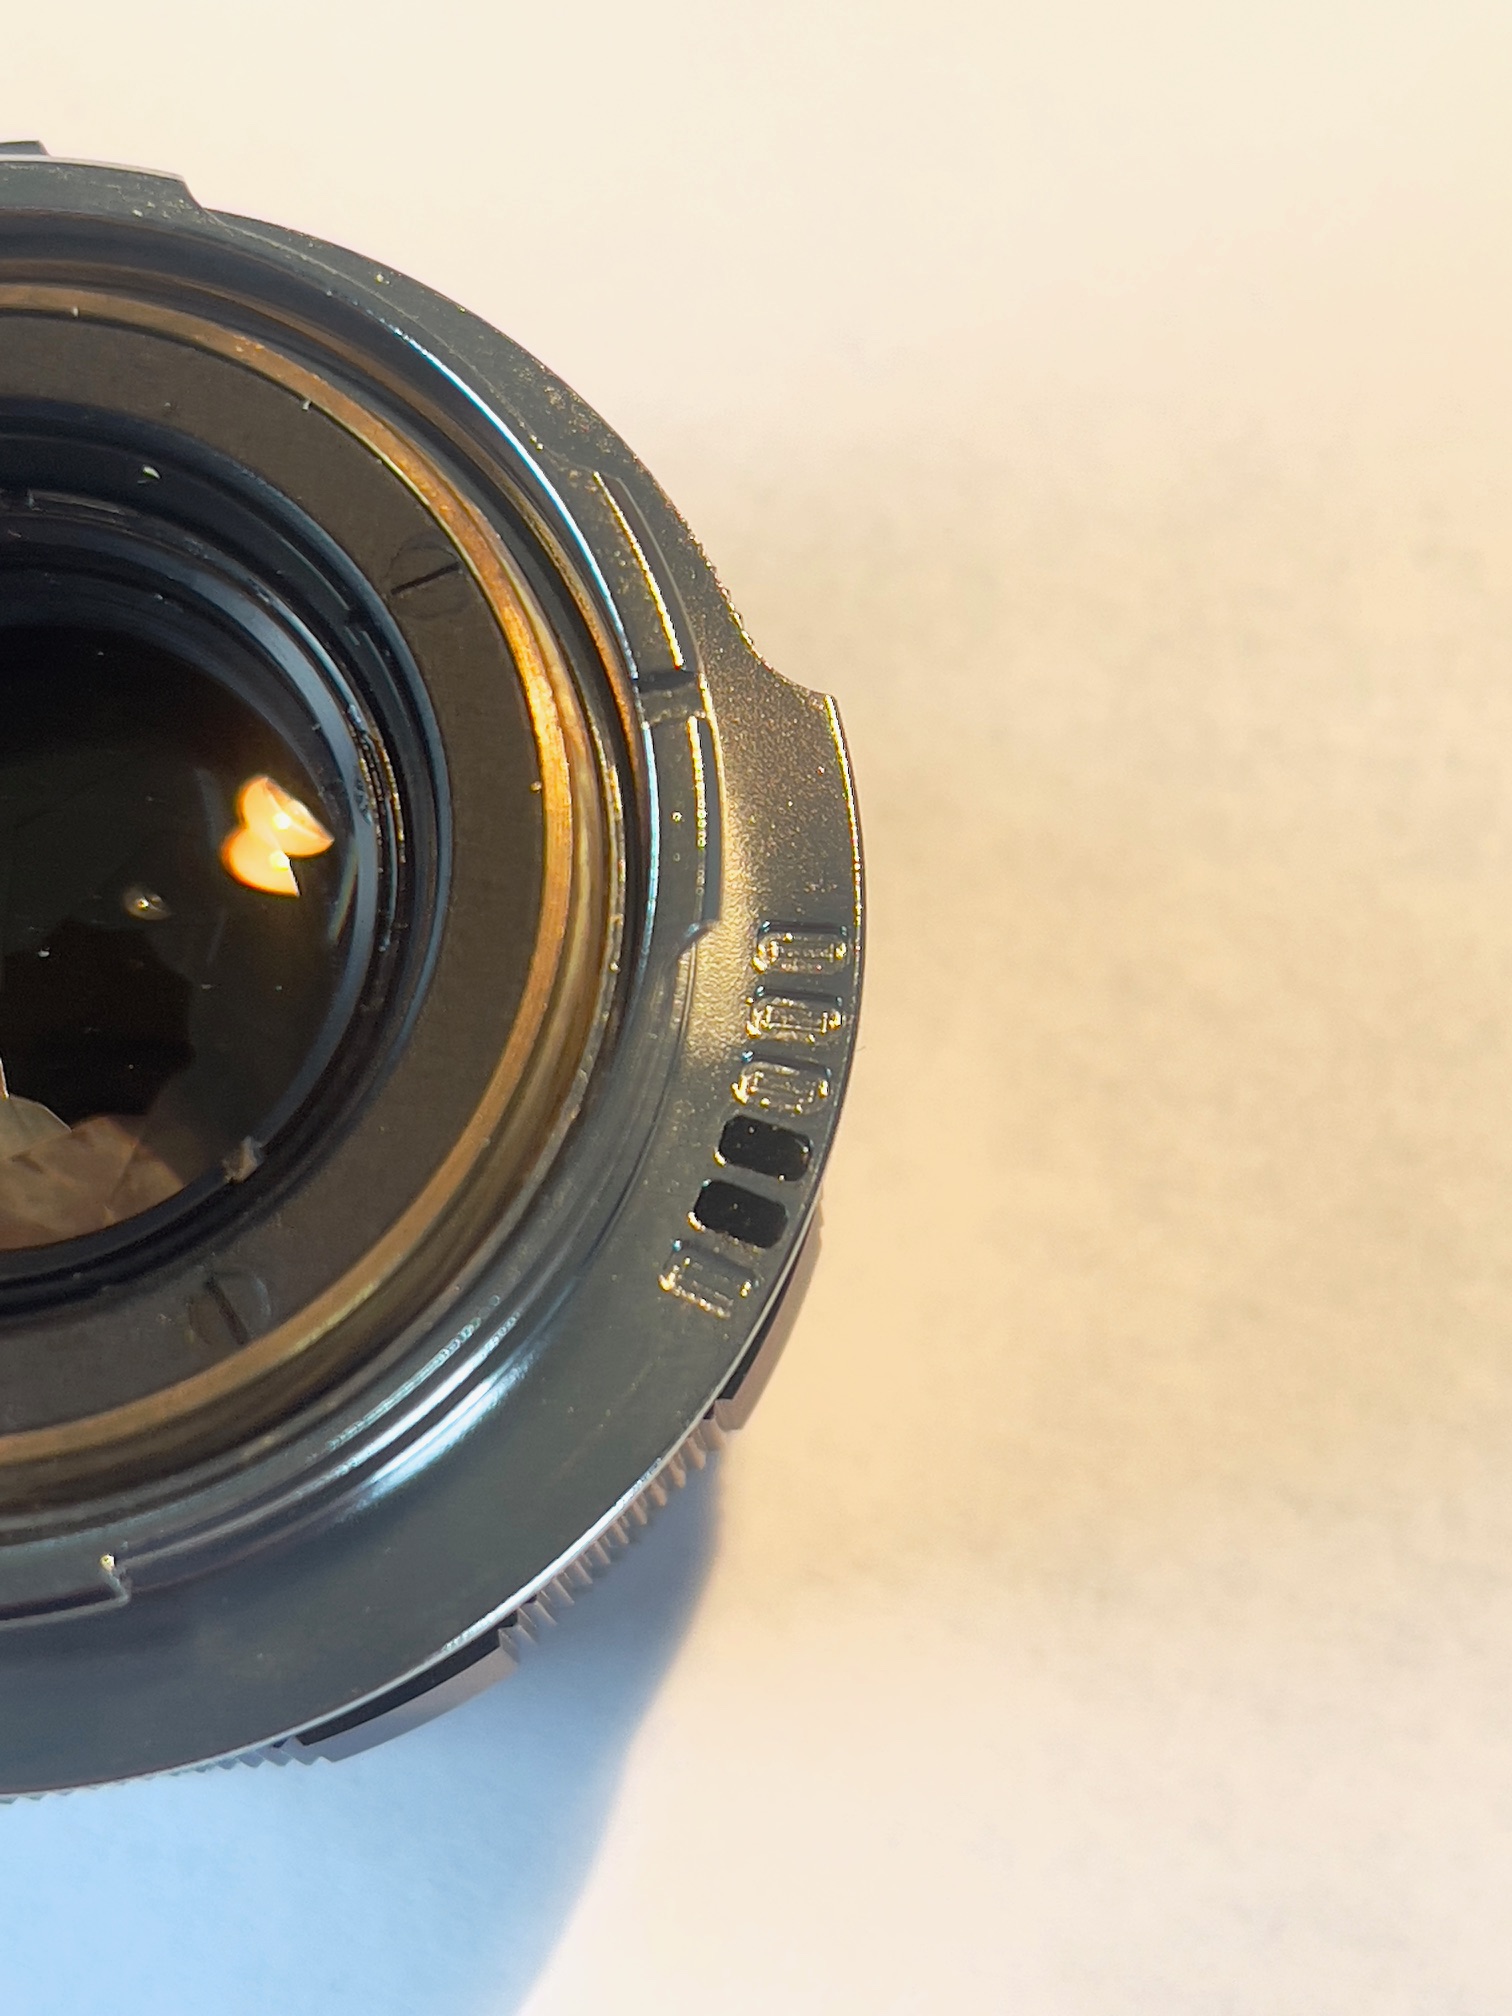
Sometime in its life my Tele-Elmarit was retrofitted with a coded mount. You can find replacement bayonet mounts on eBay for $50. When mounted on the camera the 6 pits align with an optical reader in the camera’s bayonet mount, (present in every digital M body), telling the camera’s software how to process the image. Simple and elegant and with 6 binary choices you can program profiles for 64 (2 raised to the 6th power) different pixel responses. Here’s my T-E:
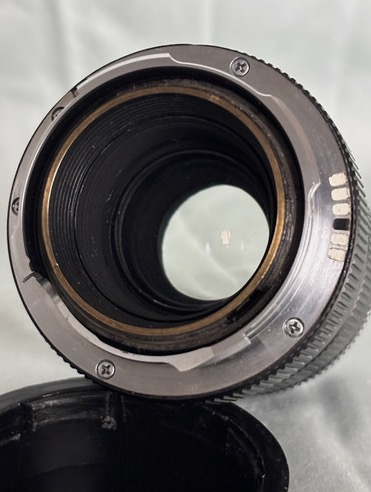
The ‘000100’ pattern is correct for the 90mm Tele-Elmarit.
The white paint fillings are unnecessary.
Adding 6-bit codes to lenses: Shiny ink pens like the Sharpie do not work properly. No need to paint in white ink for blank divot locations, though Leica does this. The recommended pen is the Uni Ball whose ink dries semi-matte.
Why do I need to experiment with various coding schemes? Because, for the life of me, I cannot find the right codes for my 35 and 50mm Canon LTM lenses and the coding table lists no fewer than 10 and 13 coding schemes, respectively, for Leica’s various 35 and 50mm lenses. In each case one of those schemes will yield the best results so I’m going to have to experiment. The first approach will be to dial in the various lens settings sequentially using the LCD option for uncoded lenses, determine the best result after pixel peeping in LRc, then confer that coding using the Uni Ball on my 6-bit Fotodiox versions for a permanent fix. A pair of 6-bit adapters from this maker ran me $51.60 and fit perfectly. In fact they are a smoother fit than the plain ones I originally installed, which ran me $36 for the pair. All display the correct frames in the viewfinder.
Automating import in Lightroom:. Click here to learn how to automatically apply lens profile correction on import of files into Lightroom.
Removing an LTM-to-M adapter: It is extremely poor practice to do this using the bayonet mount on the camera’s body as a resistance tool, unlocking the lens then torquing counter-clockwise against the stop. Especially if the adapter is stuck – it has been known to happen – you are risking changing the precise positioning of the flange or worse. I use a metal aftermarket lens cap, far more robust than Leica’s plastic version, inserting the lens with adapter and twisting CCW. At $15 I would rather destroy the cap than my camera. That cap also has the three raised nubbins on the rear which act as a wrench should your adapter get stuck on the camera. The nubbins fit in the cutouts in the LTM-to-M adapter. You can see that metal rear cap in the image below.
What makes the discovery process of the best code easy is that the M10 has two approaches to recognizing lenses. If the lens is coded then the camera will automatically read those codes, with no override permitted. If it is uncoded you can dial in the lens’s focal length and type manually and that will be used in the absence of the coding pits. This means that, with an uncoded lens, it’s easy to experiment trying any number of variations to see which is best. In addition to correcting for aberrations and vignetting, the use of the correct 6-bit code – whether coded or input manually – ensures that the focal length of the lens is recorded in the EXIF data for an image.
Manual lens input is unreliable: The implementation of manual lens input is flawed in the M10. You mount an uncoded lens and sometimes the camera says no lens is fitted. Then when you do get rid of that message (try again!) and dial in a lens, sometimes that setting ‘takes’ and sometimes it’s disregarded, at random. You can see if the lens has been ‘recognized’ by looking at the Lens Detection menu where focal length/maximum aperture should be displayed. If they are not, try again. And if you think the camera remembers the lens when you have alternated with a coded one, think again. Once an uncoded lens is removed the camera switches back to auto lens recognition and has no memory of which uncoded lens was last fitted. Not great. To experiment, I found it best to use live view where the lens dialed in is clearly disclosed. If it says ‘no lens’, try again. Simply stated, Leica wants you to pay up for coded lenses. Not nice. Last I heard they still offer a service where you send in your lens and they add the code for you. No, you do not want to know the cost, or the turnaround time.
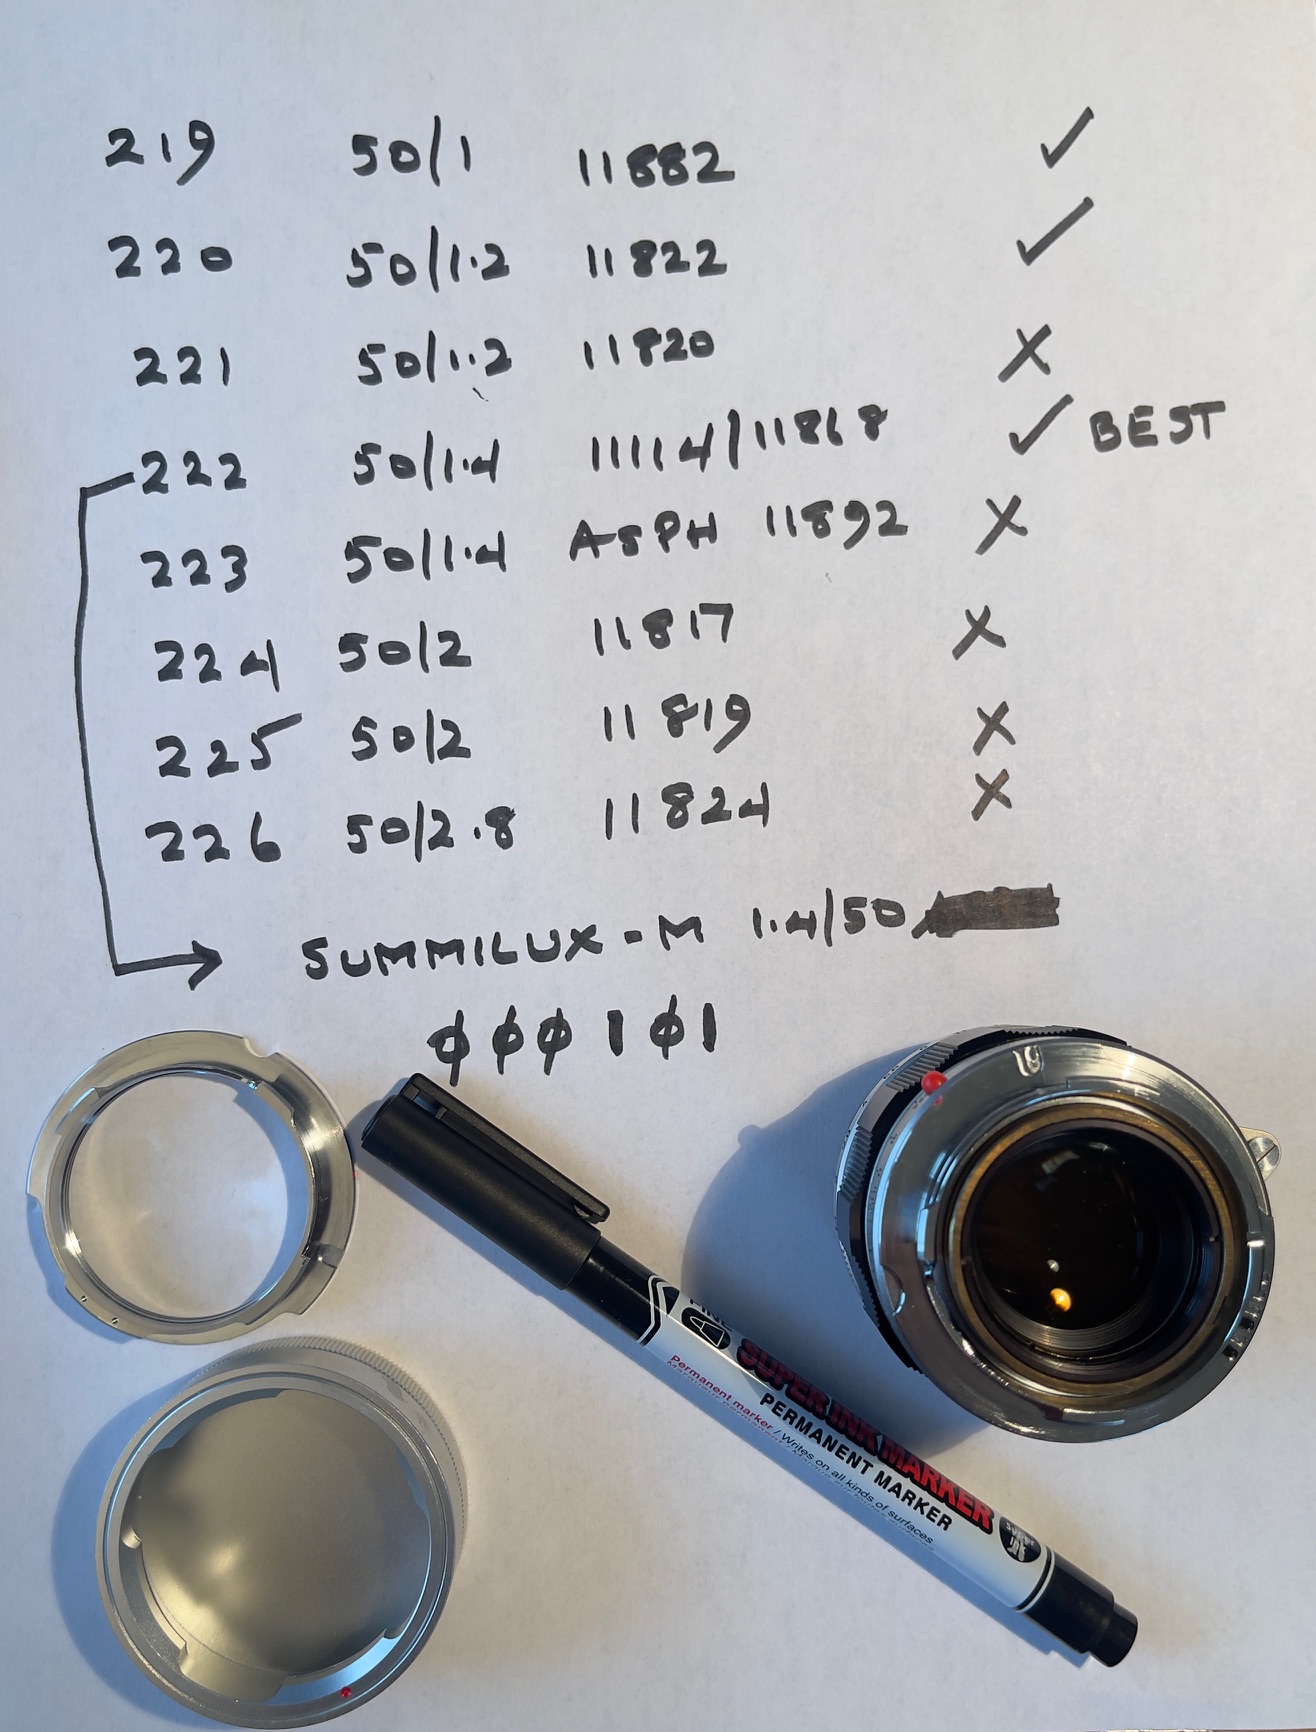
The coding process is simple. I selected a blank sky as my photo target and made sure to include a tree branch in one corner. The evenly illuminated sky will disclose vignetting while the tree branch will immediately reveal color fringing. I then took a picture with each of the 35mm Leica lens choices input in turn, loaded the images into LRc with no corrections applied and scrolled through the images looking for vignetting and color fringing. All images were taken at the lens’s maximum aperture where vignetting is always greatest, regardless of manufacturer. The differences were subtle but they were there, and I chose the best for coding the adapter. This happened to be the 35mm f/2 Summicron v4, pre-ASPH:
Coding the Canon 35mm f/2 Canon LTM:
Making the decision.
The correct coding for that lens is 000110 where ‘1’ indicates a black paint filled pit, ‘0’ means leave as is:
The adapter has been coded – 000110. This is the 35/135 version of the adapter.
The lens is now properly reported as to focal length in LRc. I simply change the name to ‘Canon 35mm LTM’ using the EXIF tool.
As reported in Lightroom.
Coding the Canon 50mm f/1.4 Canon LTM:
Making the decision. The Fotodiox adapter has been coded 000101.
Original plain adapter and tough metal rear lens cap at lower left.

Choosing the best code. Canon 50mm f/1.4 LTM at f/1.4 in all images.
All eight available 50mm choices in the Lens Detection menu shown, from fastest to slowest.
So much for the “experts'” claims that coding lenses 50mm and longer is not required. The highlighted choice clearly has the least vignetting. This excellent Canon 50mm f/1.4 LTM lens has negligible color fringing in any image, just as with the 35mm f/2 Canon, above.
The correct coding for that lens is 000101 where ‘1’ indicates a black paint filled pit, ‘0’ means leave as is, which is the code for the Summilux-M 50/1.4 non-ASPH.
The lens is now properly reported as to focal length in LRc. I simply change the name to ‘Canon 50mm LTM’ after import, using the EXIF tool.

As reported in Lightroom.
Use with the 35mm f/3.5 Summaron RF: While the ‘goggled’ Summaron was designed for the M3, it can also be used with the M2 and later film bodies. The finder magnification drops but framing and focusing on the film bodies are accurate. That combination makes little sense, however, as the M2 et al have native 35mm frame lines dispensing with the need for a bulky goggled lens while showing a larger image. With the digital Leicas things got worse. While they preserve the 27.75mm flange-to-film/sensor distance of their film forbears the flange/sensor assembly has been pushed forward, protruding further from the body. Leica claims this makes the goggles useless for accurate focusing as they are too remote from the digital M’s body, but I have not found this to be the case. I get identical focus settings at 3 feet, 12 feet and infinity. The only thing wrong is that on the M10 the Summaron RF displays the 50/75mm frame lines instead of the 35/90 pair. You can see accurate framing using the frame selector lever but that makes for a rather inconvenient package. But the RF lens focuses accurately and is perfectly usable. Given that the lens was first sold in the 1950s that’s some serious backward compatibility.
The 35mm f/3.5 Summaron RF on the M10.
Other incompatible lenses: None of these can be used – the Zeiss Hologon 15mm f/8 which protrudes too far into the body (these are rarer than honest politicians and not especially good by modern standards), the Type II 50mm Summicron DR where the focusing mechanics interfere (this is the one which takes goggles for close-ups under 3 feet), any collapsible lens which would destroy the shutter mechanism if retracted and 1961-95 Leitz Canada versions of the 35mm Summilux-M f/1.4 which can be attached but will not focus to infinity. Leica can fix that and your wallet simultaneously.
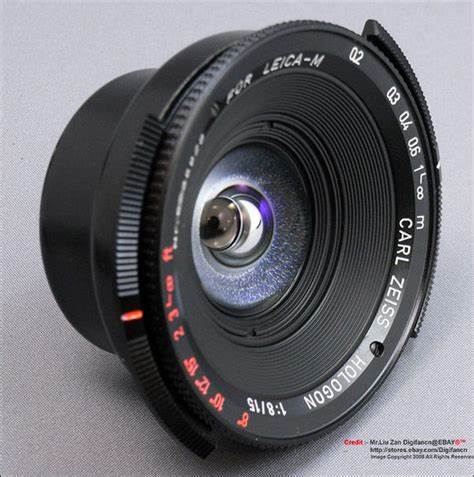
The Zeiss 15mm f/8 3-element Hologon.
Great in its day, now a collectible surpassed by later designs.
ISO setting:. There are two ways of setting ISO on the M10. One is with the lift-and-turn dial in place of the film rewind knob on the film bodies. That’s a beautiful reinterpretation of a classic design – look how ugly the flat top plates of digital predecessors of the M10 are without it. That knob covers a range from 100-6400, plus Auto and Manual. With Auto the camera selects the ISO and as the sensor is known to be largely noise free up to 6400 I leave it set on Auto. You can limit the Auto ISO range using the LCD display. The other way is to set that knob to Manual and set the ISO using the rear LCD. In that case speeds up to ISO 50,000 are available. Given that I got by with 400 ASA Tri-X for decades I doubt I will be going there. Meanwhile, the simple ergonomic design of the external ISO setting knob is a masterstroke and a significant improvement on the screen-only method found in the M10’s predecessors. Leica have made it difficult to pull out the knob to make changes so there’s no way you’re going to make a change accidentally. That’s good design.
By the way, I have the M setting on the ISO knob set to 12,500 using the LCD. That way, if I want a speed faster than 6400 I simply dial that knob to M. The setting is not volatile.
Viewfinder frame illumination and frame pairs: There is no middle finder illumination window between the finder and rangefinder patch windows as seen on the film bodies. Rather than using ambient light to illuminate the finder frames the M10 uses LEDs, and the result is a brighter set of frames in poor light. Frustratingly Leica has stuck with the ‘two frames at a time’ approach where frame pairs for 28/90, 35/135 and 50/75mm are displayed at the same time. For me the perfect Leica M viewfinder was found in the M2 with just three frames – 35, 50 and 90mm – and only one of these visible at a time. No clutter. Plus I’m not about to use a 28, 75 or 135 lens. The 28mm is neither here nor there, with the next usefully wider step being 21mm. The 75mm is a solution looking for a problem. And as Leica itself states in their instruction manual, the 135mm cannot be reliably focused using the rangefinder (though magnified live view is fine) unless stopped down at least two stops. Really. Then why include the frame? I’ll bet that a skilled serviceman can reprogram the frame display and should the camera have to go in for servicing I’ll see if the 35/50/90mm combination of the M2 can be restored. Leica has retained the frame selector lever which allows the user to preview framing regardless of the lens fitted. Nice, and I occasionally use it to preview framing with a different focal length. I already own 35, 50 and 90mm M bayonet optics but might add a 21mm later. In that case live view or a clip on finder may be called for.
Rangefinder patch: The notches to allow estimation of depth of field, based on image overlap, at f/5.6 and f/16, seen in the M film cameras, are gone. I always thought this added unnecessary noise to the finder, and they are not missed.
Geo-tagging: The M10 has no GPS antenna so does not geotag images. One option is to use the Visoflex 2 clip on electronic finder which includes a GPS antenna but rather than use this clunky accessory I prefer to record my walkabout locations using an iPhone and then import locations in Lightroom to geotag the images. Easy and fast, with no bulk and weight added.
Exposure metering method: I only use the optical viewfinder and this means that the sole option for exposure metering is center weighted, which is fine. If you want spot or matrix you have to use live view (rear LCD) which is not something I care to do. I simply do not use the rear LCD for anything other than set up or for checking remaining battery life. I only use the optical viewfinder when taking pictures. The magnificent optical finder is why you pay for a Leica rangefinder camera in the first place. Again, sticking with its minimalist design philosophy, Leica has got it right here.
Super long exposure times: The mechanical dial on the top plate permits exposure times up to 8 seconds. For longer times up to 4 minutes (!) set the dial to ‘B’, activate the camera and depress the button on the front where the film rewind lever used to be on the film bodies. Not exactly intuitive. The LCD will display choices (they vary with ISO) which can be dialed in with the thumbwheel.
The ‘T’ shutter setting: With the shutter speed dial set to ‘B’ the shutter remains open as long as the shutter release is depressed. However if you activate the self-timer with the ‘B’ setting the shutter stays open without finger (or cable release) pressure on the shutter release button. A second pressure on the shutter release button concludes the exposure. Pretty obscure, I know, but handy for long tripod-mounted exposures when you do not have a locking cable release to hand. When the self timer is running a very bright red LED flashes, at the top of the viewfinder window of all places.
Rangefinder adjustment:. There are two easily accessible adjusters for the Leica M rangefinder, film or digital. If your camera suffers a severe blow it’s possible that the vertical alignment of the images will be sub-optimal. Even when in focus the image in the rangefinder patch will be ‘seeing double’. You have to remove the red Leica or Leitz sticker (it’s held with double sided sticky tape) or a screw (M2/M3/M4 models) to access this adjuster which looks like this:
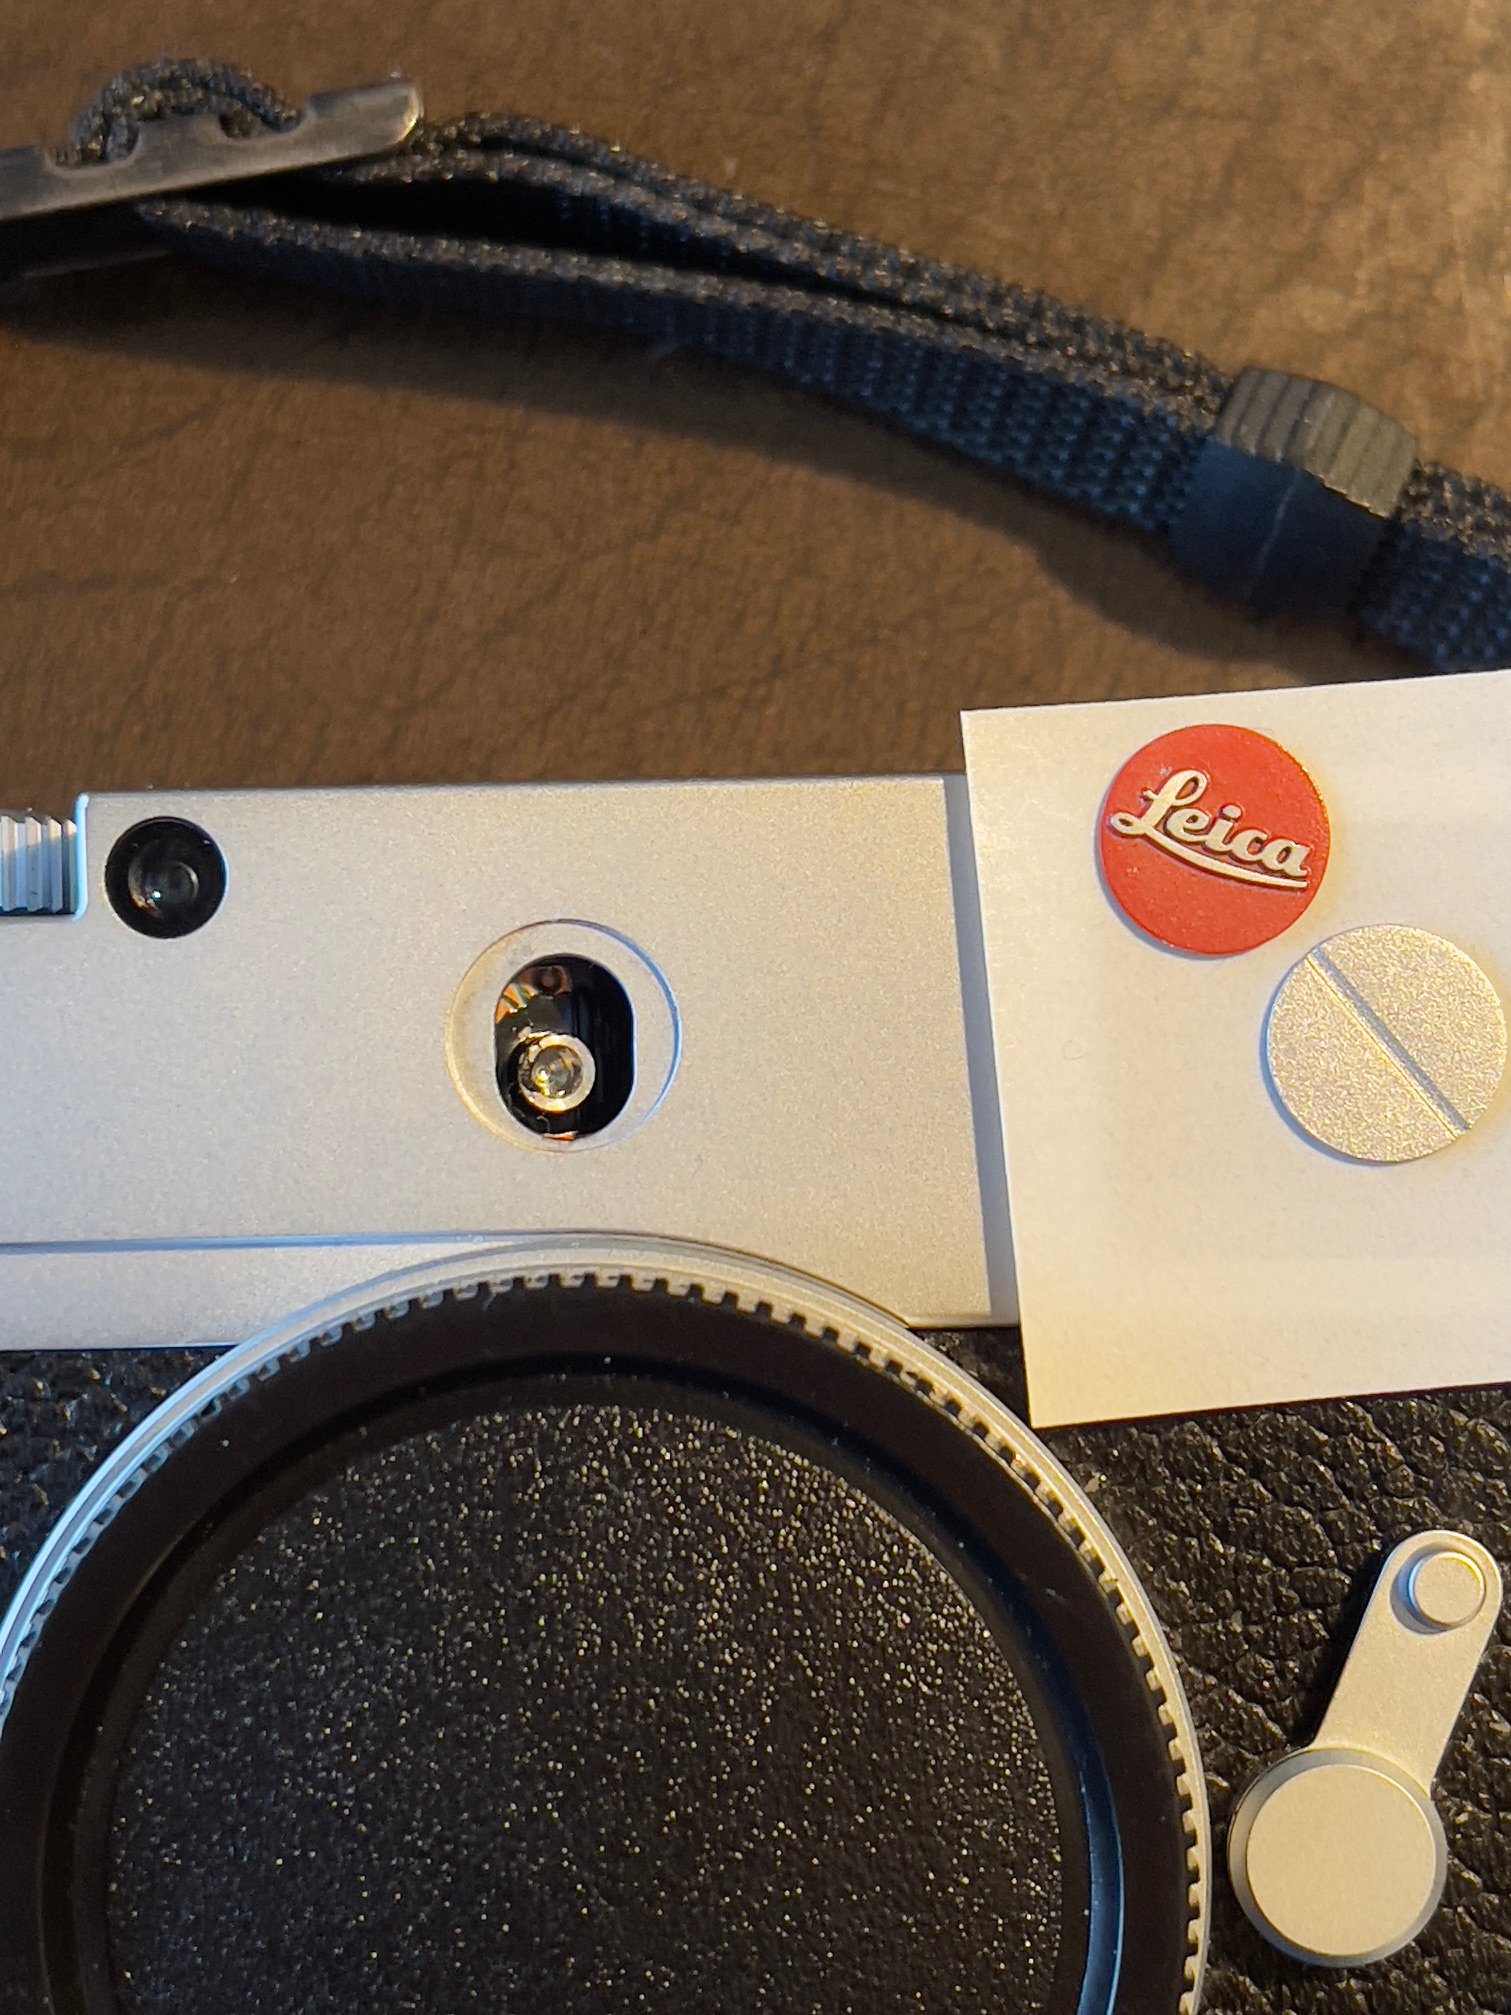
The surprisingly crudely finished vertical rangefinder adjustment screw.
The other more commonly used adjuster is the one for the cam roller which contacts the cam on the rear of the lens. This is used to adjust focus accuracy. It’s eccentrically mounted so turning the retaining screw (or Allen bolt in digital Ms) varies the position of the roller relative to the cam on the lens.
You do this using a 2mm Allen wrench on the M10, with the camera upside down, thus:
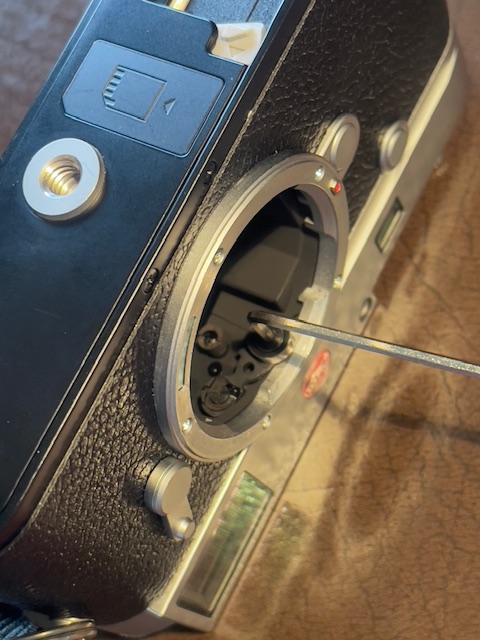
The focus accuracy adjustment in progress.
In this position clockwise rotation (toward you) is fine as the stop on the cam roller assembly will prevent motion of the assembly. The screw is tight by design. If rotating counterclockwise (away from you) you want to insert a finger behind the roller to prevent the assembly moving away from you as you turn the wrench.
Why do this? Well, first conduct a critical test, using the longest/fastest lens you have, taking a picture of your test target at the closest focusing distance. For me that’s the 90mm Tele-Elmarit at f/2.8 and 1 meter. It took me six tries to get this dead right and in aggregate I estimate that the total range of motion of the Allen wrench was 10 degrees (out of 360 degrees in a circle). That’s very little. This is a very sensitive adjustment, so take it easy, a bit at a time.
The difference? How about ‘night and day’? And don’t waste time doing this using a test target at infinity – in both the ‘before’ and ‘after’ instances the infinity focus appeared perfect. The sensitivity of the rangefinder is greatest at close distances. I can only wonder how many photographers blame their lens when the problem is solved with this simple adjustment.
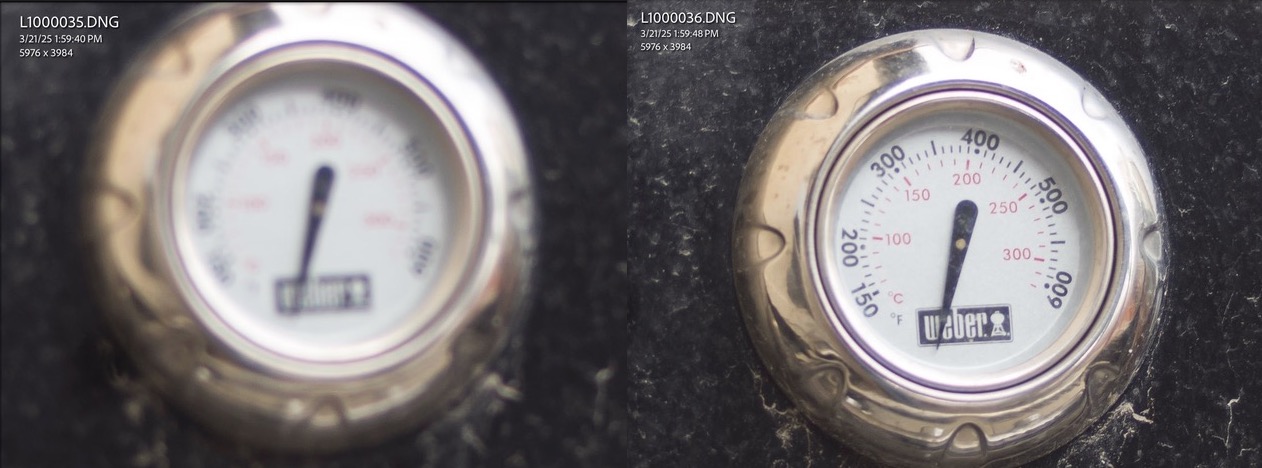
Before and after.
Now the camera – and its owner – are ready to go to work.
What about that film Leica M3? The M3? Well, it’s reverting to its originally contemplated status as a display piece among the greatest classic cameras in my home theater. Film really is awful. There it will join a Zeiss Contax IIa – the camera that pointed the way for the Leica M, a Nikon F – the greatest film SLR ever, a Minox B spy camera – a piece which defines the Cold War, a huge Calumet 4×5 Monorail – loved by Hollywood’s glamor photographers, a Paillard Bolex H16 – where Spielberg cut his teeth, and a Rolleiflex 2.8D – a favorite of many ’50s fashion mavens. No chintzing here! Only the best of the best.
In Part III I will take the M10 out for its first field test.