Setting up for field use.
For an index of all Leica-related articles click here.
The Leica SL2-S is more like a computer with a lens attached than it is a camera, with all the complexities that implies. As with any computer, tailoring the user interface and excluding the host of unused or unwanted options offers a solid return on the time invested. After all the tailoring the setting elected can be stored as a User Profile should another favored setting catalog be chosen at a later date. This makes for easy reversion to preferred settings. If useless or erroneous button presses are not made unavailable then you risk finding yourself in some bizarre operating mode which can only be solved by reference to the manual. You know, the one at home. My preferred settings are highlighted in red. As you will see, there are many.
As mentioned in Part I the SL2-S body has five assignable buttons and one assignable joystick. This elegant design sees to it that there is no clutter (by contrast I count 27 buttons and levers on the Nikon D800 DSLR, and Ioprobably missed some) making for an elegant design. And remembering the functions assigned to these six controls is no big deal, even at an age where recalling my home address needs some thought.
Here’s how I have assigned them. To assign a function to a button or to the joystick hold either down for a few seconds, whereupon the selection menu will appear on the LCD. My needs are solely for still photography as I do not make videos:
- Front lower – Exposure metering mode (Spot, Multi-Field, etc.). I favor Multi-Field.
- Front upper – Shutter type (Mechanical, Hybrid, Electronic). I use Hybrid, liking the soft sound of the shutter.
- Top plate Right – ISO. I use AutoISO most of the time, but limit the maximum ISO to 12,500. (Menu->Page 2->Auto ISO Settings-Maximum ISO->12,500->Push the thumbwheel to store). North of that even Lightroom Classic’s excellent Denoise algorithm, which does a fine job of removing noise without sacrificing detail, struggles. And, hey, 12,500 is still 5 shutter speeds faster than that film speed demon of old, Kodak’s TriX! Truly, today’s photographer is ridiculously spoiled by modern digital sensors.
- Top plate Left – Exposure compensation. This is adjusted with the thumbwheel and the relatively hard to reach button is well placed to avoid accidental use.
- Rear plate Joystick – EVF magnification. The joystick falls naturally under the left thumb and a press switches the EVF to magnified view, and also permits the magnified area’s location to be moved around. Page 4->Customize Control->JoystickMF Mode->Magnification->Press joystick to confirm). I have it centered. I have focus peaking turned off, finding it adds useless noise to the EVF image and little else. (Menu->Page 6->Camera Settings->Capture Assistants->Setting->Select a Profile->Focus Peaking->Off).
- Rear plate button – Left. I have this disclose the FOTOS bluetooth page where a single press on the joystick turns Bluetooth on for pairing with my (now ancient) iPhone 12 Pro Max. I like to store GPS data with my images which FOCOS does seamlessly. There’s that word again – seamless. So much of the control interface, especially the use with M lenses, is indeed seamless.
Focal length recognition with 6-bit coded M lenses: As for proper focal length recognition, as explained in Part I all my M lenses are 6-bit coded for use with the Leica branded M-to-L adapter, meaning that they are recognized when mounted. When any of these lenses is mounted in the adapter a message like this appears on the rear LCD or in the EVF:
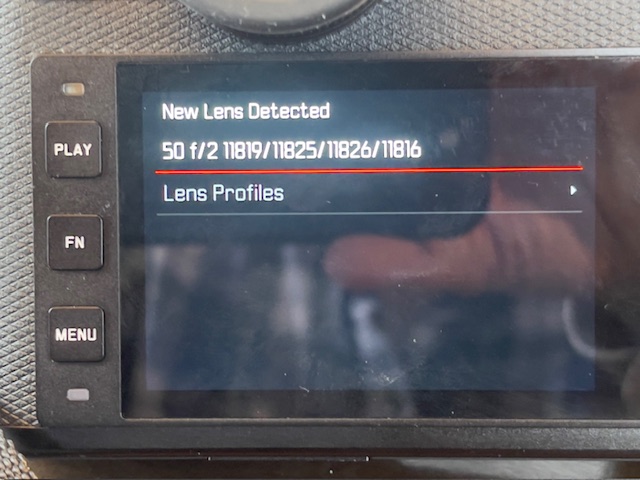
Message seen after mounting a 6-bit coded M lens.
A touch on the shutter release button removes the message. The sole anomaly here is that when I mount the 35mm LLL Summicron 8 element clone, the display gives me the option of choosing either the 35 f/1.4 Summilux (11869/11870/11860) or the 35mm f/2 Summicron (11310/11311). The latter is the pre-APO ASPH model of the lens and is not listed in the 6-bit code table. This 6-bit code table states that the 35mm f/2 pre-APO ASPH Summicron is, indeed, coded ‘000110’, the same code used for the 35mm f/1.4 Summilux, which explains why there is a choice of two lenses when the 35mm Summicron clone is inserted. So that means don’t bother choosing, just touch the shutter button after mounting the lens. Further, I see no difference in images when selecting either, confirming that the 6-bit code is the same for the two lenses.
SDXC cards and insertion and removal: The SL2-S can accommodate two SDXC/SDHC/SD cards which can be used sequentially, or one as a back up, or one for DNG (Adobe RAW) and one for JPG files. I use only one San Disk Extreme 64gB card which the SL2-S reports can store a whopping 985 images, more than I will ever need in one day’s photography. The average DNG file size computes to 65gB which seems incorrect. Most come in at 42gB or so which figures to 1,523 images, identical to that reported on the M10. I only use DNG.
For a camera with such superior ergonomics card insertion and removal is surprisingly poorly engineered. The right hand door does not open far enough making card insertion and removal more difficult than it should be, and the alternative of connecting the camera with the card installed to the Mac is even worse, as you have to find the cable and then fiddle with the rubber door cover on the left side.
Viewfinder display: The only EVF indicator I use is the horizontal alignment axis. (Menu->Page 6->Camera Settings->Capture Assistants->Setting->Select a Profile->Level Gauge->On) The factory assigns this button to switch between Stills and Video, touting the hybrid nature of the body, and that’s the last thing I want or need.
I have set the EVF to show none of the dozens of icons disclosed by the default factory setting, preferring an uncluttered view (Menu->Page 6->Camera Settings->Capture Assistants->Setting->Select a Profile->Info Bars->Off).
Viewfinder color and brightness:. As with import into Lightroom Classic, below, the viewfinder stock color is too magenta. I adjusted it using Menu->Page 5->Display Settings->EVF Color Adjustment->Look through EVF->Use joystick to change color rendering->Depress the thumbwheel to save the setting. The Instruction Manual rather uselessly says “Confirm selection” for this step and it took me a while to figure out that depressing the thumbwheel stores the preferred setting.
A related setting under Display Settings permits the adjustment of viewfinder brightness. I find the central default setting is fine.
Turning off the EVF: Before the selected power saving time out kicks in and turns off the EVF and the LCD, removing your eye from the EVF turns on the rear LCD display, which I can only assume is a major power hog. As I never use the rear LCD when taking pictures I turn it off permanently. (Menu->Page 5->Display Settings->EVF-LCD->EVF Extended->Depress joystick to save). The ‘Extended’ option is clever, keeping the LCD off unless the ‘Play’ button to the left of the LCD is depressed, allowing chimping of stored images. The ‘Extended’ option still allows the use of the ‘Menu’ button to enter the menu system, though that should be rarely required one the body is set up to your liking. You really do not want to mess with Menu settings on the LCD display when out and about taking pictures.
Saving the settings: Once satisfied with all the tailored settings I save them to a user profile which is easily recalled should something accidentally be changed or if a different profile is used. (Menu->Page 4->User Profile->Manage Profiles->Save as Profile->Depress joystick->Depress thumbwheel->Yes->Depress joystick). It takes quite a while to determine preferred settings so this step is highly recommended should something go awry down the road.
Import into Lightroom Classic: Compared with the neutral rendering of the M10, images from the SL2-S have a pronounced magenta cast. Accordingly I made an Import Preset with the following settings:
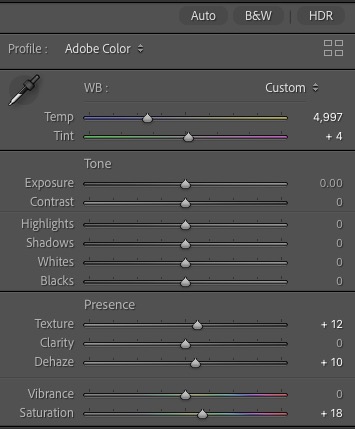
The LRC Import Preset to remove the magenta cast.
Elect this Preset when importing SL2-S images and all is well.
In Part !!! I will publish some snaps taken with the Leica SL3-S.