Category Archives: Lenses

Five cheap lenses for the Leica M

Great bargains.

For an index of all Leica-related articles click here.

Background:

This piece summarizes the specifications, costs and modifications made to my recently acquired kit of five lenses, ranging from 21mm to 135mm, for the Leica M10. They are every bit as usable on film M bodies. Well, some of the time. Two or three are from Canon (depending on your 135mm choice), one or two are from Leitz (ditto) and one is from Voigtländer. With the exception of the 21mm Voigtländer Color-Skopar VM Aspherical all are over 50 years old and the average cost was under $400. That’s chump change compared with what Leica’s contemporary optics command on either the new or used market.


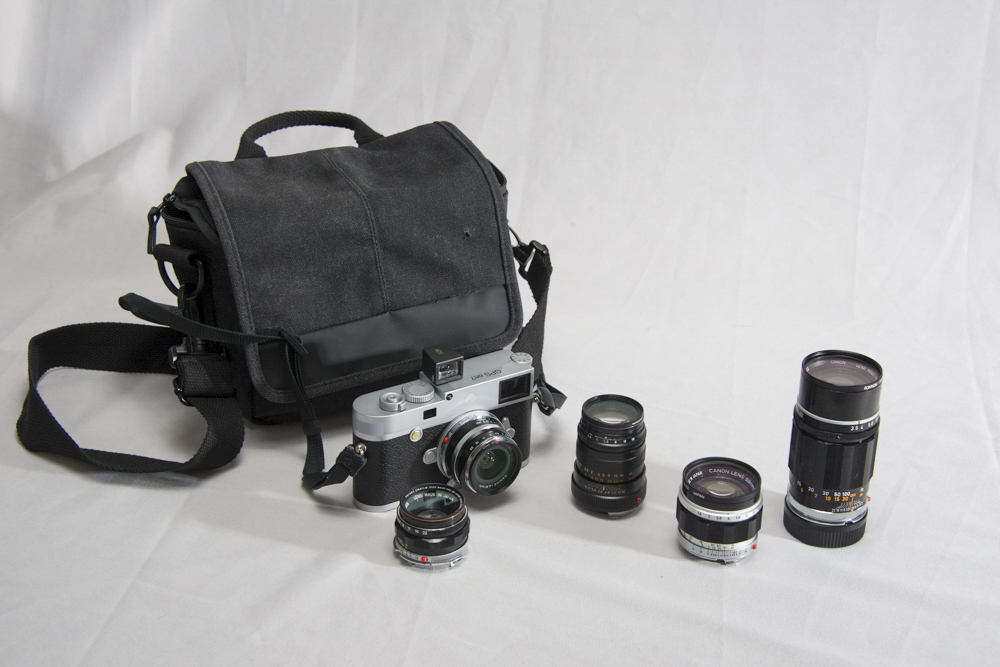
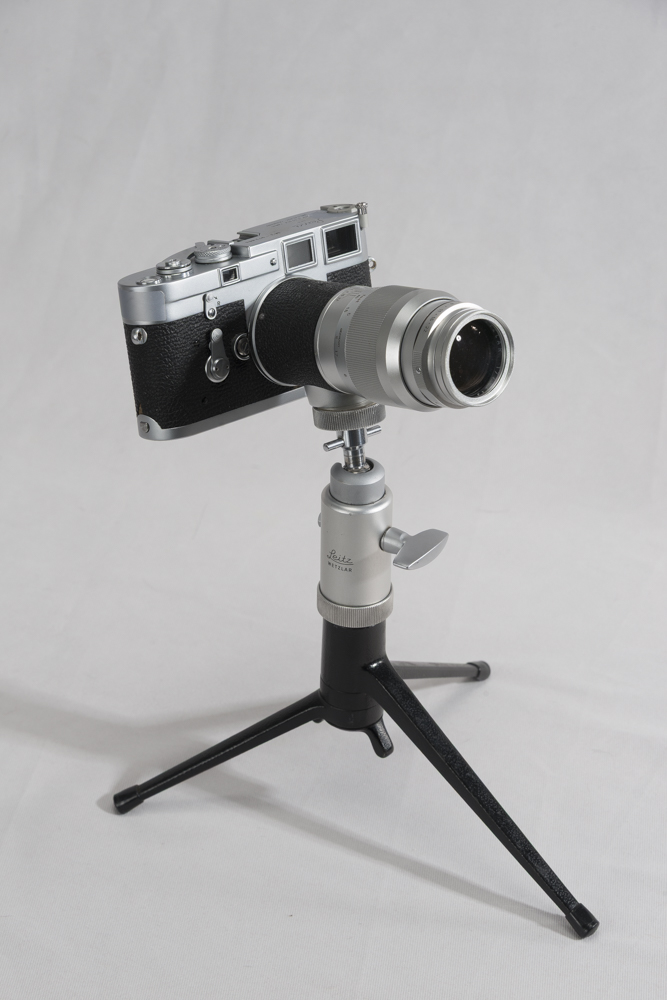
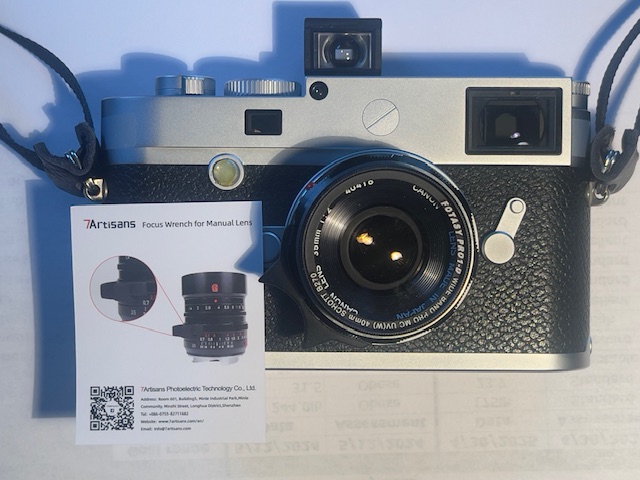
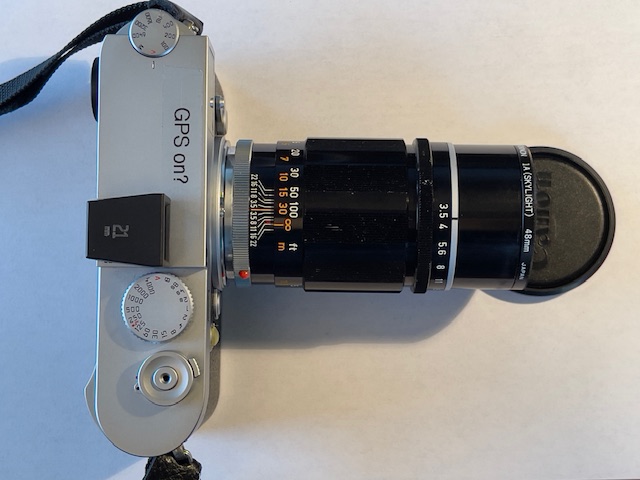
The Leica M10 outfit. The 21mm lens is on the camera with its auxiliary finder.
135mm Leitz Elmar not shown.

Dispelling a myth:

I keep reading that ‘modern digital sensors out resolve older lenses’. This is a meaningless statement. Out resolve compared with what? I can state from experience that every one of these lenses delivers much higher and finer grained resolution on the M10’s 24mp sensor than even the best technique used with a film M body and fine grained Kodak Ektar 100. Further, the Ektar is so slow it is very likely that camera shake will be added to the image owing to the need for longer, resolution-destroying shutter speeds. When it comes to the 135mm focal length where camera shake is especially prevalent, it’s little exaggeration to say that poor light hand-held photography with film is a waste of time. Where the M10 – happily cranks up the ISO to a noise-free 6400, the film-loaded M remains stuck at 100. That’s 6 stops slower. Stated differently, the digital snapper will be using 1/500th at f/4 whereas the proud owner of the M2 or M3 will be using 1/8th at the same aperture. Night and day different. Still, the film guy does get to enjoy the sensation of winding on from one blurred frame to the next. Or maybe his deliverable is a postcard-sized print? What a waste of a Leica.

So forget the ‘out resolve’ nonsense, forget film and enjoy these lenses better than they ever were back in the day by using a modern digital sensor and a short shutter speed. The later M10R (40mp) and M11 (60mp) upped the resolution ante and dynamic range, so you can expect even better results with these later digital bodies.

Drawbacks?

Sure, the ancient single coating on older lenses is far less flare resistant than the multi-coating applied to modern optics. But then again, the film era snapper did not have Lightroom, and a couple of simple tweaks on the sliders, especially the ‘dehaze’ one, and your ancient lens just acquired the equivalent of modern coatings. Takes less time to do than to write.

Age:

With lenses over 50 years old expect to have quite a search for good examples. Lubricants dry out, multiple owners suggest a possibly troubled history, poor storage leads to rust or oil on the diaphragm blades with haze, scratches and mould common. So be a skeptical buyer and ask all the right questions to put matters on the record with eBay should the seller lie to you.

Enhancements:

  • The shoulder bag is described here.
  • The 21mm finder is described here
  • Replacement of the ghastly red dot is here.
  • The added silicone dome on the Focus button is here.

Non-Leica glass:

If you think only Leica glass should grace a Leica body cease reading this. Any number of aftermarket makers made and make fine optics for the Leica rangefinder bodies. Get real.

When I acquired my Leica M10 I was certain of one thing. I was not going to buy Leica glass – new or used – at the exorbitant prices demanded. The sole exceptions are the Leitz Canada 90mm Tele-Elmarit, as it is bargain-priced on the used market, and the similarly bargain-priced 135mm Elmar. Some of the great classic Leica Thread Mount (LTM) lenses were made by Canon in the 1960-70 era and these are abundantly available used, albeit largely from Japanese vendors whose prose on eBay is optimistic, to put it mildly. ‘Mint’ in Japanese English pretty much means ‘shot’, as often as not. But that’s nothing some serious due diligence, done before hitting the ‘Buy’ button, would not overcome. Canon made some outstanding lenses in that era.

While there are many new contemporary Chinese lenses to be had at bargain prices, most have very large apertures along with the bulk and weight those bring, not in keeping with the Leica concept of ‘small camera, small lens’. Plus I’m naturally averse to buying products from a nation sworn to destroy us. So those were not candidates.

Outlay:

My total outlay for all five optics was $1,500-$1,600, which is half the amount you can expect to pay for one contemporary used Leica lens. That’s more a comment on Leica’s ridiculous pricing, not on my ability to track down bargains. Here they are with links to my historical notes as well as to resolution tests. You can pretty much correct for most lens faults in Lightroom but you cannot find resolution if it’s missing. In summary, these old lenses have never been better.

The cost shown below in all cases includes a protective UV filter (do not waste money on Leica branded filters which cost ten times what regular ones sell for) and an LTM-to-M bayonet adapter for the three LTM lenses. Again, avoid the Leica branded adapters ($$$). I do not use lens hoods, finding them to largely be a waste of time, with bulk added. If you get flare the ‘Dehaze’ slider in LRc is your friend.

Finish quality:

Engraving quality on the three Canon lenses is as good as it gets, meaning Leica quality, and the paint filling shows no sign of fading or discoloration. Black anodizing and satin chrome and equally high quality. Those on the Voigtländer are a step down and quite why they cannot provide proper indexes for mounting and for the aperture ring is a mystery. The paint fillings on the aperture ring of the Leitz 90mm lens were badly faded and had to be refreshed. Easy fix.

6-bit coding:

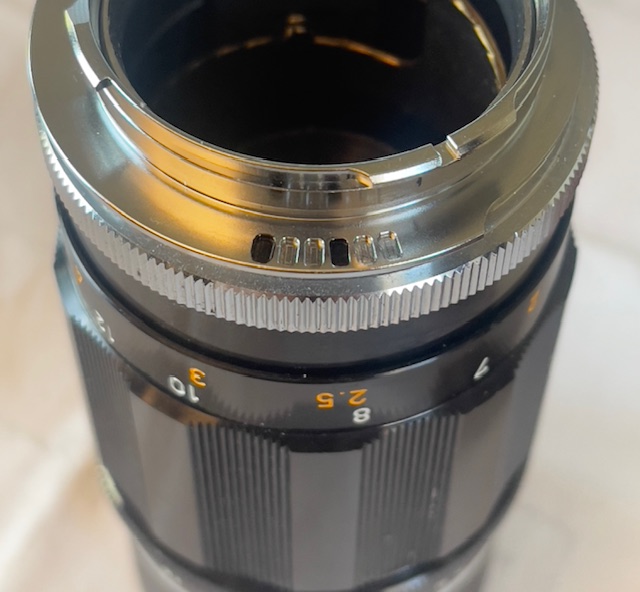
6-bit coding is the bees’ knees, enhancing already fine performance with digital sensors. It’s also very easy to add. I use the cheap Fotodiox LTM-to-M bayonet adapters which come in plain and 6-bit coded versions for very little. All five are 6-bit coded to ensure correct EXIF lens data. The Tele-Elmarit came with a 6-bit flange but I had to add codes to the other four lenses.

Optical quality and weight:

All five are optically and mechanically outstanding with most peaking a stop or two down from fully open. The exception is the 135mm Elmar which is pretty much perfect at full aperture. Weights below are with a UV filter in all cases and LTM-to-M bayonet adapters for the three Canons. The weight of all five optics combined is just 2 lbs. 12 ozs. with only the 135mm not really being pocketable.

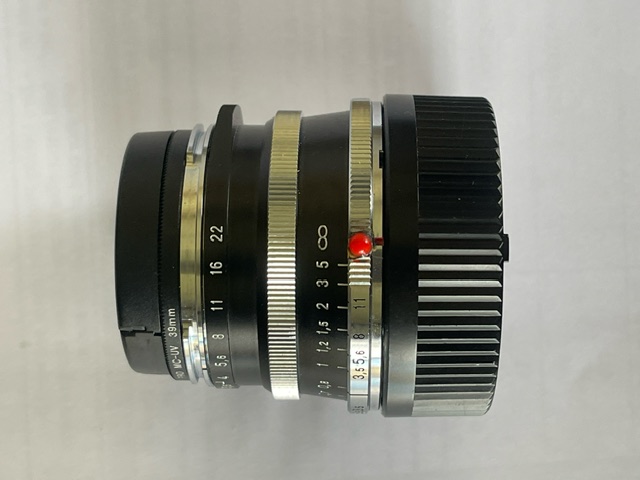
Very wide – 21mm f/3.5 Voigtländer Color-Skopar VM Aspherical:

Background: Here
Resolution tests: Here
Cost: $350 used – like new
Crappy 21mm finder: Here.
Filter size: 39mm
Minimum focus distance: 0.5 meters, couples down to 0.6 meters
Weight: 185 grams/6.5 ozs. The finder adds 0.2 ozs.
6-bit code: ‘000001’ (Elmarit-M 21mm f/2.8)
Modifications: Red dome mounting index added. Aperture index added on UV filter.
Leica equivalent: 21mm f/3.4 Super Elmar-M ASPH – $3,600
Notes: The Color-Skopar is available new for $650. The stock mounting and aperture indexes are shockingly poor. The lens is optically outstanding but flare resistance is no better than with the older lenses. US seller.

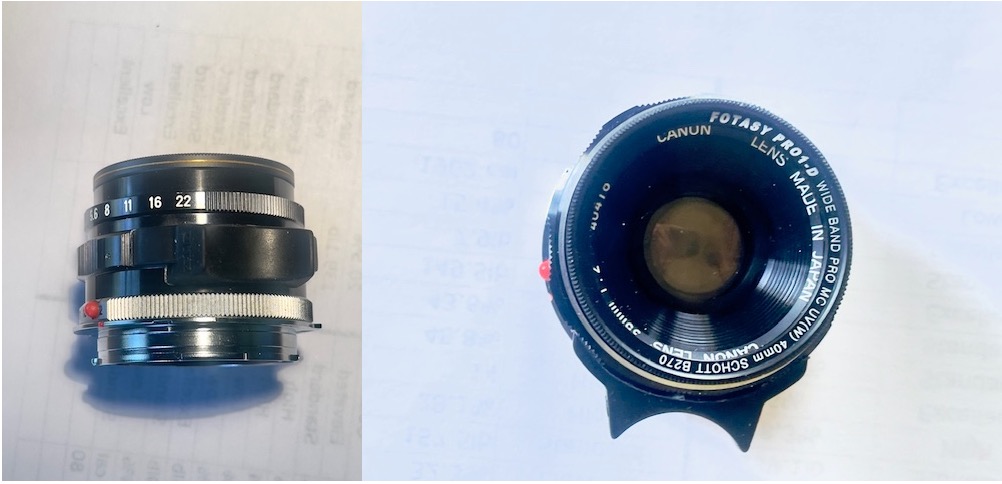
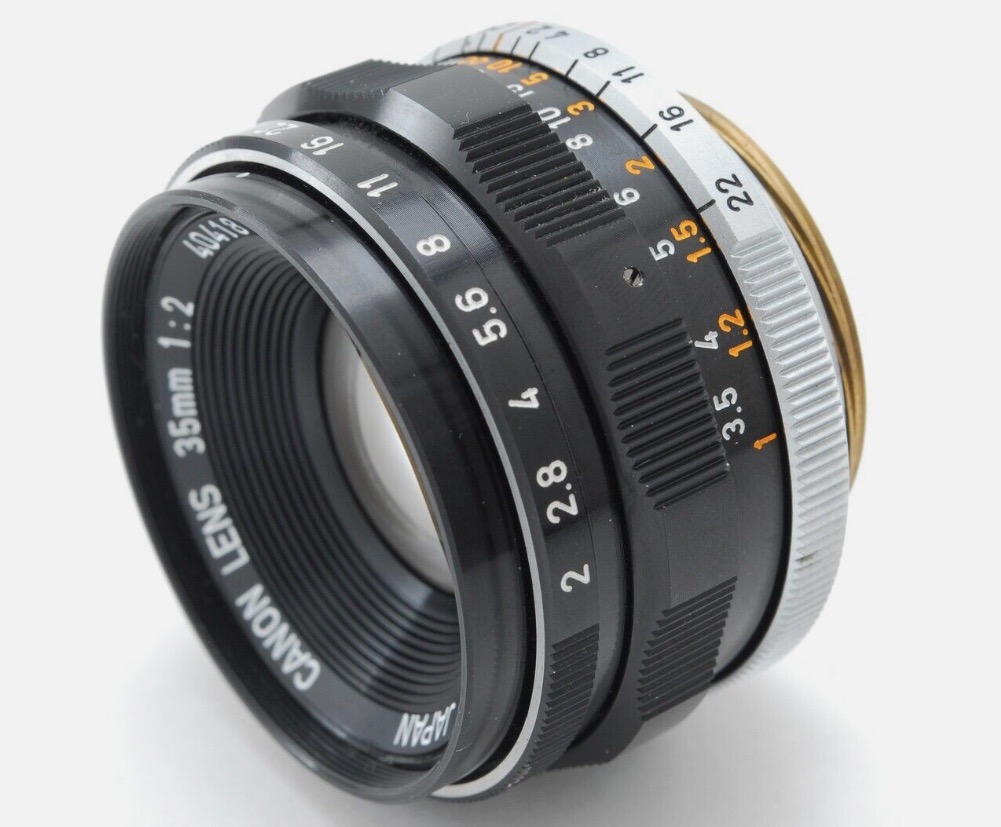
Wide – 35mm f/2 Canon LTM:

Background: Here
Resolution tests: Here
Cost: $400 used – like new
Filter size: 40mm
Minimum focus distance: 1 meter
Weight: 139 grams/4.9 ozs.
6-bit code: ‘000110’ (Summicron-M 35mm f/2 (IV))
Modifications: Red dome mounting index added.
Leica equivalent: 35mm f/2 Summicron-M ASPH – $4,200
Notes: An absolute gem, if you can find a clean one. Japanese seller.

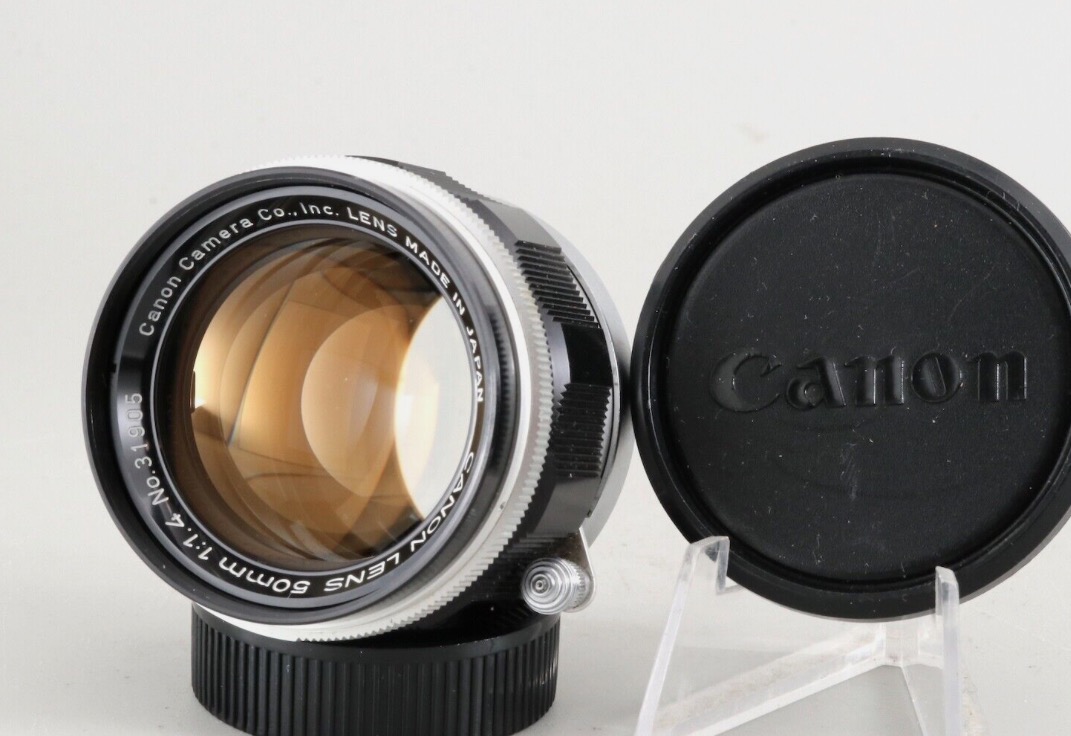
Standard – 50mm f/1.4 Canon LTM:

Background: Here
Resolution tests: Here
Cost: $300 used – like new
Filter size: 48mm
Minimum focus distance: 1 meter
Weight: 269 grams/9.5 ozs.
6-bit code: ‘000101’ (Summilux-M 50mm f/1.4 (II))
Modifications: Red dome mounting index added.
Leica equivalent: 50mm f/1.4 Summilux-M – $4,800
Notes: The lens locking button fell off and I had to procure an aftermarket spring to get things back together properly. That and a drop of Loctite 242 to keep the assembly bolted together. A fine lens if you can find a clean one. Japanese seller.

Portrait – 90mm f/2.8 ‘thin’ Tele-Elmarit:

Background: Here
Resolution tests: Here
Cost: $460 used – good user, some dust inside, otherwise clean glass
Click stops: Irritating half stop clicks
Filter size: 39mm
Minimum focus distance: 1 meter
Weight: 217 grams/7.7 ozs.
6-bit code: ‘000100’ (Tele-Elmarit-M 90mm f/2.8 (II))
Modifications: None
Modern Leica equivalent: 90mm f/4 Macro-Elmar-M – $4,200
Notes: It’s tiny, and bargain-priced as these things go. Stop it down to f/4 or smaller and it’s excellent at all apertures thereafter. I had to refill the paint fillings for the faded aperture markings. US seller.

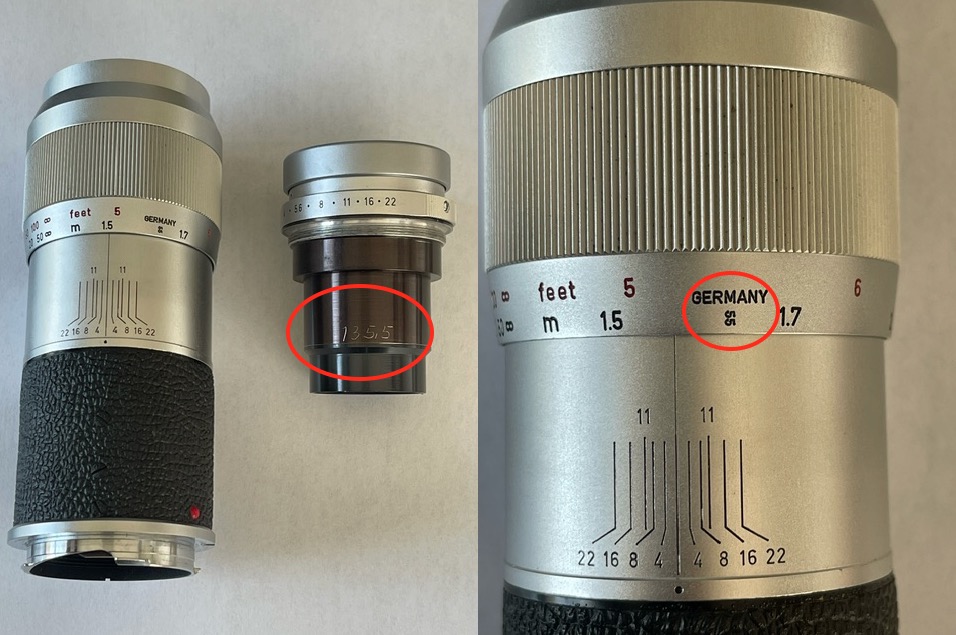
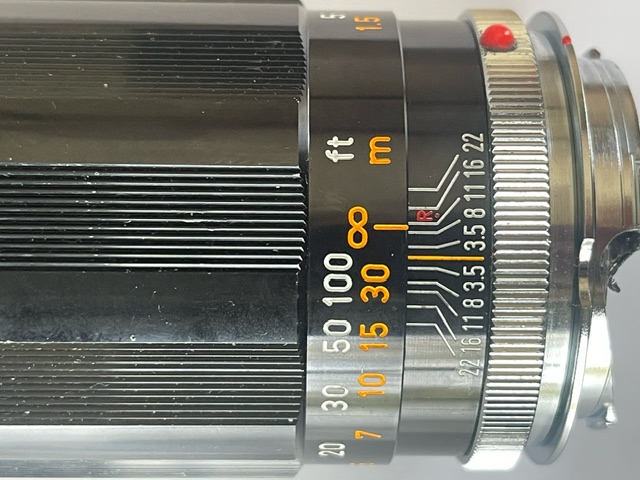
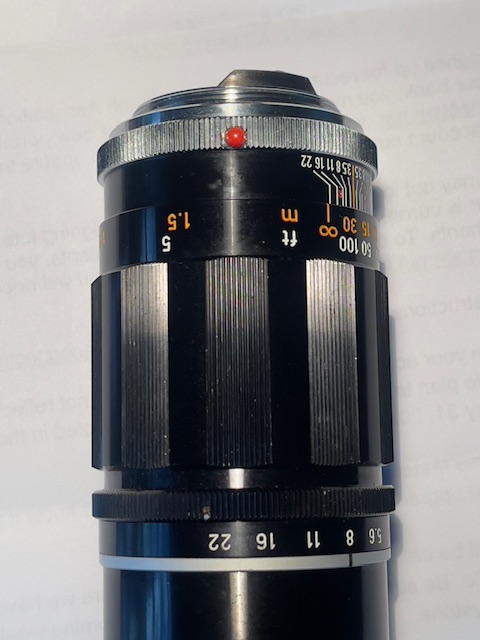
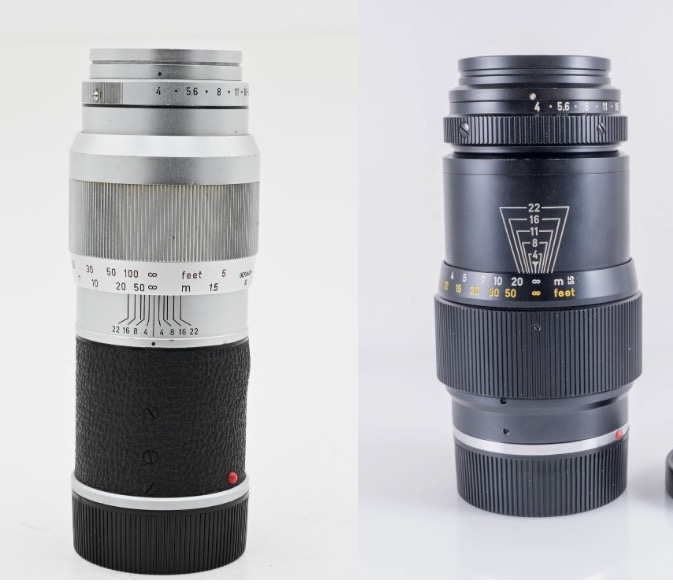
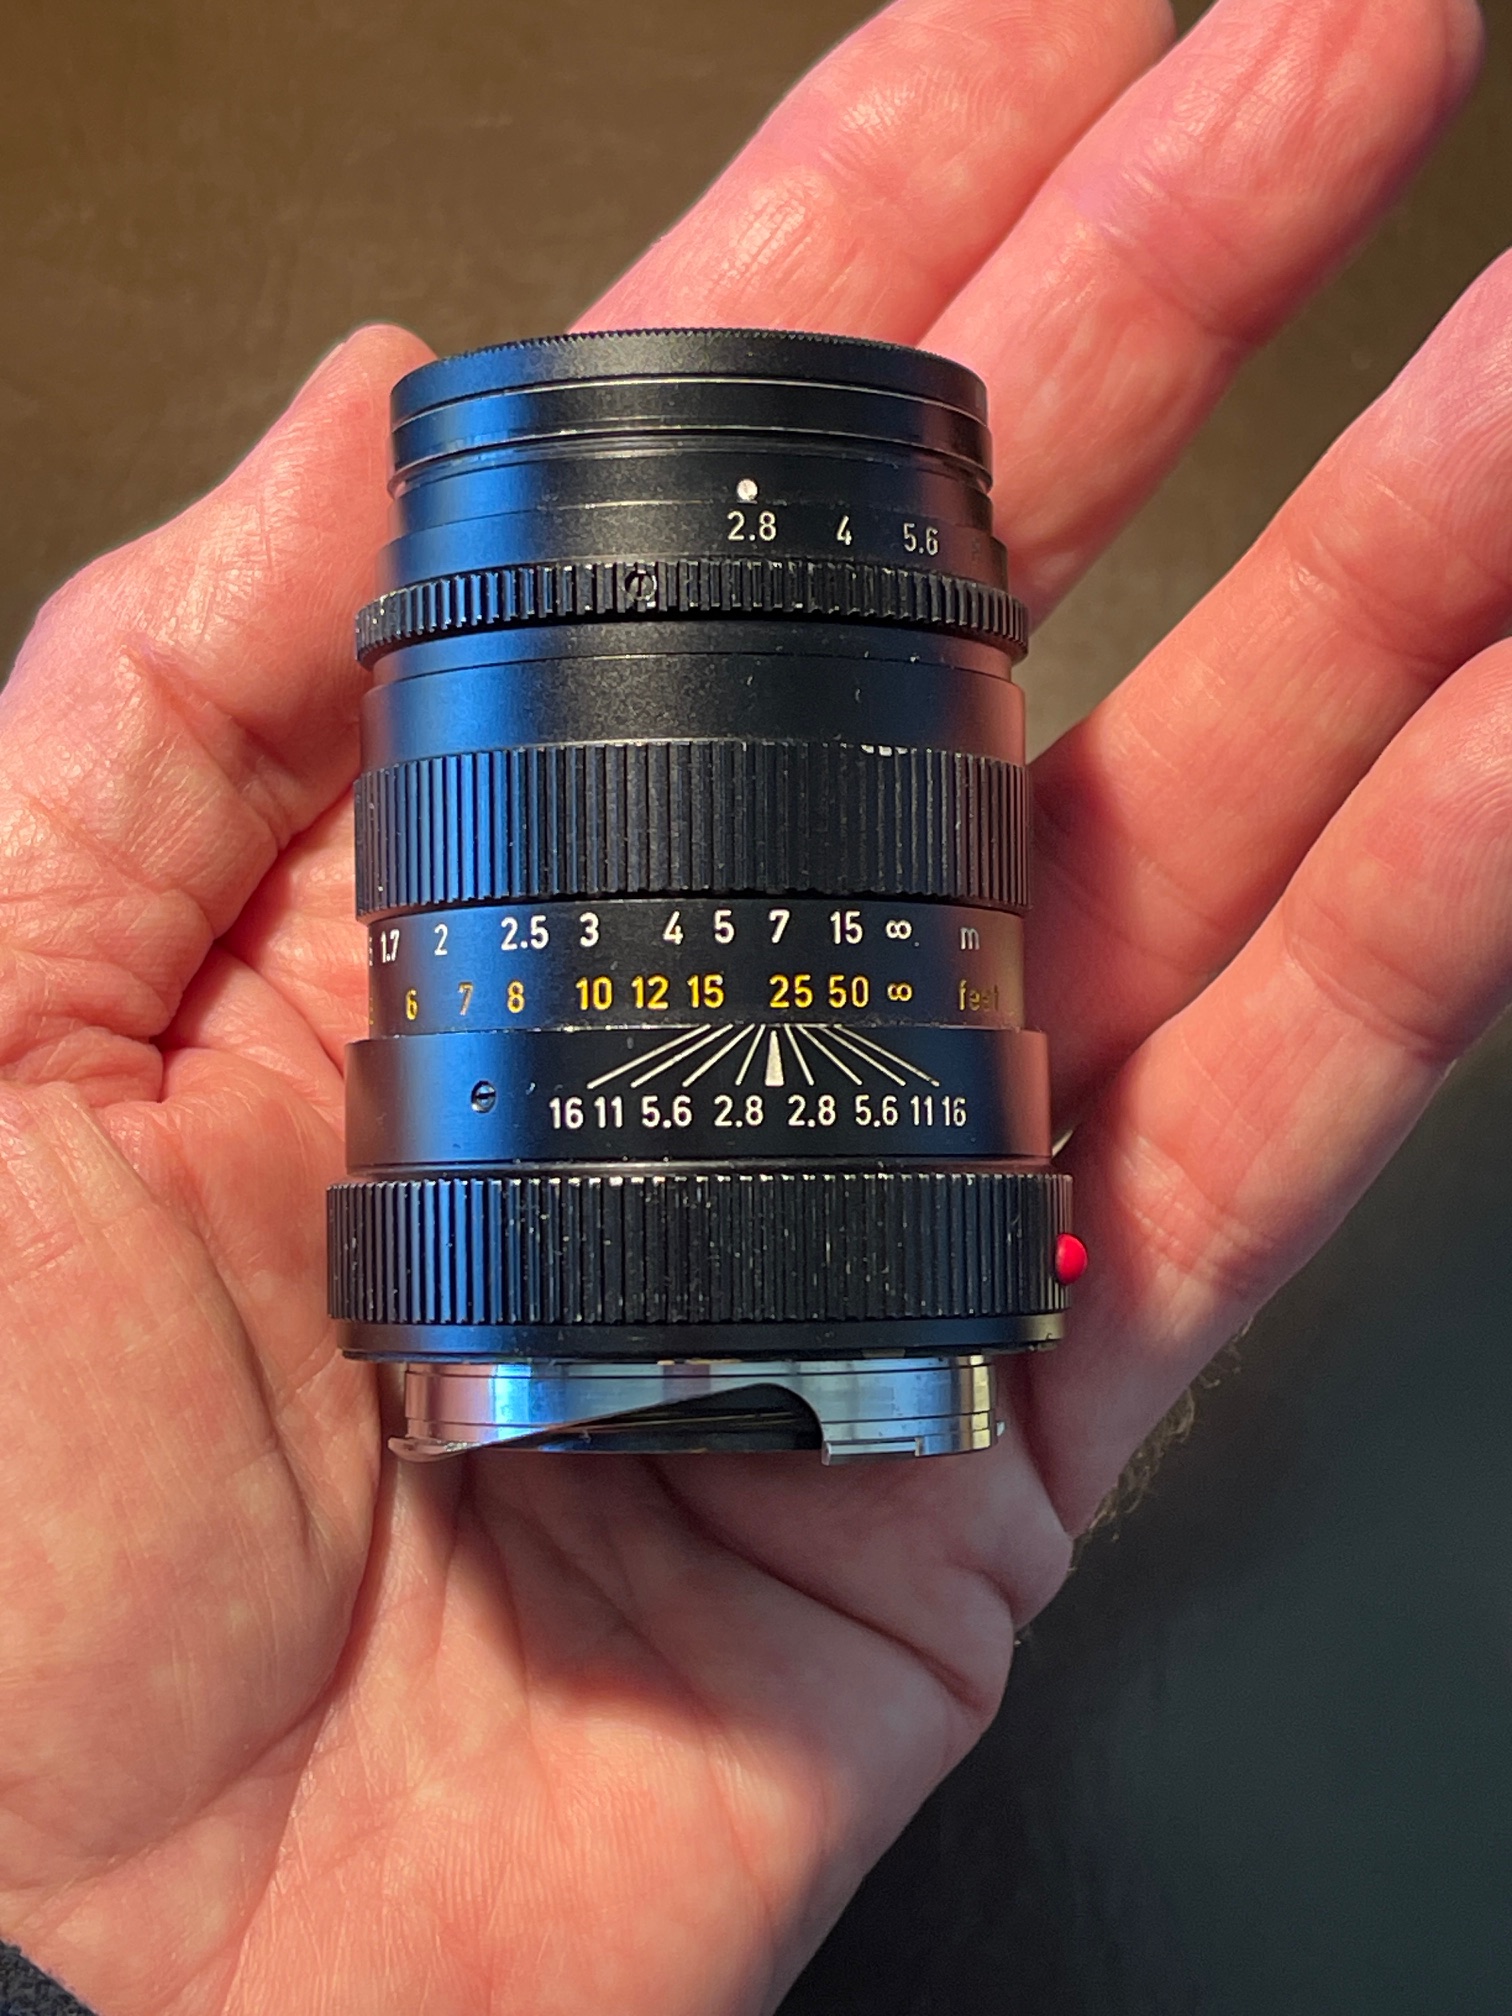
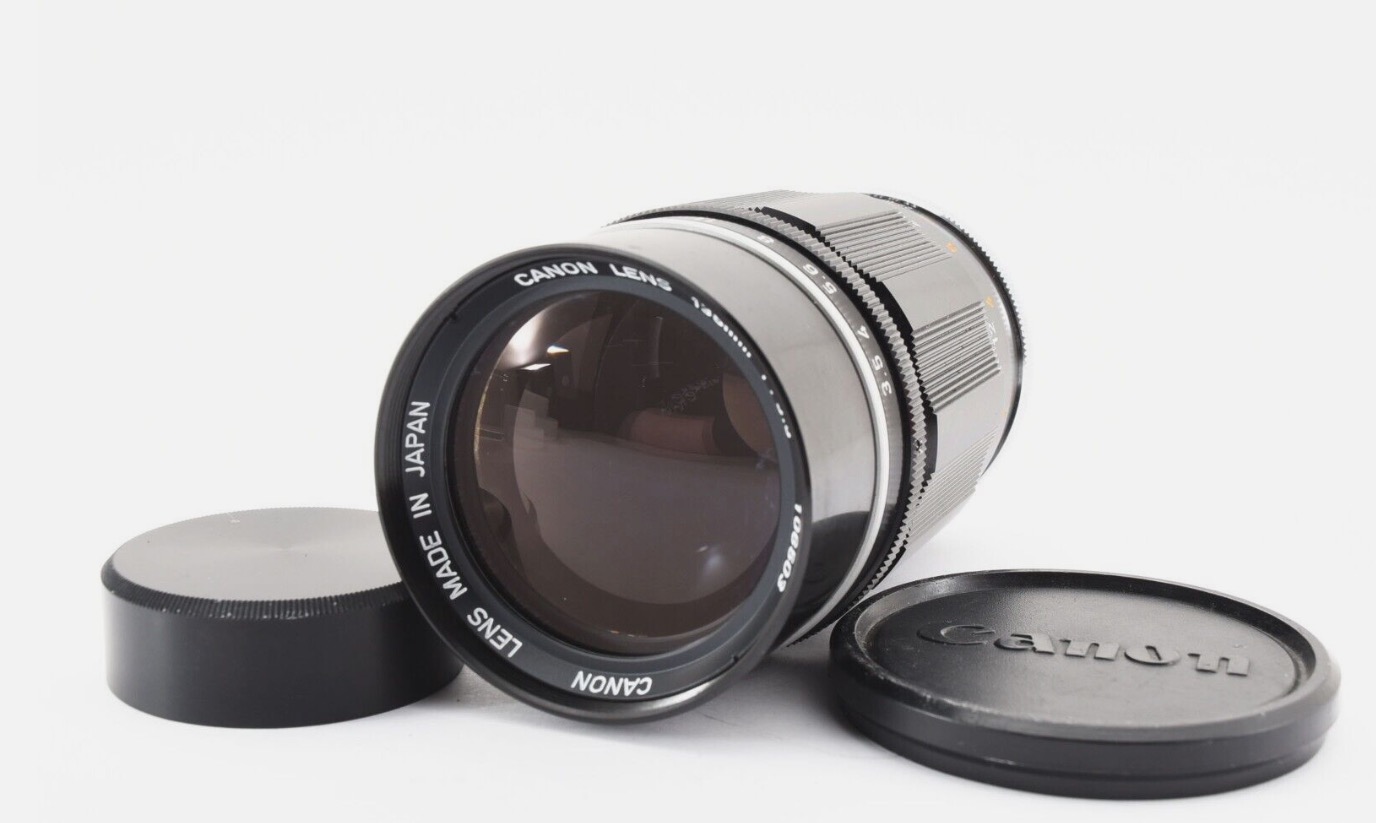
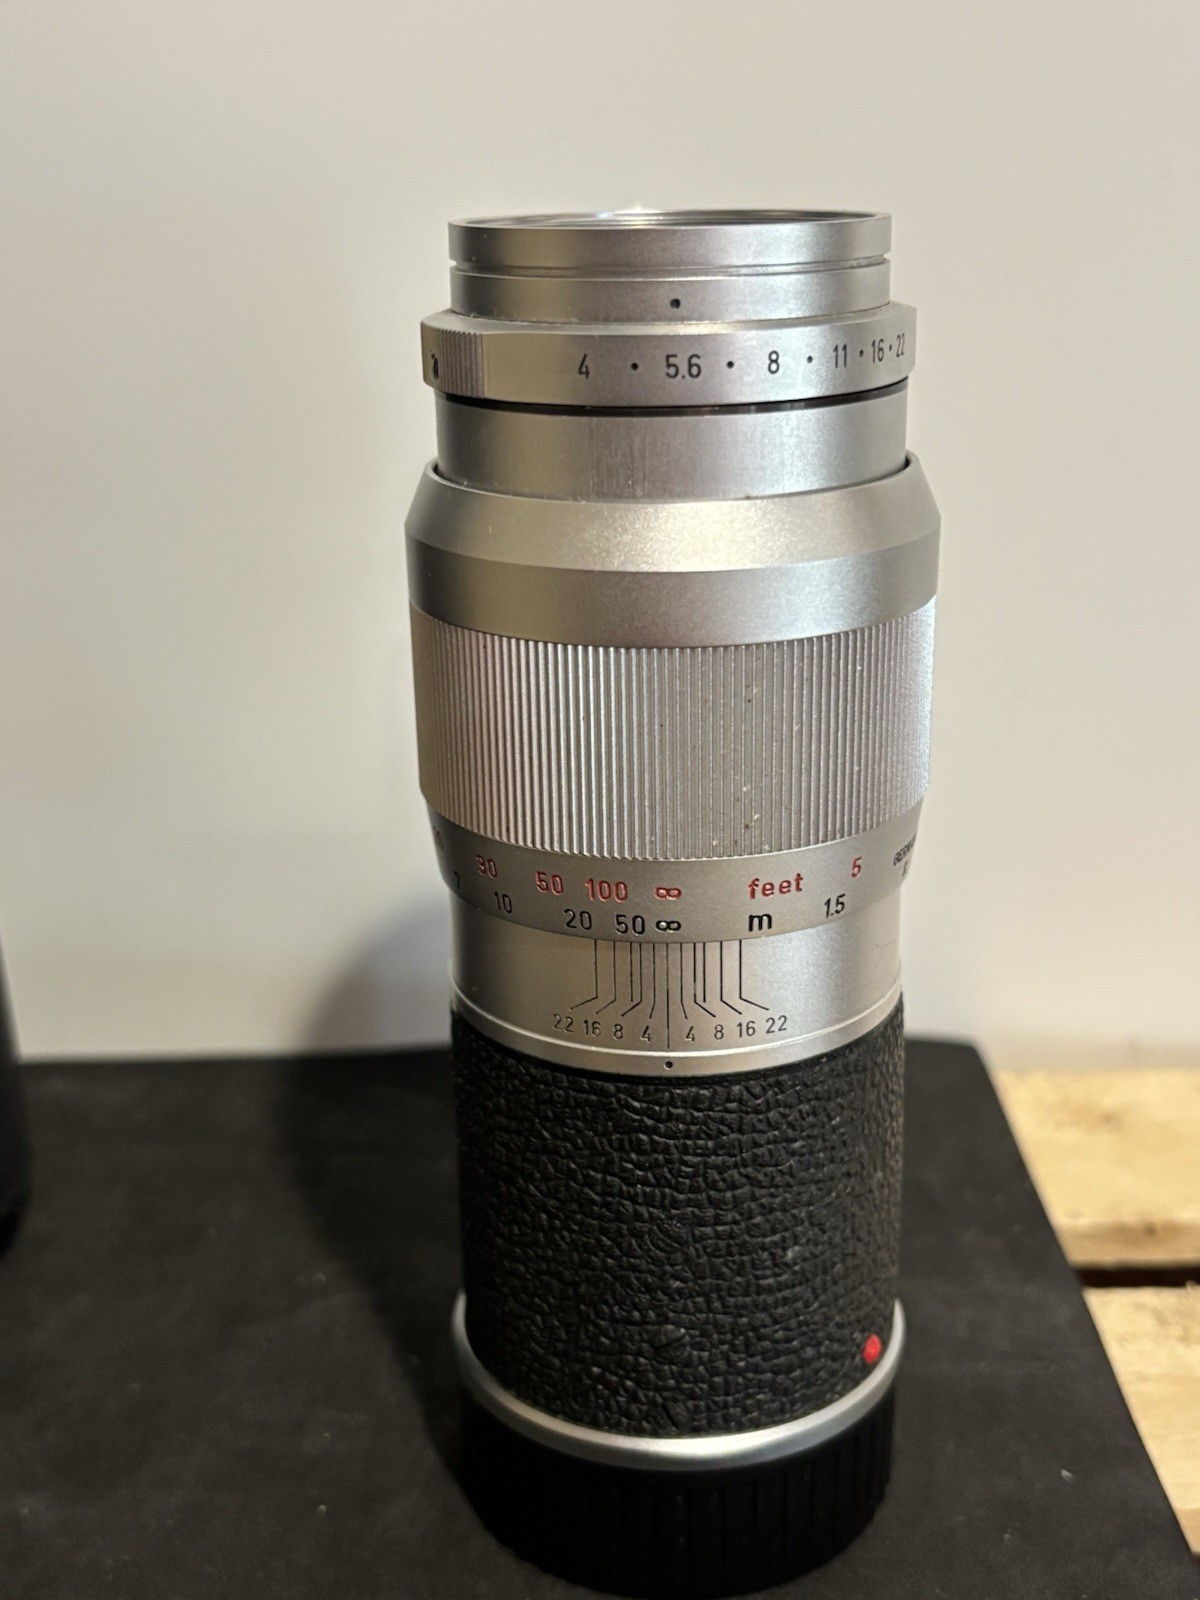
Telephoto – 135mm f/3.5 Canon LTM or 135mm f/4 Leitz Elmar:


Background: Here
Canon resolution tests: Here
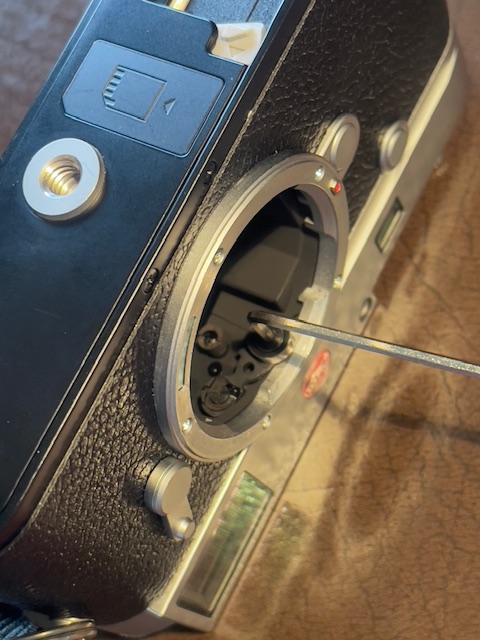
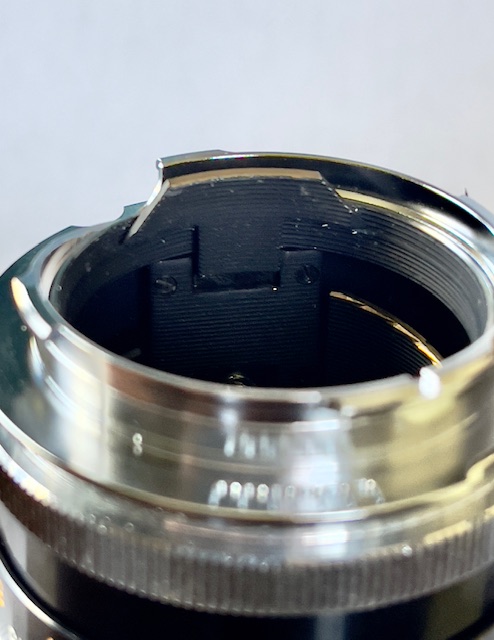
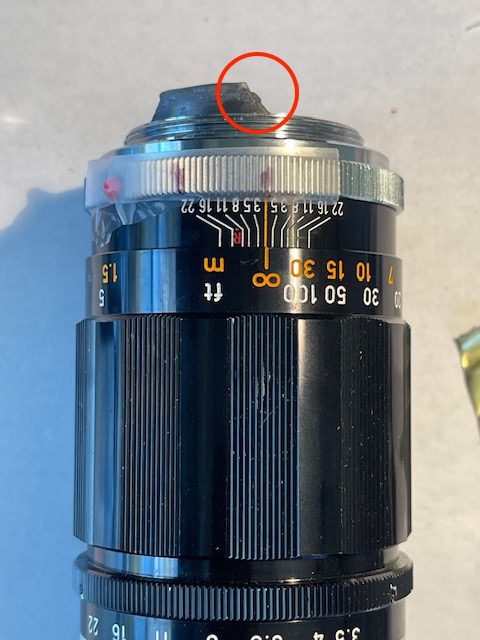
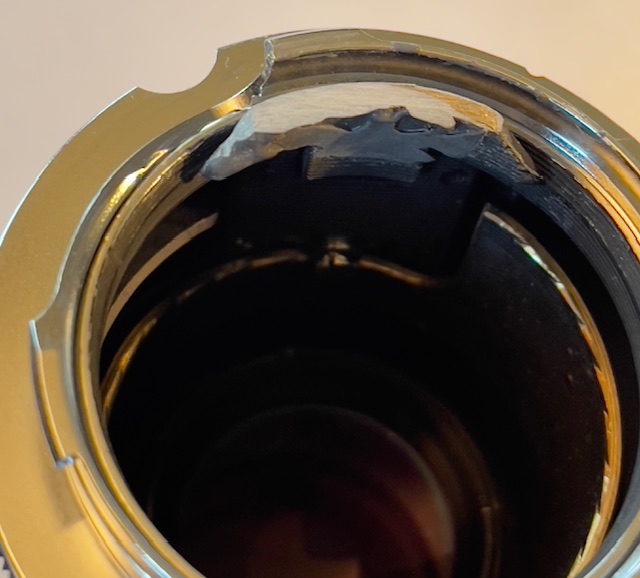
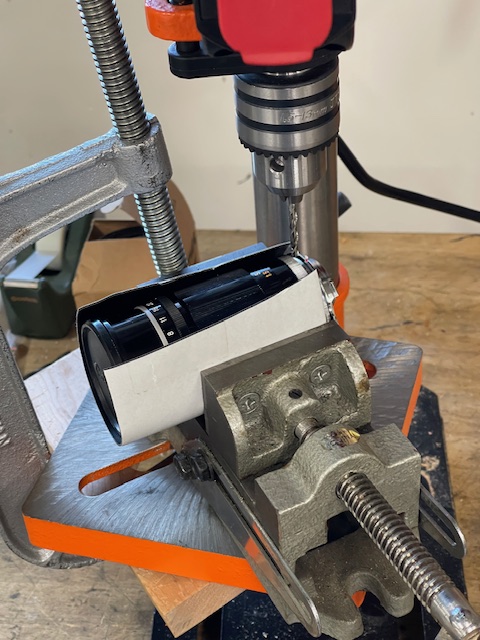
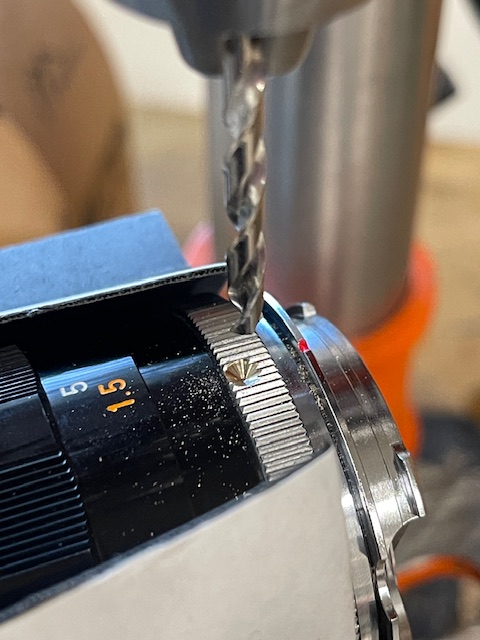
Canon modifications: Red dome mounting index added. Focus cam extended and modified with epoxy for accurate focusing. The stock positioning of the cam prevents the rangefinder in any Leica M from working properly.
Cost: Canon – $148 used – mint, close to new. Leitz – $262 – used, mint
Click stops; Full stops on the Canon, frustrating half stops on the Leitz
Filter size: 48mm/39mm
Minimum focus distance: 1.5 meters
Weight: Both – 446 grams/15.8 ozs.
6-bit code: Canon – ‘001001’ (Elmarit-M f/2.8); Leitz – M10 set to 135mm f/2.8 uncoded lens
Modern Leica equivalent: 135mm f/3.4 Apo-Telyt-M – $3,400
Notes: Both are as good as it gets for very little money. The Canon is the 8th and last version made, 1971. Japanese seller. The Leitz was made in 1960. US seller. While the Canon needs cam modification, the Leitz lens works straight out of the box. In either case correct rangefinder alignment is critical for accurate focus and even then accurate focus remains a challenge at larger apertures and/or closer focus distances. I recommend focus bracketing. The Elmar is meaningfully better than the Canon as regards both resolution of fine detail as well as absence of flare at all apertures. Make Really Large Prints and you will see the difference. But it also costs a little more. The Leitz lens cannot be 6-bit coded but by leaving the camera manual lens setting at ‘135mm f/2.8 Elmarit’ that profile is automatically invoked when this sole uncoded lens is mounted. All the other lenses are 6-bit coded and will invoke the correct profile for each, overriding this manual setting.

135mm f/4 Leitz Elmar lens

A fine long focus optic.

For an index of all Leica-related articles click here.


The 135mm f/4 Elmar on my Leica M3. Leitz ball head and tripod.


The lens head detached. The assembling technician has
scribed the exact focal length of 135.5mm on the inner tube and
the “55” engraving on the external focus collar confirms this.

Background:

The 135mm focal length for Leica M rangefinder cameras has largely fallen from favor, yet it’s an intriguing optic, especially if strongly out-of-focus backgrounds are called for. It poses some challenges in use but this lengthy piece gives background to its use for best results.

While the 135mm Canon LTM is an excellent long focus lens I could not let the chance of snapping up a pristine Leitz 135mm Elmar at a bargain price pass. I paid $260 shipped from a US seller. Made between 1960-1965 the lens was replaced by the telephoto design 135mm f/4 Tele-Elmar (physically shorter if probably no sharper), and later by the 135mm f/3.4 Apo-Telyt. Indicative used prices are $250-300 Elmar, $350-400 Tele-Elmar and $silly for the Apo-Telyt. 135mm Elmars are a bargain as that focal length has largely fallen out of favor with Leica M users and, indeed, Leica no longer lists any optics in this focal length. However, all M Leicas save the M2 (and the M1, MD, etc.) include the 135mm frame in their various viewfinders.

Choosing a lens:

When looking for an Elmar of this vintage be aware of the usual bugbears – uneven focus collar resistance, oil or corrosion on the aperture blades, haze and mould. And, of course, look out for lenses from previous owners who saw to it that their use of a tie to clean the front element wreaked havoc on the soft lens coating of the time, leaving scratches galore. One thing you do not have to worry about is balsam separation as the simple four element design has no cemented components. Used examples are abundantly available.

The design:

This is a no compromise mechanical design with a 12 (!) leaf diaphragm, solid brass internals and a vulcanite covered rear part to break up the large area of satin chrome. That number of diaphragm leaves sees to it that out-of-focus areas are rendered smoothly with no ugly polygonal artifacts. And yes, there’s a red half dome index for easy mounting of the lens on the M body. The lens is a delight on any Leica M, and no one does satin chrome finishes better. Beautiful to behold and very hard wearing. If you are into patina, look elsewhere. You want a black anodized finish? Prepare for ugly wear. Though made in Germany, it was designed by the great Walter Mandler at the now defunct Ernst Leitz, Midland, Ontario factory in Canada, so you get the best of the New World and the Old.

Like the Canon the Elmar has a very long focus throw of some 345 degrees from infinity to 5 feet. At 5 feet, without a hood, the tip of the lens with a UV filter fitted just touches the lower right corner of the related finder frame, meaning the body of the lens never interferes with the finder’s view on an M10. While the long focus throw does not make for fast focusing it does allow precise focusing and, believe me, you need that at larger apertures and shorter focus distances. The lens weighs 15oz/426 grams without caps but with a protective UV filter (39mm) fitted.

Rangefinder adjustment is critical:

The need for a properly aligned rangefinder cannot be overstressed with a 135mm lens. You need a 2mm Allen wrench to adjust the eccentrically mounted cam follower/roller, and I suggest you photograph a bookcase with a row of books at an angle to the camera, the camera on a tripod and the lens at full aperture, focused near the minimum distance of 5 feet. Books? Because the fine print on their spines makes for easy determination of the point of optimum focus. Tripod? Because you do not want to confuse movement blur with inaccurate focus. Take a snap then adjust the roller/cam follower as shown, take another snap, and so on, until the book’s spine you focused on and the sharpest spine in the image imported to Lightroom are one and the same:


Make adjustments of no more than 2-3 degrees of arc at a
time and iterate the process until focus is perfect.

It took me a good half dozen attempts before I nailed it, but boy, was it satisfying or what? You really see what this lens is capable of with this simple process.

To give you an idea of the sensitivity of this setting a movement of 2-3 degrees of the Allen screw in the eccentrically mounted cam roller results in a focus change of 2-3″ at a focus distance of 7 feet. 2-3 degrees? That’s a small enough amount that you can barely tell that you have rotated the screw. That screw is stiff by design so take some time to get a feel for the amount of torque needed to turn it and take it a bit at a time to avoid frustration. This way you should be able to creep up on the optimal setting not oscillating crazily either side of what is needed, finally taking it one step too far and then backing it off to perfection. To make things easier, keep the tripod in a fixed position and the lens focus collar setting unchanged. If you refocus each time you are introducing another variable – operator focus error. Stick some Scotch tape on the focus collar to prevent accidental movement. On a film body, like an M2 or an M3, the adjuster is a slotted screw so you’ll need a right angled screwdriver to properly access it. Alternatively, grind down the tip of your screwdriver to an acute angle. (Or buy one from Leica for $5,000, I suppose). And good luck round-tripping this process using film! By the way, it only took Leica some 50 years to realize that an Allen head was a superior answer to the slotted screw original. Still, they had used that design for over 50 years, so why change it? Sometimes I think that the pace of change at Leica makes the Vatican look like it’s speeding ….

Which is out of alignment – camera or lens?:

In my experience Leica rangefinders go out of adjustment far more easily than Leica lenses. It’s more likely your rangefinder is incorrectly adjusted than your lens, unless the latter has been dropped. The analytical process is simple:

  • Optimize your rangefinder as above with the 135mm lens at full aperture. It does not get more critical than that.
  • Now swap the 135mm for a shorter lens and take test snaps at full aperture.
  • Into LRc and see whether the point of optimum focus is what the rangefinder tells you. If it is, well and good.
  • If not one or other of your two lenses is out, so try with a third lens.
  • If the two shorter ones are both out then the 135mm needs adjustment. This is a job for an experienced technician and not a DIY project. Reckon on $150 plus postage plus time. You might as well get the lubricants refreshed while you are at it. Also consider asking the technician to add 6-bit coding pits.
  • Chances are that if your 135mm is correctly adjusted to your rangefinder all shorter lenses will be fine, as small focus errors will be covered by increased depth of field with the shorter lenses. By the time you get to 35mm or 21mm DoF is so substantial that you can almost guarantee the rangefinder will deliver sharp results.

In camera lens correction profile:

I have found the 135mm f/2.8 Elmarit in-camera profile of the M10 delivers the best corner detail, noticeably so at large apertures with pixel peeping at 100% in LRc. (The other choices in the M10 are the 135mm Tele-Elmar and the 135mm Apo-Telyt). The Leitz 135mm Elmar cannot be 6-bit coded (unless you send it out to a technician to have the code pits engraved) but by leaving the camera’s manual lens setting at ‘135mm f/2.8 Elmarit’ that profile is automatically invoked when this sole uncoded lens is mounted. All my other lenses are 6-bit coded and will invoke the correct profile for each, overriding this manual setting when mounted on the M10. Images show no distortion or color fringing and little except depth-of-field is gained by stopping the lens down. It has excellent resolution even at full aperture, all the way to the corners, reflecting Leitz’s early use of rare earth glass in its design.

The non-rotating focus mount:

The lens has a double helicoid focusing mount – unlike the single one in the Canon – meaning the aperture ring does not rotate as the lens is focused. Nice, though why Leitz chose to add click-half stops beats me. A solution looking for a problem. At least the aperture settings are equally spaced. So why does the lens have a mirror aperture scale underneath the regular one? Because the lens head is detachable to use on short barrel focus collars when fitted to the old Visoflex mirror box and the focus mounts for those are single helicoid, meaning the aperture ring rotates when the lens is focused.

The depth of field scale:

I also suggest you disregard the engraved depth of field scale. This was determined assuming far smaller print sizes – using film – than permitted by modern digital sensors. DoF for a 13″x19″ print is far shallower than for a 5″x7″ one. Stated differently, DoF for big prints is considerably less than the DoF scale on the lens suggests.

The Visoflex reflex housing:

No one in his right mind uses the old Visoflex any more – though it fits the M10 body perfectly – but credit to Leitz for their foresightful thinking. In the 1960s when this lens came to market Leitz was struggling mightily to keep up with innovative, landmark camera and lens designs from the likes of Nikon and Pentax. Unfortunately, the clunky and massive Visoflex II and III were not exactly in keeping with the Leica design ethos, and probably did little to stem the bleeding of sales to the Japanese. The massive hunk of the prism viewfinder of the Visoflex added weight but not brightness to the image viewed through it. Not that it was a new idea for Leitz. The pre-war Visoflex I was even clunkier, but sort of worked and all three are fine for lab work, especially with the waist level finder fitted. And SLRs did not exist pre-war so the Visoflex was the only game in town. Modern digital Leicas accept the later EVF versions of the Visoflex which looks every bit as wrong on the camera as the old mechanical one, though mercifully it is much smaller and lighter. The Leica M is a rangefinder camera, but Leica continues to deny this with the EVF. Forget all this nonsense with reflex housings/kludges.


The Visoflex II on an M3 with the 200mm Telyt.

To compound their problems Leitz introduced the Leicaflex in 1964, a design which was immediately a generation behind the best from Japan. But that’s a story for another day. Suffice it to say that when it came to shooting themselves in the foot, Ernst Leitz had awesome aim in the 1960s. But there was little wrong with the 135mm Elmar whose use of newly computed glass formulae was truly state-of-the-art.

Getting best results:

None of these diversions should deter ownership of the 135mm Elmar as a long, rangefinder coupled lens. To get the best results, just make sure your rangefinder is accurately tuned to meet the focusing demands of this fine and inexpensive lens, and use fast shutter speeds to minimize definition destroying camera shake. Better to up the ISO for a shorter shutter speed and get some grain than have an image ruined by motion blur. Sometimes those can be recovered, but don’t count on it.


Kids at play. M10, 135mm Elmar at f/8. A crop from 1/4 of the file.


Walking the pug. M10, 135mm Elmar at f/8.
Click the image for a big version.

First results appear here.

Resolution tests appear here.

A focus tab for the 35mm f/2 Canon LTM lens

A handy improvement.

For an index of all Leica-related articles click here.


The 7Artisans tab in place on the Canon 35mm f/2 LTM lens.

Leica originally fitted its 35mm lenses with a locking plunger as a focus collar aide. This would lock focus at infinity, making removal from the M’s bayonet mount easier (there’s little to grip at the base of the lens) as well as providing purchase for the left index finger for focusing. It works well.

Some time in the 1960s this plunger gave way to a shaped protrusion which is, if anything, even better. Some lenses retained the infinity lock though that’s largely gone out of fashion. The point remains that the focus collar on small 35mm lenses is narrow and not that easy to grasp and the protrusion makes focusing much easier.

I am finding that the 35mm f/2 Canon LTM lens, with a bayonet adapter for the M body is an outstanding optic, very much at home on the M10. Small, fast, wonderfully sharp, and pretty much the standard lens for street snapping. Having added a glued-on half dome index for easier mounting of the lens, it remained to do something about the total absence of a focus tab. Strangely, while Canon includes a locking tab on the 50mm f/1.4 LTM lens, none is to be found on any of the many versions of the 35mm optic.

7Artisans to the rescue.


Correct placement.

The 7Artisans ‘focus wrench’ (!) is available from Amazon for under $10, and includes a (3M, no less, if you believe that) sticky contact patch. It adheres well. What’s not to like?

Canon 135mm LTM resolution test

A handy telephoto lens.

For an index of all Leica-related articles click here.


The Canon 135mm f/3.5 LTM lens.

I profiled the 135mm f/3.5 Canon LTM lens here. I had to do a bit of work to reprofile and extend the cam mechanism for correct focus but the results are well worth it.

Before revising the cam I made sure that the rangefinder was correctly set using the 90mm Tele-Elmarit. The procedure for adjusting the cam follower (roller) is illustrated here. If your rangefinder is not correctly adjusted – and mine was not when I received the camera – then you are simply wasting time.


A 2mm Allen wrench is used to adjust the cam follower.

The 135mm focal length, especially used at large apertures and/or close focus distances, is really stretching the rangefinder accuracy of the Leica M to its limit. In such cases I advocate using ‘bracketing focus’ – one image nearer than seems right, one at the best apparent rangefinder setting and one too far if you want assurance of peak resolution. With digital that’s a realistic approach. With film reckon on $45 for 3 snaps with one sharp one …. Alternatively there are both 1.4x Leica aftermarket viewfinder magnifiers ($250 used) or aftermarket variants ($100) which enhance rangefinder resolution, but having to screw one into the eyepiece every time you take a picture seems like a royal pain. Further, you will barely be able to see the 50mm frame lines with the magnifier fitted and the 35mm ones will not be visible. So removal is the order of the day if you mount either focal length. (Update 5/5/2025:. I changed my mind on this. While it is inconvenient to have to remove the magnifier for 50mm and shorter lenses to properly see the frame lines, the device adds meaningfully to focus accuracy with longer/faster/near focused optics. See here).

How far is ‘infinity’ as marked on the lens? It’s much further than you might think. In the test images below, the car’s registration plate is exactly 82 yards away from the camera, whereas the roof at the top right is 125 yards distant. There is a clear difference, per the rangefinder, between 82 yards and 125 yards. At 125 yards the lens is indeed set to infinity. At 82 yards it is set thus:


The lens focused at 82 yards.

Stated differently, if you want to insure that when the lens is at infinity the subject is also at infinity, your subject must be 125 yards or more distant from the camera. That’s a long way off. At 82 yards and 100% pixel peeping at full aperture the depth of field is no more than 4 feet fore and aft of the registration plate of the car in these images. That’s as good an illustration of how critical focus is with a lens this long, used with a Leica rangefinder, as I can conceive of. It also shows what an extraordinary feat of mechanical/optical engineering the Leica rangefinder is to this day, and has been since the first M3 in 1954.

Here are the test images taken at all apertures from f/3.5 down to f/22 – the lens is coded ‘001001’, where ‘1’ denotes a black paint filled pit. The lens is so distortion and vignetting free that there is no need to use a lens correction profile in LRc when processing images. These images are SOOC, and I used a monopod to minimize camera shake.


Test images from f/3.5 to f/22. The apertures shown are incorrect.

You can view all 8 images in medium size by clicking here.

To view full size 22mb originals click here. It’s a large file so be patient when downloading. You can zoom in on these to your heart’s content.

Conclusions?

  • Hard to focus correctly using the rangefinder at full aperture and/or short subject distances
  • Mild flare at f/3.5, disappears by f/5.6.
  • At f/3.5 the whole frame is usable with a touch on the LRc ‘Dehaze’ slider and will easily make a large print with excellent resolution if focus is correct.
  • At f/5.6 the resolution is high across the frame.
  • There is little change in resolution hereafter through and including f/22. If there’s any diffraction at the smallest aperture it’s nearly impossible to see.
  • Peak definition is reached at f/5.6 but there’s very little to choose between any aperture from f/5.6 to f/22.
  • No meaningful color fringing at the edges of the frame at any aperture. The lens is 6-bit coded as a Leitz f/2.8 135mm Elmarit-M which delivers the best result of the three coding options for 135mm lenses in the M10’s firmware.
  • There is no LRc lens correction profile available so I use the one for the 135mm f/3.4 Apo-Telyt-M. The only noticeable difference is correction of very minor pincushion distortion, but it’s not really necessary other than in architectural photos taken straight on.

By the way, disregard the f-stop data in the EXIF information. The M10, even with 6-bit coding adapter, does a poor job of estimating the aperture used. (There is no electrical or mechanical link between the lens’s aperture setting and the camera, so Leica estimates the aperture based on the shutter speed and ISO used). Go by the file names, moving the decimal point in the last three digits one place to the left to see the aperture used. So, for example ‘110’ means f/11.

The lens is an outstanding bargain. I paid $120 for mine, shipped from Japan (they are hard to find in the US) and in near mint condition. A 6-bit coded Fotodiox Pro adapter and an odd sized 48mm UV protective filter (New Old Stock found on eBay) added $28 for a total of $148. Not a lot for a fine optic, albeit one which I will use only occasionally. I also had to invest sweat equity in modifying the cam and installing a red dome mounting index, but that’s my idea of fun. It may not work for you, in which case I would look at a good used 135mm f/4 Leitz Elmar at around $250. These are abundantly available. As with all Leitz lenses of this vintage be sure to check for haze, fungus and scratched glass, the latter always thanks to some incompetent who took to cleaning the lens with his soup stained polyester tie.

The 135mm f/3.5 Canon LTM is a fine optic for picking out architectural details and the like and is recommended for its limited specialized uses.

From a reader of the blog:

Reader Bob Palmieri sent me this image, taken with his M10 and the 135mm Canon LTM at full aperture, of jazz saxophonist Sam Taylor, taken in Chicago, 2025. The guitarist in the rear is Park Dendy:


Click the image for a large version.

To see more of Bob’s work check out his photoblog.

Canon 135mm f/3.5 LTM lens

Old and good.

For an index of all Leica-related articles click here.


The Canon 135mm f/3.5 LTM lens on the Leica M10.

Background:

While the 135mm focal length is a bit of a stretch on a rangefinder Leica when it comes to accurate focusing, it’s handy for picking out architectural details and adds little weight to the Leica M outfit. Arguably the best M body for this focal length is the film Leica M3 with its 0.91x viewfinder magnification, but the 0.73x in the digital Leica M10 does at a pinch unless you are close to the minimum focusing distance at full aperture. 135mm lenses are not hard to design so my expectations for performance of this 50+ year old optic are high.

Canon choices:

After the great success I have had with the bargain priced 35mm f/2 and 50mm f/1.4 LTM Canon optics, I thought I would hunt down one of their 135mm lenses. According to this rather sketchy web site there were no fewer than 8 versions of the lens made from October 1952 through January 1975, optically identical. Seems like Canon could not resist fiddling with the cosmetics and engraved details. The paint filled engraved markings on my copy look as new as the day they left the Japanese factory.

With lenses this old it makes sense to try and buy as late a model as possible and that site states that Version 8 had serial numbers between 106647 and 110715. The only physical difference appears to be the identification as “CANON LENS MADE IN JAPAN” as opposed to the earlier “Canon Camera Co., Inc. LENS MADE IN JAPAN” designation. If that’s correct then the serial number range is wrong as my lens has the “CANON LENS MADE IN JAPAN” designation with a serial number of 106503. That makes it Version 8, 1971 vintage. Most eBay listings are for the older Version 7, with Version 8 relatively scarce.

There are a great number of these listed on eBay, most in Japan, and the usual precautions apply. Any mention of ‘tiny balsam separation’, ‘tiny fungus’ or ‘tiny haze’ should see you rushing for the (not so tiny) exit. Mine is mint and cost $120 shipped from Japan, to which I had to add an odd sized 48mm UV protective filter for $12 and the Fotodiox Pro 6-bit coded LTM-to-M adapter for $16, making for a total cost of $148. A modest outlay reflecting the relatively low popularity of this focal length, one which I recall as being all the rage when I was a kid. Times change.

One dated aspect of this lens is the absence of a double helicoid focusing design, meaning the front of the lens and the aperture ring rotate when the lens is focused, necessitating dual aperture scales. This makes use with a polarizing filter difficult. In this regard the 35mm and 50mm Canon lenses are more modern designs, with non-rotating front elements. However, all three lenses have equally spaced aperture settings with full click-stops.

6-bit coding:

The M10’s firmware stores three 135mm Leica lenses:

  • 135mm f/2.8 Elmarit-M with goggles
  • 135mm f/4 Tele-Elmar-M
  • 135mm f/3.4 Apo-Telyt-M

Strangely, every available code table I have found omits codes for the 135mm f/4 Tele-Elmar which my tests disclose is a good choice of lens profile with the Canon lens in terms of absence of color fringing and vignetting. However, if you wish to use this profile there is an easy workaround. As all my other four lenses are 6-bit coded I would simply set the Main Menu->Lens Detection to the 135mm f/4 Tele-Elmar and leave the lens uncoded. Then when this sole uncoded lens is mounted on the camera, the software automatically switches to the manually dialed in lens, the 135mm Tele-Elmar. As long as the Lens Detection setting is not changed, every time an uncoded lens is inserted the camera sees it as the last lens dialed in manually – which is the 135mm Tele-Elmar! Neat.

In practice I have found the profile for the 135mm f/2.8 Elmarit-M to render the best edge detail, noticeably so with 100% pixel peeping in LRc. As my Fotodiox Pro adapter has the engraved pits for coding I coded it ‘001001’ which is the code for the Elmarit-M. Unlike with that Elmarit-M which brings up the 90mm finder frame, enlarged by the goggles, the coded Fotodiox adapter correctly brings up the 135mm frame lines. Then on import to LRc I will simply change the EXIF lens name in files with this lens designation to read ‘135mm Canon LTM’. So for those ‘experts’ who claim 6-bit coding for lenses longer than 50mm makes no difference, I can only say that is not the case in my experience. 6-bit coding makes a noticeable difference with the 135mm Canon LTM lens, and I recommend you do it.


The ‘001001’ code applied to the Fotodiox Pro adapter.
The Leica interprets this as a 135mm f/2.8 Elmarit-M.

Cam modification:


The non-rotating focus cam on the Canon
135mm lens. The actual cam is the brass
ring visible below, which contacts this pusher.

Canon did something very strange with the positioning of the ‘pusher’ focus cam on the rear of the lens. On a Canon LTM camera the focus index on the lens is displayed some 15 degrees to the right of the ‘Top Dead Center’ location of the pusher. Apparently someone at Canon thought it would be a smart idea to make the focus distance visible through the viewfinder though the reasoning behind this decision is lost in history. Which is as well as it’s an utterly useless design decision. This, however, poses a serious use issue with the lens when fitted with the Fotodiox LTM-to-M adapter on a Leica M body. Fotodiox correctly machines the single start thread on the adapter to position the focus index at TDC, as with any other LTM optic. However, this causes two problems:

  • The pusher cam almost misses the cam follower (roller) in the throat of the camera’s bayonet mount as it is offset to the left. This means rangefinder focusing is inaccurate.
  • The lens is located 0.0055″ too far forward on the bayonet adapter for correct focus even were the pusher to properly contact the cam follower. That means focus will be off significantly once the cam position is remedied.

In this illustration you can see just how offset to the left the cam is from the correct TDC position for contact with the cam follower – note the two black marks on the Scotch tape. The mark at the infinity focus line is where the center of the cam should be:


The cam’s offset. The leading edge
of the extended cam must be sloped or
concave to allow it to ease past the
roller when the lens is mounted,
otherwise it will jam and you risk
damage to the camera.

So first I had to add some J-B Weld epoxy at the leading edge of the cam to make sure of proper contact between cam and cam follower (roller) but also allowed some epoxy to be proud of the surface of the regular cam to correct for the focusing error. This dimension calls for an increase of but 0.0055″, a small amount, but critical for accurate rangefinder focusing. That’s the amount the pusher moves between the two black marks in the image above. J-B Weld has a fairly viscous consistency when the two parts are mixed and can be dabbed on to the leading edge of the cam and then allowed to cure for 24 hours. I needed three applications, meaning 72 hours, to build up the cam. No one said this process is fast.


The epoxy extension filed down for
accurate focus. The excess epoxy on the
inside of the cam pusher does not interfere
with anything, so I left it. A dab of
black matte paint finishes the job.

Having applied more epoxy than required on purpose, I then used a fine Nicholson miniature file to gradually file this layer down until the focus patch was correctly at infinity with the lens thus focused. I also made sure to file the new leading edge of the modified cam to a smooth slope to allow for gentle contact with the cam follower in the camera when the lens is mounted. Once cured J-B Weld epoxy is very hard so I expect it to wear well in use, especially as the sole contact the epoxied extension makes is with the benign rotating cam follower in the camera’s throat. The only friction occurs when the lens is mounted or removed. Checking focus accuracy at the minimum focus distance of 5 feet at full aperture confirms the fix is good. This is an extremely critical test and one you must do to make sure all is well when it comes to critical focusing. If this is not correct you will forever be blaming a splendid optic for poor performance. You cannot be too particular with a 135mm lens on a rangefinder Leica when it comes to focus accuracy as depth of field is very shallow and focusing errors (and camera shake!) are magnified compared to use with shorter lenses.

Phew! It took me the best part of a week to get this dead right. On my first attempt I filed away too much epoxy and had to build up the cam again. By the way, the lens has zero collectible value so it’s not like these modifications hurt anything. If anything they extend resale ownership to a large cadre of frugal Leica M owners who do not want to spend Leica-amounts on a relatively little used focal length.

Viewfinder interference:

Used without a lens hood the lens does not impinge on the 135mm frame in the finder of the Leica M10, except at its minimum focus distance of 1.5 meters/5 feet, where it just touches the lower right hand corner of the frame. In other words there’s no issue with finder blockage. Focused at infinity the lens protrudes just 4.0″ from the camera’s mount with a UV filter mounted. By comparison the 135mm Elmar is 4.8″ long and the Tele-Elmar is 4.4″ long. The Apo-Telyt is 4.1″ long. Considering it is not a retrofocus design Canon has done a fine job in limiting the length of the lens.

Red dome lens mounting index:

More shop work! As with the 21mm Voigtländer lens, I had to machine a recess for epoxy for a red dome mounting index in the rear serrated ring on the lens. The serrations do not provide an adequate mounting surface for the red dome. The stock index on the Fotodiox LTM-to-M adapter is far too hard to see and there is no tactile feedback for use in poor light. It bears repeating, if you are not experienced with machining operations, please delegate this task or risk marring your lens.


The lens is securely held in a machinist’s
vice on the table of the drill press.


The recess for the epoxy is drilled.
Note the stock index mark on the LTM-to-M adapter.

Set up time to get this right is 20 minutes, everything secured in place. Drill time is 30 seconds. Get the setup nailed and the drilling part is easy.


Now mounting the lens on the camera is easy.
Note the fine quality of Canon’s engravings and finish.

Canon vs. Leica:

The first impression when picking up the Canon lens is one of great solidity, likely the result of zero plastics in the construction, and weighing in at a chunky 15.4 ozs/435 grams. No rattles, no squeaks, just glass and metal alloy and superbly finished, with high quality engravings all around. Leica quality, in other words and the optic balances nicely on the very solid Leica M10. The diaphragm has no fewer than 10 leaves which should make for smooth out-of-focus areas and the click stops are firm, necessitating a hold on the broad focus collar to change apertures, otherwise the focus changes. The focus throw from infinity to 5 feet is extremely long, almost a full circle. Call it 345 degrees. So rapid focusing from here to there is not this lens’s forte, but careful alignment of the rangefinder images is. My guess is that Canon did this by design to enhance focus accuracy with the ‘iffy’ rangefinder at this focal length. Compare to Canon’s 35mm f/2 design with its extremely short focus throw of 90 degrees, because why add spurious fine focus tuning accuracy with a short focal length lens?


The 135mm Leitz Elmar and Tele-Elmar lenses.
Note the very long focus throw on the Elmar.

One of the significant advantages of the Canon lens over the Leitz 135mm f/4 Elmar (1960-65) or later f/4 Tele-Elmar (1965-85 and 1992-98) is for those (me!) who value 6-bit coding. There is no groove in the mounting flange of the Leitz lenses for addition of 6-bit codes so the lens has to be machined to add code pits. You cannot remove the rear flange for replacement with a 6-bit coded one as it’s retained internally, not with external screws. Reckon on $150 plus postage and waiting time to have the job done professionally. You hope. Paint the codes on the plain, stock flange and they will quickly wear off from friction between the lens and the mount on the camera’s body, so that’s not a solution. The other advantage is that at $148, all in, the Canon is far cheaper than the Leitz versions, though these do sell for fairly attractive prices, from $250 to $350, for unmolested copies.

One note – the early 135mm Leitz Elmar also came in an LTM version which means that a coded LTM-to-M adapter can be used for proper 6-bit coding. Given the reportedly small optical difference in performance between it and the successor Tele-Elmar it’s probably the best bet if you absolutely must have a Leitz 135mm lens, though it will encroach on the 135mm finder frame considerably more than is the case with the Canon. Add a lens hood and you are flying (half-) blind. Published tests suggest there’s little performance difference between the Canon and these two Leitz lenses. Do yourself a favor and keep your wallet heavy. Go with the Canon and be prepared to modify the cam as I show above. It’s not that hard if you have a modicum of mechanical skill.


The gigantic 135mm Elmarit with goggles.

There was also a 135mm f/2.8 Elmarit with giant goggles which completely defeats the concept of ‘small camera, small lens’. The goggles were added to enhance finder magnification for accurate focusing, and use the (magnified) 90mm finder frame. Talk of putting lipstick on a pig. This clunker was variously made between 1963 and 1997 and it’s hard to see going there.

Finally Leica made the 135mm f/3.4 Apo Telyt version, introduced in 1998, and seemingly recently discontinued, which makes you wonder why Leica still includes 135mm finder frames in its viewfinder. Leica added 6-bit coding somewhere around 2006 as standard, but the lens is silly priced used, so it is of little interest.

A more detailed resolution test appears here.

Some snaps to follow when I have had a chance to try this lens out on the M10.