Category Archives: Hardware

Stuff

Upgrading the Mac Pro 2013 – Part XXII

An expensive beast.

For an index of all my Mac Pro articles, click here.

The 2013 Mac Pro may still be hard to find but that does not mean the buyer should overpay for the better CPUs available. Paying Apple or OWC a huge premium for a better CPU suggests you have more money than sense, in which case go for it. This piece is not for you.

The nMP adds one feature not available in the oMP – Thunderbolt. This Intel data communication technology is a motherboard-only hardware installation and it is extremely unlikely that the aftermarket will ever see a TB-equipped motherboard for the oMP. So that means data speeds are limited to 600mb/s at best in the oMP (using a PCIe SATAIII card) whereas twice that rate should be theoretically possible in the nMP.

Where the nMP falls down in price:performance is in CPU speeds. The Geekbench chart below is for multi-core performance.


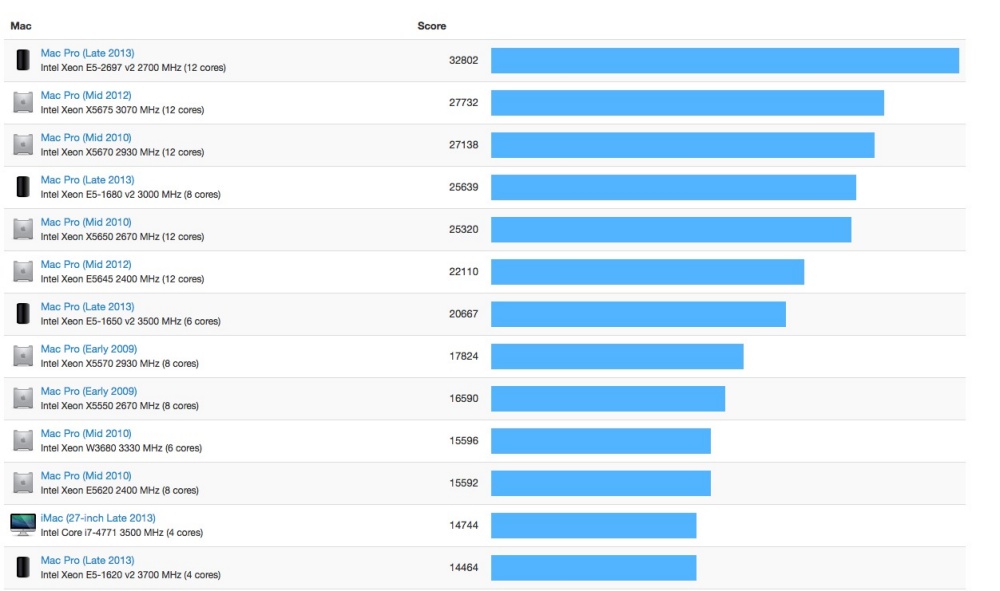
64-bit multi-core Geekbench data.

Given that the oMP can be upgraded with even faster CPUs than the fastest Apple ever marketed, the 4-core base nMP’s CPU performance is poor by comparison. Install a couple of X5680 3.33GHz or X5690 3.46GHz Xeons in your 2009-2012 oMP and you will get Geekbench scores of 30-32,000, which equals the extremely costly $7,000 top of the line nMP for half the total cost of the computer.

The stock 4-core Xeon E5-1620 in the nMP Geekbenches at 14,600. There are currently three ways of getting a faster CPU:

  • Pay lots to Apple for a costlier CPU at purchase of your nMP
  • Pay lots to OWC/MacSales when you send in your nMP for upgrade and they resell your old CPU for which you get zilch. You have to ship the complete nMP to OWC for the upgrade.
  • Do it yourself and save lots of money

Here’s the current data for the available CPU options which are known to work:

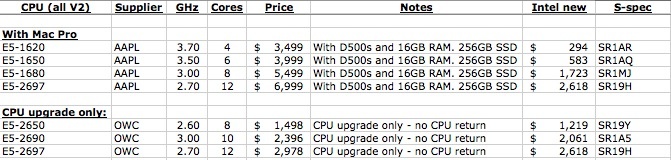
All of these CPUs have a Thermal Design Power of 130 watts, which compares to 80 watts (E5520 8-core), 95 watts (X5650, X5660, X5670, X5675 – all 12 core) and 130 watts (W5590 (8-core), X5680 (12), X5690 (12)) for 2009-2012 dual CPU oMPs.

To ensure meaningful comparisons, I have shown all the Apple-bought options with twin D500 GPUs, 16GB of RAM (the $3,000 base spec nMP comes with only 12GB), and a 256GB SSD. So, as you can see, Apple is charging a premium of $3,500 to upgrade from the 4-core to the 12-core CPU. OWC is barely better, charging $2,978 for the upgrade.

The math could scarcely be simpler. First, there is no earthly reason to buy a new Intel CPU. Used CPUs pulled from servers are fine – I lose count of how many of these I have installed in oMPs and have never had one fail. Never. Just avoid Engineering Samples – look for the ‘S-spec’ on the CPU lid, which confirms that it’s the final item.


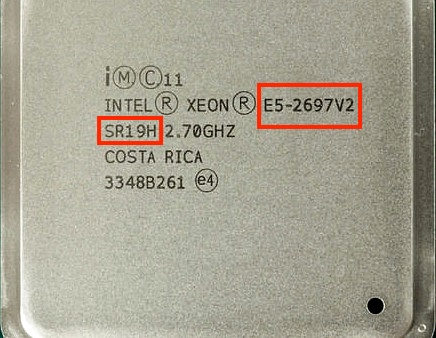
Model number and ‘S-spec’ on a final production CPU.

Do the CPU upgrade yourself:

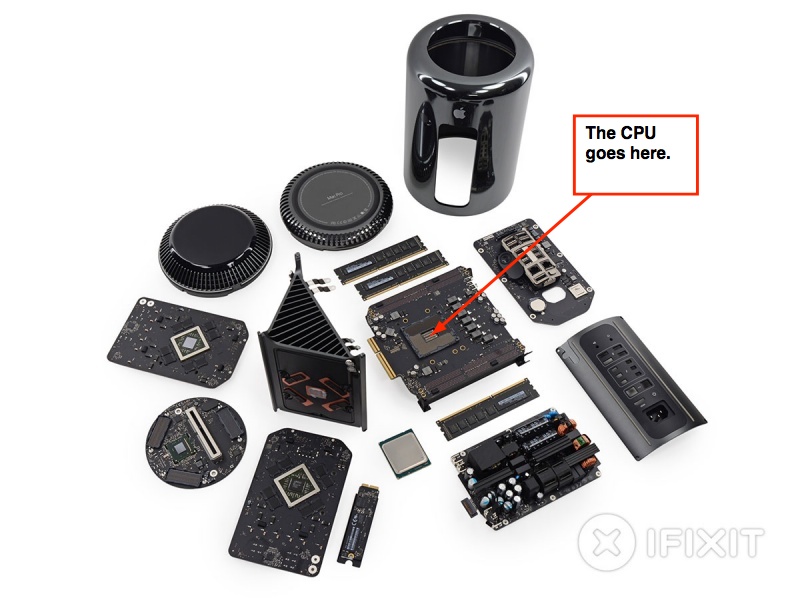
You can do the nMP CPU upgrade yourself. There’s a fair number of sub-assemblies to remove to get at the single CPU which is buried deep inside the form-over-function cylindrical case design of the nMP, but patience and care will get you there. Until Apple Service Manuals become available, the iFixit guide is excellent:


Click the image for the iFixit CPU replacement guide.

Economics of the DIY upgrade:

The current data suggest the following is the most cost effective approach:

  • Purchase the base 4-core nMP new with 16GB of RAM – $3,500
  • Purchase a used 12-core E5-2697 on eBay for $2,500 (Must be marked ‘SR19H’; avoid ones marked ‘QDUF’ which are beta test engineering samples)
  • Sell the stock E5-1620 for $150
  • Net cost of the 12-core upgraded nMP: $5,850. That’s $1,150 less than Apple charges.

The warranty issue:

This piece by OWC says the warranty remains valid when you do a CPU upgrade, unless you damage the machine in the process. Beats me if it’s right as I have not read of the principle being tested, so do your own research if a warranty is important to you:


OWC on warranties.

I remain unconcerned as CPUs very rarely fail. Fans, graphics cards, disk drives, even memory sticks – all of these are likely to fail far sooner than a CPU. That’s where you will most likely claim under warranty.

Other upgradables:

1 – RAM:

Memory upgrades are already available from OWC. Other suppliers will doubtless follow. Four 16GB 1866MHz sticks will cost you $850 or so at OWC, replacing the four 4GB sticks in the stock machine. Alternatively, go to B&H and pay $225 less for Crucial RAM of like spec. Replacement is a trivial process – unplug the old, plug in the new and you are done.

2 – Solid State Drives:

Conventional 1TB SSDs from Samsung run some $450, but these will not fit in the nMP. Apple uses a proprietary connector for the internal SSD, which is retained with but one Torx T8 screw – a trivial replacement. Here are the Apple options:

Until aftermarket options become available the best thing here is to simply wait if you really must have a huge SSD. Given that the best use of an SSD is for the OS and applications I am somewhat mystified why anyone needs 1TB, even with large scratch disks. Further, there’s nothing to stop you using an external SSD in your overpriced Thunderbolt enclosure as a super fast boot and apps drive. But paying $800 for a 1TB internal drive makes little sense.

Panasonic Leica 15mm f/1.7 MFT lens

An interesting addition.

It’s not available in the US yet, though B&H already lists it:

The real comparison here for street snappers is the stellar Olympus 17mm f/1.8, which I have been using for a few months now. Regular readers will have noticed that the predominant gear byline for most of my recent street snaps published here is “Panny GX7, 17mm Zuiko” and the reasons are the same I noted in my original review. The fastest AF focus ever, unbelievable flare reistance into the sun, lovely color rendering and excellent optical quality at any aperture. The 17mm Zuiko is very much my “where have you been all my life?” lens.

So this new Panny-Leica optic has its work cut out in the competitive landscape. Fair, it’s a tad wider at 30mm FFE compared with 34mm FFE for the Oly and, truth be told, my brain is hard wired for 35mm after decades with a Leica M2 or M3 and a 35mm Summaron or Summicron attached.

But the point here is that it is heart warming to see so many lenses and makers in the MFT system – Panasonic, Olympus, Leica, Voigtländer with others like Bower/Rokinon joining the frey. And it’s ridiculous to argue that the $600 asked for the new 15mm optic is high. Have you priced Leica’s MF Summicron for the M body recently?

I was going to run a piece in late 2013 on the Panasonic GX7/Olympus Zuiko 17mm f/1.8 as the greatest street snapper combination yet, but decided to hold off until I had more experience with the outfit. Unless there is something very special indeed about the new Leica optic, expect to see that piece run in December, 2014.

Meanwhile, the hegemony enjoyed by Canon and Nikon in pro DSLR ‘flapping mirror/vast bulk and weight’ applications addresses an ever narrowing field of specialization. If you need very shallow depth of field and routinely print larger than 18″ x 24″, there’s still good reason to go with the big boys. But for everyone else, MFT solves. APS-C seems increasingly pointless to me – most of the bulk of FF and none of the pluses of MFT.

Conflicted advice? Hardly. I use a Nikon D3x/D2x and a host of legacy MF lenses, mainly because it’s fun and the investment is amortized. But light and jolly this gear is most certainly not.

4K displays – latest thoughts

Getting there.


Click the picture for the Seiki site.

A better graphics card:

In anticipation of eventually adding a 4K display, I have upgraded one of my Mac Pros, with an EVGA nVidia GTX680 2GB PC graphics card. The card fits in the #1 PCIe expansion slot, where its double width does not block any of the three other slots. This machine currently uses a $220 Seiki 32″ 1080p TV set as a display, running at 60Hz over HDMI. The ROM in the GTX680 has been flashed by the seller to allow display of the opening splash screen with the Apple logo and cog wheel on start/restart. This is not essential, but nice to have when doing an Option-Restart which will display all bootable drives on the screen. If you don’t miss the splash screen, buy a used PC GTX680, for under $300. It will work fine. You can flash this yourself if you are running Windows in BootCamp – I cannot as Windows is not permitted chez Pindelski, sanity trumping choice. I bought the flashed card used on eBay for $400, compared with $670 for a new ‘Made For Mac’ GTX680.


The EVGA GTX680 in the Mac Pro. The two six pin auxiliary
power cables attach to sockets on the backplane board.

The former GT430 compared with the GTX680:


A significant increase in performance. Call it five times as fast.


The new card reported in System Information.
Link speed is 5GT/s.

Don’t overdo it!

Along with the ATI Radeon 7950 (200 watts maximum), also available in a ‘Made For Mac’ variant, the GTX680 is the most powerful card available for the Mac Pro which does not risk overpowering the power feeds. The maximum power available to the card is 225 watts (75 watts on each of the two PCI cables and a further 75 watts from the PCIe slot), which compares with the maximum draw of 195 watts for the card. Cards which can draw more than the 225 watts available, and thus risk damage to the Mac Pro include (but are not limited to) the Radeon 7970, 7990, R9 280, R9 290, GTX580, GTX590, GTX690, GTX770, GTX780, GTX780 TI, and GTX Titan. If you propose using any of these hard, a separate power supply is indicated.

Sound over HDMI:

Additionally, OS X 10.9.2 broke sound over HDMI (thank you Mr. Cook – Apple’s Ballmer) but a smart person has posted the fix at MacRumors and you can find it here. Be sure to check my message (#68) in that thread if you run into problems. The kext (driver) provided by the original poster works fine and HDMI once again shows as a working choice in System Preferences->Sound, delivering sound over the HDMI cable to the TV’s built-in speakers.

The state of 4K displays:

Nine months ago I wrote about the early state of play regarding 4K displays, which offer 3840 x 2160 pixel definition. Until now, the highest pixel density available has generally been the 2560 x 1600 available in 30″ Dell Ultrasharps and in the discontinued 30″ Apple Cinema Display.

Things have moved along and there are now several choices of 4K display for the Mac Pro (2009/4,1 or 5,1 and later, and new Mac Pro) user:

  • Dell P2815Q 28″ using twisted nematic display technology – $700
  • Dell UP3214Q 32″ – LED – $2,500
  • Dell UP2414Q 24″ – LED(?) – $1,200
  • Sharp PN-K321 32″- LED – $3,100 or $3,500 from Apple for the foolish
  • Seiki SE39UY04 39″ – LED TV set – $500

For reasons attributable to the genius in charge at Apple, none of these will run OS X at the usual 60Hz which delivers smooth cursor motion. All run at 30Hz in OS X, whereas the first four will run Windows in BootCamp at a full 60Hz. Way to go, Timmy! Your OS runs Windows better than it does its own native apps while Apple touts the 4K capabilities of the new Mac Pro ….

The fifth, the 39″ Seiki TV, runs at 30Hz only in either OS X or Windows, owing to hardware limitations in the TV set.

So my Mac Pro is ready for 4K but which display to use? I’m not about to pay $2-3,000 for a display and the latest rumor has it that Seiki will be selling a revised version of their 39″ TV set in Q2/2014 for maybe $800, sporting 60Hz screen refresh rates. 39″ is huge – 2.1 times the display area of a 27″ display and at twice the definition, and 3.6 times the area of a 20.5″ display. If that happens, I should be seeing 4K here soon. 10.9.3 will be required to support 60Hz and it is in advanced beta test as I write.

There are issues with 4K implementation in OS X Mavericks, not least being very small font display at 4K definition. My proposed use is simply to display large realtime charts of stock market data (my day job) during working hours, so text size is not a key driver for my purpose. However, I will be testing the display with Lightroom and Photoshop and reporting my findings in due course. Color calibration with a colorimeter should not be an issue as the Seiki TV has extensive color adjustments built in, with more secret stuff in the Service Menu, which you can access by hitting Menu->0000 on any Seiki TV’s remote.

Cheap Arca plates

From Desmond.

One of the things which irritated me about the otherwise excellent Surui K-40X ball head for my old Linhof tripod was that the Arca plates for additional cameras (it comes with one) were overpriced at over $40 each.

I needed additional plates for my 350mm and 500mm Nikkors, each with lens mounted tripod fixtures, a clamp for my Manfrotto monopod, and a small plate for the Pansonic GX7, and was not about to be hosed down for overpriced pieces of alloy with simple, machined v-notches.

Shopping Amazon I chanced on the Desmond brand of knock-offs (a knock-off of a knock-off) at Amazon and proceeded to order the following:

The first two are for the Nikon D2x and the 350mm Nikkor. Hullo! $6.50 each! (The 500mm Reflex Nikkor already has an original, overpriced, $40+ Surui). The second row is for an Arca-compatible clamp for my monopod which sports an old Leitz ball & socket head (superb!), replacing the previous Manfrotto QR plate. And the last is for the GX7, a very small plate for a very small body.


The full-sized plate for the Nikon D3x/D2x


The clamp for the Leitz B&S head. Comes with a 3/8″ to 1/4″ reducer.


The camera plate for the Panasonic GX7.

All the plates come with a D-ring for the retaining screw as well as a generously sized slot which will accept a variety of coins for torquing down.

Reactions? All fit fine. The safety locking slot/button on the stock Surui clamp works perfectly.

And the lot costs about as much as one Surui ‘original’ knock-off. In fact I like the big camera plate so much I have replaced the Surui on my D3x with the Desmond, relegating the Surui plate to the less used D2x. Life is too short for all that screwing ….


On the Nikon D2x.


On the 300mm Nikkor.


On the Panny GX7 – small enough to be left in place.
The battery/SD card remain accessible, but
you can no longer flip up the LCD.

The Desmond plates have a 0.48″ wide dovetail at the broadest point, compared with 0.53″ for the Surui. This means that fewer turns are needed on the unlocking clamp on the ball head to release the camera – 0.75 turns of the locking knob for the Desmond compared with 2.75 turns for the Surui plate. Nice.

Nicely made and dirt cheap, what’s not to like?

Full frame bargains

From Canon.

One of the signal advances for photographers has been the continuous improvement in processing software. The enhanced capabilities for shadow recovery and highlight taming in products like Lightroom 4/5 (and doubtless in others like DxO, CaptureOne and Aperture – none of which I use, but competition always does its thing) give new life to old picture files.

Case in point, my first serious DSLR was the original Canon 5D (2006). When I pull up images from that body in LR5 they appear with an exclamation point lower right alerting me that an older version of LR was used to process them. Update those to the latest version (Develop Module->Settings->Process) and your images can enjoy the benefits of the latest in processing technology.

I have gone back and re-printed some of these and the results really are impressive.


The indoor pool at Hearst Castle.

The above 5D Mark I image has high dynamic range. Updating to the 2012 Process from the original 2003 in LR5 allows easy recovery of the shadows and taming of the highlights with the related sliders. A touch on the Noise slider takes out what ails the shadows. A quick click in the Lens Profile section has the 15mm Canon Fisheye image de-fished for a linear rendition, into the Print module and the 18″ x 24″ print will knock your socks off.

Sure, neither the original 5D or its ‘pro’ equivalent 1DS Mark II had sensor dust removal, but I can assure you that my Nikon D700 did and it was almost useless. You still had to clean the sensor with moist alcohol swabs, as I now do with my Nikon D3x. The price of a lightly used, amateur owned 5D or 1DS Mark II? How about $450 or $800? If there’s a better bargain for a photographer looking to make really large prints from full frame negatives I do not know of it. And you can forget the overpriced ‘red ring’ Canon ‘L’ lenses. The 15mm f/2.8 Fisheye (discontinued), the 35mm f/2 USM, the 50mm f/1.4 USM and the 85mmf/1.8 USM ‘cooking’ variants deliver all the quality you need, at bargain prices. Just avoid the cheap and nasty zooms if you are printing big. For web display any FF DSLR is overkill.


The exceptional Canon 1DS Mark II.

Nikon? There are no FF bargains yet. The D700, which has an excellent low noise sensor sells lightly used for a surprisingly high $1,300, the D3 (same sensor, pretty much) for $1,800.

New prices of the 5D and 1DS Mark II? How about $3,000 and $8,000, respectively? Do you really need the latest and greatest or would a small fraction of the extra money be better spent on a large format printer, paper, ink and some mounting supplies so you can really show your work for once?