An extraordinary piece of engineering.
For an index of all my Mac Pro articles, click here.
Upgrading from the GTX680:
This writer, a graduate mechanical engineer, has one extraordinarily sensitive device built into his constitution, one missing from liberal arts graduates. It’s a BS Meter and when I saw this on the box of the EVGA GTX980 my BS Meter went off the scale:
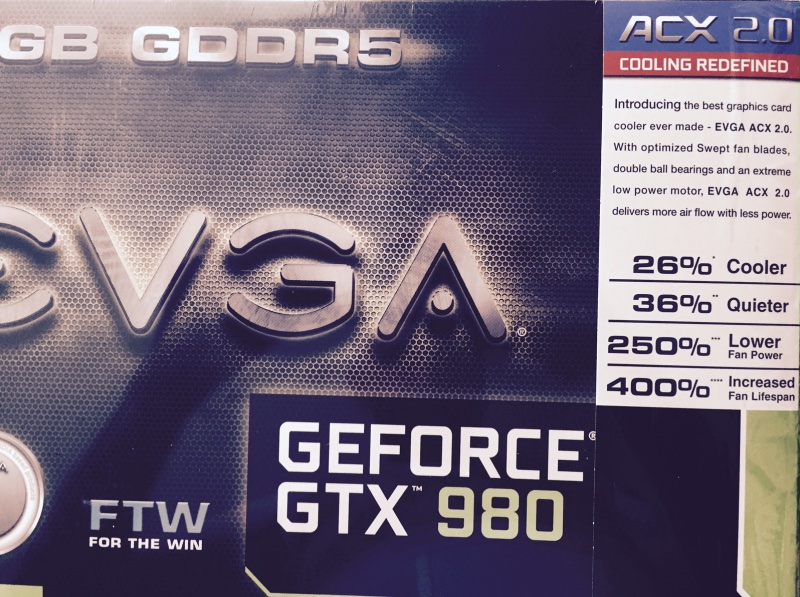
And you thought only Apple did this sort of thing?
But while I cannot attest to the percentages nor see how on earth any of this BS can be tested and proved, read on and you will agree that the GTX980 is an extraordinary engineering accomplishment.
When I wrote about the Nvidia GTX680 graphics card for the Mac Pro 18 months ago it was the fastest card out there and ran natively with drivers provided by Apple with Mac OS X. The reason no separate drivers were needed is that Apple had offered the GTX680 in a ‘Made for Mac’ edition which showed the full boot screen at start and, accordingly, was obliged to include the drivers to maintain the ‘Apple supported’ story. Maximum power draw is 195 watts.
Driven to ever greater performance by computer users who devote what few brain cells they have to gaming, Nvidia rolled out the GTX780 card a while back but that was a poor choice for the Mac Pro user as at full power draw it needed 250 watts against the maximum spec of 225 watts stated by Apple for aggregate current draw from the PCI slot (75 watts) plus 2 x 75 watts from each of the PCIe boost sockets on the Mac Pro’s backplane board. Sure, 25 watts was not exactly much of an overdraw, but why tempt providence, backplane boards with fried traces costing some $450 + labor to replace.
Then Nvidia recently announced a technical tour de force, the GTX980 which claims to draw just 165 watts at maximum draw, or 15% less than the GTX680 while simultaneously offering much better performance and running much more quietly. While my measurements suggest the power savings are ever so slightly overstated, the performance boost and noise reduction are remarkable. Working video pros can benefit from upgrading to this card thanks to the brain dead gamers who pushed its development.
The reduction in fan noise in the GTX980 compared with the GTX680 is not simply attributable to a cooler running card, meaning lower fan speeds. In the case of the EVGA case design (I cannot speak for others like Gigabyte, PNY, Zotac, etc. not having tried them) attention has been paid to the design of the fan blades to provide quieter running. Recall how Apple made a big deal of this in their rollout of the cylindrical Mac Pro? Apple has long majored in claiming credit for invention of what are existing, decade old technologies and this was one of the more irritating examples. Remember the vaunted ‘Superdrive’? A dirt cheap Hitachi or LG CD/DVD reader-burner with the escutcheon removed (a 5 second job). Or the banishment of ‘vampire draw’ from its battery chargers? Please. Or want to go back to the early days of the Mac with its graphical interface and mouse? All stolen from Xerox.
GTX980 cards which come with two dual-link DVI sockets:
In my piece on the Apple 30″ Cinema Display I mentioned that there are at least five variants of the GTX980 which provide the optimum connections for two of the big dual-link DVI Apple Cinema Displays (and similar Dell, etc. 2560 x 1600 displays) without having to use the unreliable Dell powered Dual-link DVI -> MDP adapter. (Apple makes a dual-DVI to MDP adapter with an equally poor reputation).
That GPU information is repeated here:
- EVGA GTX980 Classified P/N 04G-P4-3988-KR, at Amazon here
- EVGA GTX980 Classified P/N 04G-P4-2986-KR, at Amazon here
- Gigabyte GV-N980WF3-4GD, at B&H here
- Gigabyte GV-N980WF3OC-4GD, at Newegg here
- Gigabyte GV-N980G1 GAMING-4GD, at Newegg here
All other versions I have examined from many makers offer just one dual-link DVI socket along with various mixes of HDMI, DP and MDP.
Having had nothing but great experiences with EVGA products in the past, I bought the EVGA P/N 04G-P4-2986-KR for $530 + tax:
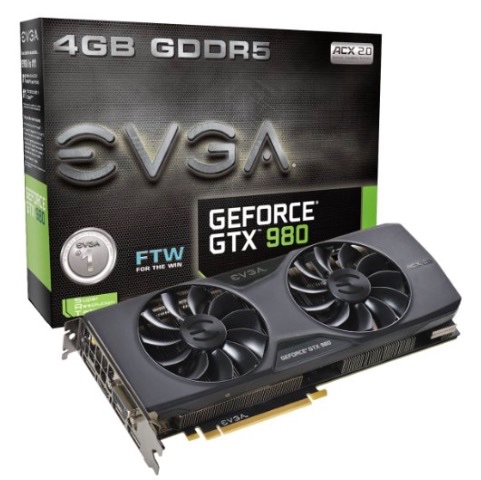
The EVGA GTX980 model P/N 04G-P4-2986-KR.
Amazon’s illustration wrongly shows one DVI socket.
This comes with one DVI-D and one DVI-I socket (both dual-link), one DP and one HDMI, regardless of what Amazon’s confused listing states.
Preliminaries:
Before rushing out and upgrading to a GTX980, a couple of preliminaries:
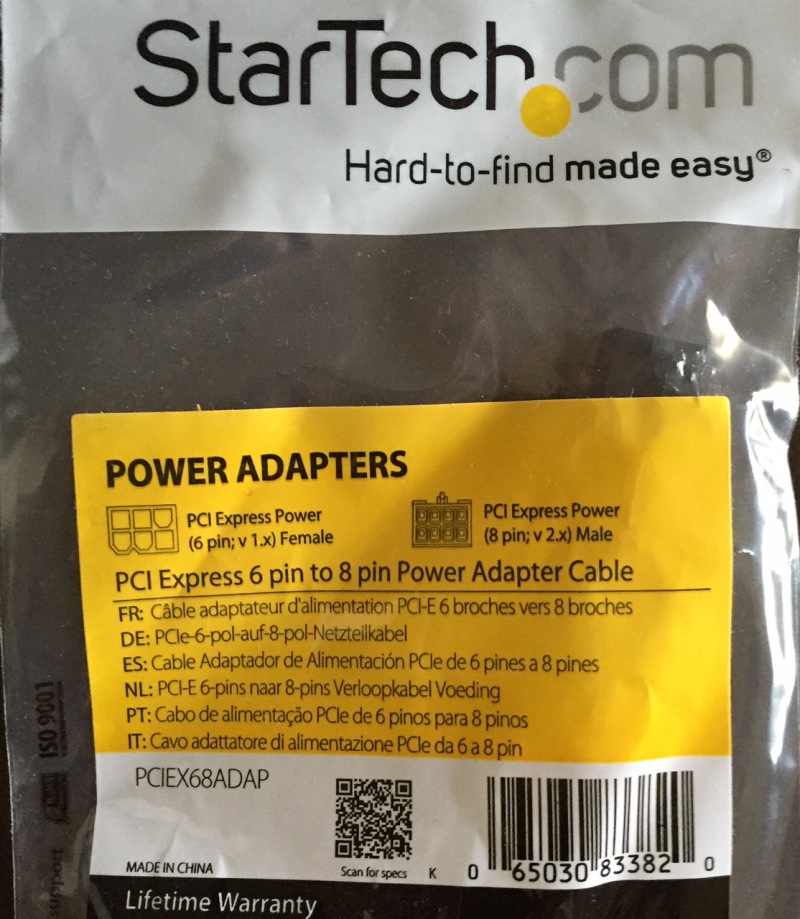
- You will need one 6 pin to 8 pin mini-PCIe power adapter cable (not two, which I bought, owing to errors on Nvidia’s web site), in addition to two standard 6-pin cables for the model I bought.
- The card is long (no problem) and wide, the latter making fitting anything in PCIe slot two challenging, but possible.
- Mine had one loose alloy cooling fin rattling around in the casing when received, even though the card was shrink wrapped. I dismantled the card, removed the errant cooling fin – one of dozens so no material effect on cooling – and all was well. You may be lucky. If your mechanical skills are limited and you get one like mine, be prepared for return and exchange delays.
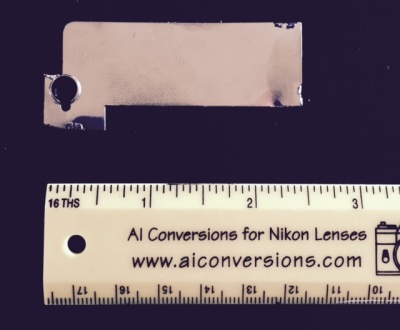
Loose end cooling fin extricated by the writer. - You cannot use the stock drivers Apple ships with OS X, and must download the Nvidia drivers. The Mac Pro will not boot with the stock OS X drivers.
Here’s how it compares with my GTX680:

GTX680 top, GTX980 below.
The PCI connector for the GTX680 still has its rubber protector in place. 10.7″ vs. 10″ in length, no fit issues, but remember to retract the (grey) PCIe fan when removing and refitting to properly engage the base ‘claw’ at the bottom rear of the card, visible on the GTX680 above. The GTX980 has a like claw, hidden in the image by the shipping protector.
Here’s the 6-pin to 8-pin adapter cable:
And here is the card installed in my Mac Pro:
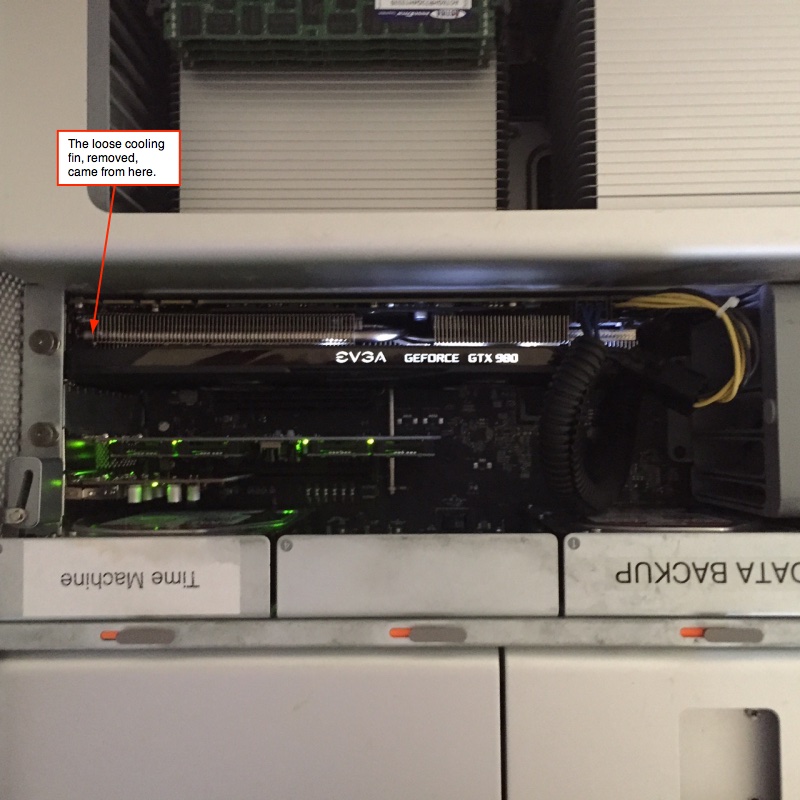
Illuminated script, no less! The green diodes are on the Addonics mSATA boot drive.
To make sure you have properly installed Nvidia’s drivers, check System Preferences->NVIDIA Driver Manager, which must appear thus before you install the GTX980:
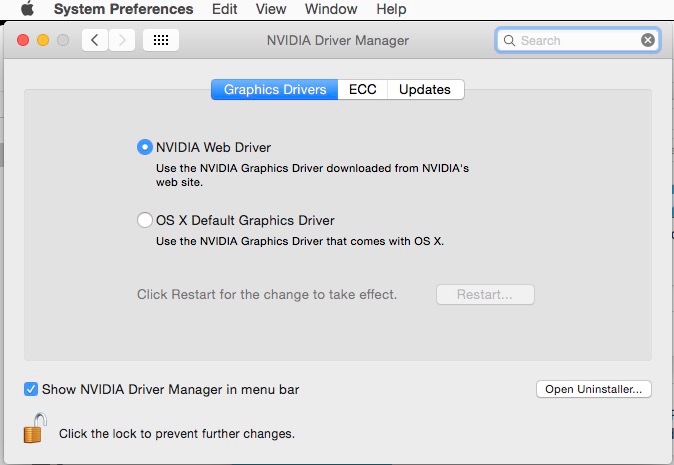
Nvidia drivers installed and activated.
You must have current Nvidia drivers for this card to work:
Nvidia has been doing an excellent job of updating its drivers as Apple endlessly and unnecessarily futzes with OS X changes, but what this means in practice is that as every OS X change upgrade breaks the Nvidia driver, so you must not upgrade your OS X installation until Nvidia has announced the related upgraded driver, or it’s a black screen for you. Irritating as all heck, and typical Apple maliciousness and small mindedness as they continue favoring ATI for GPU chips in their machines.
Start up your GTX980 with OS X drivers installed in lieu of the required Nvidia drivers and, in my case, you get a lot of screen flashing, a jerky cursor, a slow boot cycle if it boots at all (a ‘grey screen of death’ is not uncommon – I got it) and no selection of display definitions in Sys Prefs->Displays->Scaled. I could only get 2560 x 1600 on my 30″ ACD whereas I like to use 2048 x 1280. A curse on Apple for not including the enhanced drivers with OS X. How small minded is that? Am I likely to rush out and buy a dustbin Mac Pro just because they are adopting the petulant behavior of their founder? Especially when the nMP cannot hold a candle to the cMP?
Be aware that if you do a PRAM reset OS X will revert to using the stock OS X drivers, meaning a very unresponsive cursor and display in my case. Go into the Nvidia menu Bar icon, switch to Nvidia drivers, reboot and all is well. If you can’t even get the display working, keep and old GT120 card around (see the end of this article) install it and connect your display to it while you elect the Nvidia drivers. A real pain.
With that out of the way, you still get no boot screen, and the nice people at MacVidCards – real experts at this sort of thing – can upgrade your card to show that screen for $180. They have an excellent reputation in the industry. Those unfortunates who use Windows can DIY, but Windows is a strict no-no chez Pindelski and I prefer to trust my costly card to a professional rather than turning it into a brick.
Click the image for the MacVidCards site.
Mine is off to MVC. I have no financial interest in their business.
After installation, all is sweetness and light with the Nvidia drivers in place:
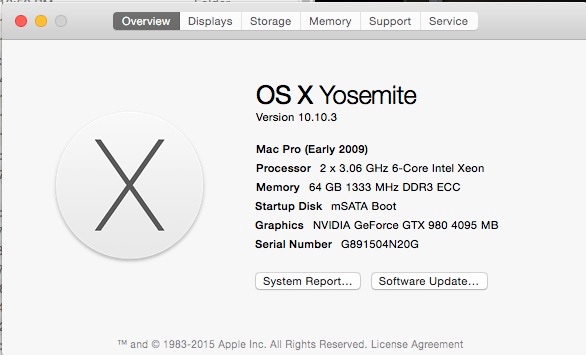
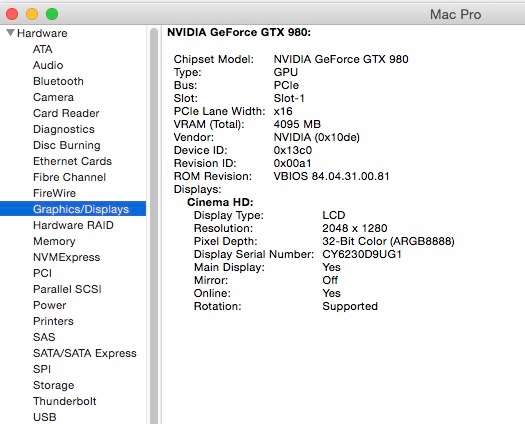
The card is properly recognized and memory is 4GB compared with 2GB for the GTX680:
Comparison with dual D700s in the new Mac Pro:
Let’s cut to the chase. Here’s Unigine Heaven running on a 1680 x 1050 display in the new Mac Pro using the top-of-the-line dual ATI Radeon D700 GPUs (dual GPUs being one of Apple’s quite especially dumb moves in recent years when hardly no software uses them); my Mac Pro is on the right:
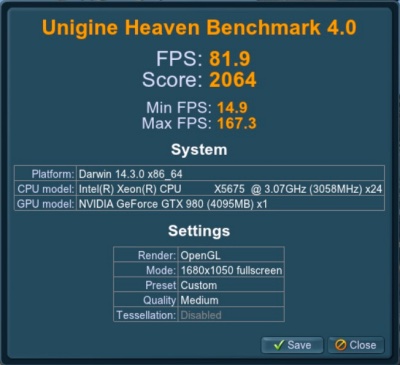
The GTX980 is 22% faster than the very costly dual D700s in the new Mac Pro.The D700s command a $600 premium over the stock D300s (specified at purchase only) whereas the upgrade from a used GTX680 to a new GTX980 runs $300 (can be done at any time).
As for noise, the fan in my EVGA GTX680 is loud – if not roaring – when the stressful Unigine Heaven test is run, whereas in the GTX980 it is silent. Impressive.
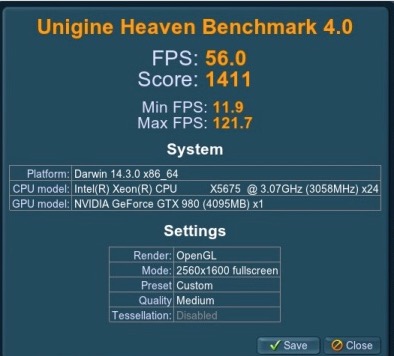
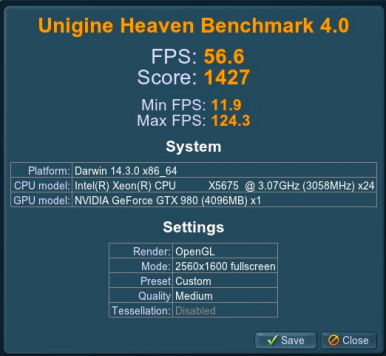
Performance at different screen resolutions in the Mac Pro:
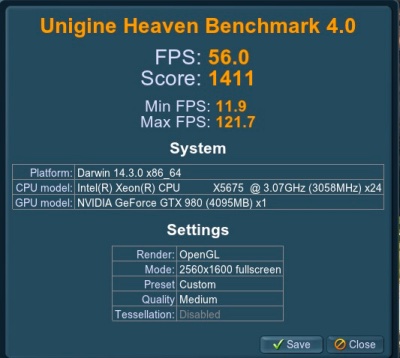
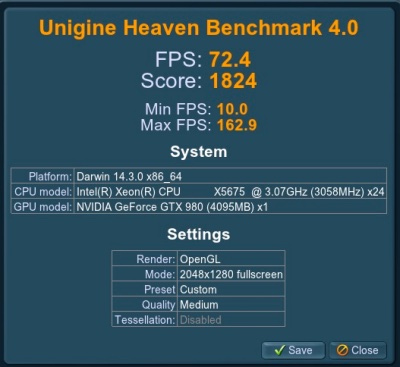
2560×1600 compared with 2048×1280 Unigine Heaven results.
Performance holds up well at 2560 x 1600 (the highest resolution available in the 30″ Apple Cinema Display) as well as at 2048 x 1280 which my eyes favor.
At the commonly used 1920 x 1200 the result is as follows – quite extraordinary:
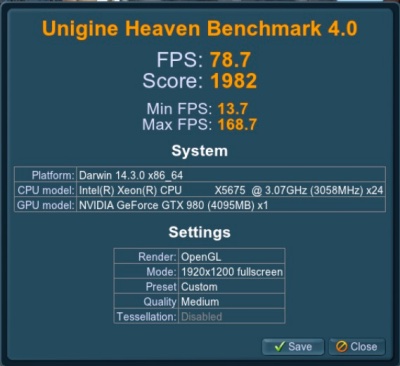
Unigine Heaven at 1920×1200.
All excellent statistics, especially in view of the card’s quiet running.
Power consumption:
I was unable to quite replicate the claimed 15% drop in power use with the GTX980 compared with the GTX680, but the good news is that total power use is well within the capabilities of the Mac Pro’s massive 980 watt power supply.
In this image you see the current draw of the GTX980 in the left column at 1680×1050, and at 2560×1600 on the right; the three measurements in each column are for the PCI slot, and for each of the mini-PCI booster sockets – recall each of these three sources is individually limited to 75 watts (6.25 amps), and all are in compliance:
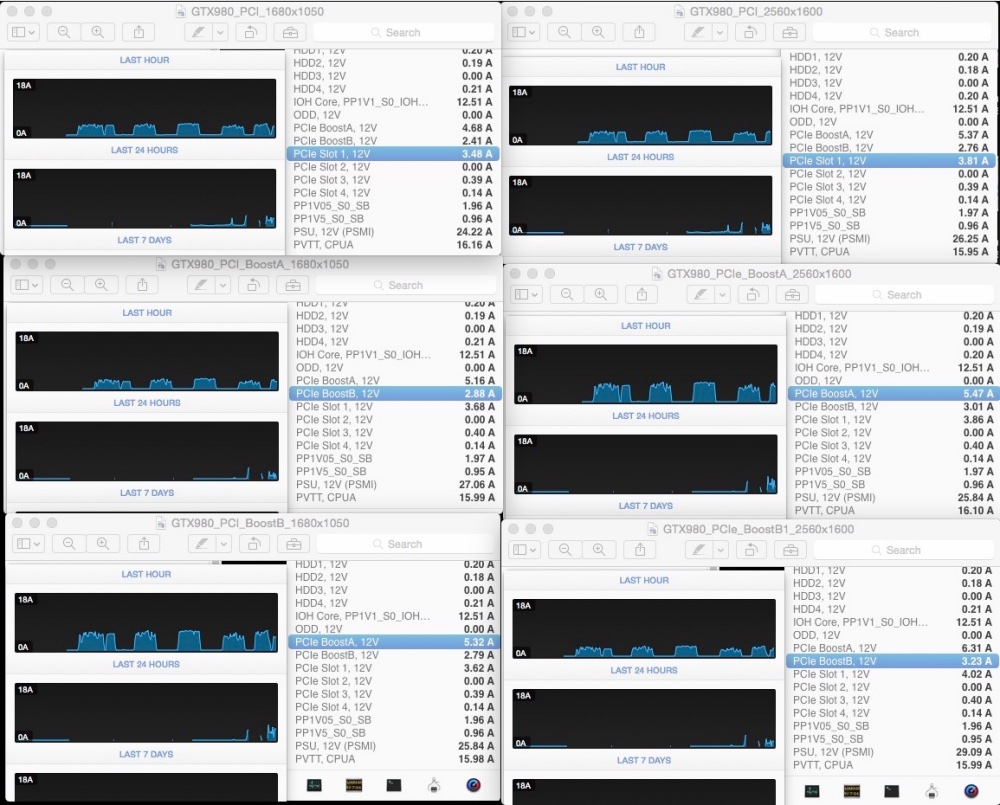
These data compute to power use of 140 watts at 1680 x 1050 and 150 watts at 2560 x 1600, all well within spec, and all measured with Unigine Heaven running at full bore – a very stressful test. When I tested the GTX680 the 1680 x 1050 test required power of 157 watts, so the GTX980 saves 11%, close to the 15% claimed, if not matching the marketing. Still, that is very impressive, and like percentage savings accrue at higher screen resolutions.
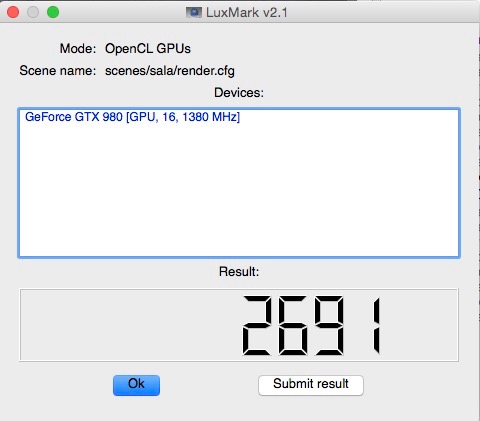
LuxMark data:
The jump in performance with LuxMark is extraordinary – this is a test which requires a complex scene to be rendered:
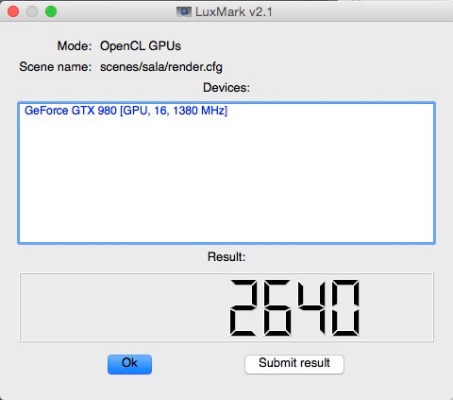
Luxmark for the GTX980 compared with the GTX680.
The gain in performance is no less than 266% (“more than 3x as fast” would be Apple’s breathless marketing prose), suggesting that video producers doing complex rendering in apps which make good use of the GPU should upgrade to the GTX980 immediately. Time is money and renders take time.
Heat:
None of my measurement apps accesses thermal sensors in the GTX980 but at least one statistic is of note. At idle, the PCI fan in my Mac Pro (the large grey fan mounted on the backplane board) ran at an elevated 1425rpm, whereas with the GTX980 installed it idles at the stock 800rpm. That can only be good news and the combination of the new chip architecture along with two fans (my GTX680 has one) does the trick.
4K displays:
I continue to defer upgrading to 4K as standards are, well, anything but standard, with much confusion about 30Hz vs 60Hz, boot screens or no boot screens, SST vs. MST, Windows compatibility (like I care), and on and on. But the 4K display user should benefit significantly from the added performance offered by the GTX980 provided he can get 60Hz refresh rates in OS X.
Who should upgrade?
Heavy video renders using CUDA? Upgrade right away if your app uses the GPU well and is CUDA dependent. The gains are easy to see and the price is under $600 with your old GTX680 selling for $300, so $300 out of pocket. A few hours work will see your cost recovered in faster render times. Popular CUDA apps include many in the Adobe CC suite (AfterEffects, Photoshop, Premiere Pro), FinalCut Pro, Maya, Avid Motion Graphics and Media Composer, DaVinci Resolve, Cinema 4D and Redcine-X.
Lightroom users? Meh. The GTX680 was already immensely capable, and while the GTX980 allows me to page through full size previews at blitzkrieg speeds and I never see any wait delays for rendering, it’s overkill. The same applies to Photoshop.
The GTX980 is a remarkable engineering accomplishment and, if you must know, Nvidia somehow manages to get over 5 billion transistors on the die which makes a top-end Intel CPU look about as crowded as Iowa.
Update June 26, 2015:
I sent the card off to MacVidCards to have the ROM modified to display the boot screen and the Option-Start boot drive selection. The card was back in my hands in a couple of weeks and MVC told me this was the first dual-DVI card they had modified. Most 980 cards have one DVI, one HDMI and one or more DP or MDP sockets.
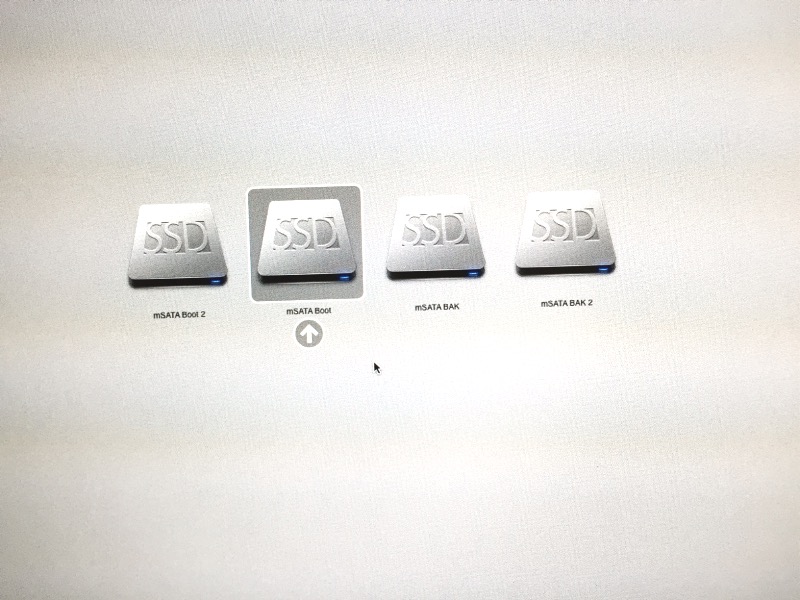
Boot drives using Option-Start in Yosemite with the MVC modified GTX980.
I get proper function on both the DVI-D, DVI-I (both at 2520 x 1600) and DP ports, with the latter limited to 1920 x 1200, as I do not have the required Dell powered adapter. I did not test the HDMI port as I do not have the right cable.
I noted two anomalies – a singe line of code appears for maybe half a second when starting, right before the Apple logo appears. MVC confirms there’s no effect on function and I agree. It’s a cosmetic blip only.
The other is that on cold start, restart or wake from sleep, the card’s fans run up to a noticeable ‘whoosh’ which dies to silence after completion of the boot or wake cycle. Once again, no effect on function, though a change from the stock unmodified card. The speedy fans effect lasts but a few seconds.
Finally, OS X’s System Profiler displays a link speed of 2.5GT/s (PCIe 1.0) whereas I was expecting 5.0GT/s (PCIe 2.0). MVC confirms that the card is actually running at 5.0GT/s, and the only reason for the slower displayed speed is that they have not dug into the code to make System Profiler display the correct speed – the return on effort is not justified, as there is a lot of code to search through. They have a detailed technical blog entry you can read here.
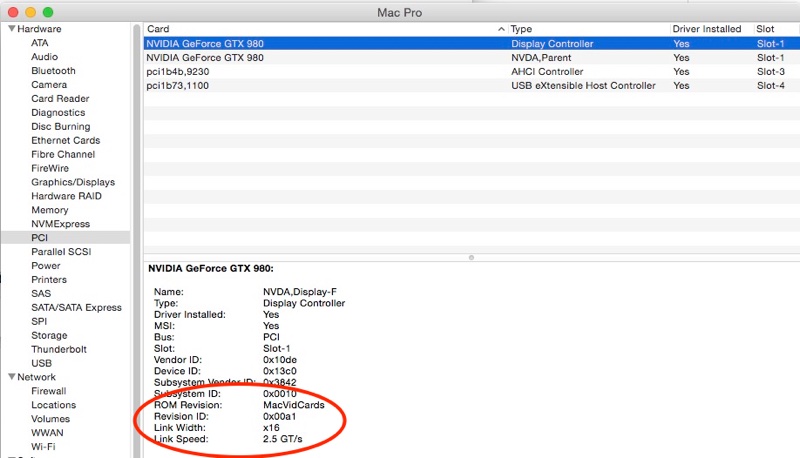
Incorrect link speed shown in System Profiler – the true speed is 5GT/s.
The performance of the 980 with the Apple Cinema Display at maximum resolution of 2560 x 1600 is unchanged – there is no penalty from the upgrade.
Here are the before and after Unigine Valley speeds at the full 2560 x 1600 resolution of the 30″ Apple Cinema Display:
Luxmark shows a small 2% gain to add to the already stellar gain in rendering speed over the GTX680 noted above.
This is a good investment and I recommend the MVC upgrade.
A boot screen for less.
You can buy a used Apple Nvidia GT120 card for $80 and this will show the boot screen. While dated and slow, that’s a lot less than the custom fix above and this old but trusty card has many advantages, including:
- Takes a single slot only
- Low power consumption
- Quiet
- Requires no auxiliary PCIe power cables, deriving all the modest power it needs from the regular PCIe slot
- Option-Start will show you all bootable drives in OS X
- One MDP and one DVI socket – can drive two displays at the same time
- DVI socket will drive up to 2520 x 1600 displays (tested, functions correctly) using a dual-link DVI cable (such as the Apple 30″ Cinema Display, Dell 30″, etc.) – no powered DVI->MDP adapter required with DVI socket use
The pain is that you have to move your display’s connector to this card to see the boot screen, do your thing, then revert the connection to the GTX980. But it’s $100 saved.
Further workarounds to driver problems:
Click here.