Category Archives: Photography

Mac Pro 2009 – Part XVI

Adding SATA III drive capability.

For an index of all my Mac Pro articles, click here.

SATA III:

One of the signs of the benign neglect afforded its Mac Pro line by Apple is the absence of SATA III compatibility. Insert a SATA III 6gb/s drive in a Mac Pro of any vintage and it will run at SATA II 3gb/s speed. Meaning at half of its design speed.

However, Apple’s sloth and refusal to add a feature found on just about every competing computer on the planet can be countered at modest cost using a PCIe card adapter.

Before making this conversion, my Mac Pro was using two 120GB SSDs, the one containing OS X, Applications and the Lightroom catalog. The other is a backup clone. Placing the LR catalog on the speedy SSD greatly improves LR’s speed, at the penalty of using up space on the disk drive. My 11,000 image catalog is some 40GB and, as a result, my SSD startup drive is over 90% full. Not good.

RAID 0:

Adding a 250GB SSD drive internally would not solve my problem – I would have to replace both the existing 120GB drives to maintain a redundant backup clone. Or I could simply make a 250GB partition on one of the internal HDDs as a backup location. However, it struck me that the two 120GB SSDs could be made into one drive using Apple’s RAID 0 capability built into Disk Utility. Then adding just one 250GB SSD would give me a new startup drive with space to clone it on the RAID 0 SSD pair. RAID 0 makes the two drives appear as one in Finder, and there is no redundancy. On the other hand RAID 0 has the nice side benefit of doubling the effective speed of the two drives as OS X can write data far faster than the SSDs can receive it. Double the number of SSDs and you double the write speed, so older SATA II paired RAID 0 drives in SATA II slots now run at SATA III speeds. Twice as fast. Magic.

Apple’s document on software RAID configuration using Disk Utility is here and makes for interesting reading for those contemplating this approach.

PCIe card:

Now a related snag is that I have no more internal connectivity for additional disk drives. Here is my disk layout before adding the 250GB SSD:


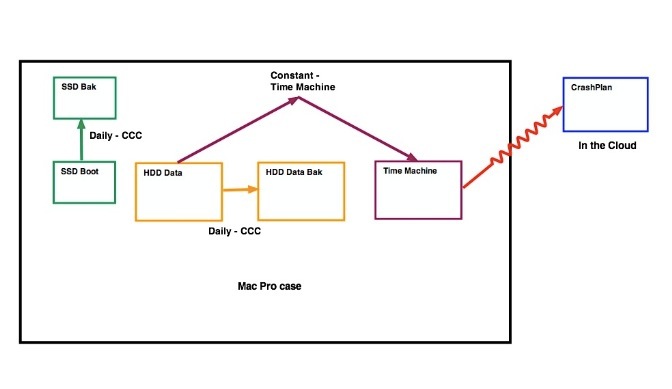
Mac Pro drives before the upgrade. SSD Bak resides in the optical drive area.

The four drive bays are taken up with the SSD boot drive, two HDD data drives and a TimeMachine drive. The backup for the SSD is in the optical drive area.

Shopping around I learned that plug-in PCIe cards are available which will accept one or two SSDs. As these use one PCIe slot, SATA III speeds are available. Apricorn makes a well reviewed PCIe SSD card in both single and dual SSD form factors, but the dual version blocks Slot 3 – not good. Accordingly, I settled on the single SSD version for all of $49, leaving Slot 3 available for later use:


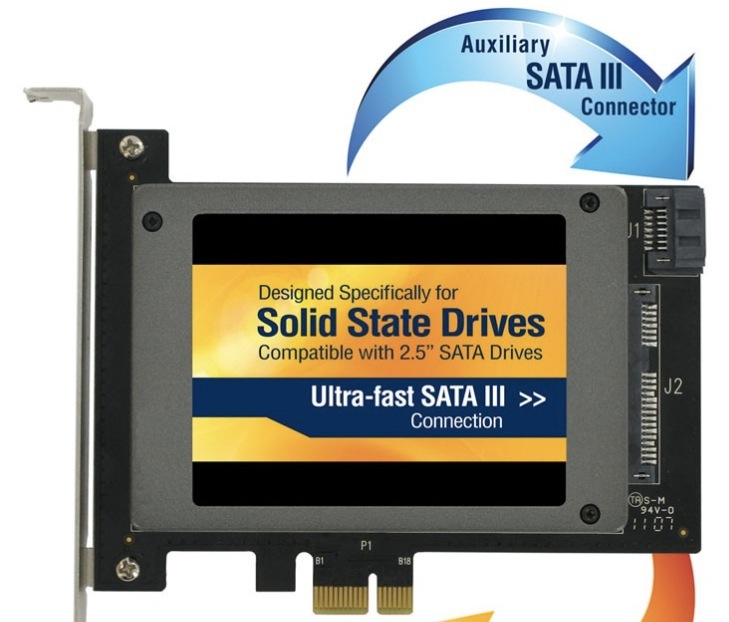
Apricorn Velocity Solo PCIE/SSD card.

The SSD slots into the card and the card into the Mac Pro with no cables involved.


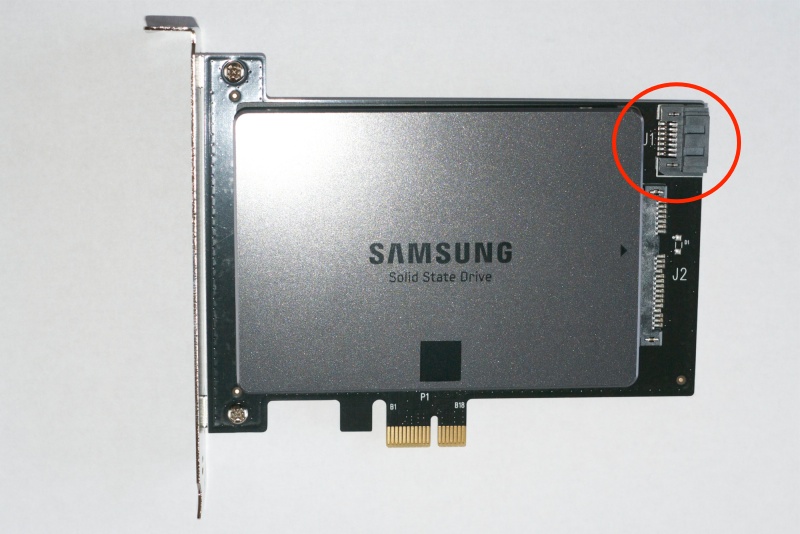
SSD inserted in the Apricorn PCIe card. The additional SATA III data port is circled.


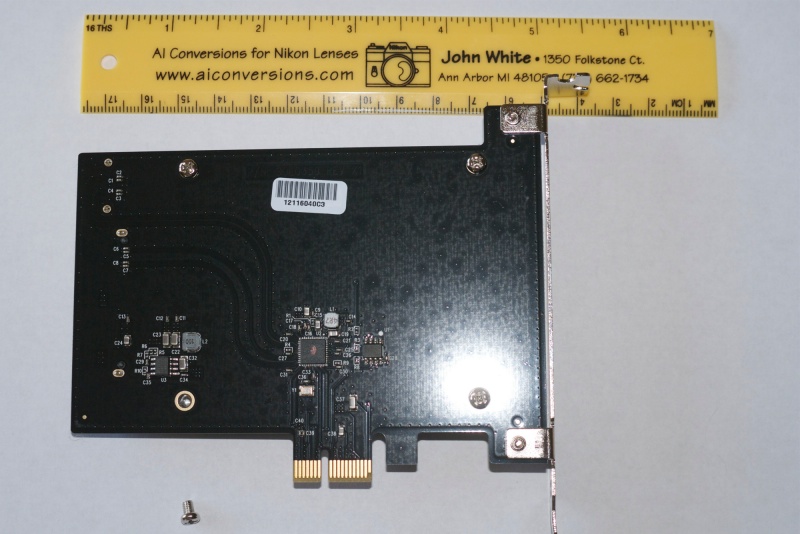
Three of the four retaining screws have been inserted and, yes,
John White does outstanding Nikon Ai conversions!

It gets better. The Apricorn has a second SATA III port for an additional drive (SSD or HDD – any size you can accommodate) which can be placed anywhere inside the cavernous interior of the Mac Pro, without interference with PCIe Slot 3:


SATA III port on Apricorn Velocity.

It makes more sense to use two single-SSD Apricorn cards rather than one dual one if you need to use two SATA III SSDs. Both take two slots (the dual overlaps a slot, making it unavailable), but by using two cards you get two SATA III data expansion sockets. Using one dual card you only get one SATA III expansion socket. So when you come to add additional drives, as I illustrate here using the expansion socket, you will be able to double the number of HDDs or SSDs thus added. Both the 16x (Slot #2) and 4x (Slots #3 and #4) will support full SATA III speeds.


Installed in PCIe Slot #2. #1 is for the GPU, top, #3 is for the USB3 card, #4 is currently vacant.

This means that a second drive, which will have to be powered from a cable from the optical drive enclosure, can be connected to the Apricorn Velocity card, and will be seen by OS X as a discrete drive and will run at SATA III speed. Good to know for future expansion needs, when they arise. For example, I could add a 2TB HDD connected to this port, and make my two existing 1TB HDDs into a RAID 0 array, behaving like a 2TB HDD. In this way I get a fast 2TB data HDD with the backup free. I ended up doing just that and illustrate the process here.

The Apricorn PCIe card comes with a 3 year warranty.

Choice of SSD and installation:

Unlike Apple, today’s Samsung is a major innovator, and its latest 250GB EVO 840 SSD is highly regarded as a state-of-the-art SSD, so I paid an additional $183 for one, making the package total around $250 with tax. It comes with a 3 year warranty.

Installation requires only a small Phillips screwdriver for the four screws which retain the SSD drive to the PCIe card (it takes less time to install than to unwrap the parts) and after using CarbonCopyCloner to clone the existing 120GB startup drive to the new Samsung SSD, I told System Preferences->Startup Drive to use the Sammy as the boot drive. Further, I did a PRAM reset on restarting the Mac Pro, some instances of the boot drive not being properly recognized having been reported unless a PRAM reset is done. (Note: If you have added USB3 capability, as I illustrate here, be aware that you cannot boot from an external USB3 drive. This is because the USB3 ports on the add-in PCIe card are not powered until OS X has started).


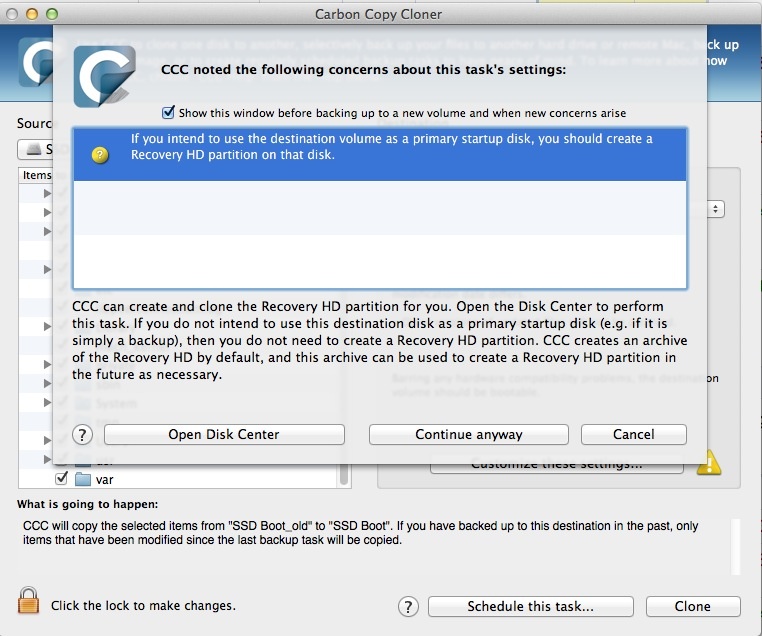
When you go to clone your current startup drive to the new SSD,
CCC will warn you that no Recovery Partition exists.


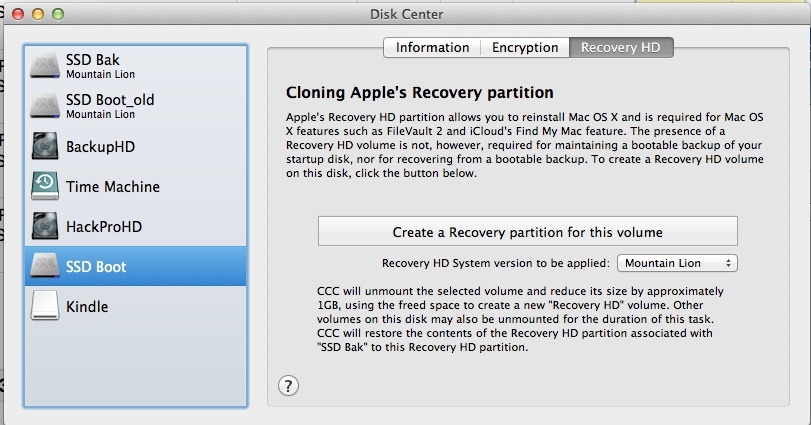
Go ahead and create the Recovery Partition using CCC. Now go to
System Preferences->Startup Drive and make the new SSD the startup.


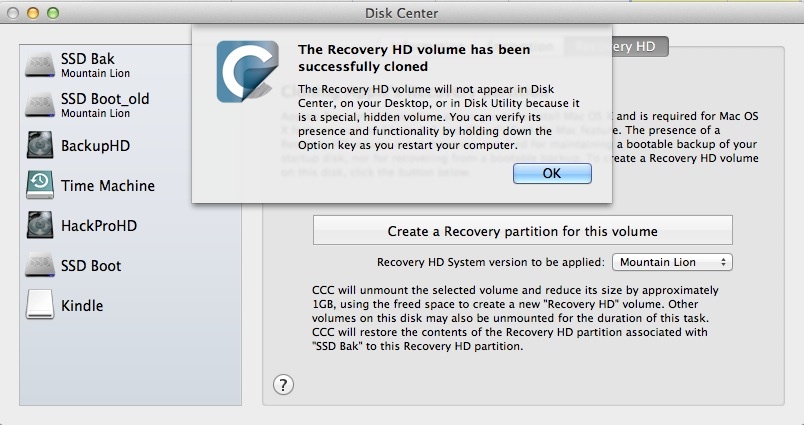
The Recovery Partition has been created.


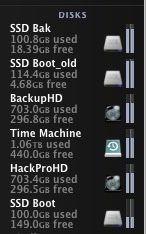
Drives before reconfiguring ‘SSD Boot_old’ and ‘SSD Bak’ to a RAID o drive.

Once the Mac Pro was restarted from the new PCIe Samsung drive, I set the two old SSD drives up as one striped (not concatenated) 240GB RAID 0 drive, to act as the backup drive for the new Samsung startup SSD.


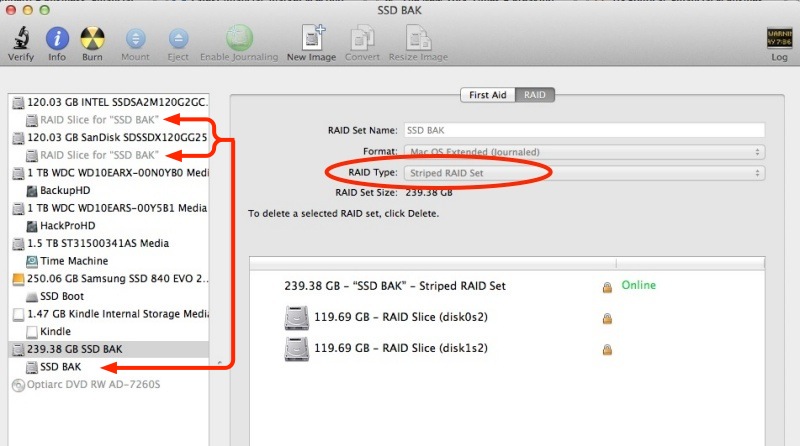
Disk Utility used to set up two SSDs as one ‘striped’ (meaning RAID 0) disk set.

This is how NOT to do it:


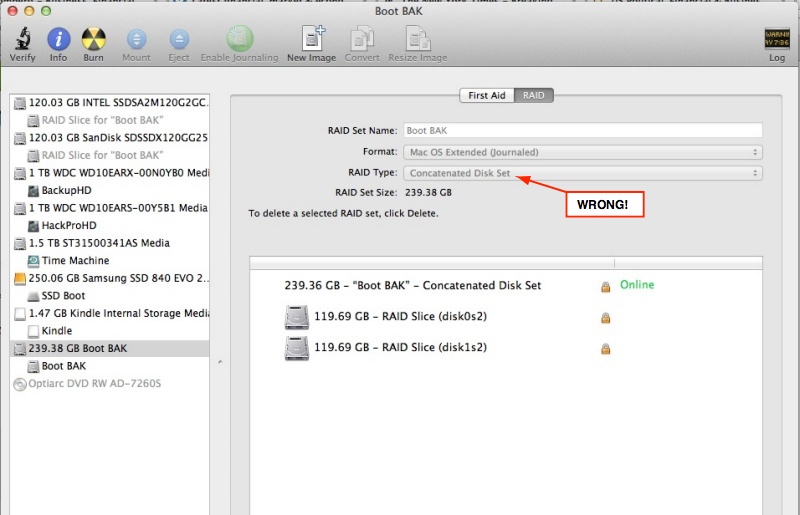
Concatenation simply strings the two disks end to end – when one is full the other takes over.

As concatenation results in only one disk being written to at any one time, the benefits of speed doubling using a RAID 0 disk set are lost, and the speed is no greater when concatenated than that of the individual drives.

I now have a 50% full Samsung startup drive and a 50% full RAID 0 backup comprised of two 120GB SSDs. The RAID 0 drive pair is reported as one drive in OS X’s Finder. Nice. Do not use the concatenation option – that strings the two drives end to end so you do not get the speed doubling that a RAID 0 striped array delivers. See the test results below to confirm this.

Be sure to enable TRIM for the new SSD and all will be well.


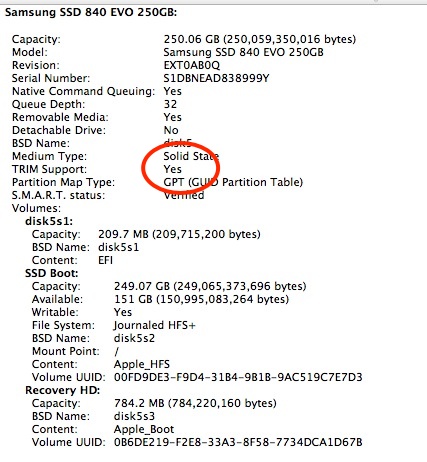
Confirming TRIM is in effect in System Profiler.

The new SSD is properly reported in SMARTReporter:


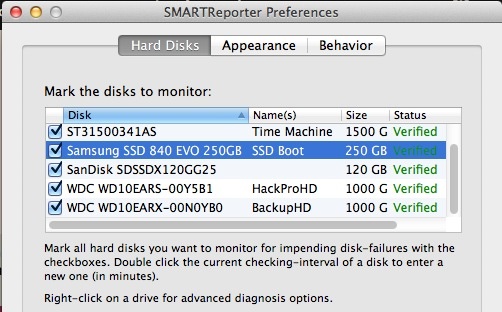
The new SSD in SMARTReporter.

Performance data:

How does it perform?

I set forth below four sets of BlackMagic disk speed test data – for the original 120GB SSD startup drive (a SATA III Sandisk running at SATA II speed), for the SATA II Intel former backup SSD, for the new Samsung SATA III 250GB Apricorn SSD and for the RAID 0 pair of two 120GB SSDs (the Sandisk and an older SATA II Intel) used as a backup:

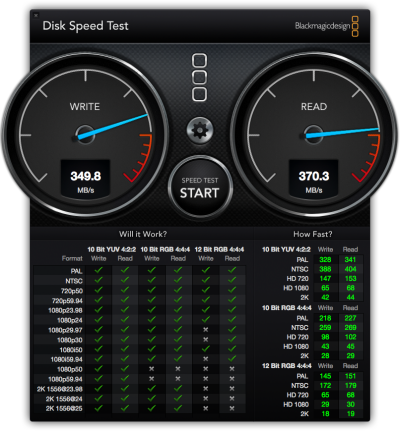
Original 120GB Sandisk SATA III SSD running at SATA II speed:

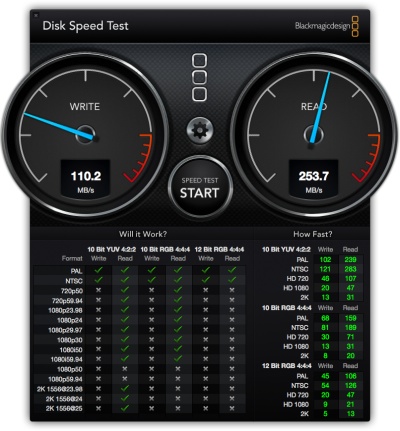
Original Intel X25-M SSD, SATA II:

As you can see, there is little difference between the SATA III drive running at SATA II speed and the SATA II drive.

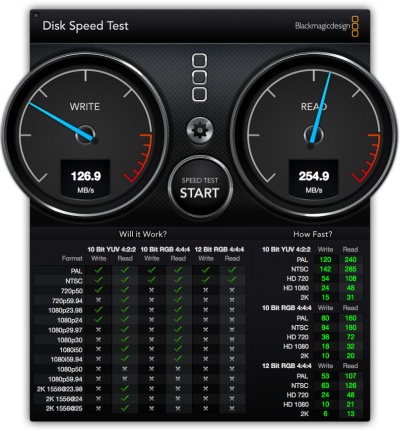
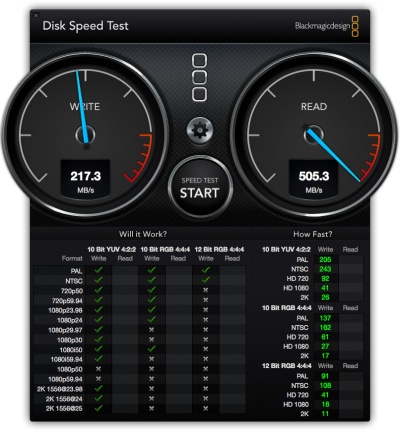
250GB Samsung EVO Apricot PCIe SSD running at SATA III speed – 2 to 3 times as fast:

120GB + 120GB RAID 0 Sandisk + Intel SSDs used as backup – twice as fast as each individual SSD, two SATA II drives running at SATA III speed:

A) Running in RAID 0:


Both discs are written to simultaneously, doubling the effective speed.

B) Running as two disks concatenated into one:


Concatenation is not the right way to do this. One disc is
written to until full then the other one is written to.

The Recovery Partition:

One final note. RAID does not support the Recovery Partition which allows recovery of the OS in Mountain Lion if your OS gets corrupted. Thus it makes more sense to boot from a plain vanilla SSD than from a RAID 0 pair, as the latter will not have the Recovery Partition available.

Use with Boot Camp with Windows:

There are many reports that Windows will not boot from the Apricorn – or other PCIe SSD – card using Boot Camp. As there is no conceivable scenario in which I will waste time with Windows, you are on your own here. I would suggest you use an emulation application like VM Ware, Parallels or VirtualBox (free) and run Windows from that – an approach which makes Windows just another executable application under OS X and requires no restart of the Mac Pro.

Conclusion:

This is a very cost and performance effective solution. You extend the lives of older, smaller drives, double their speeds, get a twice as fast startup drive and add an additional high-speed SATA III expansion option in the process. Power consumption of drives connected to the PCIe card is way below the maximum allowed. What’s not to like?

Don’t forget to recreate the related CCC Scheduled backup task when you are done – use of UUIDs for drives dictates this.

Update June 2015:

While you can squeeze in one or two SSDs using the Apricorn PCIe card above, there is now a more space efficient approach to adding lots of SSD drives, using the newer mini-PCIe mSATA drives which retail for a modest premium over regular 2.5 SSDs and are much smaller. Up to four 1TB mSATA SSDs can be installed on one PCIe card from Addonics (costing all of $55) and no external power supply is needed. These SSDs can be configured as JBOD (separate drives), RAID0 (two or more drives seen as one with no redundancy but increased speed) or RAID1 (mirrored drives with automatic back-up) using Apple’s Disk Utility.

I have sold my traditional SSDs and migrated to the Addonics/mSATA approach for its space efficiency, better cooling and higher capacity, and you can read all about that here.

Nexus 7 2013 tablet – Part V

MicroSDHC/SDXC and GPS.

Part IV is here.

MicroSDHC/SDXC:


A MicroSDHC card alongside an adapter for use with SDHC.

A friend gave me this nicely designed MicroSDHC/SDXC card adapter as a gift. It integrates the OTG cable – see Part IV – with a MicroSDHC card slot. No cables. Nice. You can read more about this Kickstarter project by clicking the image below:


Click for the web site.

That adapter takes SDHC cards up to 32GB and SDXC of 64GB. 64GB! SanDisk makes 64GB MicroSDXC Class 10 (10 MB/s) cards for $50. Imagine that – 64 1GB full length movies in a card smaller than a fingernail. Amazing. The Cold War spies of the ’60s with their Minoxes and microdots would have killed for this. It’s so small that concealment is not the issue – finding it is. I’ll report back when I have had a chance to use it. I will use the SDHC adapter in my Panasonic G3 to see whether write speeds are materially worse than with a regular SDHC card.

The prospect of a versatile, top quality camera like the Panny G3, on the road with the Nexus 7 with unlimited storage and decent processing capabilities is intriguing. Further, the WordPress app does the trick for blogging from the road.

Boy, is Apple ever in trouble, or what? They are competing with the Gillette model – sell the holders at cost, sell the blades for profit. (Tablets and clicks, in GOOG’s case). Hard to see how AAPL can ever compete as they have no razor blades to sell and Google’s tablet matches or exceeds Apple’s on quality and performance. If GOOG really wants to kill the iPad, it should simply sell the tablets for a couple of quarters at 50% of cost – 20 million at $100 cost each means a loss of $2bn, compared with annual EBITDA of $17bn. Hardly a stretch if you brief Wall Street in advance on the goal – remove a key competitor, clean up, stock rises. Might as well short AAPL while you are at it. Then they can do the same to Samsung …. or simply cease licensing Android to Samsung.

The Android user may, in fact, be best served using Google hardware as he is assured of the latest OS first (and fast fixes of issues – see below) and has to suffer none of the UI adulteration indulged in by the likes of Samsung.

Then rinse and repeat with cell phones.

GPS fix:

The 2013 Nexus 7 has built in GPS but as shipped there is a software glitch which many owners have reported shuts down GPS after a few minutes of use. This is in contrast to reported experiences with the 2012 Nexus 7 where a like GPS chip works properly.

On August 23, 2013, Google released a software update (Settings->Apps->About tablet->System updates) which updates the Nexus 7 to Android 4.3 Build number JSS15Q, though no mention of a GPS fix appears in the related screens. I have installed this and can report that GPS works well. The update apparently also fixes touchscreen glitches, but I have not had any touchscreen issues.

Disclosure: Long GOOG, purveyors of evil.

Charm

In Carmel.

Casanova Restaurant personifies the charm of Carmel-by-the-Sea.

Hand painted plates decorate the walls and the whole interior has an intensely Mediterranean look and feel.

The lighting is just so.

The wine selection is definitely Carmel-priced, as are the entrées:

Recommended, if your pocket book can handle it.

Snaps on the Panasonic G3 with the 14-45mm kit lens, and the iPhone 5.

Here’s the history of this lovely place:

Nexus 7 2013 tablet – Part IV

Connectivity.

Part III is here.

Certain aspects of the connectivity of the Nexus 7 have already been addressed.

  • Wi-fi is fast and connects quickly but struggles with re-locating a regular wi-fi signal once it has been tethered to the iPhone, dictating that the tablet be powered off completely then powered on, otherwise you get a network ‘not in range’ message. This looks like an Android glitch.
  • Bluetooth headphones pair quickly and work well, at a very minor power consumption penalty.
  • The $40 LG inductive charging puck is far preferable to the ghastly micro-USB2 connector, the trade-off being an approximately 20% increase in time to full charge. Both the inductive and cable chargers have the Nexus emit a three note chirp when first connected and a two note one when fully charged. Nice.
  • I have yet to test Android’s equivalent of Apple’s AirPlay (wireless streaming of content to a TV/computer on the same wi-fi connection). This is done using an app named AirSync which needs a server program installed on the computer/TV end which resolutely refuses to mount on my Mac Pro which is the TV/movie server here.
  • An app named DoubleTwist purports to emulate iTunes for Android systems. I have not tested it.

In what follows I address use with cameras and external storage, as well as with credit card readers.

One common complaint from tablet and smartphone owners is that few devices have MicroSDHC card slots to permit insertion of additional storage. The Nexus 7 has none. One app and a cheap cable fix that, though the result means having storage attached by cable to your tablet. I keep reading that more elegant solutions are on the horizon but as many of these seem to be funded through the fraud that is crowd funding, don’t hold your breath. (Fraud as in ‘raise money, catch the one way flight to the sun’. High time this nonsense was regulated like any IPO).

Nexus Media Importer:

To import or read files from/on external storage you must first install this $4 app available in the Play Store:


Once installed with a readable storage medium attached, files can be moved to or from the tablet and the external storage. No hacking of the Nexus 7 is required and that’s just as well as you do not want to risk the resulting instabilities which hacking can cause.

Nikon D2x and D3x:

These bodies provide a MiniUSB (not MicroUSB) socket to connect to external devices. Ordinarily, as I do not carry a CF card reader when travelling, I connect the bodies to my MacBook Air on which Nikon Transfer software is installed. RAW files are downloaded to the MBA for processing in Lightroom. Connecting the Nikons to the Nexus 7 using the On-The-Go (OTG) cable (below) does nothing when Nexus Media Importer is running, so direct download from camera to tablet does not work. However, a simple workaround is to use a portable CF USB2 card reader, insert the card in the reader and attach the reader/card combination to the Nexus 7 using the OTG cable.

Panasonic G3:

The Panasonic has a MicroHDMI connector, even smaller and more fragile than the poor MicroUSB2 one in the Nexus 7, and the G3 comes complete with the cable. What a confusion of connectors! The result is the same as for the Nikons – Nexus Media Importer does not see the camera when it is attached using the OTG cable.

Flash storage attached using a card reader:


SDHC card, card reader and OTG cable with the Nexus 7.
That’s as far as the MicroUSB plug goes into the tablet.

This works perfectly. Insert the card from your camera in the reader, connect the reader to the OTG cable and the OTG cable to the Nexus 7. Fire up Nexus Media Importer and the files – whether camera files, music or movie files – are immediately recognized and can be moved to the tablet at will. Even Excel spreadsheets work. As one full length compressed movie averages 0.8GB (using Handbrake and the ‘Android tablet’ output option), that translates into 40 movies fitting on a 32GB SDHC card. More than anyone can reasonably need.

For more storage, either replace content on the SDHC card or get more cards. Movies play perfectly from the attached SDHC card, so there’s really no need to transfer them to the Nexus’s internal storage. You can use your choice of player on the tablet – I use both the stock Gallery or the (free) MX player which has more aspect ratio etc. adjustability and reports time used and time remaining. If you do decide to move movies from the SDHC card to internal storage, I timed the transfer rate at 1gB in 10 minutes. Not stellar, but handy if needed.


Files on external flash storage highlighted for move to internal Nexus 7 storage.

Flash storage using a flash drive:

Same result as for an SDHC card, above. Works perfectly and makes for a tidier rig. You can just move your movies from your desktop/laptop to the flash drive and carry them in your pocket with the OTG cable for use when needed.

Notebook, bus powered, spinning disk drive:

While the power LED in my 160GB 2.5″ spinning disk drive illuminated, the drive is not recognized by Nexus Media Importer with the drive connected using the OTG cable. It looks like the drive must be powered to derive sufficient power to work. The same would go for a big external 3.5″ hard disk drive.

SSD:

I do not have a spare SSD to test this but it’s an interesting option. The SSD’s power consumption would have to be meaningfully lower than that of an HDD but at this time I do not know where the cut-off lies. AnandTech has an article from a while back suggesting that the power consumption advantage of SSDs over notebook HDDs is modest, so this may not work. They do say that write power needs are greater than read, but I have no way of concluding objectively.

Apps: I have not tried running apps from external flash storage as there’s no motivation to do so while internal storage space exists. However, I have read that this cannot be done but have not tried to test it.

OTG cable:

I bought this one from Amazon for all of $1.46 and it took 19 calendar days to arrive from the People’s (non-) Republic. At $1.46 shipped there is no basis for complaint. You can pay more for locally sourced versions which will ship faster.

Square credit card reader:

There’s an Android version of the Square app in the Play Store. Be sure to push the Square dongle all the way into the headphone socket, sign-in to the app and it works perfectly, allowing you to take credit card payments:


Square card reader in use with the Nexus 7.


Square app ready for transaction input.

Conclusion:

The Android operating system provides a broad range of connectivity to external devices. Connection of external flash storage and movement of files between flash and internal storage is both possible and very simple. In those cases where the Cloud is inaccessible and storage needs are large, Android provides a workable solution.

While common cameras appear not to be recognized, simply placing their CF or SDHC cards in a connected card reader is an easy solution.

Upodate August 22, 2013:

I mentioned earlier that the only way I could revert to home wi-fi after tethering the N7 to my iPhone 5’s hotspot was to power off the N7 and restart. A royal pain.

I have found that by unchecking ‘Wi-Fi & mobile network location’ in Settings->Personal->Location Access, that the problem goes away. To revert to home wi-fi, go into Settings, cycle Wi-Fi off then on, and home wi-fi is immediately recognized:


Uncheck the last box.

Part V is here.

Nexus 7 2013 tablet – Part III

Games, movies and file transfers, TRIM, security and back-ups.

Part II is here.

Gaming:

I am not qualified to write at any length about the gaming experience on the Nexus 7 as I never play computer games, but I delegated the task to my 11-year old son Winston, who snapped up the following games from the Google Play Store:

  • Bounty Arms
  • POP SnF
  • Fruit Ninja
  • Riptide GP2
  • Wild blood
  • Temple Run

Some, like Riptide GP2, take special advantage of the enhanced graphics in the Nexus 7 and I must admit that the responsiveness and speed – looking over my son’s shoulder – seem perfect. The detail renfering in Riptide is exceptional. Sound effects, thanks to the stereo microphones, are realistic, especially when the tablet is held in landscape mode which places the speakers behind each hand, where they reflect sound from the user’s palms to his ears. The 2013 Nexus 7 uses a Qualcomm Snapdragon S4 Pro CPU, a step up from the 4-core Cortex A9 in the 2012 model and comes with 2GB DDR3 RAM, compared with 1GB in the predecessor. So it’s hardly any wonder that the performance on gaming is stellar.

Predominant reaction from my boy: “Awesome”. Go figure what that means.

Movies:

The experience is excellent. Both Winston and I watched movies on the Nexus 7 using the speakers or headphones. We tested both wired and Bluetooth headphones without any issues. Our Arctic Sound Bluetooth headphones do not go super loud but are loud enough. As a 16:9 widescreen image almost fits the 16:10 display of the Nexus 7 fully, the displayed image size is the much the same as on an iPad Mini which displays broad black bars on the top and bottom, representing a lot of unused pixels. The 1920 x 1200 definition of the Nexus 7 screen is breathtaking, with a widescreen movie using 1920 x 1080 of those pixels. It’s hard to see why you would want any more pixels on this size of display. Depending on brightness and volume settings, I estimate that a full battery charge is fine for two movies and possibly three. Using wired headphones (Sennheiser PX100 – highly recommended) battery life increases by maybe 30 minutes compared with Bluetooth headphones.

File transfers:

Download the free Android File Transfer utility to your Mac or PC, and you will be greeted with this message:

File transfer could not be simpler and is a world better than the simply ghastly iTunes experience which dictates that files to be moved to the iPad must first reside within iTunes on your desktop. iTunes has to be the single worst product Apple makes and successive efforts at simplifying it have only made it worse.

As space on the Nexus 7 (I have the 16GB model, there’s also a 32GB one) is limited, it makes sense to first compress movies using Handbrake before transferring them to the Nexus 7. Handbrake (free) has an Android Tablet output preset, which is what I used, with a typical 4GB movie file shrinking to 0.7GB, whereupon it can simply be dragged and dropped from your desktop to the Movies directory on your Nexus 7:


The Android File Transfer window on the Mac Pro.
Barebones and a delight to use.

Here’s a big (almost 3 hours long) movie being transferred – you can figure the transfer speed based on this illustration – it’s fast:


Movie file transfer to the Nexus 7.

I view movies using the Gallery app which comes with the Nexus 7 and the Android operating system even automatically generates cover art for any transferred movie. Here’s how the Gallery display looks on the Nexus 7:


Movies in the Gallery app on the Nexus 7.

Music is transferred just as easily and if it’s coming from your iTunes library and includes cover art, the art is also transferred. For those interested in syncing their entire iTunes library, apps like DoubleTwist are available, though I have not tested this. But it’s yet another demonstration that the Android user need not fear isolation from his iCloud ecosystem, which is readily accessible through Android apps.

Expanding storage capacity:

I have ordered an OTG USB 2.0 to Micro USB cable for all of $1.46, shipped. It’s on the slow boat from China, but once here it should permit access of data files (but not execution of apps) stored on any connected device. No jailbreaking of the Nexus 7 will be necessary. That’s significant as jailbreaking can introduce instabilities which are the last thing you want.

The connected device can be an SDHC or micro SDHC card in a suitable holder, a camera, a self-powered portable hard drive – or better still an SSD which uses far less power – and so on. Even a powered external drive should work fine, albeit presenting the inconvenience of a power cord. This sidesteps the common criticism that the Nexus 7, like many current tablets, has no micro SDHC card slot.

For users who want to carry around large movie and/or music collections without dependence on Cloud storage, this inexpensive connecting cable should do the trick. I would guess that a wired keyboard would also be recognized though Bluetooth is probably the way to go here. I’ll update this review once I have tested the cable with a variety of storage devices.

TRIM:

TRIM is the software technology which manages and removes garbage which can pile up on an SSD. The 2012 Nexus 7, with an earlier version of Android, did not include TRIM with the unfortunate result that the tablet slowed down after months of use, as the garbage piled up on the SSD. Android 4.3 JellyBean adds TRIM support and users of the 2012 Nexus 7 who have upgraded to 4.3 report that the slowness problem goes away, so I would expect no slowdown issues with the 2013 Nexus 7.

Security:

Some aver that Android is less secure than iOS, and the most common remedy for the Nexus 7 is to install avast! Free Mobile Security. Quite why this does not come installed stock I have no idea, as the app permits location of a lost or stolen device in much the same way that ‘Find my iPhone’ does with iOS devices, and also permits a remote wipe of a lost tablet. You can access a missing tablet over the Web so there is no need to own another Android device. Be sure to download both avast! Mobile security and the avast! Update Agent. The latter adds the ability to remotely control your tablet in the event of loss or theft. avast! really should consolidate these two apps.

Here I am accessing my Nexus 7 from a MacBook Air using this link in my browser:


Web access to the Nexus 7 from a laptop.

Here’s the range of commands available from my laptop as they are applicable to the Nexus 7:


What you can do to your Nexus 7 from a laptop.

This is what executing the ‘Lost’ command does:


Remote comntrol options from any browser – Mac/PC/Linux/Ubuntu, you name it.

After issuing a ‘Lost’ command, I received the GPS coordinates of my ‘lost’ tablet in seconds:


GPS coordinates of lost tablet are reported in seconds.

Now I have only to convince Officer Plod at the local doughnut store to arrest the thief.

avast! also includes web site scanning for viruses and scans your tablet for any viruses present.

All in all, the avast! user does not lack for control.

If you have multiple Android devices, be sure to register them under the same email at avast! Doing so permits all devices to be seen on one login screen, thus:


avast! with multiple Android devices. Yes, I liked the Nexus 7
so much that I bought one for myself and one for my son.

Proceeds of sale of the iPad Mini paid for the second Nexus 7!

Should the anticipated Q4/2013 iPhone 5 upgrade disappoint, as I suspect it will, it will be a simple matter to add the latest, more capable Samsung or Google cell phone to the list of devices protected by avast!, while retaining full access to the iCloud ecosystem.

Mobile backup:

While you are at it, install avast! Mobile backup:

This app is installed to your Android tablet and controlled from a PC, Mac or Android device. The app uses storage provided by Google on Google Drive in the Cloud; the first 15GB is free, with up to 16TB (!) available on a subscription basis.

Here’s the backup status on my Nexus 7 – you can automate back-ups and restrict them to wi-fi only to save on usage costs. I paid avast! $15 for a one year subscription which adds the ability to backup apps. Here’s what your $15 buys you – it seems like a no brainer to pay for this. The ability to do a restore onto a replacement or additional device (tablet, cell phone) is invaluable and greatly speeds transition to new devices:


avast! Free and Premium backups compared.

Here you can see that all the apps have been backed-up using the Premium service:

Part IV is here.