Category Archives: Software

CrashPlan – Part I

A third line of defense.

When I recently wrote about CarBak, the backup portable hard drive with all my pictures on it which I keep in my car, it was not lost on me that the Big One (I live in Northern California, surrounded by major geological fault lines) would take care of the home and car in one mighty outpouring of energy.

The Hayward Fault …. and me!

Further, for terrorists there are only a few high value targets in the US. These include famous structures such as The Brooklyn Bridge, The White House and Congress in DC, Sears Tower in Chicago, The Transamerica Building and the Golden Gate Bridge in San Francisco. All simply fabulous, though for me the Brooklyn Bridge is #1 by a fair margin for its sheer beauty, comparable to anything, anywhere. So living near one of those is probably not a great idea if you want to keep local data safe.

At the time I added CarBak I had also determined to go with a cloud storage back-up plan but could not get comfortable with anything out there.

However, when Adam Pash at Lifehacker talks up anything I listen hard. You see, Mr. Pash was the person who inspired me to build the HackPro to replace Apple’s awful desktop hardware which had been nothing but a story of mechanical failure for this user for many years. That proves to have been the single best computer thing I have ever done, so call me a Pash Groupie. The cloud storage service Pash speaks about is named CrashPlan and I just signed up for a 30 day free trial.

The appeals of CrashPlan include:

  • Unlimited volumes of data for $5/month
  • Incremental timed back-ups
  • 448-bit encryption of your data – you lose your password and you are dead meat as they do not know it
  • Servers not located on the Hayward Fault, best as I can tell

While you can elect timed backups throughout the day and can even allocate the CPU percentage usage to the task, I cannot afford hardware bottlenecks during my working day. As my local, incremental, daily Carbon Copy Cloner backup (thank you Mr. Bombich) runs at midnight, and takes a few minutes, I set CrashPlan to run from 1am to 6am. Lower broadband traffic at that time helps, given the awful state of US broadband which is, for the most part, an order of magnitude slower than that in South Korea. Or even France! And because my provider – AT&T – is still running copper cable which was likely installed when Alexander Graham Bell was still having his nappies changed, I cannot get anything faster. They tried and my speed actually fell. Yup, that’s The Phone Company for you. America’s future.

So my backup plan now looks like this:

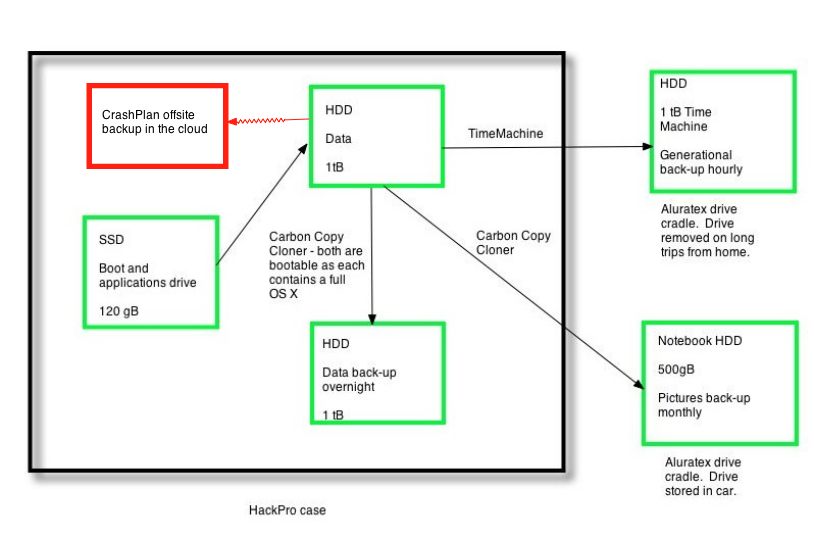
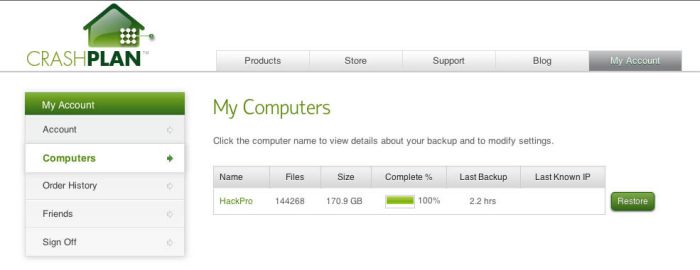
The only part of CrashPlan inside the HackPro’s case is their software. Search me where the data reside.

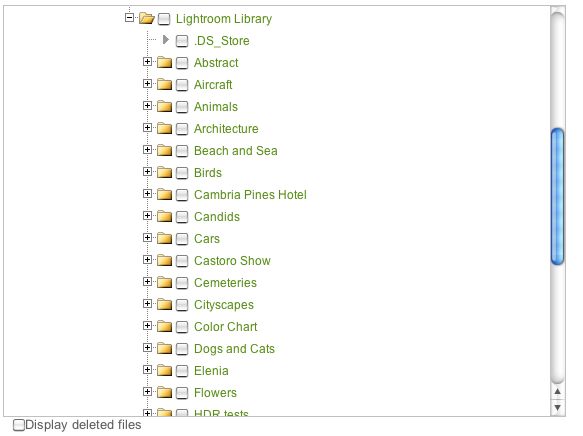
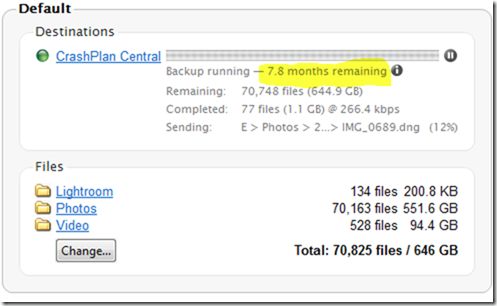
I have started with CrashPlan just backing up my User (login) and Pictures folders, the latter containing my Lightroom library where all my ‘serious’ snaps reside. (The family goo-goo stuff is in iPhoto), which figures as follows:

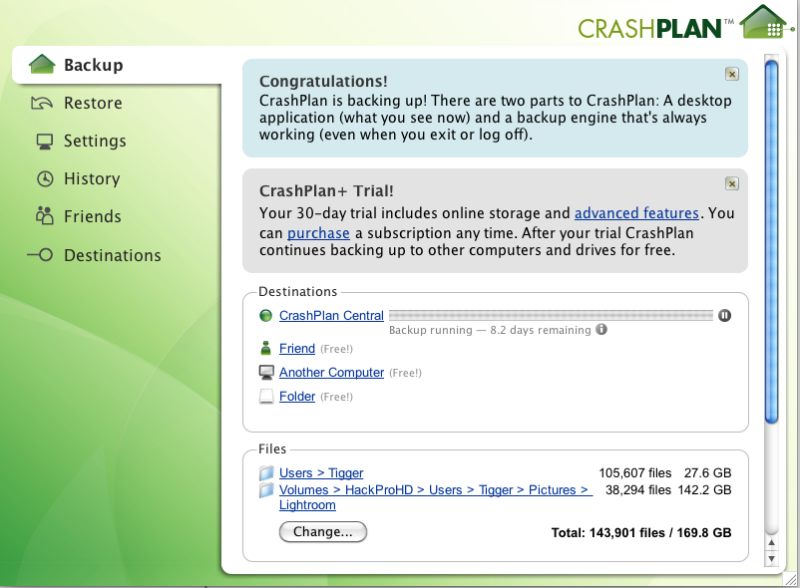
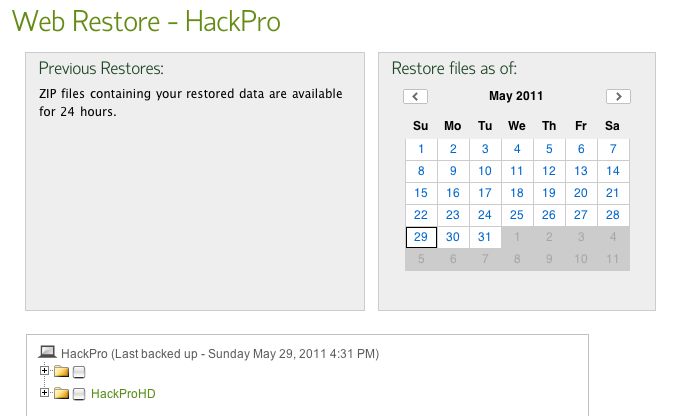
The eight days shown assumes full time availability. As I have gone to 1am-6am, that means it will likely take some 38 days for a first complete backup, meaning my 30 day trial will have expired. No matter. I’ll buy one month for $5 to finish and test the result.
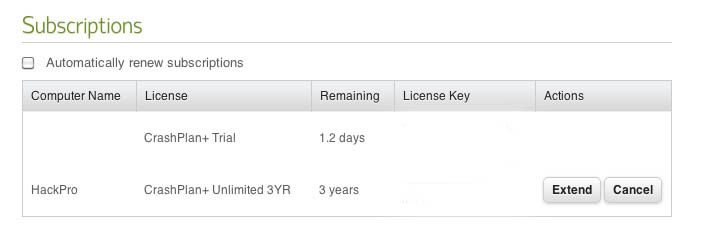
CrashPlan prices.

CrashPlan also offers a free option which allows you to store data on a friend’s computer using their software. This is an idea comparable in stupidity to, say, the US invading China (comparable, but hardly impossible), and I can think of several million reasons not to do this. If your data is not worth $60 a year to you then it’s not worth anything.

Or, stated differently, the only viable approach to backup is to totally distrust everyone, especially yourself. If it can go wrong, it will. Did I ever tell you about the IT geek who worked for me whom I fired in a moment of righteous (self) anger? The son of an unmarried mother swore up and down we were doing daily backups. I checked the logs and they said we were. Then one day we had a server crash and had to do a restore. The backups were useless. They had never been tested …. he was lucky the windows did not open when I fired him. My anger was misdirected, of course. I had made the mistake of trusting him. The fault was mine.

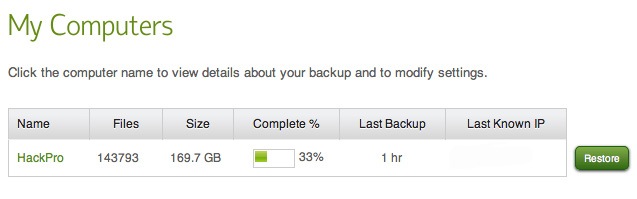
Ever since then I test my backups monthly, making it a point to boot from the backup HDD in the HackPro and restoring a file or two from the Time Machine and CarBak backups. Once you make it a routine, it’s a few minutes and no big deal.

Finally, if you are in a big hurry to get your local data uploaded, CrashPlan will send you a hard drive for your copy and you mail it back. If you have no backup at all, this is the way to go. Hurry!

Making a cloud storage vendor your primary backup plan is back with the China invasion scenario for smarts. You cannot check financial stability (remember how safe Enron was? Can you spell AIG now in for $187bn of your money?) any more than professional auditors can. You will never know where the servers are located, the vendor using the shield of secrecy to refuse disclosure (for all I know they are in downtown Pyongyang) and there’s no one on earth you can believe about their security or the integrity of their employees. Statistically, some are likely to have criminal records/DUIs/spousal abuse/whatever on their copy sheet.

So forget about due diligence. A time sink.

And finally, the cloud is a fragile beast. Remember Bell and his nappies and the Telco’s wiring? How do you know the cloud will be available when you need it? The Big One will take out all broadband in your area if the terrorists don’t get there first. And it doesn’t have to be a terrorist. When I was working in San Mateo at the peak of the Internet bubble, a construction worker busy expanding the San Mateo Bridge in time for the bursting of that bubble managed to cut a huge bundle of optical fibers nearby and it took fully six months to reconstruct them. Broadband speeds plummeted, all because of one Joe Six Pack.

But as a third line of defense (OK, fourth line in my case) $60 or so a year per computer does at least compare to the vitamin you fool yourself will stave off next winter’s cold. It probably does nothing, but you feel good about it.

I’ll report back when I have uploaded all and tested a download, which will be in several weeks time.

Meanwhile I hope the Big One can wait until Day 39 hence, when all my snaps are on CrashPlan’s servers.

Another fine Photoshop CS5 book

Evening again.

I made mention of Martin Evening’s fine photography and technical writing when I looked at his Lightroom 3 book a while back. Having just upgraded from Photoshop CS2 to CS5, I favorably commented on Richard Harrington’s book recently. It excels for its author’s clear language and an abundance of videos, even if the definition in those is sorely lacking.

Given my previous experience with Martin Evening’s work I went ahead and splashed out on his CS5 book. By contrast to Harrington’s it’s more print than video; the quality of the videos is simply outstanding and I only wish there were more. His video on masking and replacing the background in a subject is so well done that I tried it with a couple of my own snaps and the instructions worked perfectly first time. The chapters are color tabbed so that you can jump to what you want with ease, and taking this large work in bite sized chunks is, I find, the way to learn. It took a couple of decades to get PS to where it is to day, so no one is going to learn it overnight.

Click the picture to go to Amazon.

I find I tend to watch the Harrington book videos on my TV whereas I tend to sit at the HackPro and work my way through the Evening examples. Like Harrington’s, the book comes with a DVD replete with pictures and videos.

Recommended. And I have to go back on what I wrote about the LR3 book; it’s far easier to use a paper copy than an iPad version. It’s just easier to look things up in a book.

An excellent Photoshop CS5 book

Videos seal the deal.

I’m finding the help files in my recent upgrade to Photoshop CS5 frustrating to use. Often the chronology of steps to get to the point at which the Help file is invoked is missing, so you don’t know how to first get to where you are. So that got me searching for a better guide and, of course, there are so many books out there that it’s hard to know where to start.

So I resorted to looking at on line video tutorials among the many Photoshop podcasts on AppleTV. That was an even worse experience. Many podcasts do not cover CS5 and of those that do you are often stuck with someone who thinks he’s funny and spends endless time sharing his sense of humor with you at the start of the video. Frustrating. Then I chanced upon a teacher named Richard Harrington and found his narrative professional, correctly paced and on point. So I bought his book for some $35.

Click to see the book at Amazon.

The book itself is slim as these things go, at 300 pages, but the included DVD contains no fewer than 72 videos illustrating key techniques. These could be higher definition but they are well done otherwise. Additionally, there are quizzes on each of the sixteen chapters, reflecting the serious, academically-oriented thrust of this production. Further, there are many TIF files to allow the in book examples to be replicated hands-on. This is an excellent method of learning the essentials of this massively complex application.

I’m adopting the Pareto Principle, reckoning that I can get 80% of the power of CS5 by learning 20% of its content. Right now I’m at something like 10/2!

Harrington’s book and tutorials are recommended if you value your time and prefer professional tuition; you can get a sense of his teaching style by looking up his video podcasts online using iTunes. The definition of these is the same as that of the ones on the DVD, which is to say not great, but you can make things out.

Auto Blur updated

CS5 meets Auto Blur.

Auto Blur is my moniker for making sharp backgrounds out of focus, an occasional dictate when using small sensor digital cameras, which tend to render everything sharp. You can read about the technique here.

One of the enhanced features in Photoshop CS5 is the outlining abilities of the Lasso tool.

First you do a rough and ready outline thus:

A first rough outline with the Lasso tool.

I use a mouse but if you are serious about doing lots of this sort of thing then a pen tablet would likely be a better tool. Then you click on Refine Edge and in the first box click on Smart Radius, moving the cursor to the right until the outline is just so:

Refined Edges.

The red circle indicates the tool which is selected after Refine Edge is applied; it’s dragged around the areas of extremely fine detail – like the girl’s hair – to make them perfectly defined against the background and reduce the edge halo effect.

The small error at the lower right is easily corrected in the Lasso tool and you are done. Mess some with the other controls if needed. The enhanced outlining is noticeable, not least for the incredible speed of operation – there’s minimal need to make small, time consuming adjustments. Then I simply clicked on Select->Inverse to select everything except the outlined figure, and applied Filter->Blur->Gaussian Blur.

This is a typical G1 image with the kit lens at 18mm fully open at f/3.9. Everything is sharp. Rollover the image to see what I’m talking about (renders fine in Chrome and Safari on my Mac) – this took all of 30 seconds to do; refresh your browser if the picture is not visible:

Thumbsucker before and (mouseover) after AutoBlurâ„¢ with CS5’s Refine Edge tool (left) and CS2 (right).
Note the absence of halos at the edge of the outline in the CS5 version compared to the CS2 one.

The CS2 version took far longer to do.

The outlining in the CS5 version is not only better, it took a fraction of the time to accomplish. This is the sort of real world value added which continues to see me as a great fan of Adobe products. I’m adding CS5 to my toolkit, even if I only know 5% of its power. Heck, a few Auto Blur later and it will have paid for itself!

Photoshop CS5 and CAF

Uncle Joe would be proud.

I have been ticking along for many years with Photoshop CS2 and been quite happy with it for my modest needs. I’m no Photoshop expert, goodness knows, my primary use being for round tripping images from Lightroom to fix leaning verticals, where PS does a better job (Edit->Transform->Distort) than the rudimentary controls in Lightroom 3. A related, occasional use is to remove overhead cables and the like using the clone tool where, once again, the LR tool does not cut it.

A while back I tried CS4, a loaner from a friend, and noticed a couple of things. First, it’s an Intel app in the Mac version, meaning it runs far faster than the older PPC CS2, which has to run through the Rosetta emulator. One simple example is that even on my fast HackPro desktop, CS2 takes 20+ seconds to load whereas CS4 takes 3, using an SSD drive. Everything else is faster too.

Now that speed increase alone is not enough to make me shell out for CS5, the current version but, as luck would have it, I was riding the Caltrain from the South Bay to San Francisco the other day, merrily reading my iPad, when the chap next to me started up a conversation. Turns out he’s an engineer at Adobe which makes its home on Townsend Street, a few hundred yards form the SF Caltrain terminus, our destination. When I told him I was still on CS2 he gently reprimanded me after picking his jaw up off the floor. Consider me reprimanded! “Dude”, quoth he, “You just have to try CS5. Content Aware Fill will blow your mind. And you gotta try the new outlining tool”.

This was both flattering (being a ‘Dude’ just shy of 60 years of age feels pretty good) and intriguing, based on his explanation of Content Aware Fill, which can do a smart job of replacing pixels in an image based on the surrounding details. And the enhanced outliner would be nice for those times I want to use Auto Blur when the ‘everything sharp at all times’ curse of the small sensor on the Panny G1 dictates manual blurring of a distracting background.

A little bit of digging made things more intriguing. CS5 is the first version of Photoshop which runs in 64-bit mode on the Mac. Further, Adobe offers a $199 (at Amazon) upgrade which will work all the way back to CS2! (Trying to upgrade from within CS5 is a waste of time, returning page errors. Adobe- wake up!) No way I was going to pay the $700 asked for CS5, especially as I own CS2, long registered at Adobe, which started life as CS1 on my G5 iMac a few centuries ago. Finally, as the next version of the Mac OS, Lion, will no longer support Rosetta/PPC apps, I have to do something as I’m not about to get left behind by sticking with Snow Leopard when that cat’s time has passed, and while I do not love PS, I do need it now and then. The icing on the cake is that Adobe offers a 30 day free trial of CS5, so before you could say ‘dial-up’ I had the software downloaded and installed. Well, you actually need broadband because downloading this 700mB whopper would take longer than life is worth with dial-up. It would be cheaper to buy the disc! And I’m not talking CS5 Extended – just the basic CS5-only version.

Let me pause and jump to some recent history before writing further of Content Aware Fill. When the British and Americans gave away Eastern Europe at Yalta in early-1945 to a grasping Stalin, the Cold War commenced. For reasons never quite clear to me, FDR and Churchill, the donors of countries they did not own, referred to Stalin as Uncle Joe; it’s tough to ascribe avuncular qualities to the greatest psychotic mass killer in history, but FDR was gaga by then and WSC was down to his uppers (and about to lose a General Election to an ungrateful nation), having just barely saved Englishmen from having to learn German. So I suppose while Eastern Europeans would disagree, those two Western leaders might be excused for their poor judgment. Heck, I still named our son Winston. Great men have great faults.

The point of this historical flashback is that Uncle Joe would have loved (I almost wrote ‘killed for’) Content Aware Fill (CAF). You see, in those days before Photoshop, when he would whack the occasional cabinet member just to keep the other boys on the Politburo in line, photo retouchers would have to set to and start editing out the whackee from all know official pictures. Then, after hundreds of hours of careful retouching to eliminate all trace of Comrade Whackee, the history books would be republished – pity the poor proof reader who missed a name – and schoolchildren indoctrinated afresh in whoever the new leaders were. People would literally be ‘disappeared’ from photographs, which took a good deal longer than two shots in the back of the head. Suffice it to say that Content Aware Fill is so good that Uncle J would have been at the front of the line at Adobe on Townsend Street, San Francisco, credit card in hand, long before the ink was dry on the first glowing reviews a year ago. Mercifully, UJ has long been six feet under, thus saving the lives of many soon-to-be-whacked photo retouchers, as their work could now be done in minutes instead of months.

The best way to illustrate CAF is with a ‘before and after’.

After and Before applying CAF

The overhead wires, a bugaboo of architectural and city photographers everywhere, took all of a minute to replace. I simply dragged the Healing Brush tool along them, regardless of background, hit Enter and after a few seconds of the spinning gear wheel here is what I got. It’s not perfect once enlarged, but a little local fixing wth the regular Clone tool and it’s done. Doing something like this in areas with complex detail would have taken ages using the Stamp and Clone tool.

Here’s another far more extreme example, which took 15 minutes to do:

CAF at the max. Streetcar lines be gone!

Where fine detail is involved I have found that using the Healing Brush to confer CAF is more effective than the alternative method. That method has you using the lasso tool to select a large area to be replaced, then clicking Shift-F5->Content Aware. The latter method takes a larger, cruder surrounding data sample in doing its thing, and tends to be best on a subject against a uniform background.

A handy related use of CAF is when you use the Edit->Transform->Distort tool in PS to correct leaning verticals. If the nature of your stretching of the original image leaves white areas within the picture, you can use CAF to fill those in.

CAF is not perfect. It likes a fair amount of surrounding area to sample and if that area includes other image elements, it will unnecessarily place them in the fill, but after a bit of use you get the hang of it and learn how much has to be sampled around the object to be replaced. It’s pretty remarkable technology and Uncle Joe would be proud as must be his many latter day descendants across the world. Judging by the fact that even the HackPro spins its gear wheel when doing CAF you really need a powerful CPU and GPU in your Mac unless you place little value on your time. There is some very complex processing going on here.

I fancy Adobe and Amazon will be finding themselves $199 better off when my 30-day Photoshop CS5 trial is up. Meanwhile, my hat is off to Adobe for a superb idea, well executed. Version two will likely be able to remove whole armies without a shot fired.

Here’s how UJ did it – before/after whacking Comrade Yezhov:

Now you see him, now you don’t.

You can read about Uncle Joe and Comrade Yezhov here.

As for the enhanced outlining tool mentioned by my new found friend from Adobe on the train, more of that later.