Category Archives: Software

Running Windows on a Mac

Ugh!

[column width=50% padding=3%]

Looking back I suppose there have been two sound decisions I made in my business life – we won’t go into the dozens of poor ones here!

One was leaving socialist England in 1977 for America which, back then, truly was the land of opportunity and, in contrast to my homeland, actually had a work ethic. The other was quitting my day job almost a decade ago and deciding to make my own living.

Working for yourself is truly a breath of fresh air and has probably added a couple of decades to my life expectancy. No more corporate team spirit, working for the greater good and all that gobbledegook which has wasted hundreds of billions of dollars of shareholder wealth over the past few decades in America’s ‘feel good’ society. Whenever forced to attend one of those ghastly team building sessions – whose goal would have made Stalin proud with its emphasis on stamping out all individuality – I would quickly plead a headache and head for the nearest beach with my camera.

But the greatest reduction in stress in my life came from no longer having to use Microsoft’s Windows. This fraud passing for an operating system with its need for large support teams of unwashed techies and constant problems was in my life no more. I became a full time Mac OS X user. And while I have nothing but contempt for Apple’s fragile hardware, OS X has been a model of stability and reliability this past decade and is as good as it gets in the latest Snow Leopard iteration …. especially if you run it on a home made PC box! Good, plentiful, cheap, easy replaced and reliable PC parts installed in a Hackintosh come to life when presented with a sound OS.

However, because I manage money to make ends meet, there are one or two financial applications I use on occasion which only come in Windows versions meaning – oh! horror – that I still have to load that piece of garbage on occasion.

While OS 10.5 Leopard was around I used Parallels as an emulator to run Windows – my copy of Windows started life as Windows 98 and I upgraded it to XP years ago. Parallels was buggy but sort of worked, with a clunky interface and a very long install time. It would lock up every other day on my MacBook and Intel iMac. Well, still better than Windows.

When Snow Leopard OX 10.6 came to market I upgraded but, surprise, surprise, Parallels would no longer work, the maker wanting more money to make its product compatible. Now given that any spend related to Windows is regarded as obscenity in the home, I shopped around and found two competitors.

[/column]

[column width=45% padding=2%]

The competition is comprised of VMWare’s Fusion, also wanting payment, and Sun’s VirtualBox. The latter is free and, now that Oracle has bought Sun, has some serious development effort being put into it. There’s money in virtualization. My earlier experience with VirtualBox 2.0 was awful and I had forgotten about it.

But when VirtualBox 3.0 was released in June, 2009 I paid attention. Larry Ellison, CEO of Oracle, did not become one of the world’s wealthiest by suffering fools (Gates at MSFT didn’t suffer them either, but made sure he sold his product to them) and a download of VirtualBox 3.0 showed the product to be much improved. Super stable on the HackPro, fast and easy to set up if, that is, you can get past the instructions which were written by engineers for engineers in contrast to the Apple approach of writing instructions for regular humans.

Mercifully, I am an engineer and most certainly not a regular human, so installation was a breeze. I then installed Windows XP Sp2, duly inserted my Win 98 disk to prove I was legit (though why anyone would actually want to steal Windows must be one of the great mysteries of our time) and immediately upgraded to Win XP Sp3 which, amazingly, went without a hitch.

I’m currently on VirtualBox 3.2.6 and Windows runs in it in its own little space, making sure no bad stuff migrates over to my OS X work space. If it gets clogged up I’ll simply reinstall it and the one or two apps I use. I give it 4gB of the 8gB of RAM in the HackPro when it’s on and allow it to use all four cores of the Intel Core2Quad CPU in the HackPro, and it runs fast if only in 32-bit mode, but how anyone can stand the UI of Windows XP beats the hell out of me. It was awful in Win ’95 and remains so in XP. No, if anything, it’s worse in XP, trying to interpose a user friendly interface which only makes the bad look awful. VirtualBox + XP Sp3 load in some 40 seconds and XP constantly reminds me that my ‘computer may be at risk’. How about fixing that, Microsoft, without forcing the user to pay for band aids? One of the nicest aspects of VirtualBox is that it allows you to create virtual disk drives in Win XP so that you can seamlessly access files in your OS X space. So, for example, I can install Lightroom 3 on the XP ‘machine’ and access my Lightroom catalog on the OS X side easily. A related benefit is that I can see how this site looks in XP using the truly awful Internet Explorer browser which, needless to say, respects few of the standards adopted by every other browser in the universe.

[/column]

[end_columns]

Windows XP Sp3 running this site on the HackPro. OS X in the background.

[column width=50% padding=3%]

All the usual peripherals work with no tuning – wireless internet, USB devices, sound, card readers, optical disk drive and so on. The only thing I have not bothered with is getting wireless printing to work as life is too short. I merely take a screen snap and print from OS X on the few occasions I need hard copy.

Anyway, this is a really long winded way of saying that if you really must run Windows on your Mac, get VirtualBox.

It is free, super stable and if you get a hankering to run Ubuntu, Linux, Solaris, FreeBSD, Windows XP or Vista, Windows Server, Windows 7, Oracle Enterprise, Debian, Redhat, Fedora, Gentoo, SUSE or Mandriva on your Mac, virtualization is a nice safe way of doing that.

[/column]

[column width=45% padding=2%]

And if you are seriously troubled, then consider updating to Windows 7 and making the world’s richest man yet wealthier. After all, there’s a fool born every minute and he has made Microsoft what it is today.

Running Windows in emulation mode under OS X on a PC box hacked to run Snow Leopard may sound like feeding bacon to a pig, but it’s the only safe way of running Windows on anything.

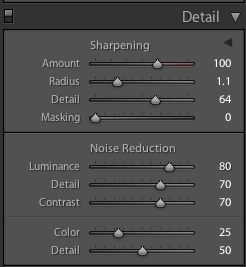
And, if you absolutely must know, this site looks almost acceptable in Internet Explorer 8. Lightroom 3? No problem, if limited to the slower 32-bit mode.

[/column]

[end_columns]

Lightroom 3 running in XP/VirtualBox in 32-bit mode.

Topaz DeNoise

Snake oil?

I confess that I have always regarded noise reduction applications for digital images as so much snake oil – a solution which makes the problem worse. Sure, they reduce noise but they also destroy definition in the process. Better noisy and sharp than blurred and smooth, in my book. Further, with most of my digital snaps being on the essentially noise-free sensor in the Canon 5D my incentive for ‘denoising’ images has been non-existent. Until, that is, the Panasonic G1 with a sensor one quarter the area of the one in the Canon became my daily user. Go over 13″ x 19″ when printing (and that is really the only time you will see noise in practical use) and noise makes itself heard, if you get my drift.

So the other day when I was giving my new Olympus 9-18mm MFT lens a good workout on the G1, I indulged in a spot of pixel peeping to see how good the definition was and, in the process, ran into noise when examining the equivalent of a 30″ x 45″ print on the Dell 2209WA monitor. Now one of the claims for Lightroom 3 is that it comes with significantly improved noise reduction capabilities, so I promptly gave these a shot .

Here’s the original RAW image:

At 18mm, f/8. Sunflowers.

And here’s a 30x selection before applying any noise reduction; this is an excellent test image as it has fine detail and shadows:

No noise reduction at 30x. ISO320, RAW.

Here’s that same section after applying the best looking noise reduction in LR3:

After applying LR3 noise reduction.

The LR3 noise reduction setting were as follows – the sharpness settings are my import defaults for the G1 RAW files, and were determined after much experimentation (5D images need less sharpening, by comparison):

LR3 noise reduction settings

Topaz DeNoise costs $80, seems to be popular on the chat boards, and requires Photoshop CS3 or later, where it installs as a plugin. As I’m still on CS2, and unlikely to upgrade, I wanted to run Topaz DeNoise from within LR3. This dictates the download of two applications – the plugin itself (41.2mB download, 113.7mB installed) and a separate app named Fusion Express (free) which is a 509.1 mB monster of a download but installs at 57.9mB if you restrict the installation to Topaz DeNoise; the Fusion Express application supports many Topaz apps, hence the size of the download. Now the installed size of Topaz Denoise must represent some of the sloppiest programming on record. At 113.7mB for a single purpose tool it exceeds the 89.5mB of Lightroom3 by some 27% – and last I checked LR3 does a heck of a lot more than just remove noise. Draw your own conclusions.

For RAW originals Topaz provides no fewer than seven presets for noise reduction and after some experimentation I determined that the lightest of these gave the best result. That said, the result was significantly inferior to what LR3 delivered with its built in tool. No matter how I tried, I could not reduce the artifacts in the circled area to as low a level as LR3 provided and shadow detail in the hairs on the stem of the sunflower was marginally worse at all settings, even after adjusting the ‘Adjust Shadow’ slider.

Topaz DeNoise version at RAW – lightest setting.

The Topaz noise reduction setting were:

Topaz DeNoise settings

What this little experiment goes to prove is that Adobe has done a truly stellar job in coding the noise reduction features built into LR3 and kept it nice and simply with just five sliders (you mostly use the first three shown above) compared to the overkill of seven offered by Topaz. No matter how much I messed with these I could not approach the LR3 result with regard to the elimination of contour artifacts in out-of-focus areas, and these artifacts are both more noticeable and annoying in the Topaz processed image.

Speed? LR3 is instantaneous. Topaz? First you need to invoke the plugin from within Lightroom which causes the RAW image to be converted to a TIFF copy then exported to Topaz DeNoise, some 7 seconds. Topaz Denoise take a further 7 seconds to process the preview image, and seven seconds every time you move a slider which makes experimentation a royal pain, then a whopping 58 seconds to process and save the file in TIFF format (I’m doing this on my four core Mac with 8gB RAM running a 2.83gHz CPU speed with an Nvidia 512 mB 9800GTX+ video card – it doesn’t get better than that!). So that’s a minimum of 72 seconds per image on a very fast computer. Good luck if you have many images to process …. that’s no more than 50 images an hour.

For the geeks amongst you, here is the Geekbench 64-bit score for my hardware:

So while Topaz DeNoise does a half decent job for the $80 asked, and if you shop around you can find discount coupons bringing the price down to $50, if you are a Lightroom2 user you can upgrade to Lightroom3 for $100. For the additional $20/$50 you get superior noise reduction, the processing is instantaneous compared with bog slow for Topaz, LR3’s improved Adobe Camera RAW processing software compared to that in LR2 is included, and LR3 offers an integrated solution which does not require that you exit the Lightroom application to enter a separate de-noising one. I did not do any tests with JPGs as I only use RAW, and you should too.

You can draw your own conclusions where the value lies. Here’s a side-by-side comparison to make things easier:

LR3 on the left. Topaz on the right.

Keywords in Lightroom

A useful discipline.

No matter how well you catalog your images in Lightroom, adding keywords always helps. That snap at the beach may belong under ‘Beach and Sea’ in your catalog or, equally well, under ‘Abstracts’. But if you add the name of the beach as a keyword, or the words ‘beach’ if it’s cataloged in abstracts, the chances of finding it at some later date when you have many thousands of images added will increase through the use of keyword search.

To find which of your images are missing keywords, set up a Smart Collection (Library->New Smart Collection) as follows:

Then when you click on the Smart Collection named ‘Without Keywords’ you can see all the images that need keywords added. I frequently forget to add keywords before cataloging my images after import and processing, so this is a useful discipline. And if you are way behind on your keywording, simly do a few images each time before quitting Lightroom. The payback down the road in image retrieval and time saved is immense – it takes less time to enter a keyword than to search for an image without one.

And while you are setting up this Smart Collection, take a look at some of the other filters that Smart Collections support. It’s a powerful tool.

Lens profile correction in practice

A dream to use.

Having explained how to create your own lens profiles for use with Lightroom3 yesterday, here’s that experience being put to use.

In this snap I wanted to emphasize the foreground sign to heighten the impact of the lone child on the beach. As you can see the original is rather blah as I was trying to moderate exposure between the poorly lit sign (the sun was shining into the lens – note how flare free the image is, especially as I do not use a lens hood) and the brightly lit beach. A separate attempt using fill-in flash looked too artificial for my taste, like one of those over-lit 1950s outdoor Hollywood musicals.

Original on the top. G1, Olympus 9-19mm MFT lens at 9mm.

A quick tap on the lens correction profile for the lens in LR3, two minutes work with the adjustment brush on the signs using AutoMask and zero feather to faithfully define the edges, a local exposure adjustment of plus one stop on the masked signs, a minus one stop exposure adjustment to the whole image, a touch on the vibrance slider, a little post-crop vignetting (the Olympus lens is totally free from optical vignetting even at 9mm, as you can see from the original, above), some selective darkening of the foreground and a blah original becomes a picture, and exactly what I visualized when pressing the button. The sheer idiocy of the sign testifies to the fact that the least able in any society work for government.

Stop! Turn right! G1, 9-18mm Olympus at 9mm, 1/800, f/8, ISO 320

With images where you expect to use lens distortion correction or perspective correction at the processing stage, it makes sense to compose with a little space around objects close to the edge of the frame, as that space will be lost when corrections are added – as in this example. Things are made a lot easier by the fact that the Panasonic G1 has one of the very few viewfinders which shows 100% of the image – most crop 3-5% making it impossible to exactly preview the saved file.

Lightroom3 is a powerful, efficient photography tool. The enhancements in Lightroom3 have now almost totally obsoleted my use of Photoshop for which feature, alone, I am immensely grateful.

Thank you, Adobe. Now maybe you can convince that jerk Steve Jobs to allow Flash to work on the iPad before I resort to jailbreaking mine.

Lightroom 3 Lens Profile Creator

DIY lens profiles.

Adobe has not left Panasonic MFT camera users out in the cold when it comes to automation of corrections to remove distortion, chromatic aberration and vignetting in Lightroom 3. They provide a fine tool to create your own lens profiles, for example when using non-Panasonic lenses on a G-digital body, like my newly acquired Olympus 9-18mm MFT. In my third column reviewing that outstanding optic, I stated:

Well, it turns out that Adobe provides a free application named Lens Profile Creator which allows you to create your own lens profiles for just about any lens on any camera, film or digital, from iPhone to Leica S2 or scanning 4×5 back on a field camera. The download includes not only the charts (you must print one so that you can photograph it) but also instructions for use of both the application and details of how to set up your camera and lighting.

With the G1 it’s only necessary to do this for non-Panasonic MFT lenses like the Olympus 9-18mm ultra-wide zoom. Panasonic lens’ distortions are corrected by the software in the G1/G2/G10/GH1/GF1 range of bodies. Here is what Adobe says of their application:

The PDF instruction guide for Lens Profile Creator can be found here and the instructions for printing the calibration charts are here.

Creation of a lens profile is easy. You take nine pictures of the chart – I used RAW as that is all I use – convert them to DNG format by importing to LR3 then exporting in DNG format, and then you load the nine DNG images into Lens Profile Creator to create the lens profile for a specific focal length. As chromatic and barrel distortion in the Olympus 9-18mm lens vary with focal length, I did this at the four marked focal lengths – 9, 11, 14 and 18mm – a total of 36 pictures. It doesn’t take but a few minutes to take the pictures (alignment, per Adobe, is not critical) and, on my nuclear powered Mac, Adobe Lens Profile Creator took some 2 minutes to generate each of the four profiles from the nine constituent pictures I took for each. For the criminally insane, you could generate multiple profiles for each focal length at varying apertures, (chromatic aberration varies with aperture) but I would rather be taking pictures. Please yourself. I focused (!) on creating profiles at disparate focal lengths as it’s barrel distortion that is the most sensitive variable for my use and it varies significantly with focal length.

Once done you place the profiles in the /Library/Application Support/Adobe/CameraRaw/LensProfiles/1.0 directory on your Mac where they will be available to all users of that Mac. (There are also instructions for those poor, unfortunate Windows users who place little value on their time and have yet to get a life). Finally, the Adobe application allows you to submit the profile to Adobe’s user forum though for some bizarre reason the submitted profiles are only currently available for download to Photoshop CS5 users, not Lightroom 3 users. Hey! Adobe! Can you say ‘Duh!’?.

Here’s how your Lightroom 3 options will look if you named your profiles correctly:

The drop down focal length selection panel in LR3.

And here’s a ‘before’ (no profile) and ‘after’ (9mm profile) comparison of a profile being applied:

Henry Moore’s bollard. Before and after with the 9mm profile.

The profile file contains no fewer than 8 profiles, created at 9mm (f/4, f/5.6), 11mm (f/4.3, f/5.6), 14mm (f/4.9, f/7.1) and 18mm (f/5.6, f/11) at the apertures shown. Lightroom will automatically chose the profile nearest in focal length and aperture to your photograph’s EXIF data.

If you would like to download the profiles I created, for your own use, you can do so by clicking below. Please note that these are for use with RAW or DNG originals only. They will not appear if your file is in JPG or TIFF. Feel free to share them with anyone. Unzip the downloaded file then place the four individual profile files (not the enclosing folder) in the /Library/Application Support/Adobe/CameraRaw/LensProfiles/1.0 directory. Next time you start LR3 they will be available. Please note that these are solely for the Olympus 9-18mm MFT lens used on a Panasonic G-series digital body taking RAW images.

Click to download Olympus 9-18mm MFT lens profile for the Panasonic G-series body. For RAW and TIFF originals only.

So if you really must have automated corrections for that 65mm Super Angulon on your 1964 Linhof 4×5, Adobe Lens Profile Creator is the tool you need.

Indeed, I see no reason why this software tool should not be used to create profiles for your film and flat bed scanners – instead of photographing Adobe’s target, simply scan it and run the scans through the program, so now you can profile your scanner (or, heavens forbid, a darkroom enlarger) in much the same way you can profile your 21st century lens on the latest in digital bodies.

Alternative #1- DxO Optics Pro Elite:

DxO makes the fancifully named DxO Optics Pro Elite for correction of lens aberrations at the equally fancy price of $300. It’s bog slow even on my hyper-speed Mac, must be loaded separately from your regular processing application and at the price asked compares poorly with the free Adobe Lens Profile Creator. I reviewed it here. And there is no version for Snow Leopard. These people need a loud wake-up call.

Alternative #2 – PTLens:

I wrote in glowing terms of PTLens here. It’s a $15 app which can be used as either a stand-alone or as a PS or LR plugin, and has a large and constantly updated lens database. The latest version includes the Olympus 9-18mm MFT lens for both RAW and JPG on a Panny G body but I cannot recommend it. Simply stated, the RAW profile is awful, way overdoing the correction and turning barrel distortion into severe pincushion distortion instead. Further, as you have to round trip the file from LR that means that a TIFF file (lossless) is first generated, meaning that your 12mB RAW file will be 80gB by the time you save it back into LR. Not a big deal but with its current RAW profile I cannot recommend the product. My profiles, above, are way superior.

By way of illustration, here are the PTLens (left) and my custom profile (right) versions of an original which shows pronounced barrel distortion of the horizon. In the PTLens version a lot of the image is lost and the figure is way too elongated. If you could see the horizon which PTLens chops out you would see severe pincushion distortion, not to mention chopping out much of the ultra-wide effect you just paid good money for:

PTLens vs. my custom profile at 9mm

Here’s another example showing what a poor job PTLens does with this camera/lens combination – PTLens on the left cuts out lots of image information; my profile on the right does it correctly:

Moore’s bollard again – see above for the ‘as shot’ original. PTLens version on the left.

Alternative 3 – use LR3:

If you don’t mind having to manually correct distortions for every picture then manually adjusting for chromatic aberration, LR3’s controls are just fine when used with the Olympus 9-18mm. However, if your ultra-wide lens displays the ‘bow wave’ type of distortion where the barreling changes to pincushioning at different spots on the horizon then the built in LR3 control, which can correct plain spherical distortion only, is of no use and a tailored lens profile is the only option.

Conclusion:

“If you want a job done well, do it yourself” is one of the most asinine homespun philosophies in the Western world. If you want a job done well, delegate it to a professional and maximize your time value by applying your skill set to what you do best. This may just be an honorable exception to that dumb ‘rule’. If you want a good lens profile, do it yourself or if you use the Olympus 9-18 MFT on a G-body, use mine.