Category Archives: Software

Mountain Lion – don’t rush

Fools rush in ….

The recent history of OS X is as follows:

  • 10.5 Leopard – the last to run on G3/4/5 PPC machines as well as on Intel Macs. 32 bit.
  • 10.6 Snow Leopard – the last pre-‘dumb’ UI, 32 and 64 bit, Intel only, will run PPC apps using Rosetta
  • 10.7 Lion – the current OS with many iOS influences, such as touch gestures and the AppStore. Intel apps only, no PPC, no Rosetta. 32- and 64-bit.
  • 10.8 Mountain Lion – more dumbing down of the UI and 64 bit Intel only

On balance, I would have to say that OS X peaked with Snow Leopard. Robust, no nonsense, no frou frou. We are now in the land of chintz, bells and whistles. Faux chrome spokes will be next.

Before being a pioneer at the bleeding edge and upgrading your OS Lion Mac or Hack to OS Mountain Lion, due out any day now, stop and do this simple test first.

It’s the bold words above that should give you pause. If you recall losing the use of NikonScan or Quicken 2007 (both PPC apps requiring Rosetta in Snow Leopard) when you migrated to Lion, you run the same risk in migrating to Mountain Lion from Lion for all your non-64 bit apps. Indeed, as what follows shows, the risk is potentially far worse.

Apple continues to dumb down the UI of its desktop OS, making it more responsive to touch gestures, which sells more Magic TrackPads I suppose (Magic What? Gimme a break, Apple), while in reality the use of touch gestures with a desktop and traditional keyboard is simply poor design. It may work with a laptop but does not with a desktop, in my experience.

The quickest way to find out what will not run on Mountain Lion is to start up all the apps you use then go to Applications->Utilities->Activity Monitor and sort this screen by clicking on the ‘Kind’ column:

Activity Monitor sorted by 32- and 64-bit apps.

Anything that does not say ‘Intel (64 bit)’ in the ‘Kind’ column will not run with Mountain Lion until the application is updated by the maker. And, in my case, there are some real shockers here:

  • CrashPlan menu bar – cloud back-up. I have emailed the maker who replied “We plan to fully support Mountain Lion by the time it is publicly available.”
  • SteerMouse manager – confers enhanced functionality on my ancient Logitech mouse. I emailed the maker who responded: “ML supports 32 and 64 bit applications, but it does not support 32 bit kexts. SteerMouse consists of a 32 bit application and a 64 bit kext.” This means SteerMouse should work fine
  • LogMeIn – permits remote access and control of any computer. I have emailed the maker and they replied that LogMeIn will work fine with Mountain Lion
  • iPhoto – no problem – Apple has just updated to 10.6.3 which works with Mountain Lion
  • SMARTReporter – menu bar utility which provides early warning of imminent drive failure. I have emailed the maker who replied: “SMARTReporter works fine in 64 bit, and mostly fine under Mountain Lion. There is one issue related to Mountain Lion, the I/O error check doesn’t work there. i’ll provide an update for this in the next days and unless the Mac App Store delays things too long, the update should be released before Mountain Lion is publicly available.”
  • MacaroniTool – excellent UNIX utility which repairs permissions overnight with no attention. I have emailed the maker
  • growliChat helper – pops up a window when something important happens
  • i1ProfilerD2LionEditionTray – deal killer. App for running the i1Display2 colorimeter for profiling displays. I have emailed Xrite requesting an ETA. Don’t hold your breath on this one, as they just replied to me as follows: “We have not established final compatibility with Mountain Lion with any of our products. Apple reserves the right to change the OS up until the day of actual first customer shipment. Our software engineers are testing with pre-release copies of 10.8, but our final testing will only begin when the release version is available.” Meaning if you move to ML, be sure to profile your displays in Lion first as you will be waiting for the ML version for quite a while. Xrite did a similarly poor job of releasing the Lion version despite having 2 years notice that Apple was abandoning Rosetta and PPC CPUs. Bunch of amateurs who care little as they enjoy a monopoly in the colorimeter market – Huey, EyeOne, Spyder – yup, all Xrtite, unfortunately.
  • Dropbox – another deal killer. Replaces MobileMe for me and provides an easily accessed cloud storage space for frequently used files. There’s an experimental Mountain Lion version here of unknown stability
  • Bento – database app owned by Apple used for inventories
  • ccc_helper – used by CarbonCopyCloner – though I believe CCC is on top of 64 bit migration. Used for drive copying
  • Temperature Monitor – the maker has written in response to my question: “Yes, of course. There is no reason why Temperature Monitor should not work. The application also has 32 and 64 bit sensor drivers included to support monitoring of Intel’s “per core” temperature sensors.”

So several of these, once disabled, make my Macs and Hacks unusable. Mountain Lion will have to wait until apps are updated or alternatives become available. Running this simple check will warn you whether Mountain Lion is too early for prime time. I suspect that, for many photographers, the answer is a resounding ‘No thanks’ at this time. Better to stop and wait than to find you have just dropped the anchor through the keel of the boat and that you are out of lifejackets.

Some good news. PS CS5 and LR4 are fine – they have been 64-bit apps for quite a while. If you use three or more monitors with #3 and above powered from a USB2 port using a Newer Technology USB-DVI adapter (excellent) then I am glad to report that the maker has just updated the driver to 64-bit. I’m using the Moutain Lion version with Lion on my third display and it’s fine.

Will my Hackintosh or Mac run Mountain Lion?

You need to check if you are running in 64-bit mode. This is done in System profiler (‘About This Mac’) as follows:

If yours says ’32-bit’ you are SOL with Mountain Lion, arguably no bad thing. Mostly it’s the graphics card that is to blame. Good luck upgrading a Mac, but Hacks are easily upgraded to later cards. The Nvidia 9800GTX+ GPU I use is a 64-bit card. It is discontinued, outstanding and easily found used for $50 or less. Apple has published a list of Macs which will not run Mountain Lion and this is probably the issue. Just about any Mac over 3-4 years old will not run Mountain Lion. The list is somewhere on their site and I’m damned if I care to look for it. If you have to, your next desktop should be a Hackintosh.

Disclosure: Lomg January 2013 AAPL call options.

Photoshop on the 2012 MacBook Air

A few hurdles first!

Adobe allows installation of Photoshop on two computers, and requires that if it is to be used on a third that one of the other two be deactivated. Fair enough. It’s premium priced software and shareholders of ADBE should rejoice at any and all attempts to control theft.

I’m on CS5, having started with CS2 ages ago and progressed through CS3 and CS4. CS5 is a fine product, it’s fast and I have never had it lock up on the Hackintosh it calls home. It is blisteringly fast on that machine, with its overclocked Sandy Bridge i7 CPU.

Given the very speedy technology in the latest 2012 MacBook Air, I determined to add CS5 to that laptop which already runs Lightroom 4.1 very capably. But how to get it on the MBA’s SSD?

Good luck finding CS5 for Mac at Adobe.com. There’s a Windows version but for the life of me I could not locate the Mac option, and all current Mac downloads point you to CS6, which I have not yet purchased. I found my original CS5 disc and cloned it to a flash drive using CarbonCopyCloner on the Hackintosh, some 1.2Gb. Inserting the USB flash drive in the MBA and starting the installation process failed. I was asked to insert the installation disk. So I copied over the installation files to the MBA and launched the installer from the MBA’s SSD. After inputting my bazillion digit serial number all ran smoothly.

But, firing up CS5 I got the ‘Activation limit exceeded – you have already installed this application on two computers. Deactivate one’ message. Well, the snag is that the other installation was on the predecessor MBA 2010 which I had wiped before sale, so there’s no way I could ‘deactivate it’. I called Adobe (866 772 3623, hit ‘3’) fearing the worst and got an exceptionally competent person to whom I explained that they needed to wipe one activation count off their registration database. After ten minutes on hold I was informed that one activation was erased and that I could proceed. I did so and all was sweetness and light! Thank you, Adobe.

Photoshop CS5.1 running happily on the 2012 MBA.

Some usage notes on the 2012 MBA – mine has 4Gb RAM, twice that of the 2010 predecessor.

Start up takes a mere 3 seconds. Opening a RAW file (Panny G3) from Lightroom 4.1 in CS5.1 takes 9 seconds. Selective Lens Blur preview takes 2 seconds, applying the blur another 10. This is a processor intensive activity. It’s faster on the MBA than on my Core i7 Hackintosh. Applying routine distortions to correct verticals and the like is near instantaneous. The 8Gb RAM MBA would probably be even faster.

Bottom line? No excuses need be made for the 2012 MacBook Air as a Photoshop machine. It is perfectly capable of keeping up with the best.

Disclosure: Long AAPL January 2013 call options.

Lightroom 4 rocks

A non-trivial improvement.

When Lightroom 4 first came out I pooh-poohed the improvements. The book module, restricted to Blurb as a printing house, was no big deal and the code bloat was awful, with the app some nine times the size of Lightroom 3.

The GPS mapping feature is OK but needs more work (trip route indication based on file times would be a start) and a global change to the new 2012 process for one’s picture catalog would be insanity. Some of the changes are significant and you risk messing up hundreds of hours of processing work. However, credit where’s it’s due. For the right image LR4’s ability to recover highlight detail where there was none is extraordinary, matched by its enhanced capabilities in the shadows.

Limekiln, 5D, 24-105. LR3 left, LR4 right.

For many users the enhanced capabilities of LR4 obsolete HDR with its clunky processing cycle and default ‘awful orange’ look. HDR is increasingly the province of the Kinkade Set which never saw a piece of kitsch it did not like. For those new to Kinkade he is the drunken letch – now mercifully deceased – who gave the world crap for the wall in abundance. You can search his name because I’m damned if I’m printing his garbage here. The man makes HDR look good.

But Adobe didn’t leave 4.0 alone. The Bokeh Cabal was going on about how some lenses were rendering out of focus detail with purple color fringing, even though LR fixed the in focus bits well. Adobe calls this ‘lateral chromatic aberration’. So they added an enhancement in LR 4.1 to fix this. I paged back through my catalog to some images snapped on the Panny LX-1 which, though it has a decent Leica lens, opts for purple fringing at every opportunity. Sure enough, Adobe was telling the truth. Their enhanced chromatic aberration correction really works.

For photography LR4 is the single biggest improvement I have seen in ages, increasingly obsoleting add-ons and Photoshop itself, the latter restricted to the occasional round trip to fix leaning verticals or to add blur or to erase Cousin Vanya, and so on. And while Adobe’s corner office seems to have frequent difficulty telling its ass from its elbow, there is no denying that their crackerjack software engineers are the bees’ knees. Too bad Apple has abandoned its original constituency of creative users, as ADBE would be chump change for AAPL and a great fit.

As for processor efficiency, LR4 barely moves the needle on CPU temperature when processing; Aperture, in its defense, does permit you to brew your tea on the keyboard under like conditions, at half the price of LR. Neat feature, that.

The Nikon D700 and geotagging – Part II

Simplicity itself.

Update 2/22/23: A superior geotagging technique using Lightroom, a plug-in from Jeffrey Friedl and your cell phone is addressed here.

I detailed the components for adding geotagging to a late Nikon or Fuji DSLR in Part I. The idea was to avoid wires, and not to use any GPS power hungry device which would derive power from the camera’s battery. And the whole megillah had to be small, unobtrusive and attention free. The solution was a remote GPS data logger which has its own battery and communicates with a small wireless bluetooth receiver attached to the camera’s ten pin socket.

I had done a lot of research in determining the right hardware and had dismissed both the poorly designed and costly Nikon GPS receiver and Rube Goldberg solutions using remote GPS loggers in combination with software. These demand additional labor to match the GPS data with the picture files from the camera, using the camera’s inaccurate time clock as the lookup field. From my perspective, it either works with minimal post-processing labor or I’m not interested, as I much prefer to spend time taking pictures than playing at code monkey. Add the fact that many Nikon DSLR bodies have GPS connectivity built-in makes my solution a no brainer.

Accordingly, the solution proposed here is elegant, requires a minimum of user intervention and is inexpensive.

The total investment of $106 proves to have been money well spent; you can find the hardware sources in Part I. With the camera receiver finally arriving after a 17 day wait for the mail from Hong Kong, I plugged it into the ten pin socket on the Nikon D700, enabled GPS in the camera’s Setup menu, switched on the data logger and a few seconds later the ‘GPS’ icon illuminated on the LCD screen and the camera was ready to receive and save GPS data. 30 seconds is the manufacturer’s claim for initial acquisition of GPS coordinates; I have generally found that to be correct, although sometimes it takes a mere 10 seconds from powering up the logger for the camera to recognize GPS coordinates. Go figure. I told the camera to use the GPS time clock, not the poor one in the camera itself, renowned for drift. The D700 can adjust for Daylight Savings time, true, but if your camera cannot, you have been warned. The chances are high that you will forget and any solution which depends on memory in our data-fevered world is not robust.

If you cannot wait the 2-3 weeks the camera receiver takes to ship from the Far East, you can get hosed down at B&H for some $190 more for the aptly named Foolography Unleashed unit and have it in a few days. Or you can pay Amazon $120, which is $60 more than I paid. A fool and his money are easily parted ….

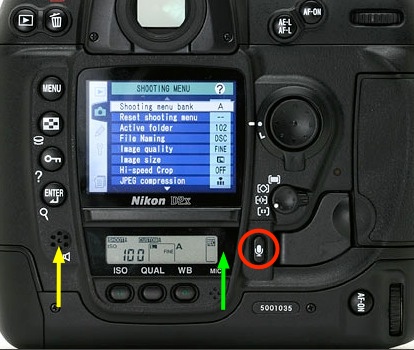
The AK-4N bluetooth receiver, circled in red, plugged into the D700.
The green arrow denotes the 2.5mm pass through port for a wireless remote.
The wireless i-Blue MobileMate 886 Mini GPS data logger is on the right.

Mercifully, unlike Nikon’s wired unit, the receiver on the camera is completely devoid of any controls or flashing lights.

How well does it work?

To quote from ‘My Cousin Vinny‘, where the tool in question was an automotive torque wrench:

Lisa: “Dead-on balls accurate.”
Vinny: “Dead-on balls accurate?”
Lisa: “It’s an industry term.”

The addition of enhanced mapping in Lightroom 4 makes the retrieval and presentation of GPS locations trivial. Here’s my first effort

GPS at home – loft, bedroom, office.

As you can see, even movements of the GPS unit of a few feet are distinguishable on the LR4 display. I have blurred out part of the GPS coordinates as doubtless there’s at least one psycho with an Uzi reading this intent on wreaking revenge for all those Anselites in denial of my bad experiences with the man, and I would rather not make his job any easier. As for the white car in the driveway, it’s a loaner. My Ferrari Enzo was in the shop when this was taken. Nothing serious – regular oil change, $5,000.

Power draw? The logger runs 10 hours on a charge and comes with both USB and car adapter charging cables. The camera receiver’s data sheet states that its power consumption is 10mA – a local Bluetooth connection only. The D700’s standard battery stores 1500mAH, so if you kept the receiver on for 10 hours straight you would use almost 8% of the battery’s capacity. In practice, the receiver only comes on when the camera’s LCD is lit by a first pressure on the shutter button, meaning that GPS is available to the camera within 1 to 1.5 seconds of touching the release button. The D700 also has an option to keep the receiver powered all the time, but I have not found it necessary to use this. When the camera is turned off, the receiver does not draw any current from the camera’s battery, contrary to what the data sheet states. The logger, which takes 30 seconds to first acquire a signal, is on all the time, thus avoiding any delay in use. It refreshes data from the GPS sateliite(s) every few seconds.

So the camera receiver is a set-and-forget device. Small and unobtrusive, you will forget it is there and, unlike with the Nikon unit which mounts on the accessory shoe, you do not lose the use of the built-in flash and need no connecting cables. With a 30 foot range, the data logger can be kept in a pocket or in the camera bag.

The small 2.5mm pass through coaxial socket on the side of the receiver accepts a short coaxial cable to connect with the wireless remote whose stock cable can no longer access the ten pin socket. The silly Nikon socket plugs can be removed as they only get in the way and are frightfully badly designed. I pulled mine off – a process which took far longer, what with all the futzing with the strap and D-rings, than getting GPS to work. The receiver does not interfere with the camera’s handling in any way and is a very tight fit, so the absence of a locking ring is not an issue. It’s not about to be knocked off. It does block the coaxial flash socket, so use a hot shoe adapter if you use wired flash or, better still, a radio trigger for studio strobes.

Short 2.5mm male-to-male coaxial cables are hard to find for those needing the wireless remote to work. I bought mine from Summit Source for some $4.95 shipped, and it’s 18″ long. Neither Radio Schlock or Amazon stock what is needed.

The receiver’s data sheet states that it works with the following camera bodies: Nikon D200, D300, D300s, D700, D2X, D2Xs, D3, D3X and Fuji S5Pro. The new D4 and forthcoming D800 and D800E appear to use the same ten pin socket and none has built-in GPS, so I would guess this device would work equally well on those bodies, but I have not tried that.

Here is the data sheet for the receiver:

AK-4N data sheet.

There is still one dependency on memory – you have to remember to turn the data logger on at the start of the shooting session! The camera’s GPS flag on the LCD is small, so I have added a white paint reminder to the accessory shoe protector:

Aide memoire and camera’s GPS flag.

I hope I remember what that means ….

I’ll publish real world results tomorrow.

GPS receiver – October 2012: A reader has advised that the receiver I refer to above has been discontinued and recommends this one.

Update October 2012: Having just added a Nikon D2X to my hardware collection I purchased another Aoka camera receiver to permanently install on that body – the 10 pin fitting is identical to that used on the D700 and the existing Aoka works perfectly with the D2X.

Try as I might, I can only get one camera to record GPS data using the one GPS data logger. If I turn on both the D2X and the D700 simultaneously, the D2X grabs the signal first, displays the ‘GPS’ flag and prevents the D700 from getting it. If I turn the D700 on first, then the D2X, the D2X cannot see the data logger. By the way, the much older D2X ‘sees’ the data logger far faster once turned on than the D700 – a second or two – I can only think the larger D2X body has room for a superior antenna. So much for progress.

So it seems the logger ‘locks on’ to one camera receiver and is incapable of driving two at the same time.

Oh well.

I suppose if you are using both cameras together, you can always look up the GPS data on a picture taken from the other at about the same time. Not ideal. Or get a second GPS data logger.

ACR lens profiles

Fixing what ails fine optics.

Adobe has long provided a free utility named Adobe Lens Profile Creator which permits any user to generate lens profiles which will correct the three most common causes of image degradation – vignetting, chromatic aberration and distortion. These profiles work with Lightroom 3 or later and with Photoshop CS4 or later.

The instructions are generally good, and the learning curve is steep, whereafter the process is easy and fast. A provided checkered target is snapped nine times – four at each corner of the frame, four at the center of each side and one in the center. The nine files are then input to the application and a profile is created. Multiple profiles for a lens, created at different focal lengths (for zooms) and apertures can be consolidated in one profile file, with PS or LR automatically choosing the profile nearest to the lens settings used. To create a file for RAW originals you need to use DNG files for the application – good luck finding that clear statement in the instructions. The key to all this is that the illumination on the target must be perfectly even. Any shadows will be interpreted by the application as vignetting and erroneous correction will result in the profile thus created.

Once you get the hang of it you can produce an accurate tailored profile, from taking the snaps to dropping the profile file in the right directory, in 10-15 minutes. The first one takes ages, of course.

Many profiles for modern lenses, created by Adobe, are included with Lightroom and Photoshop, mostly for the G and a few late D lenses, but aficionados of the older manual focus Nikkors and many AF D lenses are out of luck. Users of PS CS5 can access user created profiles, but I suggest you read the caution at the end of this piece before jumping in.

I set to making profiles for the two lenses in my collection most in need of them – the 20mm f/3.5 Ai-S (same optics as the Ai version) and the 35-70mm AF D f/2.8 zoom (same optics as the earlier ‘non-D’ variant). Longer lenses seldom need much in the way of correction. Profiles seem to benefit wide angles and wide zooms most. No surprise there as that’s where it’s hardest to fight the laws of physics – distortion and vignetting being much in the picture, if you get my drift.

The profiles below only work with RAW and DNG files. If you use TIFF or JPG they will not appear in LR or PS. They work equally well with full frame and APS-C sensors, as both LR and PS compensate appropriately. They are most effective in full frame Nikons, where the peripheries of the lens’s image circle are most used.

20mm f/3.5 profile:

For the 20mm I created profiles at f/3.5 and f/8. f/8 is very much the sweet spot for this fine optic and use with a tailored profile really makes the results sing.

Click to download the profiles for the 20mm f/3.5.

Even though the 20mm f/3.5 Ai-S lens has no CPU, as long as you remember to dial in the 20mm ‘non-CPU’ lens setting on the camera, the profile will be automatically recognized from the related EXIF data. This should apply to any lens which does not post EXIF focal length data to the file. LR and PS depend on this information to look up the right lens automatically, though you can always override the applications’ choice.

35-70mm f/2.8 profile:

For the 35-70mm zoom I made profiles at f/2.8 and f/5.6 at each of 35mm, 52mm and 70mm. This lens trends, like many zooms, from barrel distortion at the wide end to pincushion distortion at the long end. Vignetting at f/2.8 is largely gone by f/5.6.

Click to download the profiles for the 35-70mm AFD zoom.

Once downloaded, place these files in this directory:

Replace ‘ThomasMBA’ with your user name. In Lion, hold the Alt key in Finder->Go to see your user Library.

When you restart Lightroom 4 (or 3) you will see this in the Develop module once you check the ‘Enable Profile Corrections’ box for a RAW snap taken on the 35-70mm AF D zoom, as an example:


The profiles for the 35-70mm in Lightroom.

Even though I have created six profiles for the 35-70mm AF D zoom, at 35, 52 and 70mm and at f/2.8 and f/5.6, you only see a choice of one file. Lightroom will automatically choose the profile closest to the focal length and aperture you used – no need to select from multiple profiles.

Here’s the 35-70mm profile at work at 70mm and f/2.8.

Before:

No profile applied.

After:

With profile applied. Vignetting is gone as is the slight pincushion distortion.
In this image, the centers of the long and short sides have been bowed out
and the corner vignetting has been removed by the lens profile.

The changes with the 20mm f/3.5 Ai/Ai-S lens are much more noticeable, with fairly strong vignetting at f/3.5 removed and the ‘Cupid’s Bow’ wave like distortion of straight lines parallel to the edges of the image corrected. The latter cannot be properly corrected by normal manual distortion correction controls in LR or PS – only a tailored lens profile like the one above can do that. An already good wide angle lens is made great with this technique. The reason I have included two profiles in the file is that at f/3.5 vignetting is more severe than at f/8, whereas distortion remains unchanged. Lightroom will automatically choose the profile closest to the focal length and aperture you used – no need to select from multiple profiles, though the profile file actually contains two profiles.

Both profiles included in the downloadable file fail to correct very minor chromatic aberration (color fringing) but a click on the ‘Remove Chromatic Aberration’ box in LR4 corrects that perfectly, looking at 30x screen enlargements of ultra high contrast subjects. The one click approach compared to the sliders in LR3 sounds simplistic but in practice works superbly.

Before:

20mm f/3.5 Nikkor at f/3.5. No profile applied.

After:

20mm f/3.5 Nikkor at f/3.5. With profile. Note the dramatic reduction in vignetting.

Well done, Adobe. And thank you Nikon for a real corker of a lens, fully usable at f/3.5 and outstanding at f/8. I look forward to publishing some snaps from this lens soon.

Enjoy!

A caution about Adobe’s lens profile database:

Go to PS CS5, load a RAW file and invoke Filters->Lens Correction. You will see a host of lens profiles, none authored by Adobe – they do not come with LR4 which contains all Adobe’s profiles as well as those submitted by lens makers like Sigma. (For reasons known only to the people at ADBE, you cannot download other lens’ profiles using LR4). Nikon and Canon do not submit profiles as that would cannibalize their RAW processing apps for the three people on earth who actually use them.

The problem is that these profiles, which appear to have been submitted by photographers, seem totally uncurated. As an example there are no fewer than 6 profiles for the Nikon 35-70 f/2.8 lens and each yields markedly different results. The descriptions all say “Nikon 35-70mm f/2.8 (raw)”. There is no indication of which aperture or focal length they apply to, making them completely useless. One Nikon profile is even listed as 0.0mm f/0.0, indicating the author failed to read the instructions. Why this is even in the database mystifies me.

My profiles are carefully made and accurate. It’s your choice.

Another Adobe cock-up:

LR4 comes with Adobe Camera Raw 7.0. On the PS side you can only get that with CS6 Beta. The latest version for CS5 is ACR 6.7 but the download will not install, has no instructions on installation, and the current 6.6.x will not convert LR4’s Process 2012 RAW files. I have read that 6.7 does not either, but obviously I cannot test that as the installer is faulty.

The workaround is to use LR4 as your first point of entry and RAW converter even if you propose sticking with CS5 for processing.This works for all but devotees of CS5’s ACR.

Simply round trip the file from LR4 to CS5/ACR whatever version (you will not be using CS’s ACR), using a lossless TIFF or PSD file format. This way, when Adobe tries to extort money from you when CS6 comes out at $600 or more, you can tell them where to stick it. You can bet they will be forced to keep the RAW converter database in LR4 current, or risk the wrath of a huge installed user base which does not want to spend $600+ on CS6 for occasional use. Hoist by their own petard.

I see no difference in the rendering of Process 2012 RAW files comparing a RAW in LR4 with a TIFF in CS5. The only difference is that the latter is four to five times the size, but $600 buys you a lot of storage ….

More profiles:

To see all the profiles I have created, click here.