Don’t pay twice!
Until I downloaded OS Lion on my MacMini a week ago, I had never made an online OS X AppStore purchase. So while the experience was painless, and I suppose over-the-air app downloads make sense for all but those cursed with bandwidth limits or poor broadband, I was still fighting an old prejudice whuch has it that you really want DVD versions of all your software in case something blows.
This is really a dated view and when I thought about it I realized that I have been buying and updating key applications from the likes of Adobe for at least a couple of years. My Photoshop CS5 upgrade from CS2, large as it is, was by download and if the installed app ever fails I can simply download it again, the input of my serial number ensuring that the replacement is at no charge.
And it’s time to move to the AppStore way. The iPad works flawlessly with the iOS AppStore and on the occasions the AppStore goes down a restart of a download has never resulted in any additional charges. Still, at almost 5gB, Lion did give me pause.
The AppStore approach for OS X devices brings with it Apple’s rapid obsoleting of the DVD drive. Having been among the early adopters of shipping software on DVDs, they have pretty much said the DVD is now dead. The MacBook Air has no DVD drive, the latest MacMini has removed it (causing much angst for Netflix mail renters) and I would expect it will not last long on the iMac either. For those pining after the DVD there’s a $100 plug-in DVD drive available at your local Apple Store and, to be fair, the latest non-DVD Mini is $100 less. Indeed, when Apple releases a ‘hard copy’ of Lion next month it will come on a minuscule USB flash drive, not on a disk. By the way, until streaming movie databases improve, I’m sticking with Netflix mail rentals where the 120,000 movie catalog compares favorably with the 12,000 or so available for streaming. Worse, owing to licensing agreements, the streaming catalog frequently drops movies. So for movie fans, the DVD is far from dead.
Whether you like Apple’s pushing of the limits here or not, there’s everything to like about their new licensing approach for software. Simply stated, any software purchased can be used on any Mac you own at no extra charge. So to test this out I went to the AppStore on my MacBook Air and bought the latest iPhoto ’11 for $15. No problem. I did not have to buy the whole iLife suite, as the AppStore lists the component parts separately.
Then I hopped over to the Hackintosh, and into the AppStore, but when I went to the iPhoto page it was asking me for another $15. What gives?
Call it poor instructions or user error; what you have to do is click on this icon in the AppStore application:
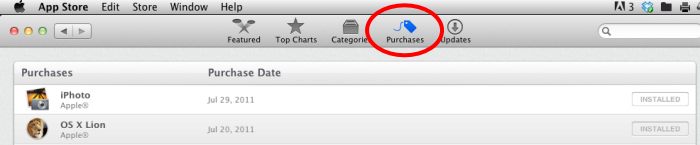
You will then see all your purchased/installed apps and subsequent downloads – click on the word ‘Installed’ – are free.
I suspect iPhoto is looked down on by many serious snappers as so much of an amateur toy. That’s doing it an injustice. The processing (Edit) controls have steadily improved, the integration with book making and card creation is excellent and it’s just the ticket for family snaps where Photoshop or Lightroom are overkill. Exporting to your web site is easy as can be. I have been using the BetterHTMLExport plugin with iPhoto for many years and am pleased to report that iPhoto ’11 is the first version which did not require reinstallation of the plugin.

The processing controls in iPhoto ’11.
Hit the option key on your keyboard and the ‘Exposure’ slider, top right, becomes a highlight recovery slider. Very handy and very fast and easy to use. iPhoto ’11 has no problems handling RAW files – the image above is from my G1 and the original is RAW, as indicated in the histogram.
My iPhoto library contains some 20,000 snaps and the update of the database to iPhoto ’11 from ’09 took some 15 minutes on my HackPro.