Panasonic GF1

The rumor every Leica user wants to be true.


The Panasonic GF1? Click the picture for more.

Imagine the capabilities of the excellent G1 packaged into a miniscule body with an electronic viewfinder and interchangeable lenses. With a decent ultrawide – say a 10mm f/2.8 (=20mm full frame equivalent) and the outstanding 14-45mm kit lens, you would have a pocket sized camera (OK, a big pocket is needed) which would suffice for almost all your travel needs.

It seems the EVF is a clip on accessory, and not built into the body, which is a shame as it will add to the bulk and make the shape more ungainly. Still, any finder is better than an LCD screen.

Panasonic has already clearly stated that they could have made the G1 much smaller and that they left the faux prism hump in the design to make the camera look like a viable competitor to the raft of modestly priced DSLRs on the market. But surely there is enormous unsatisfied demand for a small camera like this and not only from disaffected former Leica fans like me? So while the picture may be a fake, something like this is only a matter of ‘when’, not ‘if’. But Panny, please integrate the EVF into the body – isn’t that just obvious, for goodness’ sake?

Meanwhile, the G1/GH1 are more than up to the task of acting the modern Leica.

In search of Atget

Remembrance of times past.

In the Mission district of San Francisco. G1, 14mm, 1/500, f/7.1, ISO 100

You can read more about the great documentary photographer Eugène Atget here, though in fairness I should add that describing Atget as a ‘documentary photographer’ is about as accurate as saying that Cartier-Bresson was a snapshotter.

Detail in the overcast sky was recovered using the technique described here. The obligatory corner vignetting, which takes the G1’s wonderful kit lens and makes it resemble the Coke bottle your great-grandfather and Atget shared, was conferred using Lightroom’s Post-Crop Vignette function. Finally, a touch of the graduated filer with underexposure was used to fade the top part of the picture. Atget probably had it easier!

Alleyways

You never know what you will find.

I can never resist alleyways in big cities, and am often surprised with something special like these, spotted in San Francisco’s Mission district the other day.


Primary palette. G1, 45mm, 1/800, f/6.3, ISO 100


Flowers. G1, 39mm, 1/200, f/6.3, ISO 100

Some G1 statistics

From Lightroom

Lightroom makes it easy to summarize statistical data about your photos, so after a month with the Panasonic G1 I thought it would be fun to see some analytics.

Of the 750 pictures I have taken with the camera so far, 275 survived the cull (36%) as ‘keepers’ and the following data are for these 275 keepers. My hit rate has really been little changed over the past 40 years or so – if anything, it’s increasing suggesting I am getting better at pre-visualization or less discriminating in my old age ….

I have the camera set for Aperture Priority with iISO (the camera selects ISO) for all of these.

As you can see, the CPU selects shutter speeds which favor the lowest possible ISO, consistent with the best image quality:

I select the aperture in Aperture Priority, and tend to the large aperture end of the range (f/3.5 to f/5.6 for the kit lens – 64% of the total), where the lens delivers its best quality – quite a tribute to Panny’s hardware and software genius; I also thus force faster shutter speeds to minimize definition loss from camera shake:

Here are the shutter speeds set by the CPU:

Interestingly, I have a significant preference for portrait orientation, with fully 58% being in portrait mode (LR incorrectly refers to this as ‘Aspect Ratio’):

And, finally, as will come as no surprise to readers of this journal, I am very much a devotee of color, though I started life as a monochrome snapper:


Home under the freeway. G1, 21mm, 1/500, f/5.6, ISO 160

I have yet to figure out how to summarize which focal lengths of the kit zoom’s are most used – that would be most interesting – but if I do, I will add a piece on that.

As for my preferred color palette, what most catches my eye on the street, red and blue seem to dominate, as this extract shows:


My G1 color palette

The snaps with a ‘2’ or ‘3’ at the top left indicate that the image has been round-tripped to Photoshop CS2 – 20% in this sample. This is almost always to correct leaning verticals as I am anything but a Photoshop maven. In fact, I detest the product and avoid using it whenever possible. Were Adobe to add perspective correction to Lightroom I would probably completely cease using PS.

Looking at your statistics can be both fun and a learning experience.

Working with Custom Sets

A useful feature in the Panasonic G1

Given the myriad of adjustments which can be made to the Panasonic G1’s custom settings, it’s nice that Panny has provided the option of saving up to three custom sets in the Custom Menu.

After banging away for a while and getting generally familiar with the camera over the past month, I have pretty much settled on a set of street snapper settings whose goal is to have a camera that is as responsive and fast to use as possible, while at the same time having a minimum of clutter on the EVF screen to get in the way of seeing pictures.

To save these setting, I start the camera in Aperture priority mode to which I apply the usual defaults, such as iISO (intelligent selection of ISO by the camera’s CPU), RAW picture quality (I have no use for RAW + JPG) and, of course, shake reduction. The EVF display is set to minimal display by toggling the ‘Display’ button on the rear, so that only Aperture, Shutter Speed and over/under exposure adjustment is shown, the latter set to 2/3rd stops under-exposed. I do not use the LCD screen on the rear and have it turned face in, as LCD settings are irrelevant to street snapper mode.

Custom Sets allow no fewer than ten additional settings to be saved, so with the camera still set on ‘A’ on the mode dial (for Aperture priority), I set the remaining variables as follows:

AFL/AE: AE. I want the rear panel button to lock exposure only, when depressed and held. I prefer to lock focus with a first press on the shutter button, when needed.

AFL/AEL Hold: Off. The problem with this setting is that the ‘hold’ remains in place after the picture is taken, which is exactly wrong. So ‘Off’ it is.

AF + MF: On. This allows for fine tuning focus, even though the camera is set to auto focus, by turning the focus collar on the lens. Very handy if you are shooting through a window or a wire fence, for example, as the camera can get confused and focus on the obstacle rather than on the subject.

Focus: Off. This allows the shutter button to work even if the image is not in focus. Better a slightly unsharp picture than none at all.

AF*: Off. This makes sure the bright red auto focus ‘assist’ light stays off in dim light. The very last thing you want for unobtrusive snapping is for a bright red LED to broadcast your presence.

P-AF: Off. This disables continuous pre-focusing before the shutter button is released. A waste of battery power and you need all you can get.

Fn: Set to Aspect Ratio. This dictates the action of the small Fn button on the rear panel. I have it set to allow choice of aspect ratio (4:3, 3:2, 16:9) as the other choices (RAW or JPG, Metering mode, iExposure or Guidelines) are of no use on the street. For that matter, setting the aspect ratio is of little use to me as I always use 3:2. You can take the man from his Leica but you cannot take the Leica from the man, and film Leicas are 3:2.

Auto Review: Off. The last thing you want is to be presented with an Auto Review of the last snap when you are desperate for the camera to free up for the next picture. Anyone who complains about the picture-to-picture times of the G1 being too slow is ignorant of this setting option. Unfortunately, Panny ships it with Auto Review set to ‘On’ which hardly helps matters.

NR: On. Reduces noise in long exposures. Why not?

Shoot without lens: Off. This allows adapted lenses to be used but, for now, I have all I need with the 14-45mm kit lens.

To save these, all you have to do, with the camera still in ‘A’ on the top mode dial, is to go to the Custom Menu->Cust.Set.Men (the very first choice), right arrow, hit Menu ->Yes and your settings are now saved to Custom Set 1.

Then rotate the mode dial to ‘CUST’ and the first Custom Set, the one you just saved, is in effect. If you create other Custom Sets, then you have to depress the Menu button and choose the one you want. For example, you may want an auto-bracketing set for HDR photography, or a ‘100 ISO’ only set for highest quality images, and so on. However, at my time of life, when I’m happy just getting the right leg in the right half of my pants, one custom set is just fine, thank you.


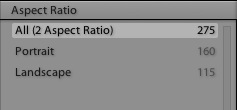
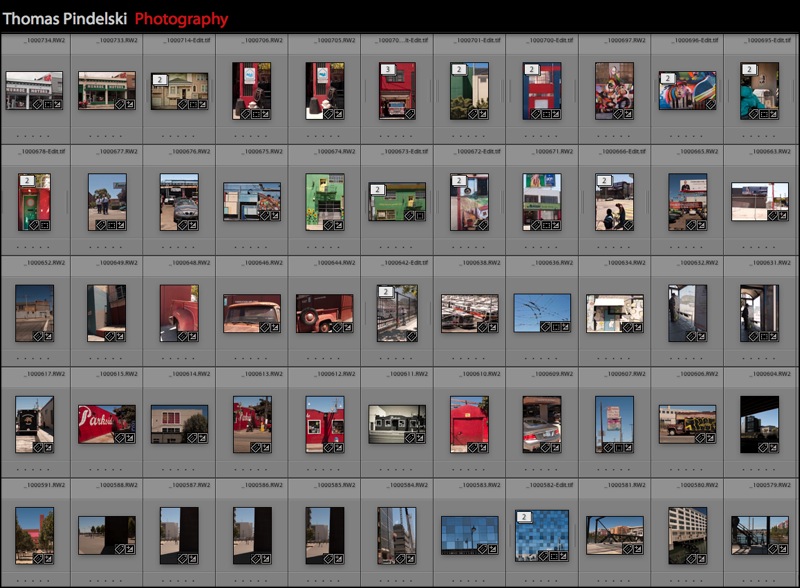
G1 – Custom Set 1 at work