Fixing cooling issues.
This piece is relevant to users of the 17″, 20″ and 24″ white iMacs with Core Duo (early 2006) or Core2Duo (late 2006) CPUs. These machines use the Intel GMA950, ATI 1600 and Nvidia 7300 (or 7600 on top end 24″ machines) Graphics Processing Units (GPUs), respectively.
When I bought my 24″ iMac I wrote here of my concerns of the poor cooling of critical components, occasioned by Apple’s obsession with looks at the expense of sound engineering design.
Many are doomed to fail owing to improper venting of hot air generated by the GPU. Indeed, if you look on Apple’s own discussion board at this thread, now some 28 pages long and counting, you will see the raft of complaints about blown GPUs on all models, regardless of GPU maker. Apple has yet to admit – if it ever will – fault, and life is simply too short to argue with them, so I decided to fix things myself. Plus they have $30bn in the bank and lots of mean lawyers ….
Things have come to an unhappy pass. Both my 20″ iMac (ATI 1600) and my 24″ iMac (Nvidia 7300) are showing advanced symptoms of GPU failure, despite the judicious use of Fan Control to speed up the GPU fan. Symptoms include horizontal and vertical lines on the screen, distorted areas and random rectangular colored patches. Add slower operation and many spinning beach balls and the machines are becoming simply unusable.
A PRAM reset, what you’ll likely be told to do by Apple, makes no difference.
Here’s the diagnostic language from Apple’s own repair manual:
Obviously they want it unplugged for two hours. It has to cool down, get it?
And while you are at it, cease being naïve – Apple is just another big corporation looking to maximize profits, bless them – the customer most certainly does not come first as this language in the same manual relating to dead LCD pixels clearly discloses:

“Don’t tell the customer”
So you are going to have to look after yourself, make some money on AAPL stock or elsewhere and get with the action. The guts of a modern Intel Mac are made by the same manufacturers used by PC makers – Intel, ATI, Nvidia, Samsung and LG Philips LCDs, WD/Seagate HDDs, etc., etc. They just come in a prettier (and costlier) box which, in this case, is poorly designed. Use the machines for the superb OS, but don’t expect too much costly integrity from the manufacturer. Read on.
Now Apple will charge you $900 to replace the logic board on the 17″ and 20″ models, whereon the GPU is well and truly soldered. Maybe less on the 24″ model where the GPU is a separate plug in module – I have read $400 or so. Either way, it’s highway robbery. And while iMacs start at $1200 new, there’s no alternative for users like us – and surely all photographers out there – who despise glossy screens. And, finally, there’s a simple sense of outrage at throwing away an otherwise fine machine after just 2 years of light use.
So we decided to repair things and not at Apple prices. My 20″ iMac’s logic board was shipped to Apples-R-Us for a $195 repair of the fried diodes and capacitors. For my 24″ model I had the choice of replacing the Nvidia 128mb GPU with a like model at $179 or upgrading to the faster 7600 model at $231 with 256mb, so I opted for the latter. This is a new part, not a fried recycler special (I asked) with a 60 day warranty.
Now surgery, the title of this piece, is meant to excise the bad and restore the patient to health. Simply replacing fried parts with new or repaired ones which would be fried again is pointless. So some thinking was called for to see how better to confer proper cooling on the GPU and its diodes.
First, extracting a motherboard (or logic board, as Apple calls it) from an iMac is …. a mother. Do yourself a favor and download the official late-2006 Apple repair manual by clicking below.

The tools needed are very few – Torx #6, 8 and 10 screwdrivers, a Philips #2, a magnetizer for the screwdrivers, a lollipop stick to remove the black sheeting around the LCD (20″ model only), lots of plastic baggies for all the fasteners you will be removing, a cool head and a pair of balls. The instructions in the Apple manual err in only two particulars. They forget to mention that the RH speaker has to be removed to remove the logic board and that the cooling radiator for the GPU has to be removed once the logic board is extricated, before shipping the latter for repair. Eight T8 screws – no biggie.
Let’s take a look at how Apple cools the GPU and related diodes. The design could hardly be more elegant.
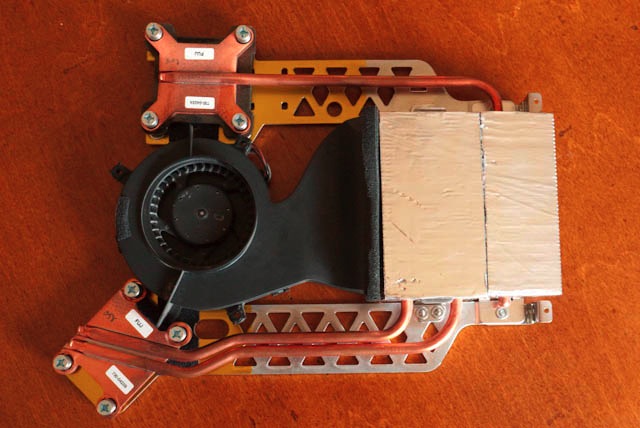
The iMac radiator assembly in the 20″ model
It’s like a car really, absent the coolant pump. The coolant circulates by convection through the copper pipes, discharges its heat to the fin assembly (silver in the picture) whence it’s blown out by the large (black) fan. Snag is, El Jobso loves smooth, slim boxes, so the heat can only escape through a narrow slot at the top rear of the iMac. Given that heat rises, the width of the slot is useless. Basically, the GPU radiator is trying to discharge enormous amounts of heat through a 5″ x 1/4″ slot. Things are not helped by the fact that the power supply, immediately to the left, is trying to do much the same through its few inches of slot. It’s like non-taxpayers lining up for the latest bailout. Not enough taxpayers are available to feed the greedy unemployed masses. Not enough outlets for all that hot air in the iMac.
Simply stated, more outlets are needed to allow hot air to escape. Like so:
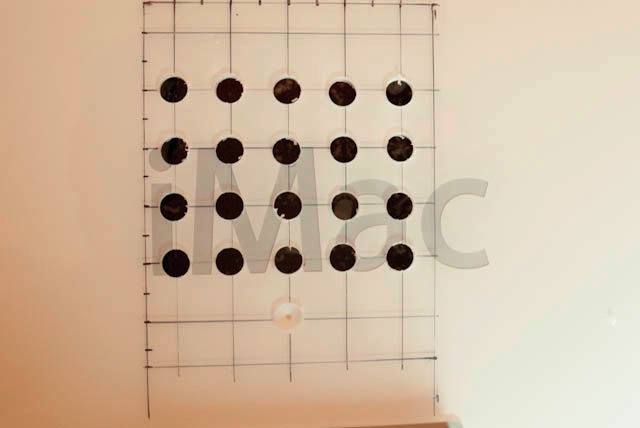
Holes being drilled in rear case of iMac behind radiator assembly
To do this, use a Sharpie marker and a Forstner 3/8″ drill bit after you have gutted your iMac. The grid is 3/4″. The Forstner bit cuts holes from the outside in, unlike a regular drill which cuts from the inside out and is guaranteed to cock-up (technical term) your placement as it skids all over the place. And you do want it to look half decent, even if the rear of your iMac faces a wall. The sharp central tip of the Forstner bit makes that child’s play.
The placement of the grid of holes is offset from center as is the position of the radiator. Use the above picture as a guide – I will post pictures for the 24″ model later. Be careful – you do not want to drill into the metal chassis underneath and you will if you get this wrong. You can get a Forstner at better hardware stores.
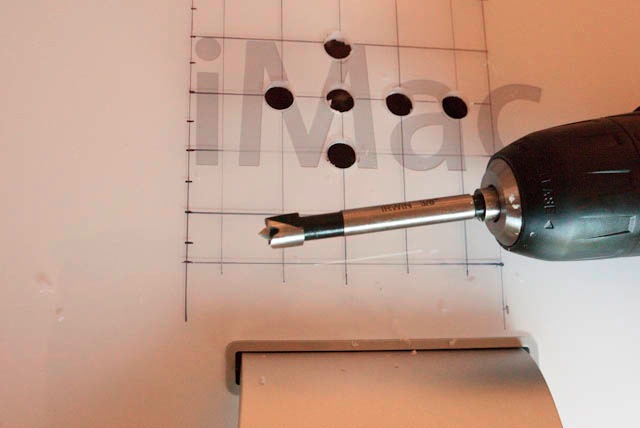
3/8″ Forstner bit in hand drill
When all is said and done, I will have 30 3/8″ diameter holes which will increase the area through which hot air can escape by 268%. Any burrs can be easily removed with a conical abrasive bit, and the Sharpie marks wiped off with isopropyl alcohol. So I’m optimistic that this is surgery, not placebo.
Oh!, by the way, you say you like glossy screens and your new iMac in aluminum and black is just fine? Well, be prepared. Reports of like failures of the GPUs in those are beginning to come in – and they have even less space for cooling inside. There’s that obsession with thinness again. Great for Vogue models. Not so good for electronics.
In Part II I provide detailed measurements for drilling the ventilation holes in a 20″ iMac, together with illustrations of how to install conductive aluminum mesh to both reestablish the electrostatic barrier provided by the aluminum liner in the case (which must be selectively cut away for the holes to work) and to filter out dust from the innards. The 24″ iMac will be addressed later – I can only deal with one Apple screw-up at a time.
I do like my big ugly PC server boxes with masses of space inside hidden under the desk.
If only Apple would sell their OS for use on a PC.
Hi. I’d like to d/l the late-2006 service manual, but the link no longer works – do you know where I can obtain a copy?
Thanks for pointing that out, Charlie – you are referring to the 20″ model.
I have updated the link to a new location and it should work.