Photo use and other considerations.
Part II appears here.
As before, this complete article was created using the MBA.
Restoring the OS:
First a word about how Apple ships the back-up OS X ‘disc’ with the new MacBook Air.
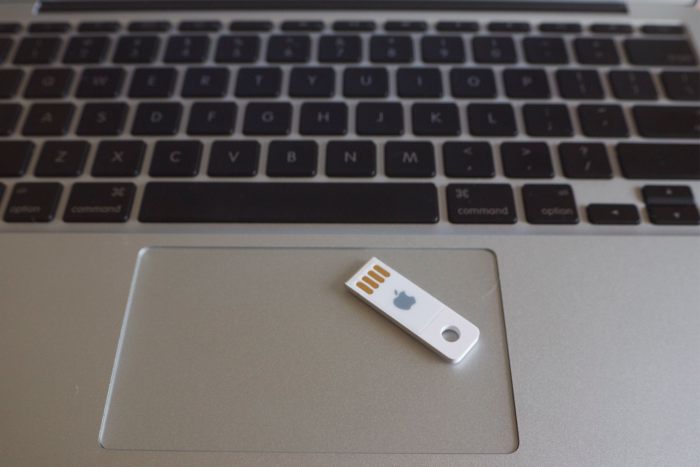
It comes on an extremely slimmed down USB drive which also includes iLife ’11. I erased the flash drive in my MBA and reinstalled the OS from this little stick. It took 28 minutes and worked perfectly. iLife ’11 adds 12 minutes to the process. Very smart and note the little hole for your key ring! And no, you cannot use it with any other machine – it’s tied to the MBA it comes with. Great idea and no more piracy.
Saving disk space:
By reformatting the internal flash hard drive using the Disk Utility on the USB stick, above, you can get far smarter about installing iLife ’11 which is included on the stick. I will not be using iMovie, iDVD, GarageBand or iWeb on the MBA so I simply opted for a custom installation of iLife ’11 as shown below, saving a whopping 2.72gB of disk space.
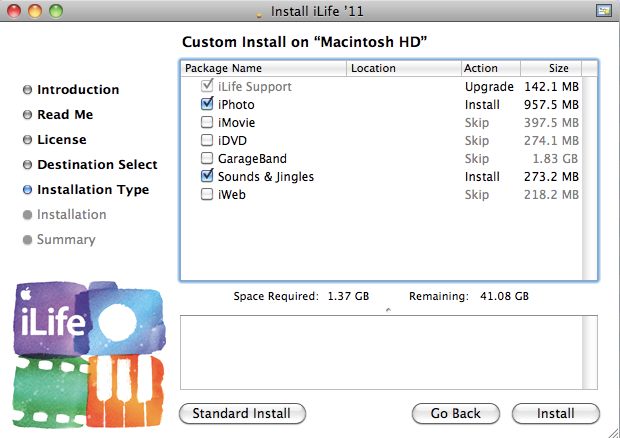
Custom installation of iLife ’11.
Lightroom use:
For sake of comparison I’m including timings for the HackPro I use at home; it runs a 7200rpm Samsung 1tB internal disk, a 2.83gHz Core2Quad CPU, an Nvidia 9800GTX+ graphics card, 8gB of RAM and dual 21.5″ Dell 2209WA displays. Absent some specialized gaming machines and the very latest MacPros and iMacs, this is as fast as it gets in the real world.
So when looking at these comparisons, bear in mind what the MBA is comprised of. A 64gB (nominal) Flash hard drive, 1.4gHz Core 2 Duo CPU, an Nvidia 320M GPU, 2gB of RAM and a single 11.6″ backlit LCD display.
Long time readers will know of my many Mac hardware failures, most the result of poor thermal design, leading to overheating, so I am naturally rather obsessive about heat management. Accordingly I am also including temperature graphs in what follows so you can see what heavy video processing does to the MBA.
For testing I installed the current version of Lightroom3, version 3.2, on the MBA. The Adobe user license permits use on two machines. I also moved over my user defined libraries for import settings (these reside in User->Library->Application Support->Adobe->Lightroom) as it’s far faster to simply copy these over than to recreate them. I need these as I wish to apply processing presets at the import step. These take away most of the subsequent processing and make a great improvement to your efficiency.
For test purposes I placed 50 original, unprocessed, RAW files from my Panasonic G1, averaging 13.1mB each, on an 8gB Transcend Type 6 SDHC card (the same I use in the G1), and placed the card in a Transcend USB card reader which came free with it. This is a very small device, weighing an ounce or two and is required because, unlike the 13.3″ MBA, the 11.6″ one I am using has no SD card slot. Neither card nor reader can be said to be fast; indeed, they are probably near the bottom of the performance spectrum but it’s what I use as it works for me. I do not need serial-shooter saving speed with the sort of snaps I take.
Except for Temperature Monitor I had no other apps loaded during these tests.
The import settings I used for these files are:
- Generate 1:1 previews
- Apply 100% sharpening, 1.1 radius, 64 detail
The latter are the optimal settings for the G1 determined after much use and some 5,000 snaps.
Here is how LR3 was set for import – I am actually copying the files from the SDHC card to the MBA SSD, to take advantage of the high speed of the Flash Hard Drive (FHD) for subsequent processing, rather than leaving the original files on the SDHC card which is far slower.
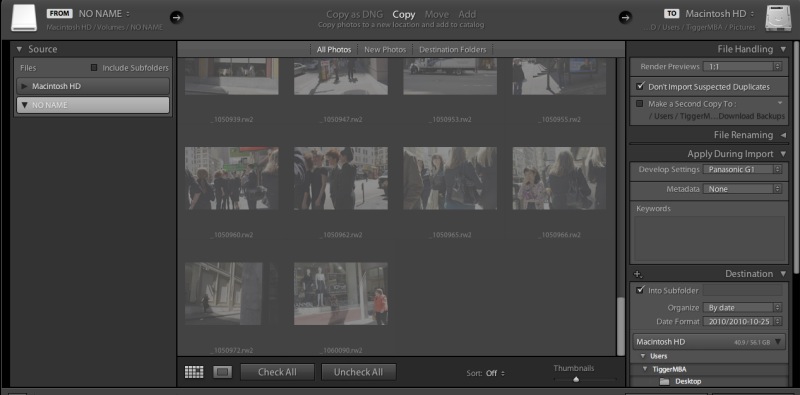
RAW file import settings in LR3.
The import process in LR3 actually has three steps. Here are the timings:
- Generate JPG thumbnail previews – 11 seconds – the time taken from the start of the import cycle to seeing all the thumbnails on the screen
- Copy 50 RAW files from the SDHC card to the FHD in the MBA – 40 seconds
- Generate 1:1 full screen previews – 393 seconds, or 8 seconds per file
On the HackPro the first two are similar, the last takes some 6 seconds per file. So not much wrong with the MBA here.
I conducted this import using battery power because that’s what you will likely be doing in the real world. The 50 file import and preview generation used 4% of the total battery energy.
Flipping between full screen previews in the Library module is instantaneous. Holding the right arrow button on the keyboard took 4 (yes, four!) seconds to get from the first to the last of the 50 imported pictures. This is the module used to cull bad snaps and it is simply impossible to imagine this being any faster.
Switching to the Develop module and flipping between files in full screen view means waiting 8 seconds for each 1:1 preview file to finish loading (HP – 3 seconds); the file appears instantaneously on the screen but the ‘loading’ indicator takes 8 seconds to disappear. Loading Safari and Mac Mail apps did not make any measurable change to this timing.
All the processing sliders in the Develop module react in real time. There are no visible delays – a huge plus in real world use.
Switching to Print Preview takes 2 seconds to render the file (HP – 1 second).
Switching to the Slideshow module for all 50 pictures takes 3 seconds to render (HP – 1 second).
Heat: The MBA gets noticeably warm if you are using it on your lap while importing RAW files and generating 1:1 previews, as the following shows – the spike occurs as import commences, and drops at the conclusion:
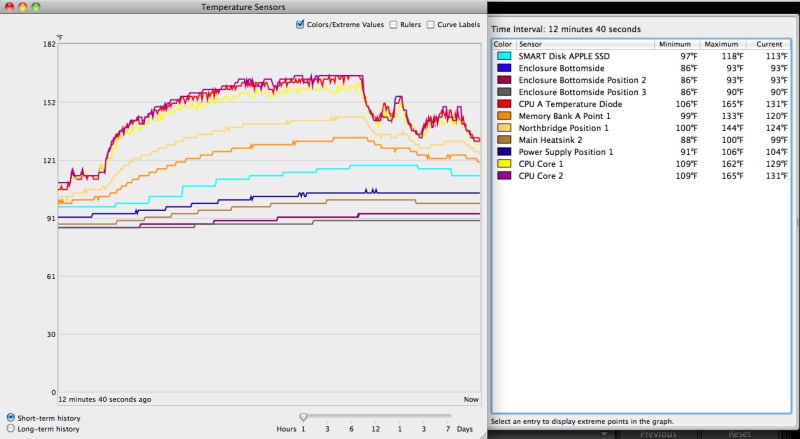
Component temperatures during RAW file import and processing.
Networking: Networking the MBA with other Macs in the home is trivial. Enable Sharing in System Preferences and, if you want remote screen access, subscribe to MobileMe and switch on Back to my Mac. You can now see the screen of any Mac from any other. Networking is especially useful when transferring files wirelessly between Macs.
MobileMe and TimeMachine: The process of setting up a new, full featured Mac reminded me just how useful MobileMe is. For some $70 annually (from AMZN) your MobileMe password gets you shared access to automatically sync’d Calendars, Mail and Address Books between all your Macs. I barely fired up MM than it was done populating all three apps on the MBA. If your time is worth anything, MM is essential.
Likewise, the TimeMachine back-up for my HackPro proved immensely valuable when populating the flash hard drive in the MBA. TM allows you to import apps and document files to any Mac, once connected, using Migration Assistant. This process will not allow you to transfer the OS, the presumption being that the machine to which data are being transferred to is the one with the most current operating system. It makes an otherwise tedious and risky process foolproof and fast, which is worth a lot given the growing application and data volumes we all now store on computers. Most importantly, you no longer have to dig up all your original software discs for reinstallation; at most, some apps will ask that you simply reinput the serial number.
Battery life: During these tests, including multiple imports and much processing and with wifi on (a significant power drain) I noted that the battery capacity in the MBA dropped by 33% in 2 hours of heavy use, suggesting a life of 6 hours. That’s right in line with Apple’s 5-7 hour life claim for a fully charged MBA battery.
Memory use: Is 2gB of RAM enough or should you pay up for the 4gB version? The answer depends on how you use the MBA. Here’s a memory use screen snap with my MBA running 1Password, Activity Monitor, Finder, Image Well (used to upload pictures to this blog), Lightroom3 with a 13.1mB RAW file loaded in the Develop Module, Mail, NetNewsWire (an RSS feed reader) and that well known memory hog, Safari. And, yes, Mr. Jobs, the Flash player plugin for Safari has been downloaded and installed even though you arrogantly refuse to ship it with the MBA. Real world users use Flash. There’s still 0.55gB of RAM free and unloading all of these apps except Lightroom3 discloses no noticeable increase in performance in Lightroom. So for my purposes, 2gB is fine; however, if you frequently run many more apps simultaneously, you may need more RAM. I suggest the best way to evaluate this is to load up all your apps and Activity Monitor on your other Mac and see how much free memory remains. That will give you an objective measure of your needs.
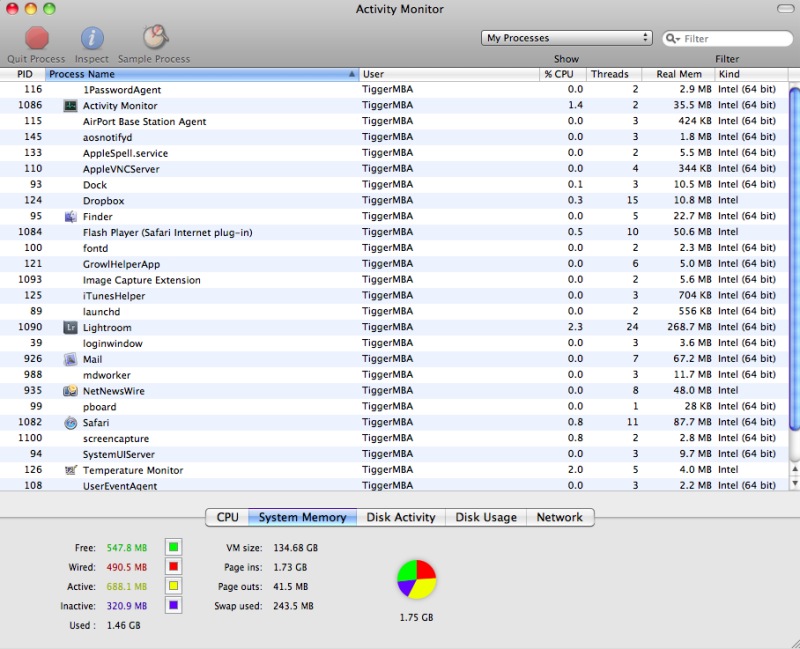
Memory use in practice.
Longevity: If you expect to read claptrap like “It feels robust”, then you need to go to an Apple fanboy site. While the apparent build quality and material choices appear superior to those in my MSI Wind netbook, which broke its hinges after 15 months of hard use, look and feel is no basis for making predictions about mechanical longevity. Check back in a year and I’ll be pleased to tell you whether this is just another piece of overpriced garbage packaged as jewelry from Apple or whether it’s the real thing. My experience with Apple laptop longevity is so poor that I’m strictly in the “show me” camp and refuse to pass on any one else’s opinions about a product which has been on the market just one week. There is simply no basis for judging longevity at this time.
Conclusions: For on-the-road processing of RAW files using LR3 the MBA is fine. It gets noticeably warm during import and preview generation but cools quickly thereafter. (See Part V for the temperature fix). You should be able to get 5-6 hours of use from the battery during the process. Timings are good with the only significantly slowing compared to a fast desktop computer being the snap-to-snap loading times for full screen previews in the Develop module, which take 8 seconds. I had no difficulty using the small display to process my pictures. The slow preview to preview time in the Develop module is not that much of a hindrance in practice when offset against the immense processing power of the MacBook Air which, all told, weighs in at 2.2 lbs for the 11.6″ model. Further, as the cull will have taken place in the Library module, which is exceedingly fast, you only switch to the Develop module when …. developing/processing the pictures remaining.
Pony up an additional $200 for the 4gB RAM version and I would guess things will be faster still when processing. Remember it’s GPU and RAM amounts that dictate this speed variable, not CPU speed, and the same GPU is used in all versions of the MBA and in the base MacBook Pro.
So if you want a really lightweight, full featured laptop for mobile use, the MBA should be considered. If you need a lot more disk storage than provided by the MBA – which is limited to 64-128gB nominal, then use an external self-powered 2.5″ HDD. The total weight of the MBA + HDD will still be way below that of your MacBook Pro, the offset being faster battery drain.
Display profiling:
I address profiling of the MBA’s display in Part IV.
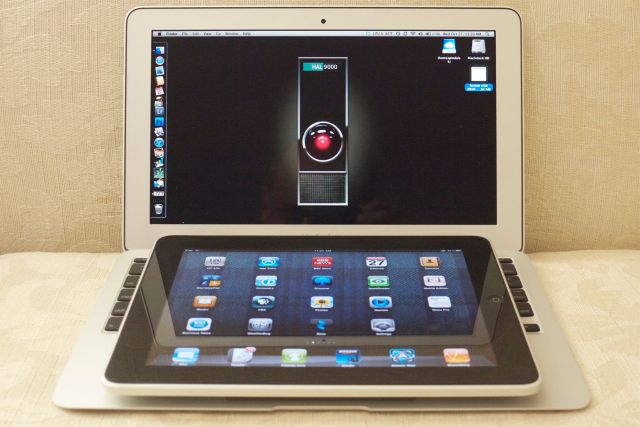
Screen sizes compared.
Do yourself a favor when using the MBA’s widescreen. Place the dock at the left as I have here. It works best with the widescreen aspect ratio of the display. In fact, it works best with any screen connected to any Mac. It beats me why Apple always displays the dock at the base of the screen in all their advertising.
The netbook alternative: Over a year ago I wrote of my experiences with a $400 MSI Wind netbook hacked to run OS X in a piece titled The Netbook Apple Will Not Make and I encourage anyone needing a cheap laptop, looking to save money and willing to undergo the tortuous hacking process (the two usually go together) to have a go. It’s a cheap introduction to netbook computing and you should disregard all the fashionable slanging of the keyboard and screen in these devices by people who think the sun rises and sets with Steve Jobs. Sure, the keyboard is cramped, but the screen is excellent and the machine will do a credible job as a mobile Lightroom platform. Most come with an SD card reader and the price is now down to $300. Down the road, when funds permit, migrating to the real thing, a MacBook, may make sense. But that in no way detracts from the netbook experience which I commend highly.
Disclosure: Long AAPL common stock and AAPL call options.
Great overview. Answered a lot of questions for me, though I am still debating the value of going for the upgrade to 4Gb.
Mind telling me how much disk space is left after the base OS and Lightroom are installed?
With Lightroom3, Photoshop CS2, iWork and iLife (iPhoto only) installed, I have 41.3gB available.
Thanks for the updates, both RAM and diskspace. This is really looking like a nice option for lightroom on the go!
Thanks thomas for the overview. answers some questions. do you think the 1,6 CPU is worth the extra money? i will also use this machine for LR3, mail and safari. Have you ever tested raw files larger than the G1’s, for i will only use the canon 5d mkII.
GPU specs are far more relevant to LR3 performance than CPU. All the new MBAs use the same Nvidia 320M GPU which is an excellent piece, beaten only by the latest in full size desk- and laptops. I would expect download and preview generation times to scale pro-rata to file size, but once done, file-to-file times will be much the same as LR3 is looking at the JPG preview, not the RAW file.
Your best bet is to take your camera’s card with a reader into the Apple Store and try the MBA to see if you can live with the performance. Apple Store computers obviously do not have Lightroom loaded on them but you can use Aperture as a proxy to gauge performance. The MBA and iMacs I have tried in the store all had Aperture installed.
thanks thomas! i will speak to my local mac dealer. maybe they will even let me install LR. the other thing i will have to try is shooting tethered, which i do on lots of my jobs.