Monthly Archives: April 2025

A Leica M shoulder bag

Small, unobtrusive, cheap.

For an index of all Leica-related articles click here.

After the camera’s shoulder strap – and most vary from useless to down right dangerous – few accessories are more important than a carrying bag, if you propose taking more than just the camera and one lens on a photo outing. You can easily spend hundreds of dollars on a camera bag and it will almost certainly come with an aura (and labels) proclaiming ‘steal me now’.

Well, there is one born every minute.

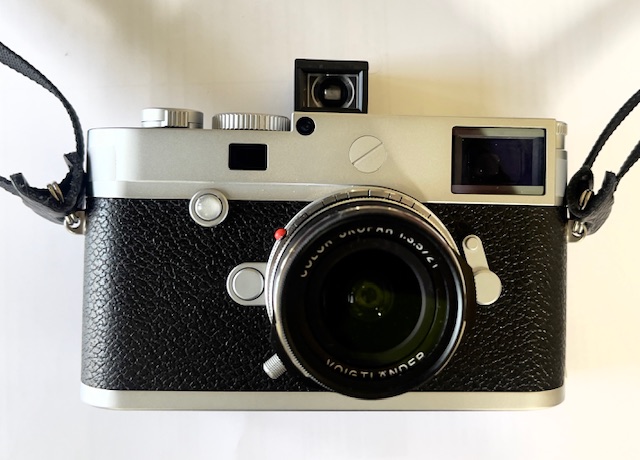
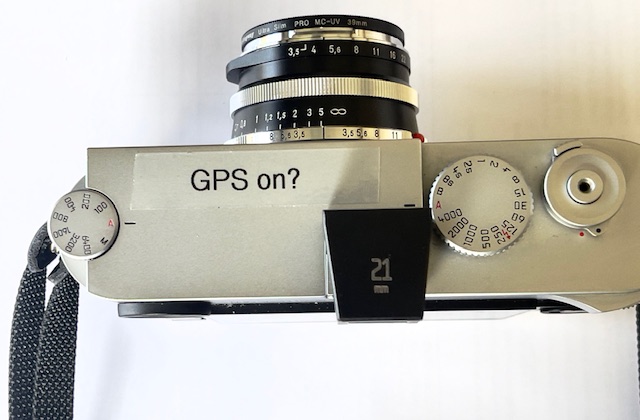
Now that my small Leica M10 outfit is complete, meaning 21, 35, 50 and 90mm lenses, it was time to find a suitable shoulder bag to carry this hardware around. A little research discloses that the perfect Leica M outfit camera bag can be had for pennies. The dictates for the ideal shoulder bag are that it should hold a Leica M with, say, three or more lenses, one of those on the body. It should therefore have two dividers, be some 8″ long, 6″ tall to accommodate the M vertically and 4″ across for a like reason. Closure should be with a velcro flap like the one on the Thinktank.

Amazon lists over 30,000 bags (!) and the closest I could come to the specifications above is the oddly named Besnfoto. It has only one velcro divider but I have a bunch of these – so many years, so many bags – and unfortunately it does have a zippered cover underneath the outside velcro flap, but that can be left unzipped in use. Not a big issue. For the paranoid there’s a Velcro ‘anti-theft’ belt latch, illustrated below.

And did I mention anonymity? The color must be drab grey or green and the Besnfoto comes in either. Forget fancy leather and forget anything which says ‘Billingham’. Come to think of it, any label on the outside is just a bad idea. Quite the dumbest camera bag I have ever seen came from the Red Dot company. Notice anything? These were bought by the same people who like to park their BMWs with the car keys in the ignition and the doors unlocked in south central LA. But, you know, German cow full grain leather, grass fed, no antibiotics:


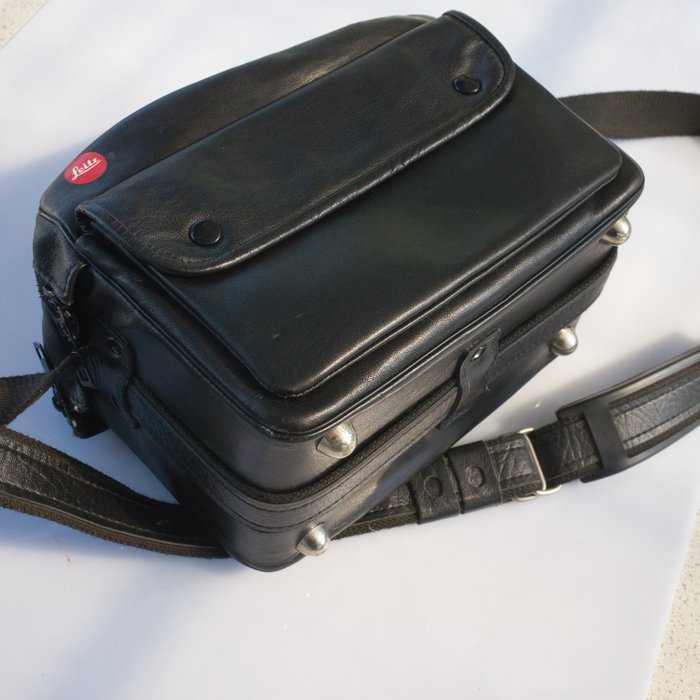
An invitation to theft.
The ‘legs’ are pure Schwabian silver.

Mind you, the Besnfoto is not much smarter in stock trim:


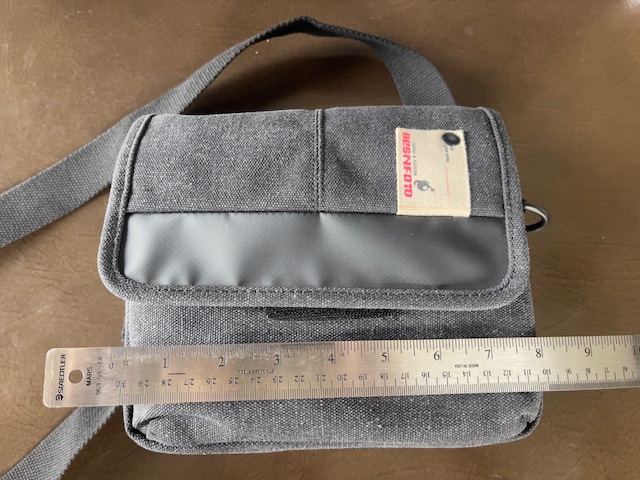
The loud label says ‘foto’ on it.
Yes, the ruler is a German Staedtler.

And they really do not want you removing that label as it’s both stitched and riveted. Whose idea was that? A few seconds’ work with pliers and a sharp blade and the label was gone. I can attest to the quality of the stitching:


No more advertising. I rather like the moth eaten look.

Here is the interior with one additional divider added:


Leica M with 35mm lens at left, 50 and 90mm
lenses center and right. A small front pocket
allows storage of spare batteries and a charger.

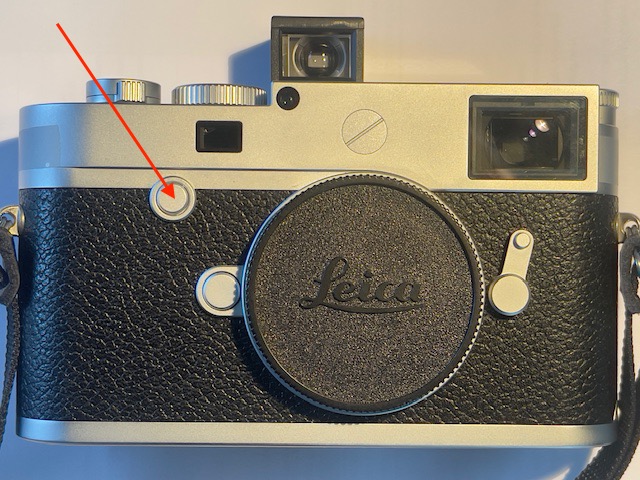
I do not keep any front or rear lens caps on any of the lenses. The fronts are protected by UV filters and the rears are sufficiently recessed that they will not suffer abrasion damage. In this way the lenses are immediately ready for action when a swap is called for.

In use I have the nice, broad shoulder strap on the Besnfoto slung over my head and the bag hanging at my left hip bandolier style, with the camera with its Upstrap over the left shoulder an inch or two above the bag. It must not rest on the bag as that will induce slack in the camera strap prompting the camera and lens to go crashing to the ground. This approach – bag strap on the right shoulder, camera on the left – also distributes weight nicely.

The rear of the bag has a velcro strap for attachment to your belt on those occasions when the belt is actually accessible – a nice ‘anti theft’ feature’ – along with a small carrying handle. Note the broad shoulder strap:


Belt attachment.

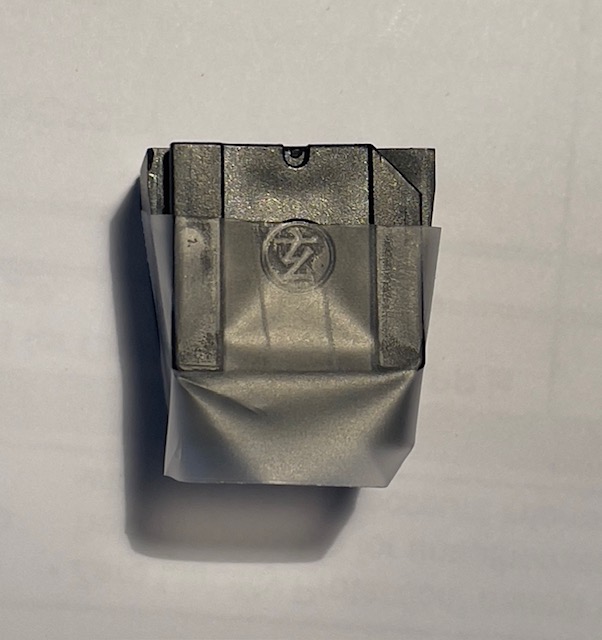
What if you want to stash more lenses in that bag? Goodness knows, there’s lots of room given their small sizes. Well, Leica used to make a double sided ‘lens coupler’ for just this purpose, and it is abundantly available on eBay for pennies. It permits attachment of two lenses back-to-back and works for all Leica M mount lenses other than those with deeply protruding rear elements. And there’s no need to align the mounting index on the lens with the red line on the coupler. The lens will fit in any of the four positions dictated by the bayonet mount:


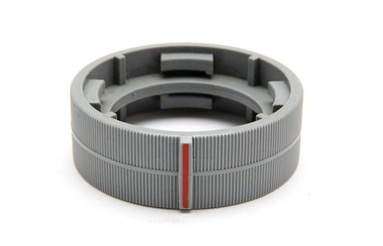
The Leica M lens coupler, code #14836.
A very handy storage tool for small lenses.

The rear element of the 21mm f/3.5 Color-Skopar does not protrude enough, even with the lens focused at infinity, to strike the rear element of any other lens fitted in the coupler. However, do not try this with the earlier 21mm Color-Skopar f/4 or any early Leitz ultra wide lenses like the 21mm Super Angulons (f/4 and f/3.4) or the 21mm f/2.8 Elmarit. All of those have deeply protruding rear elements and you really do not want to use them on digital Leica Ms in any case, as they perform poorly. Here it is in use:


The 21mm f/3.5 Color-Skopar and the 35mm f/2 Canon LTM
lenses fitted to the Leica M lens coupler.

Stacked and in the bag. And there’s still room for an energy bar and a bottle of water:


35mm on the camera, 21+50mm center, 90mm at right.

This bag will not provide heavy duty protection against knocks and falls. That is not its intent. Rather it is in keeping with the Leica ethos of “small camera, small lenses, easily carried”. The Besnfoto camera bag is recommended.

A cheap 21mm finder for the Leica

Cheap and cheerful, it does the job.

For an index of all Leica-related articles click here.

Back in the day when I owned a 21mm f/2.8 Elmarit ASPH (they were affordable three decades ago) I used the genuine Leica 21mm finder. That ran some $250 back then and it was pretty awful, with heavy barrel distortion. Today you can spend $1000 on a new one or $400 on the Zeiss (Cosina) version. Reviews suggest that the Zeiss is every bit as awful but you leave with $600 in your pocketbook.

Used beater Leica finders can be found for $300. Voigtländer used to make a couple of versions – a clunky and ugly plastic one (also sold under the Ricoh label) and a rather elegant metal torpedo type which included frames for a 25mm lens and came with a satin chrome or black finish. It’s so-so by all accounts and used ones crop up occasionally for $150 or so.

Why am I writing this? Well, when I reviewed my recently acquired 21mm f/3.5 Voigtländer VM Color-Skopar lens I suggested I would use live view to chimp the rear LCD screen as a composition aid. Well, forget that. It’s a poor experience. You hold the Leica like an iPhone, looking like a real twit, and the display is seldom bright enough to see much in bright light even when set to maximum brightness. So I shopped around and came across this dirt cheap plastic finder which ran me $26.40 shipped from a US seller on eBay:


At that price it’s not a great risk to try.

It’s not going to win any prizes for looks but, amazingly, despite the high barrel distortion (what else is new?) it delineates the field of view of the 21mm lens accurately side to side and top to bottom. It’s also very bright, has no frame lines, defeated all my efforts to photograph an image through it and weighs just 5 grams/0.2 ounces. And it’s a nice tight fit in the M10’s accessory shoe and will not fall out even if nudged. There is no lock on the foot and none is needed. It’s also tiny and fits nicely in my shoulder bag. Sharpness drops off to the sides of the view but not enough to make composition difficult. It’s also set back too far in the accessory shoe meaning that you get a part of the camera’s top plate in the view, but it’s nothing you cannot work around. See below. And it beats chimping.


Tiny.

The finder protrudes slightly behind the top plate but that’s not an issue in use. Below I take a cutting tool to the foot to mount it further forward, to see less of the top plate of the camera in the view than anything else. Plus the protrusion offends my aesthetic senses.

I have no difficulty using it with eyeglasses and the plastic should preclude scratches to my eyewear.

Try it. You might like it.

Making a better fit:

The stock finder protrudes 1/4″ behind the top plate of the camera:


Stock fitting – 1/4 rear protrusion.


A piece of Scotch tape defines where to cut the base of the mounting shoe.


Diamond tipped cutting wheel on the Dremel tool.


Cut carefully, a bit at a time, from the base and the front,
alternating cuts until the two cuts meet. A small Nicholson file is
used to clean things up.


The improved fit. The finder fits tightly enough that the
1/4″ of the foot which has been removed is not missed.
You still see the camera’s top plate at the bottom of
the view, but less of it.


It’s always something. The devil is in the details.
A small white index line is added to show the shutter speed
selected. The finder obscures the stock index on the top plate.

Leica M10 – the Focus button

Obscure and under appreciated.

For an index of all Leica-related articles click here.


The Focus button.

In the schematic of the camera on page 122 of the English instruction book Leica refers to the button as the ‘Focus button’. It’s in the same location as the rewind release lever on every film M body or, for fans of the early M2 design, where the rewind button used to be. A nice nostalgic touch.

But references to the Focus button are scattered in the manual and the word does not even appear in the index. Plus, the name is misleading.

The first mention, on page 165, states that the Focus button can be used to enlarge details in live view mode to aid focusing. The process is somewhat convoluted and of no interest to those, like me, who never use live view for focusing. This is first and foremost a rangefinder camera, for heaven’s sake.

The second mention, on page 170, states that the Focus button can be used to set exposure compensation by holding it depressed while turning the thumbwheel. This is most useful. With the thumbwheel enabled for exposure compensation I have found that it gets nudged from the zero position just carrying it over a shoulder. So I have turned that functionality off in Menu->Customize Control. The problem with the Focus button approach is that it’s quite difficult to depress that button as it does not protrude sufficiently from the body. Once depressed the thumbwheel does indeed dial in exposure correction, regardless of how it is set in Customize Control.

So the answer is to make the button more prominent, which is easily done with these:


Plastic kitchen drawer bumpers.

I understand these are a special order item from Leica in Germany, priced at $99.95 each. The order code word is DUMMY. Also, there’s a 9 month waiting list and the red version (REDDUMMY) runs all of $149.95. I bought 100 from Amazon for $7 because, you know, I am cheap. That little lot should last me a while.

Before installation a quick swipe of the camera button’s surface with isopropyl alcohol (use vodka if you bought a DUMMY or DUMMYRED from Wetzlar, and consume after installation) removes any traces of finger grease.


Installed.

Be sure to buy 1/4″ (6mm) diameter buttons as they will not be impeded by the surround to the Focus button. Anything larger does not work. I found the stock adhesive too weak for permanence so wiped it off with some acetone and used 3M yellow Super Weatherstrip and Gasket adhesive for a better bond. This is applied to both surfaces, allowed to become tacky (2-3 minutes) and then the bumper is put in place using fine tweezers. If needed the bumper is still removable, if not easily so.

Now the Focus button is really easy to use and you can clearly feel when it has been activated. (In the M11 the button was moved to the top right of the top plate, a much better position, and the mounting ring around the periphery disappeared. That’s the German version of Kaizen at work. It just takes the Germans longer).

The third mention of the Focus button is on page 174 of the instruction manual. Set the shutter speed dial to B, wake the LCD with a press on the central button of the directional pad and hold the Focus button for one second. The range of slow shutter speeds from 8 seconds and up is displayed and can be set with the thumbwheel.

Thus two of the three known uses of the Focus button have nothing to do with focusing.

I have the latest known version of the M10’s firmware installed and, sadly, there is no provision to program other functions to the Focus button. You would think that would be a line or two of code. Oh well.

Automated file import in Lightroom

6-bit coding comes into its own.

For an index of all Leica-related articles click here.

My earlier piece on 6-bit coding of Leica M-mount lenses concluded with the following codes for my four lenses:


Lightroom stores lens correction profiles, which correct for vignetting and distortion, for the first three. Strangely the Tele-Elmarit is missing.

While 6-bit coding corrects for edge color effects in-camera, there is still a need to apply lens corrections in LR or LRc for the best results. Ordinarily this is done manually, frame by frame, a very laborious approach. You have to check the lens maker and then choose the correction profile from a very long list, one frame at a time. Not good.

Here is how to have Lightroom do that automatically when the files are imported. Even if the imported files were made with more than one lens, the correct profile will be applied to each, along with chromatic aberration correction. Here’s the process.

Take a picture with each of your 6-bit coded lenses and import those into LR or LRc. Go into the Develop module on the first image and scroll down to the ‘Lens Corrections’ pane at right. Check the first two boxes as shown below. My examples are specific to the lenses I own. Choose as appropriate for yours.

21mm f/3.5 Voigtländer Color-Skopar Aspherical VM:


  • Click on ‘Make’ and choose ‘Voigtländer’
  • Click on ‘Model’ and choose ‘Voigtländer VM 21mm f/3.5 Color-Skopar Aspherical’ from the long list
  • The correct Adobe profile will appear in the box ‘Profile’
  • Click on the drop-down ‘Default’ above under Setup
  • Click on ‘Save New Lens Profile Defaults’
  • My 21mm Color-Skopar is 6-bit coded as a Leica 21mm f/2.8 Elmarit pre-ASPH, which is what Lightroom sees in the imported file
  • You have now instructed LR that every time it’s importing a file with the 6-bit code for the 21mm f/2.8 Elmarit-M to apply the profile for the 21mm f/3.5 Voigtländer VM Color-Skopar Aspherical lens.

The next time you import a file taken with the Voigtländer lens, the correct correction profile will be applied along with correction of chromatic aberrations.

Now repeat this process for files taken with your other lenses, selecting the appropriate Make and Model each time, then saving the result. Here are my settings for the other three lenses I own with 6-bit coding. Amazingly LRc has corrections for the two Canon lenses, each over 50 years old:

35mm f/2 Canon LTM:


50mm f/1.4 Canon LTM:


90mm f/2.8 Leitz Tele-Elmarit:


In the case of the Tele-Elmarit there is no lens profile stored in LRc so I chose the one for the 90mm f/2.8 Elmarit-M which is very similar. Both lenses are almost distortion free so you really do not have to check the ‘Enable Profile Corrections’ box, but you still want to correct for chromatic aberrations.

Now on your next import these profiles will be applied automatically. The next step is to correct the lens’ names in EXIF data using the tool I describe here which takes little time and allows the serious business of post-processing to commence.

A note on changing lens names:. For my three non-Leitz lenses I like to change the names from the Leica 6-bit coded names to the correct ones – 21mm Voigtländer and 35/50mm Canons. If I apply the EXIF tool to do this any Lens Correction changes made using the above method are erased, and the lens corrections have to be applied anew after the lens name change. To avoid this, instead of using the above method to apply lens corrections, create Develop presets for each lens with the appropriate corrections profile selected, saving them in the Develop modules Preset pane (click the ‘+’ sign’) thus:


Develop presets in LRc’s Develop module

Import the images in the usual way, run the EXIF tool to change lens’ names as required then in the Library module of LRc select the images to which you wish to apply Lens corrections using the Quick Develop panel at the right, thus:


Applying Lens Corrections using Quick Develop

For 100 images this takes a mere 2-3 seconds.

So the order of events is:

  • Import images from the SD/SDHC/SDXC card
  • For non-Leica lenses use the EXIF tool to change lens’ names
  • For non-Leica lenses apply the lens correction profile using the Quick Develop panel in the Library module of LRc after selecting images from each lens in turn using the Metadata panel in the Library module
  • You cannot select multiple images in LRc’s Develop module to apply lens corrections. This workaround lets you do so.
  • You are done