Category Archives: Cooking

Cooking hardware that makes a difference.

The vintage Black & Decker electric can opener

They don’t make ’em like they used to.

I wrote about an excellent and inexpensive manual can opener here. That design works well but increasing pain from stressed wrists suggested I look for a powered alternative.

I owned one of these years ago, but while functional it is quite specially ugly:


The current model

As the image discloses it is also ridiculously overpriced.

So I hunted around and found a beautiful, curvaceous vintage B&D design on eBay.


The vintage EC85 model

I had to craft four 2” stand-off metal ferrules to drop the opener sufficiently below the deep valance at the front of the cupboard base, to permit proper access to controls. Quality workshop time. These ferrules are invisible. The provided retaining screws are very long to permit proper height positioning, and the threads engage immediately. A well thought out design.


The invisible ferrules

Note how the cutter assembly ugliness is largely invisible – compare with the current model. B&D originally provided up to 5 sets of stand-offs (‘spiders’), but my opener came with only one (just visible in the first image) – hence the ferrules, which are actually more robust than the original design. The spider doubles as an alignment aide for the four 1/4″ through holes which are required for the pass-through retaining screws. The major complaint with these is yellowing of the plastic body and I lucked out with a decent looking one.

So if you can find one which is not yellowed and includes the spiders (make sure the screw washers are included), your outlay will not exceed $50 and you will not shudder every time you look at it. Of course, it’s only 40 years old, so it works perfectly. A bottle opener (lower left) and knife sharpener (right) are included. And yes, a magnet grabs and holds the cut off lid.

Enjoy – and no more wrist pain. And I would avoid free standing designs – there are better uses for your kitchen counter space and ‘free standing’ is a flawed design concept when you are struggling with that extra large can.

Smoked beef brisket

A tough cut.

There’s a well known Gary Larson ‘Far Side’ cartoon titled ‘Boneless Chicken Ranch’, showing the chickens all flat and splayed out, like so:


Boneless Chicken Ranch.

How does a brisket work?

The comparison with a brisket cut of beef is apt. Cows have no collarbones so without the tough brisket meat between and either side of their forelegs they would splay out helpless, just like those chickens. And the design of that brisket meat is ingenious. The triangular, tapering piece has the muscle fibers running transversely (the meat cut is referred to as the ‘point’) whereas the rectangular part sees the fibers running vertically (the ‘flat’). There is one point/flat brisket pair on either side of the animal. The muscle orientation provides strength along both the horizontal and vertical axes. Buy a whole brisket and you get both the point and the flat and that’s important to know as will be discussed below. How you carve the meat differs for point and flat briskets.
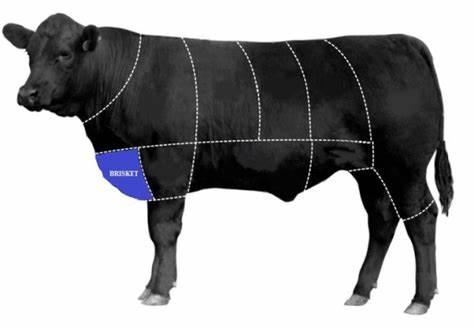

Brisket location.

As with many hard, heavily muscled meats, ‘low and slow’ is the preferred cooking method to allow the muscle fibers to relax and make the result edible. And smoking brisket meat, as any grill aficionado will tell you, is the way to go.

The best smoker:

You can get chintzy smokers, made from very thin steel sheet, at your local hardware store for $150 and they will last you one season. Or you can pay a little more for a Weber Smokey Mountain grill, made from heavy steel plate with an enameled exterior and a decade long life expectancy.

The WSM comes in three diameters and I use the smallest, the 14.5″ model, which nicely accommodates a 5 lb point brisket. Why point? Because it’s the fattier cut which does not dry out so making for a juicier result.


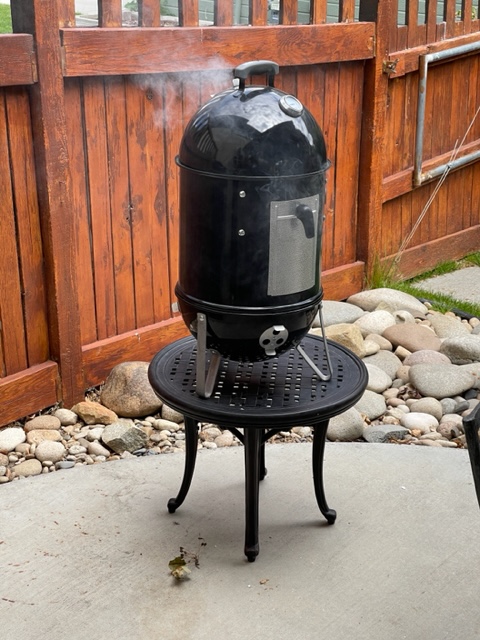
The 14.5″ Weber Smokey Mountain smoker. Click the image for Amazon US

This compact R2D2 unit is rather short of stature so I stand it on a metal side table when in use. Do not stand it on anything combustible!

Brisket meat:

Here is the point cut brisket:


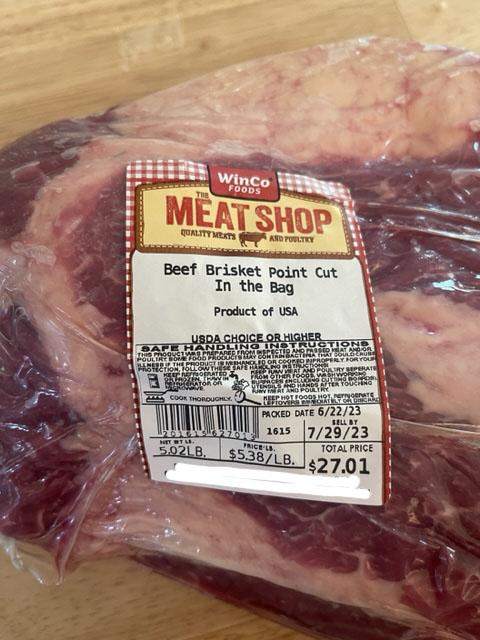
A 5lb. point cut brisket.

The rub:

For the rub I combine 10 grams (1/2 oz.) of kosher salt with 10 grams of freshly ground black pepper and rub the brisket all over with the mixture. No fancy herb additions needed. Remove the brisket from the fridge an hour before starting the smoke to let it warm up to room temperature.

Charcoal and how to light it:

The beauty of the WSM is that it includes a water bath below the two grilles which results in indirect heat for the meat. No flames can reach around the inverted bowler hat design so a fat fire is not likely. Here’s how the parts go together:


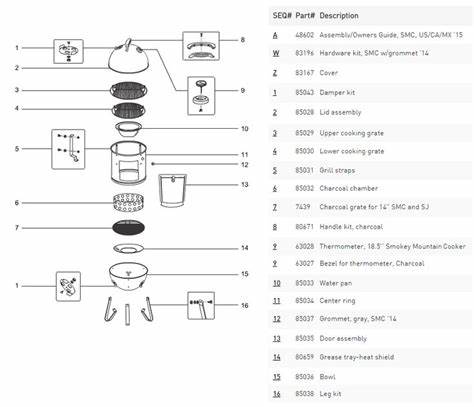
#10 is the water bath.

To fire up the smoker 75 Kingsford charcoal briquettes (more for larger models) are arranged in a pyramid in the perforated retaining ring (#6 in the parts diagram) below the grilles with four Weber starter cubes disposed among these. Light these and let them burn off for 30 minutes with the briquettes exposed to the outdoors, after which the charcoal will have a white ash coat, smoking furiously. Then add four chunks of dried wood – Apple for a sweeter finish, Hickory for a smokier one – place the WSM’s cylinder section (#11 in the parts diagram) atop with the water bath installed and full, insert one or both grilles (I use only the larger top one) and you are ready to place the brisket on top. Be a man and use proper fist sized wood chunks, not those poncy shavings which burn up far too quickly.

The starter cubes have combusted and the charcoal is beginning to show white ash. It will be ready for use in a few minutes:


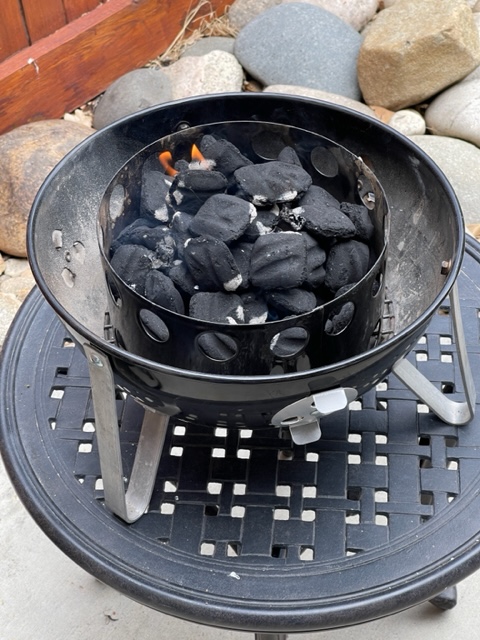
Ready in 15 minutes. The base vent is fully open.

Do not use charcoal starters (dangerous, as the hot coals must be transferred from the starter to the smoker) or lighter fluid (you really want to destroy the ozone layer and have hydrocarbons in your meat?). Use four of those tiny starter cubes and all the hydrocarbons will be thoroughly burned off once the coals are ready for use.

Temperature readings:

Place the brisket fatty side up on the top grill, make sure both bottom and top vents are fully open and place the hemispherical top on the smoker. You are looking at two temperature readings. The thermometer in the hemispherical Weber top reads the internal dome temperature and you are aiming at 200-250F dome temperature – don’t over do it or your meat will dry out. If the temperature rises above 250F partially close the base vent – this controls the oxygen intake for combustion – until you are back in the range. Leave the top vent in the dome fully open at all times.


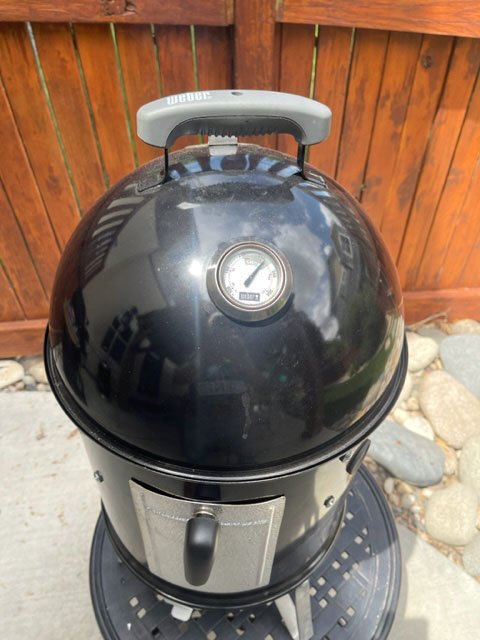
Dome temperature in the sweet spot.

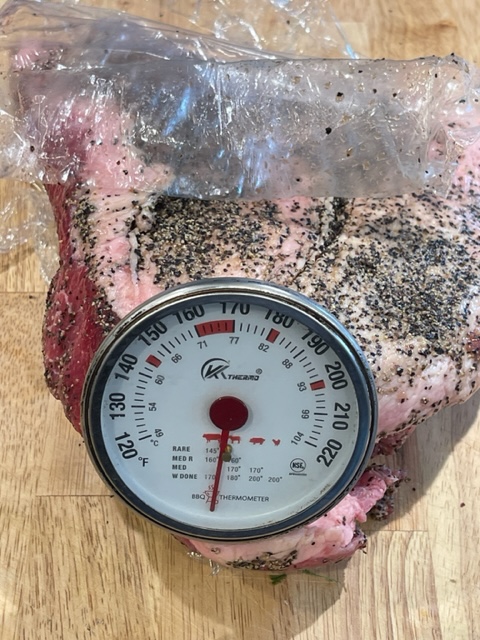
While the Weber’s built-in dome thermometer reports the inside air temperature, the constant reading thermometer inserted in the meat reads ‘doneness’.

The constant reading thermometer:

Before doing so, insert a constant reading thermometer in the thick of the meat. Now you can spend endless dollars on a wi-fi/Bluetooth/NASA-approved device, confirming that a fool and his money are readily parted. Or you can use one of these bullet proof ones, no electronics to fail, no iPhone or mainframe needed to read the results and get the same outcome.

The difference is that you will not be replacing it annually while ‘customer service’ in Shanghai refuses to reply to your desperate warranty claims for your $100 Tempogizmomatic.


The constant reading thermometer inserted. Click the image for Amazon.

Accuracy? When I bought mine I placed it in a pan of boiling water and instead of 212F it read 190F. A second sample read 211F, close enough. As that’s close to the desired ‘doneness’ temperature this makes for very accurate measurement.

As it gets smokey in there, cover the face of the thermometer with a small piece of Reynoldswrap silver paper, removing the paper when a reading is required. Otherwise you will have a heck of a job seeing the indicator needle.

We want to get to 195-205F for the right degree of doneness. Brisket meat is served well done, not rare or medium-rare. How long does this take? As a general guide I grill/smoke for 1.25 hours per pound of meat, so our 5lb joint will take 6 hours, give or take. Don’t bother checking the internal thermometer until at least 4 hours have elapsed as a) that’s futile and b) each time you pop the dome you will lose heat and have to extend the cooking time. If you keep the dome temperature in the 200-250F range there is no need to spritz the meat with anything until it’s done.

Wood:

How about wood management? Those four manly man sized chunks of wood will be largely burned up in 2 hours, indicated by a lack of smoke emanating from the fully open vent in the dome of the WSM. If you like a smokier finish, add a couple more chunks through the front door in the cylinder section of the WSM at this time, and you will get another hour of smoke. No more is needed. The WSM gets hot so use a pair of these using some of that money you saved by not buying an idiotic electronic Bluetooth thermometer. You can use those same gloves to manhandle the brisket when removing it to the cutting board.

Maintaining the water bowl:

The water bowl inside the WSM, which ensures only indirect heat reaches the meat and helps prevent fat fires, is checked once during the six hour smoking session, after 4 hours. I generally find the water in mine to be two thirds evaporated at that point and simply top it up by pouring additional water into the bowl through the grille(s), being careful not to slop any on the hot coals below. No need to risk removing the brisket with its grille for this step.

Managing the 170F ‘stall’:

I checked the internal thermometer after 4 hours and it read 170F. One hour later, after 5 hours, it still read 170F. This is known as the ‘stall’ and results from the ongoing evaporation of moisture from the joint, which prevents the temperature from rising. You can either simply wait it out – your guests will love you – or wrap the joint in heavy duty Reynolds silver wrap at the 4-5 hour mark to stop evaporation of moisture and help push the joint over the stall point. I did this after 5 hours and the stall ceased, with the joint’s internal temperature reaching 195F after 6 hours and 15 minutes.

Once the meat is removed from the WSM be sure to close both the top and base vents. That will starve the system of oxygen, ensuring the coals are extinguished and that any remaining water in the water bowl does not boil off, leaving hard to remove deposits.

Resting and carving:

Phew! After 6 hours or so you will smell of wood and charcoal smoke and have a beautifully rendered brisket with a dark exterior ‘bark’ ready to be removed to the cutting board, having first checked that the interior thermometer is reporting 195-205F. We are not done yet.

Let the brisket rest at room temperature for 30-60 minutes – this will make it easier to cut. Check back to the second paragraph of this piece and you will see that the brisket has a grain direction, just like pure, untreated wood. When carving the brisket we want to cut across the grain, meaning the knife has to be at right angles to the muscle fibers. Cut incorrectly, meaning in line with those fibers, and you will get a very stringy piece of meat which is no fun to chew. So how to determine the cut direction?

Simple. Cut off a piece thus:


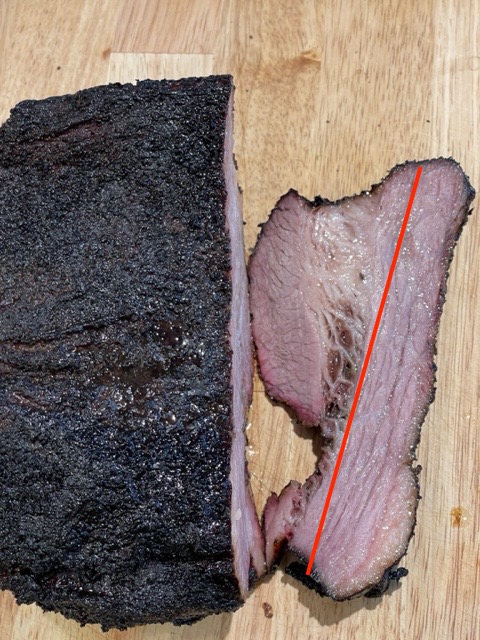
First cut – incorrect.

This cut is wrong. You can clearly see the run of the muscle fibers, denoted by the red line.

Here’s the second cut at right angles to the first – no fibers are visible as the cut is at right angles to the grain:


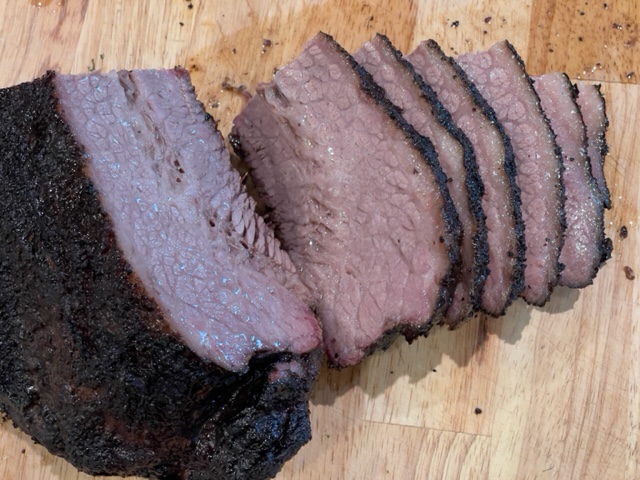
Second and final cut – no fibers visible.

The best carving knife:

What’s the best knife to use? No, it’s most definitely not your utterly useless chef’s knife, especially if you have discovered the massive benefits of a cleaver.

You need a serrated bread knife, like this, to ease the ‘sawing’ through those muscle fibers.

Enjoy!

Nothing beats an Idaho baked potato with butter, sour cream and chives from the garden.
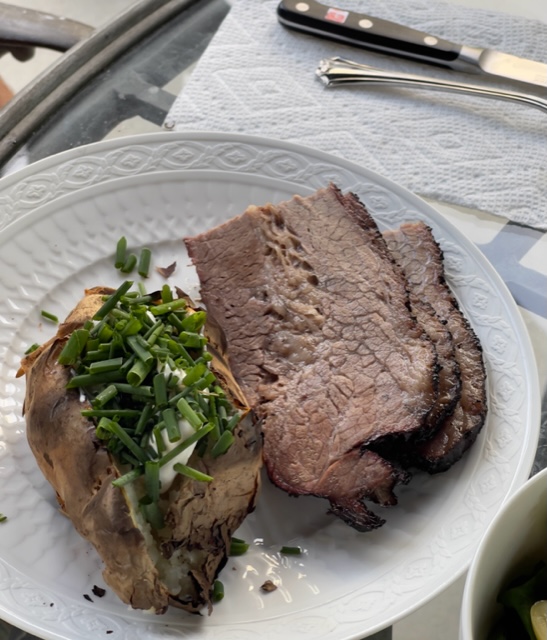

Juicy and perfect..

Poaching eggs

Poached perfection.

This is one of an occasional series on cooking devices which make a difference. For an index of cooking articles on this blog click here.

I confess that this is a technique which it has taken me a couple of decades to master and the length of time is a direct function of my general resistance to kitchen gadgets. I greatly enjoy the physical aspects of cooking and prefer to use traditional hand tools – cleavers, knives, pounders and so on – tending to look askance at gadgets.

Now my many years of poaching failure have seen attempts at various techniques. I have done the swirling vortex hot water with vinegar bit. Abject failure. Wisps of ugly egg white everywhere with the egg, as often as not, looking like the victim of alopecia. Then I chanced on Nigella Lawson’s BBC cooking series. Well, actually, I chanced on staring at Nigella – which is why guys watch her show – so my attention to her detailed instructions may have been less than perfect, but she advocated draining the cracked egg in a small sieve, spraying lemon juice on it and then placing it gently, via a ramekin, in hot water, no vortex in sight. The result was much the same as the vortex method. The water clouds up, whites migrate to the surface and you cannot see what the heck is going on.

So I put the whole thing aside and decided that poaching was not going to be a winner for me.

However, I’m anything but a quitter, and recently came across this device:


The four egg poacher.

Click the link for Amazon which will happily take some $33 of your money.

And disregard the one star reviews which say you will cut yourself on the edges of the stamped insert (you will not) or that the screws come out (they do not). These are likely posted by crooked competitors seeking a sales boost, and there are many devices like this at various prices and capacity (2, 4 or 6 eggs) to be had. This one is spendy but I have found it to be beautifully made, with the eggs being perfection itself. And you can always see the state of your eggs through the glass cover. I used two cups of water and you use the same amount whether poaching 1, 2, 3 or 4 eggs.

I swiped a generous layer of butter on the inside surfaces of the removable Teflon cups. Do not use olive oil. The eggs will stick after a couple of uses.

Once the water was simmering I gave the eggs 3 minutes. I found no need for the provided spatula to remove the finished egg. Grab the cup using the provided spigot, give it a shake and out she comes. Three minutes made an egg that was was nice and runny, and if you like your poached yolks hard then I grieve for you.

Here is the whole Eggs Benedict routine with Canadian bacon and Hollandaise sauce. I warm up the bacon for 30 second on high in the microwave. This has it adopt a shallow cupped shape which neatly holds the poached egg atop the English muffin::


Breakfast.

I use Knorr packets of Hollandaise to cut down on the cholesterol. Half a packet (12g) with a half cup of milk and a little butter is enough for four eggs.

A great device, recommended heartily.

And if you want the perfect egg in a shell, be sure to read this.

Shelves that slide

A key storage bugaboo resolved.

For an index of cooking articles on this blog click here.

To say that shelf storage in the typical kitchen is sub-optimal is an understatement. It is atrocious. It’s not enough that storage in the pantry and kitchen is commonly deep, add those low kitchen cupboards and you can bet that those items on the lower levels in the back will quickly be forgotten about or lost. And reaching in for the items at the rear to extricate them means removing those in front to make room, simultaneously incurring a slipped disc or two. A disaster.

Check your local Yellow Pages for ‘Shelves that slide’ and you will likely find a local vendor who will drop by, measure up and in a few short weeks you have sliding storage. That technology makes the lowest, rearmost items readily visible when the shelf is slid out and easily removed vertically without the need to displace hardware in the front:


Pots and pans. The shelves slide
out much further than illustrated here.

In the pantry the benefits are similarly great.


In the pantry.

I stopped complaining about kitchen storage once I had these fitted throughout the below-counter cupboards a few years back. They are very heavy duty, come with plastic door protectors and run on ball bearings. Heirloom tools, in other words. They became so addictive that, more recently, I called the maker back to similarly equip the pantry. Installation is non-invasive for your existing shelves remain in place.

As the second image above shows, the new shelves are far more resistant to bending than the original “builder standard” ones. They are made from plywood which is very resistant to sag, compared with the poorly specified particle board originally used.

The Sunbeam AP10 coffee percolator

Another design from the master.

For an index of cooking articles on this blog click here.

In my review of the Sunbeam Radiant Control toaster I made mention of the designer, no, make that the genius designer, Ludvik J. Koci. Genius? Because everything about that special piece of mechanical engineering and Art Deco design makes that toaster a masterpiece with no equal today, at any price.

Looking at Google Patents I checked on other patents awarded to Koci and the first I came upon was his 1959 patent for the first automatic electric coffee making percolator. Like the toaster, it uses a bimetallic strip to perform switching functions, meaning there are no moving parts to wear. That’s a key reason Koci’s designs work for decades. That and a copper/nickel body with a thick coat of chromium allied with a stainless steel percolator pump. And is it gorgeous to behold or what? I paid $69, shipped.


Contemporary advertisement for the Sunbeam AP10.
Click here for a larger version.

The origin of those curlicues on early versions of the toaster and on his percolator? The 1939 World’s Fair in New York, which Fair included the Perisphere – a gigantic concrete display sphere – and the related Trylon spike.


The Perisphere and Trylon, New York, 1939.

How does the coffee taste compared with a ‘nothing special’ Hamilton Beach drip machine? Well, I’m no connoisseur of coffee. Indeed, I recycled my bean grinder a couple of years ago when I determined there was no difference in taste between fresh ground beans and pre-ground Peet’s French Roast bought in a vacuum sealed package in the supermarket. I tend to view coffee as a caffeine delivery system, and I would rather have a beautiful coffee maker than an ugly one.

Well, suffice it to say that after my first brew – 4 cups of filtered water and 3 heaped tablespoons of regular ground coffee – I am about to beat the world and Olympic records for the high jump. This from a seated position. I set the control dial on medium and the ‘perk’ took 8 minutes. A second try on ‘Stronger’ and I followed up on the new high jump record with a new men’s record for the 100 meters freestyle. By the way, a series of embossed internal markings make the adding of just the right amount of water simple.

After more experimentation I have settled on two level tablespoons of coffee to four cups of water, compared with three heaped ones with the drip maker. That’s approximately half the amount, which will speed the time to recover the cost of the Sunbeam. At the same time I have turned the strength dial from centered to one third of the way to the ‘Milder’ end. This has removed the acidity from the brew and simultaneously reduced the percolation time from 8 to 6 minutes, both reflecting the reduced number of recirculation cycles.

The quality of construction in this American made machine is truly ne plus ultra. Everything fits perfectly without play, the clear dome is a hunk of glass which bayonets out for cleaning and the cord has a robust strain relief to prevent fraying. (Replacement power cords remain available from Amazon). There is no switch – plug it in, unplug it. During a regular perk the illuminated dial extinguishes after 8 minutes of jolly noise. Leave the Sunbeam plugged in and it keeps your coffee warm by cycling the bimetallic strip thermostat.

For coffee caffeine junkies, this is just the ticket.


The strength dial, from Mild to Nuclear.
The light extinguishes once done and cycles to keep the contents warm.


A bayonet fit chunk of glass.
No plastic here.The chrome finish is to die for.


The basket’s perforations are very fine, so little store bought ground coffee does not fall through. In days past you could get coarse ‘percolator grind’! (But see below). The cover for the basket is barely visible on the right. No paper filter is used.

Now my ‘modern’ and quite especially ugly coffee maker has joined the predecessor toaster in the recycling bin. Percolators are still made and can be had new for much the same I paid for a 70 year old one. But the materials are inferior, the finish will probably corrode in no time and the retaining nut for the perc tube base is likely aluminum. Anodic corrosion will see to it that the nut is destroyed in record time as it becomes a sacrificial anode. See here.

Update:. As luck would have it I came across some coarse ground, low acidity coffee:


Primos coffee from Amazon.

Whereas an occasional ground or two manages to escape the filtration basket with regular ground coffee, the coarser grind here sees to it that none do. The coffee is medium roast and low acidity and I have the dial on the Sunbeam turned just a tad to the left of center for an optimal brew.